Now Reading: How to Reattach Garage Door: Step-by-Step Repair Guide
- 01
How to Reattach Garage Door: Step-by-Step Repair Guide
If your garage door suddenly stops working, it can quickly turn into a frustrating problem. Maybe you pulled the emergency release cord, or maybe the door jumped off its tracks during a power outage or accident. Whatever happened, you now need to reattach your garage door to the opener and make sure everything works safely. The good news is, you can do this yourself with some basic tools and patience—even if you’ve never worked on a garage door before.
This guide will walk you through every step, from understanding how garage doors connect to openers, to safety checks, troubleshooting, and avoiding common mistakes. Whether your door is manual or automatic, whether you have a chain drive or belt drive, you’ll find detailed, practical advice here.
Reattaching a garage door isn’t just about pulling a cord and hoping for the best; it’s about knowing how the system works, following a methodical process, and checking that everything is secure and balanced afterward.
Before you start, remember: garage doors can be heavy and the springs are under tension. Safety always comes first. Let’s get started on reattaching your garage door with confidence.
How Garage Doors And Openers Work Together
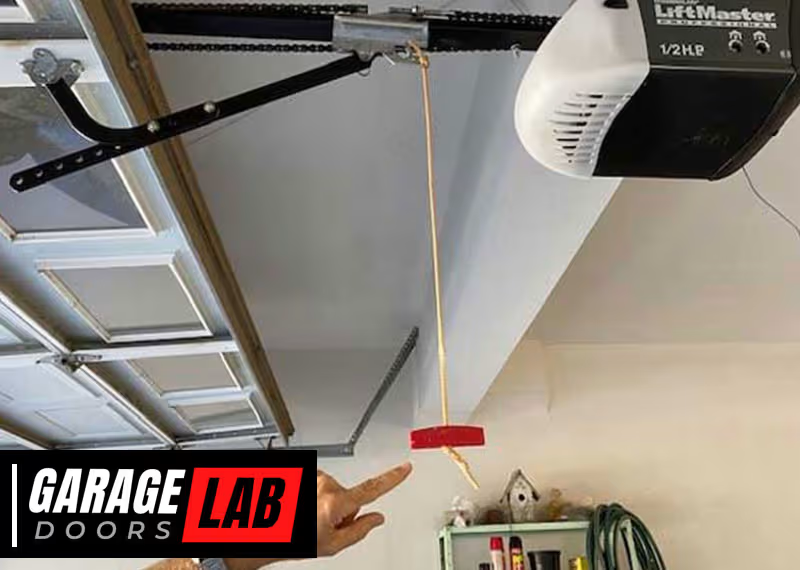
Understanding the basic system helps you reattach your garage door correctly. Most residential garage doors use an electric opener, connected by a trolley and an emergency release cord. The opener pulls the door open and pushes it closed using a chain, belt, or screw drive.
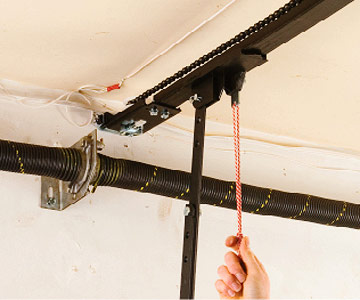
When you pull the emergency release cord—often a red rope hanging from the center rail—you disconnect the door from the opener. This lets you move the door manually during power outages or if the opener fails. To reconnect, you need to engage the trolley back onto the opener carriage.
There are two main types of systems:
- Trolley system (most common): Slides along a rail in the center of the garage ceiling.
- Jackshaft system: Mounted on the wall beside the door, using side cables (less common in homes).
Manual operation is possible when disconnected, but for automatic opening, the trolley must be reattached.
Safety First: Preparing To Reattach Your Garage Door
Before you touch anything, take a few safety steps. Garage doors are under tension, and mistakes can lead to injury.
- Unplug the opener before starting. Even if you’re not working on electrical parts, this prevents accidental activation.
- Clear the area around the door. Remove bikes, tools, or anything that might block your movement.
- Check the springs and cables. If you see a broken spring or frayed cable, stop—this is a job for a professional.
- Wear safety glasses and gloves. Protect your eyes and hands from dust, grease, or sharp metal edges.
- Keep children and pets away from the workspace.

Tools And Materials You’ll Need
You don’t need special tools for most garage door reattachment jobs. However, having the right items on hand makes the process smoother.
- Step ladder (6-8 feet, depending on your garage)
- Flashlight or headlamp (if your garage is dim)
- Lubricant (garage door spray or silicone-based)
- Phillips and flathead screwdrivers
- Wrench set
- Socket set
- Rag for cleaning tracks or trolley
- Replacement pins or cotter pins (if your trolley uses them)
- Owner’s manual (optional, but helpful for your specific opener)
If you see damaged parts (broken springs, bent rails, or disconnected cables), stop and call a professional. Never try to repair high-tension springs yourself.
Step-by-step Guide: How To Reattach A Garage Door
Every garage door is a little different, but most systems follow similar steps. Here’s a detailed process to safely and correctly reattach your garage door.
1. Identify Why The Door Was Disconnected
- Power outage: You probably pulled the red cord to use the door manually.
- Jammed door: The system may have disconnected automatically to prevent damage.
- Accident: A vehicle or object hit the door, pulling it off track.
Knowing why helps you spot any extra repairs you might need.
2. Inspect The Door And Opener
- Check that the door is on its tracks and not crooked.
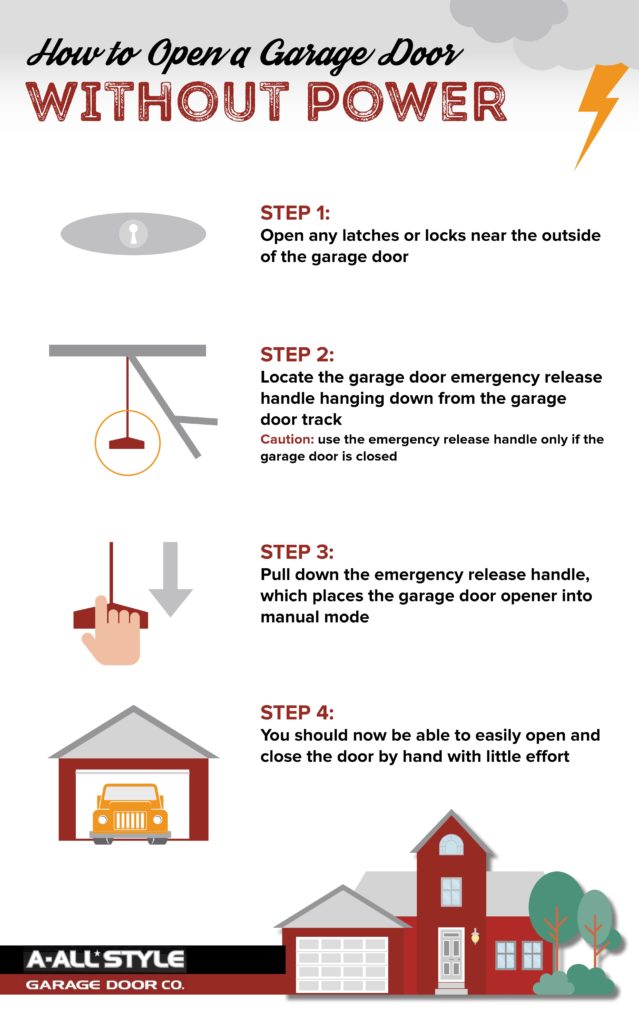
- The trolley (the part the red cord hangs from) should be in the “disengaged” position (often toward the door).
- The emergency release cord should be hanging down and not tangled.
If you notice loose parts, bent rails, or anything that looks wrong, address these first.
3. Move The Door To The Closed Position
- If your door is not fully closed, gently lower it to the ground by hand.
- Never force a stuck door—excessive pressure can damage the tracks or opener.
- If the door is too heavy to move easily, the springs may be broken. Stop and call a professional.
4. Align The Trolley With The Opener Carriage
The trolley must be positioned so it can re-engage with the opener carriage. Usually, this means moving it until it clicks into place.
- Pull the red emergency release cord straight down and then toward the door (if needed). This will keep the trolley in the disconnected position.
- Push or pull the door manually until the trolley aligns with the carriage on the opener rail.
- You may hear a click when it aligns.
5. Reconnect The Door To The Opener
There are two common ways to re-engage the trolley, depending on your opener:
Automatic Reconnection (most Modern Openers)
- Plug the opener back in.
- Press the “Open” button on your remote or wall control.
- The opener will start moving, and the trolley will automatically reconnect with the opener carriage.
- You should hear a solid “click” as it locks in place.
Manual Reconnection (older Models)
- With the door closed, pull the emergency release cord toward the opener (not straight down).
- This should snap the trolley back into the carriage.
- Test by gently lifting the door with the remote; it should move smoothly.
6. Test The Door Operation
- Press the wall switch or remote.
- The door should open and close normally.
- Listen for unusual noises (grinding, squeaking, or popping).
- Watch for smooth movement; the door should not jerk or hesitate.
If the door does not move, or if it moves unevenly, stop and check for misalignment or obstructions.
7. Lubricate And Inspect
- Spray garage door lubricant on hinges, rollers, and tracks.
- Wipe away excess dirt or grease.
- Lubricate the opener rail lightly if recommended in your manual.
8. Final Safety Check
- Test the auto-reverse safety feature. Place a 2×4 board flat on the floor under the door and close it. The door should reverse immediately when it touches the wood.
- Check the photo-eye sensors at the base of the tracks. Clean the lenses and realign if needed.
- Make sure the emergency release cord is hanging freely and can be reached easily.
Common Problems And How To Fix Them
Even if you follow every step, sometimes things don’t go as planned. Here are some typical issues people face when reattaching garage doors—and how to solve them.
The Trolley Won’t Reconnect
If you press the button and nothing happens, the trolley might not be aligned properly. Try these steps:
- Move the door manually until the trolley and carriage line up.
- Pull the release cord firmly toward the opener.
- Check for obstructions on the rail.
The Door Feels Too Heavy
A garage door should lift smoothly and stay in place when raised halfway. If it drops quickly or is hard to lift, the springs may be broken or unbalanced. Do not try to adjust or replace springs yourself—this is dangerous and requires special tools.
The Opener Makes Noise But The Door Doesn’t Move
This can mean the trolley is not fully engaged, or a pin is missing.
- Check for missing or bent pins in the trolley.
- Inspect the opener rail for damage.
- Consult your manual for specific part replacement.
The Door Moves Crooked Or Jams
This usually means the door is off its tracks or a cable is loose.
- Inspect both tracks for bends or debris.
- Check the cables on both sides for even tension.
- If you see damage, call a garage door technician.
How To Avoid Common Mistakes
Many homeowners make the same errors when trying to reattach their garage door. Here’s how to avoid them:
- Never force the door if it won’t move; forcing can bend tracks or break springs.
- Don’t skip safety checks. Always test the auto-reverse and sensors after reattaching.
- Don’t ignore odd sounds. Squeaks, bangs, or grinding noises usually mean something is misaligned.
- Don’t forget to lubricate. Dry rollers and hinges can lead to early wear and noisy operation.
- Check the manual. Each opener brand has slightly different steps—consult the manual for your model.
When To Call A Professional
While many garage door issues are DIY-friendly, some problems require expert help.
- Broken springs or cables: These parts are under high tension and can cause injury.
- Bent or warped door panels: These can make the door unsafe.
- Repeated disconnections: If the trolley keeps coming loose, a deeper issue may be present.
- Electronic errors: If the opener blinks error codes or won’t respond, you may need a technician.
As a rule: If you’re unsure, call a pro. Safety always comes first.
Real-world Example: Reattaching A Garage Door After A Power Outage
Mike, a homeowner in Ohio, experienced a power outage during a storm. He pulled the red emergency release cord to get his car out, but after power was restored, the door wouldn’t reconnect to the opener.
Here’s how Mike solved the problem:
- He made sure the door was closed and aligned.
- He checked that the trolley was in the disconnected position.
- He plugged in the opener and pressed the wall button.
- The opener moved, but the trolley didn’t catch. He realized the trolley needed to be aligned with the carriage, so he moved the door manually until both lined up.
- On the next button press, the trolley snapped into place, and the door worked as before.
Mike learned that alignment matters most when reconnecting after a power loss.
Table: Automatic Vs. Manual Garage Door Reattachment
Here’s a quick comparison of automatic and manual reconnection methods:
| Method | Steps Required | Tools Needed | Common Issues | Best For |
|---|---|---|---|---|
| Automatic | Plug in, press button, opener moves trolley | None | Misalignment, obstruction on rail | Modern openers (post-2000) |
| Manual | Pull cord toward opener, align trolley, reconnect by hand | Step ladder, manual effort | Trolley doesn’t lock, missing pin | Older openers, manual releases |
Table: Signs You Need Professional Help
Not all problems can be solved at home. Here are warning signs that require a technician:
| Sign | Possible Cause | DIY Solution? |
|---|---|---|
| Loud bang, door drops quickly | Broken spring | No |
| Loose, hanging cables | Disconnected or broken cable | No |
| Repeated trolley disengagement | Worn part or misalignment | No (beyond basic checks) |
| Opener flashes error code | Electrical issue | No |
| Door hits ground, doesn’t reverse | Safety sensor problem | No (unless basic cleaning) |
Maintenance Tips To Keep Your Garage Door Running Smoothly
After reattaching your garage door, regular maintenance can prevent future problems. Here’s how to keep your system in top shape:
- Lubricate moving parts every 6 months. Use a silicone-based spray on rollers, hinges, and springs.
- Test the balance. With the door disconnected, lift it halfway. It should stay in place. If not, springs may need adjustment.
- Check the tracks for debris, bends, or damage monthly. Clean with a damp rag.
- Inspect cables for fraying or rust.
- Clean the photo-eye sensors with a soft cloth.
- Tighten loose bolts on hinges and brackets.
A well-maintained garage door lasts longer, runs more quietly, and is less likely to disconnect accidentally.
Table: Maintenance Schedule For Garage Doors
A simple schedule helps you remember key tasks.
| Task | Frequency | DIY or Pro? |
|---|---|---|
| Lubricate rollers/hinges | Every 6 months | DIY |
| Test auto-reverse | Every 3 months | DIY |
| Check springs/cables | Every 6 months | DIY (visual only) |
| Inspect tracks | Monthly | DIY |
| Professional tune-up | Annually | Pro |
Non-obvious Insights Most People Miss
Many guides skip these important points:
- Don’t lubricate the tracks themselves—only the rollers and hinges. Greasy tracks attract dirt and cause problems.
- Check your opener’s force setting after reattachment. Most openers have a dial or digital control to set how hard the motor pushes/pulls. If set too high, it can damage the door; too low, and the door won’t close all the way.
- Keep your emergency release cord accessible, not tied up or tangled, so it works in an emergency.
- After power outages, be patient. Sometimes the opener logic board needs a few minutes to reset after power returns. Unplugging and re-plugging can help.
Frequently Asked Questions
What Should I Do If My Garage Door Won’t Reconnect After Several Tries?
If you’ve followed the steps and your garage door won’t reattach, check for obstructions on the rail, a misaligned trolley, or a missing pin. Also, unplug the opener for a minute, then try again. If the problem continues, it’s time to call a technician to check for deeper issues.
Is It Safe To Reattach The Garage Door Myself?
For most situations—especially just after using the emergency release—it’s safe if you follow safety guidelines. But never try to fix broken springs or cables yourself. These parts are under high tension and can cause serious injury.
Can I Operate My Garage Door Manually All The Time?
Yes, you can use your garage door manually if you prefer, but it will not lock automatically and may be heavier to lift. Automatic openers add convenience and security, especially for heavy doors or if you have mobility issues.
How Often Should I Test The Garage Door’s Safety Features?
Test the auto-reverse and photo-eye sensors every three months. Place a board under the door and close it; the door should reverse immediately. Clean the photo-eyes regularly to avoid false triggers.
Where Can I Find More Information Or Replacement Parts?
Check your opener’s owner manual or visit the manufacturer’s official website. For general guidance and diagrams, the Wikipedia Garage Door Opener entry is a reliable resource.
Reattaching your garage door might seem intimidating at first, but with the right steps and a little patience, it’s a safe and manageable task for most homeowners. Take your time, follow safety procedures, and don’t hesitate to seek help if you hit a roadblock.
With good maintenance, your garage door will run smoothly for years to come.


