
When you open or close your garage door and hear a loud rattling, see the chain bouncing, or feel that the door is moving slower than usual, it’s a warning: your garage door opener chain may be too loose. A loose chain isn’t just noisy—it can also cause the door to move unevenly, wear out the opener faster, and even damage the door itself. Many homeowners ignore these signs, thinking the problem is small, but over time, it can lead to expensive repairs. Learning how to tighten the chain on your garage door opener not only solves these problems but can also extend the life of your entire garage system.
If you’re new to DIY maintenance, don’t worry. You don’t need to be a mechanical expert to fix a loose garage door chain. Most adjustments only require a few tools, some patience, and a clear step-by-step approach. However, it’s essential to follow each step carefully—rushing or skipping any detail can create bigger problems or even cause injury.
In this detailed guide, you’ll learn not only how to tighten the chain, but also why tension matters, common mistakes to avoid, and tips for keeping your opener working smoothly for years.
Let’s dive in and make your garage door opener chain as quiet and reliable as possible.
Understanding Garage Door Opener Chains
Before you start tightening anything, it’s helpful to understand what the garage door opener chain does. Most chain-driven openers use a metal chain (similar to a bicycle chain) to pull the trolley that moves your garage door up and down. The chain is connected to a drive sprocket and a tensioner, which keeps it taut. Too much slack can make the chain jump or rattle; too little tension can overwork the motor or even snap the chain.
Most residential openers use one of three drive types: chain drive, belt drive, or screw drive. Chain drives are popular because they’re strong, affordable, and easy to repair, but they need regular tension checks.
Common Signs Of A Loose Chain
- Noisy operation – Rattling or slapping sounds.
- Chain sagging – Chain hangs down from the rail.
- Slow or jerky movement – Door opens/closes unevenly.
- Chain jumping sprocket – Chain slips or skips teeth.
- Visible gap – More than 1/2 inch sag between the rail and chain.
Not every noise means the chain is loose, but these signs usually appear together.
Why Chain Tension Matters
Keeping the chain at the right tension is important for safety and performance. If the chain is too loose, the opener struggles and wears out faster. If it’s too tight, the extra force can break the chain or damage the sprocket.
Most manufacturers recommend a chain sag of about 1/4 inch to 1/2 inch at the midpoint.
Tools And Materials Needed
You don’t need a full toolbox, but having the right tools makes the job smoother and safer. Here’s what you’ll need:
- Adjustable wrench or socket set (usually 7/16″ or 10mm)
- Step ladder (for reaching the opener rail)
- Protective gloves (to avoid pinched fingers)
- Screwdriver (sometimes needed for covers)
- Rag or cloth (for cleaning)
- Light machine oil (optional, for lubrication)
- Flashlight (if your garage is dim)
- Safety glasses (recommended for overhead work)
Gather these before starting so you don’t have to climb up and down the ladder.
Safety Precautions
Working on a garage door opener is usually safe, but mistakes can be dangerous. Here’s how to stay safe:
- Unplug the opener – Never work while it’s powered. Accidental activation can cause injury.
- Don’t force parts – If a bolt won’t move, check for lock nuts or rust. Forcing can break parts.
- Keep your hands clear – The chain and trolley can move suddenly.
- Use a stable ladder – Make sure it’s set on flat ground.
- Work with a partner – If possible, have someone nearby in case you need help.
Many beginners forget to unplug the opener. Even if you think nobody will use the remote, unplugging the opener is the only safe way.
Step-by-step: How To Tighten Chain On Garage Door Opener
Now, let’s get to the main process. These steps cover most chain-driven openers (such as Chamberlain, LiftMaster, Craftsman, Genie, and others). Always check your opener’s manual for model-specific advice.
1. Disconnect Power And Check Chain
First, unplug the opener from the ceiling outlet. If it’s hardwired, turn off power at the breaker. This prevents accidental starts.
With the opener off, inspect the chain along the rail. Look for sagging, rust, or damage. If you see rust or bent links, consider replacing the chain, not just tightening it.
2. Measure Chain Sag
Find the longest section of chain between the trolley and the motor. Use a ruler or just your finger to measure the distance from the chain to the bottom of the rail.
- Ideal sag: 1/4 inch to 1/2 inch at the midpoint.
- Too loose: More than 1/2 inch.
- Too tight: Chain is pulled straight with no sag.
A little sag is normal; don’t try to make the chain perfectly tight.
3. Locate The Adjustment Bolt
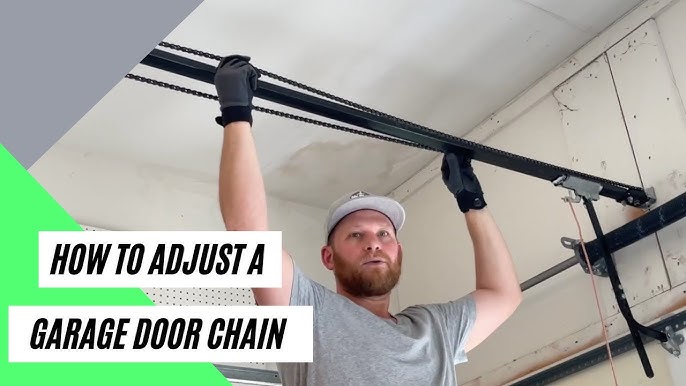
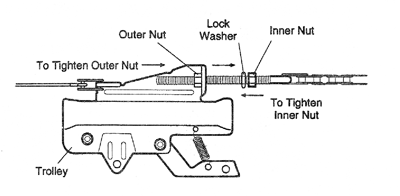
Most openers have a chain tensioner near the trolley (the moving part attached to the door arm). The tensioner usually has two nuts on a threaded rod:
- Lock nut: Holds the adjustment in place.
- Adjustment nut: Changes the chain tension.
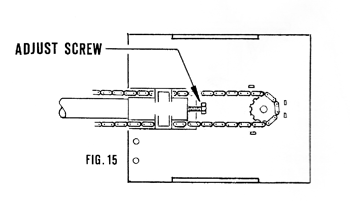
Some older openers use a spring-loaded tensioner or a turnbuckle, but the principle is the same.
4. Loosen The Lock Nut
With your wrench, hold the adjustment nut steady and turn the lock nut counterclockwise. Once the lock nut is loose, you can adjust the tension.
5. Tighten The Adjustment Nut
Slowly turn the adjustment nut clockwise. Watch the chain as you turn—every full turn should take out a little slack. Check the sag after every 1-2 turns.
- Stop when you have about 1/4 inch to 1/2 inch sag.
- Don’t overtighten! The chain should move slightly when pushed.
It’s a common mistake to overtighten because the chain will tighten more when the door is in motion.
6. Re-tighten The Lock Nut
When the chain is at the correct tension, hold the adjustment nut and tighten the lock nut against it. This keeps the adjustment from slipping loose over time.
7. Lubricate (optional)
If your chain looks dry or rusty, apply a few drops of light machine oil. Wipe off any extra oil with a rag. Do not use heavy grease, as it attracts dust and dirt.
8. Reconnect Power And Test
Plug the opener back in or turn the breaker on. Open and close the door a few times using the wall switch (not the remote, in case something is wrong).
- Listen for noises. The chain should run quietly.
- Watch for smooth movement.
- If you hear grinding, see the chain jumping, or the door does not move, unplug and recheck your adjustments.
9. Final Inspection
Look over the chain and rail for any missed issues. If everything works smoothly, your job is done.
Visual Guide: Comparing Chain Sag
Seeing the difference between good and bad chain tension helps a lot. Here’s a simple comparison:
| Chain Sag | What It Means | Action Needed |
|---|---|---|
| 0 inches (completely tight) | Too tight – risk of chain/motor damage | Loosen chain slightly |
| 1/4 – 1/2 inch | Correct tension | No action needed |
| Over 1/2 inch | Too loose – noisy, jerky movement | Tighten chain |
Always aim for the middle ground—a little slack is normal and safe.
When Not To Tighten The Chain
Sometimes, a loose chain means a bigger problem. Do not tighten if:
- The chain has rusted or broken links.
- The sprocket is worn or missing teeth.
- The trolley assembly is cracked.
- There is excessive vibration even after tightening.
If you see these issues, it’s better to replace the damaged part or call a professional.
Common Mistakes And How To Avoid Them
Many homeowners make small errors that cause bigger problems later. Here’s how to avoid them:
- Overtightening the chain
- This puts stress on the motor and can cause premature failure.
- Forgetting to unplug the opener
- Always disconnect power before any work.
- Missing the lock nut
- If you don’t retighten the lock nut, your adjustment will slip.
- Using the wrong lubricant
- Heavy grease can clog the chain. Use light oil only.
- Ignoring bigger problems
- Tightening won’t fix broken sprockets or worn rails.
A non-obvious tip: after adjusting, check the travel limits on your opener. Sometimes tightening the chain can slightly change where the door stops. Adjust the up and down limits if needed (see your opener’s manual).
Maintenance Tips For A Long-lasting Garage Door Opener
A well-maintained opener not only works better but also saves money over time. Here’s how to keep your opener in top shape:
1. Check Chain Tension Every 6 Months
Garage door chains stretch a little with use. Check sag twice a year, especially after winter.
2. Lubricate Annually
Apply a light oil once a year to the chain and trolley rail. Avoid spraying oil on plastic parts.
3. Inspect For Wear
Look for worn sprockets, rusted chains, or cracked trolleys. Early replacement prevents bigger failures.
4. Clean The Rail
Dust and cobwebs can build up on the rail. Wipe it clean with a dry cloth every few months.
5. Listen For Changes
If your opener gets noisier or the door moves differently, check the chain and opener right away.
Some homeowners never check their opener until it fails. Regular checks can prevent a $20 fix from turning into a $300 repair.
Chain Drive Vs. Belt Drive: Performance And Maintenance
Many people wonder if they should switch to a belt drive opener instead of a chain drive. Here’s a quick comparison:
| Feature | Chain Drive | Belt Drive |
|---|---|---|
| Strength | High – good for heavy doors | Medium – best for single doors |
| Noise | Louder (rattling sound) | Very quiet |
| Maintenance | Needs regular tensioning | Little to no adjustment |
| Price | Lower cost | Higher cost |
| Lifespan | 10-15 years (with care) | 10-15 years (with care) |
If your garage is under a bedroom or you hate noise, consider upgrading to a belt drive. If you need strength and don’t mind a little noise, chain drives are reliable and easy to maintain.
Troubleshooting: If Tightening Doesn’t Fix The Problem
Sometimes, the chain is tight but problems remain. Here’s what to check next:
1. Opener Motor Issues
If the motor struggles or won’t move, it may be worn out. Listen for humming, burning smells, or see if the door moves only a little.
2. Sprocket Or Gear Wear
A worn sprocket can make the chain skip, even if it’s tight. Look for metal shavings or missing teeth.
3. Trolley Assembly Damage
If the trolley (the moving part on the rail) is cracked, the chain won’t stay tight. Replace any broken parts.
4. Track Obstructions
Sometimes, dirt or debris in the rail causes jerky movement. Clean the rail with a cloth.
5. Door Balance
An unbalanced door puts extra load on the opener. Disconnect the opener and lift the door by hand. If it’s heavy or doesn’t stay up, call a pro to adjust the springs.
6. Remote Or Limit Settings
If the door stops too soon or doesn’t close fully, check your travel limits and remote batteries.
A surprising issue: On some openers, a worn-out chain drive gear (inside the opener housing) can look like a loose chain problem but actually requires a gear replacement. Always inspect the gear if problems return soon after tightening.
Cost Of Professional Garage Door Chain Adjustment
Hiring a pro is sometimes the best choice, especially if you’re uncomfortable with DIY repairs. Here’s a price comparison:
| Service | DIY Cost | Professional Cost |
|---|---|---|
| Chain Tightening | $0 (just your time) | $75 – $150 |
| Chain Replacement | $20 – $40 for parts | $120 – $250 |
| Full Opener Replacement | $150 – $350 for parts | $350 – $700 |
If your opener is more than 10 years old, sometimes a new unit is a better investment.
When To Call A Professional
DIY is great, but some situations require expert help:
- You see frayed wires or burned components.
- The chain keeps loosening after tightening.
- The door is very heavy or feels unsafe.
- The motor hums but nothing moves.
- You have no experience and want peace of mind.
Professional service ensures safety and can reveal hidden issues.
Environmental Factors That Affect Chain Tension
Most people don’t realize that garage temperature and humidity can change chain tension. Metal expands and contracts with temperature swings. In cold climates, chains may loosen slightly in winter and tighten in summer. If you live in an area with big temperature changes, check your chain more often.
Garage doors in coastal or humid climates can also rust faster. Use a rust-resistant lubricant and inspect more regularly if you’re near the sea.
Upgrading To A New Chain Or Opener
If your chain is rusty, noisy, or keeps loosening, replacement may be smarter than repeated adjustments. Modern chains use zinc plating or stainless steel for longer life. New openers offer Wi-Fi control, battery backup, and softer starts for less wear.
If you’re considering an upgrade, check reviews and comparisons from trusted sources like Consumer Reports.
Expert Tips For Reliable Chain Drive Opener Performance
- Mark your adjustments – Use a marker to note how much you turn the nut each time.
- Keep a maintenance log – Write the date of each adjustment for easy tracking.
- Replace parts early – Don’t wait for a total failure. If you see rust or cracks, replace the chain or trolley.
- Double-check travel limits after every adjustment.
- Store the manual – Keep your opener’s manual handy for quick troubleshooting.
These small habits can add years to your opener’s life.
Frequently Asked Questions
How Often Should I Tighten My Garage Door Opener Chain?
Most homeowners only need to check and possibly tighten the chain every 6 to 12 months. If your opener is older or you use the garage door many times a day, check every 3-6 months. Chains stretch slowly with use, so regular checks prevent big problems.
What Happens If I Overtighten The Chain?
If the chain is too tight, you risk damaging the motor, sprocket, or the chain itself. The opener works harder, which can cause overheating or early failure. Always leave a little sag (1/4–1/2 inch) for safe operation.
Can I Use Any Lubricant On My Garage Door Opener Chain?
No. Use only light machine oil or the lubricant recommended by your opener’s manufacturer. Avoid heavy grease, motor oil, or WD-40—they can attract dust or damage plastic parts.
What Should I Do If The Chain Keeps Getting Loose?
If your chain loosens quickly after adjustment, check for worn sprockets, damaged trolleys, or a stripped adjustment rod. Sometimes, the adjustment nut slips. If you can’t fix the problem, call a professional for help.
Is It Worth Switching From Chain Drive To Belt Drive?
It depends. Belt drive openers are quieter and need less maintenance but cost more. If you have living space above the garage or want less noise, a belt drive can be a smart upgrade. For heavy doors or budget-minded homeowners, chain drives are still a good choice.
A well-tensioned chain is the secret to a quiet, reliable garage door opener. With the right tools, a little time, and these step-by-step tips, you can keep your garage running smoothly and avoid costly repairs. Always put safety first, and don’t hesitate to call a professional if you’re unsure.
A small effort now can give you peace of mind every time you open or close your garage door.