Now Reading: How to Sync Liftmaster Garage Door Opener With Car Easily
- 01
How to Sync Liftmaster Garage Door Opener With Car Easily
Syncing your LiftMaster garage door opener with your car can make life much easier. Instead of searching for a remote every time you arrive home, you simply press a button inside your vehicle. It’s a small upgrade, but it brings real comfort and security. If you’re new to this, the process might seem confusing at first. You might worry about pressing the wrong button or resetting your settings. But with the right steps, anyone can do it—even if you’re not a tech expert.
This guide will walk you through everything you need to know about syncing your LiftMaster opener with your car. You’ll learn about the tools you need, the step-by-step process, troubleshooting advice, and some helpful tips people often miss. Whether you drive a brand-new SUV or an older sedan, by the end, you’ll understand exactly how to set up your system with confidence.
Understanding Liftmaster Garage Door Openers
LiftMaster is a leading brand in the world of garage door openers. Their systems are known for reliability, safety features, and compatibility with many vehicles. Most modern LiftMaster models use rolling code technology. This means the code changes every time you use it, making it much harder for someone to copy your signal.
Older openers might have a fixed code system. These are less secure, and some cars may not support them. It’s important to know which type you have before starting. If you’re unsure, check your opener’s manual or look for a “Learn” button on the unit.
The “Learn” button is a key part of the syncing process, and its color often indicates the system type.
Why Sync Your Car With Liftmaster?
Syncing your car with your garage door opener offers more than just convenience. Here are a few reasons why people make this upgrade:
- No more lost remotes: The control is built into your car.
- Increased security: Rolling codes reduce hacking risk.
- Quick access: Enter or exit your garage in seconds.
- Cleaner dashboard: No extra devices cluttering up your space.
- Weatherproofing: Remotes can freeze or break. Vehicle buttons are safer.
Many car models from brands like Toyota, Honda, Ford, BMW, and Mercedes now include built-in HomeLink or Car2U systems. These are designed to work with LiftMaster openers, but syncing requires the right steps.
What You Need Before You Start
Syncing your car with a LiftMaster opener is usually simple, but being prepared can save time. Here’s what you need:
- Your vehicle: It should have a built-in garage door control system (often called HomeLink or Car2U).
- LiftMaster remote control: Even if you want to use your car button, you’ll need the remote for some steps.
- Garage door opener unit: You’ll need physical access to this, usually mounted on your garage ceiling.
- Owner’s manuals: For your vehicle and LiftMaster opener.
- A ladder: To reach the opener’s “Learn” button safely.
- A helper (optional): Not required, but helpful for pressing buttons in different locations.
Safety Tip: Always keep your car in park with the engine off when programming. Make sure the garage door area is clear of people, pets, and objects before testing.
How Car-to-garage Syncing Works
Most cars use a system like HomeLink or Car2U to connect to garage openers. These systems act like a universal remote, storing your opener’s code and sending it when you press the button. LiftMaster’s rolling code requires a specific process so your car can “learn” the code securely.
The process usually involves three steps:
- Clearing the car’s memory (if needed)
- Programming the car’s button with your remote control
- Syncing with the LiftMaster opener using the “Learn” button
Let’s break down each step in detail.

Step 1: Clear Existing Garage Door Codes (if Needed)
If your vehicle is new to you, or you’re changing from another garage, it’s best to clear any old codes before adding your LiftMaster. This prevents interference and security issues.
Here’s how to clear the memory:
- Turn on your car’s ignition (do not start the engine).
- Find the garage door buttons (often on the roof, visor, or dashboard).
- Press and hold the two outer buttons for about 10–20 seconds.
- Watch for a blinking indicator light. When it blinks rapidly, the codes are cleared.
- Release the buttons.
Some vehicles need you to hold a specific button instead of the outer ones. Check your car’s manual for your model’s steps.
Non-obvious insight: Some cars can store up to three different door codes. Clearing the memory wipes all stored doors, not just one. If you use the other buttons for different garages or gates, only clear the button you want to reprogram.
Step 2: Program The Car Button With The Liftmaster Remote
Now, you’ll “teach” your car’s system the code from your LiftMaster remote. This lets your car’s button copy the remote signal.
Follow these steps:
- Hold your LiftMaster remote a few inches from the in-car button you want to program.
- Press and hold both the car button and the remote button at the same time.
- Hold them until the indicator light in your car changes. It might blink slowly, then quickly, or simply turn solid.
- Release both buttons.
If the light goes out right away or doesn’t change, try again. Some systems are sensitive to timing.
Non-obvious insight: On some cars, you need to press and hold for up to 30 seconds. Patience is important—don’t let go too early or the code won’t save.
Step 3: Connect Your Car Button To The Liftmaster Opener
Even if your car “learned” the remote, many LiftMaster openers use rolling codes. This means you must finish by syncing your car with the opener unit itself.
Here’s the typical process:
- Find the “Learn” button on your LiftMaster opener. It’s usually near the antenna wire, sometimes under a light cover. The button may be yellow, red, orange, or purple.
- Get your car ready. Be inside your vehicle with the door closed.
- Press and release the “Learn” button. You have 30 seconds to finish the next step.
- Within 30 seconds, press and hold the in-car garage button for 2–3 seconds, then release.
- Repeat the press-and-hold step up to three times, until the garage door moves or the opener’s lights flash.
The door should open or close. This means syncing is successful.
Important: If you wait too long after pressing “Learn,” you’ll have to start over. Have everything ready before climbing the ladder.
Different Types Of “learn” Buttons And What They Mean
The color of the “Learn” button on your LiftMaster opener isn’t just for looks. It tells you which technology your opener uses, which affects the syncing process.
Here’s a handy reference:
| Learn Button Color | Frequency | Compatible Systems | Notes |
|---|---|---|---|
| Yellow | Security+ 2.0 (310, 315, 390 MHz) | Most 2011+ vehicles, HomeLink 5 | Rolling code, extra security |
| Purple | 315 MHz | 2007–2011 vehicles, HomeLink 4 | Rolling code |
| Red/Orange | 390 MHz | Older vehicles, HomeLink 3 | Rolling code, less common now |
| Green | 390 MHz | Very old systems | Fixed code, not as secure |
If your car isn’t working with a yellow or purple Learn button, you may need a HomeLink repeater kit or an adapter.
Syncing With Homelink Versus Car2u
Most vehicles use HomeLink, but some Ford, GM, and Chrysler cars use Car2U. The steps are similar but not identical.
Homelink
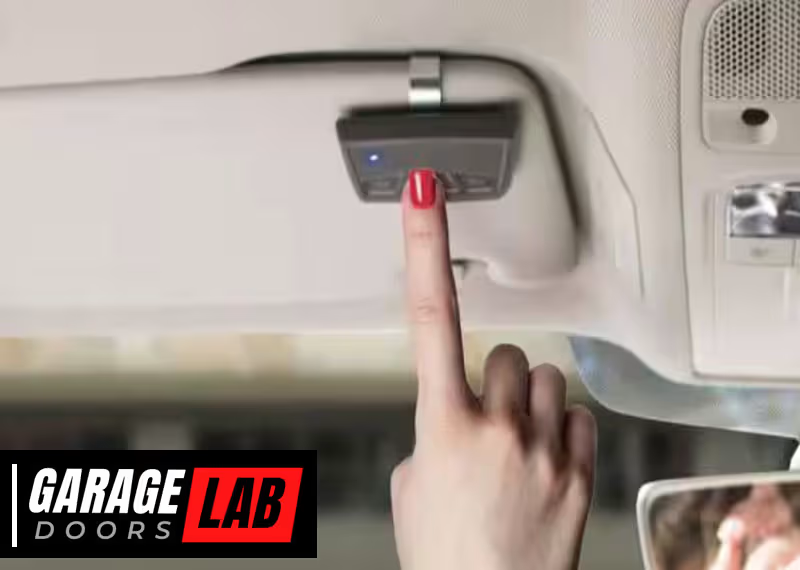
- Buttons are usually on the sun visor, ceiling, or rearview mirror.
- Uses indicator lights to show programming status.
- Works with most rolling code openers, but very old cars may need a repeater.
Car2u
- Buttons are on the sun visor or roof.
- Uses three LED lights to confirm programming.
- May require a special process for rolling code openers.
Tip: Always check your car’s manual if you’re unsure which system you have.
Common Mistakes And How To Avoid Them
It’s easy to make small errors when syncing your garage door opener. Here’s what to watch out for:
- Not clearing old codes: Old signals can block new ones. Always clear before reprogramming.
- Standing too far from the opener: Your car should be parked close to the garage for signal strength.
- Not pressing the “Learn” button correctly: It’s a quick press-and-release, not a long hold.
- Waiting too long: After pressing “Learn,” you have 30 seconds. Move quickly.
- Forgetting rolling code steps: Some cars need both the remote and the “Learn” button step.
- Dead remote batteries: If the remote is weak, your car won’t learn the code.
Practical example: If your car button works the garage once, then stops, it’s likely the rolling code wasn’t set correctly. Repeat the “Learn” button process.
Troubleshooting: What If It Doesn’t Work?
Syncing sometimes fails, even if you follow all steps. Here are the most common problems and solutions:
The Car Button Won’t Program
- Check the remote’s battery.
- Try a different in-car button.
- Move the remote closer or farther from the button when programming.
- Hold the buttons longer (sometimes up to 30 seconds).
The Opener Won’t Respond To The Car
- Make sure you pressed the “Learn” button (not just a light button).
- Try the in-car button multiple times after pressing “Learn.”
- Check for interference from nearby electronics.
- If your opener is very old, it may not be compatible with rolling code systems.
The Door Opens, Then Stops Working
- The rolling code may not be saved. Repeat the syncing process.
- Some cars need you to hold the button longer the first time.
Your Car Is Not Compatible
If your car is older than 2007, or your opener is very new, they might not talk to each other. In this case, consider buying a HomeLink Compatibility Bridge. This device helps older cars work with modern openers.
Data insight: According to HomeLink, more than 99% of new cars can sync with rolling code openers when using the right bridge or repeater.
Special Cases: Multiple Cars Or Multiple Garage Doors
If you have more than one garage door, or multiple vehicles, you can sync each car to each door. Most car systems allow up to three different openers.
Here’s how to do it:
- Choose a different in-car button for each garage door.
- Repeat the full syncing process for each button and each door.
- Label your car buttons (with a small sticker) to remember which is which.
For families with multiple cars, each vehicle must be programmed separately. There’s no risk of one car “erasing” the other’s settings.
Security Tips After Syncing
Garage doors are a common entry point for burglars. After syncing, boost your security with these ideas:
- Change your remote’s battery every 1–2 years.
- Don’t leave remotes or car keys in unlocked cars.
- Regularly test your in-car buttons to make sure they work.
- If you move or sell your car, clear all garage codes.
Extra tip: Some newer LiftMaster openers let you set temporary PINs or use smartphone apps for extra control. Check your opener’s manual for these features.
Upgrading To Smart Garage Controls
If you want more than just in-car syncing, consider adding a smart garage controller. LiftMaster offers myQ technology, which lets you open or close your garage from your phone. You can even get alerts if the door is left open.
Here’s how smart controls compare to in-car syncing:
| Feature | In-Car Sync | Smart Controller (myQ) |
|---|---|---|
| Open/Close from Car | Yes | No |
| Open/Close from Anywhere | No | Yes |
| Guest Access | No | Yes |
| Activity Alerts | No | Yes |
| Works if Car Battery Dies | No | Yes |
If you travel often, or want to let a friend in while you’re away, a smart controller is a great option. You can learn more about myQ and other smart garage features from LiftMaster’s official myQ page.

Real-world Example: Syncing A 2021 Honda Cr-v With A Liftmaster Opener
Let’s walk through a real example. Suppose you have a 2021 Honda CR-V with HomeLink and a LiftMaster opener with a yellow Learn button.
- Clear the HomeLink memory by holding the two outer buttons for 20 seconds.
- Hold the remote two inches from the HomeLink button.
- Press and hold both until the HomeLink light blinks rapidly.
- Climb the ladder and press the yellow Learn button on the opener.
- Within 30 seconds, return to the car and press the HomeLink button for two seconds, three times.
- The garage door opens. Success!
If it doesn’t work, repeat the Learn button step, or check the manual for any special instructions.
Maintenance After Syncing
Once your car and opener are synced, maintenance is simple:
- Test the system once a month.
- Replace the opener’s light bulbs and remote batteries as needed.
- Update your car’s HomeLink software if available (some newer cars allow this).
- If you get a new garage door opener, repeat the syncing process.
Safety Features In Liftmaster Openers
LiftMaster includes several safety features:
- Auto-reverse: If something blocks the door, it will reverse.
- Rolling codes: The code changes every use for security.
- Manual release: You can open the door by hand if the power fails.
Always check that these features work after syncing your car.
Cost And Time Estimate
Syncing your car with a LiftMaster opener is usually free and quick. Here’s a rough breakdown:
| Task | Estimated Time | Cost |
|---|---|---|
| Syncing one car | 10–20 minutes | $0 |
| Buying a HomeLink bridge (if needed) | 5 minutes setup | $20–$40 |
| Professional help (optional) | 30–60 minutes | $50–$100 |
Most people can do it themselves in under 20 minutes with no extra cost.
When To Call A Professional
You rarely need a professional for syncing, but it may help if:
- Your car or opener is not responding after several tries.
- You have an older or complex system.
- You’re uncomfortable using a ladder or working with electronics.
Professionals can also check your system for safety and upgrade options.
Summary: Key Takeaways
Syncing a LiftMaster garage door opener with your car is a smart way to boost convenience and security. With a bit of patience, most people can do it in less than half an hour. Remember to check your opener type, clear old codes, and use the right steps for your car’s system. If you run into problems, most can be solved with a new battery, a HomeLink bridge, or a quick call to support.
For more detailed information about garage door openers, you can check resources like Wikipedia’s Garage Door Opener page.
Frequently Asked Questions
How Do I Know If My Car Is Compatible With My Liftmaster Opener?
Most cars made after 2007 with HomeLink or Car2U are compatible with rolling code LiftMaster openers. Check your car manual or the HomeLink site for a compatibility tool. If your car is older, you may need a HomeLink bridge.
What Does The “learn” Button Do On A Liftmaster Opener?
The “Learn” button puts your opener into programming mode. It allows new remotes or car buttons to sync with the system. The color of this button can tell you about your opener’s technology and compatibility.
Why Does My Garage Door Not Open After Syncing?
If the door doesn’t move, you may not have completed the rolling code step. Make sure you pressed the “Learn” button, then the car button within 30 seconds. Try repeating both programming and syncing steps.
Can I Sync More Than One Car To The Same Liftmaster Opener?
Yes, most LiftMaster openers and car systems allow you to sync multiple vehicles. Just use a different in-car button for each car and repeat the full syncing process.
Is Syncing My Car With My Garage Door Opener Safe?
Yes, as long as you follow instructions and clear old codes when selling or trading your car. LiftMaster’s rolling code technology makes it hard for outsiders to copy your signal.
With these steps and tips, syncing your LiftMaster garage door opener with your car should be smooth and worry-free. Enjoy the convenience every time you drive in or out!


