
The modern garage door opener has evolved from a simple convenience to a smart home hub. While the primary function remains the same, effortless entry and exit, the integration of technology has opened up new possibilities for security, monitoring, and control.
For many homeowners, the next logical step in enhancing their garage security is adding a camera. This isn’t just about seeing who’s at the door; it’s about having a comprehensive view of your property’s most vulnerable entry point.
Adding a camera to your myQ garage door opener system can significantly elevate your home security and provide invaluable peace of mind. The myQ platform, developed by Chamberlain Group, is designed to connect your garage door opener to your smartphone, allowing for remote monitoring and control.
While myQ itself offers a robust set of features, integrating a compatible camera transforms it into a visual surveillance system, giving you eyes on your garage, driveway, and even the street. This guide will walk you through the process, from understanding compatibility to installation and leveraging the full potential of a connected camera system.
Key Takeaways
- Compatibility is Paramount: Not all cameras work with myQ. You need to ensure the camera is specifically listed as compatible with the myQ app or a myQ-enabled garage door opener.
- Types of Cameras: Options range from dedicated myQ-integrated cameras to general Wi-Fi cameras that can be viewed alongside your garage door status within the myQ app.
- Installation Varies: Some cameras are plug-and-play with the myQ app, while others require independent setup and then integration.
- Placement Matters: Strategic camera placement is crucial for optimal viewing angles and effective surveillance.
- Security Benefits: Cameras provide visual confirmation of activity, deter potential intruders, and offer evidence in case of incidents.
- Smart Home Integration: Connecting a camera to your myQ system enhances its smart home capabilities, allowing for more sophisticated automations and alerts.
Understanding Myq And Camera Integration
The myQ system is the proprietary smart home technology developed by Chamberlain Group, the parent company of brands like LiftMaster and Chamberlain. It allows users to monitor and control their garage door openers, gates, and other Chamberlain products remotely via a smartphone app.
The core of myQ is its connectivity, usually through a Wi-Fi-enabled garage door opener or a separate myQ hub. When you add a camera to this ecosystem, you’re essentially layering visual monitoring onto the existing control and notification system.
The integration can happen in a few ways:
- MyQ-Certified Cameras: These are cameras specifically designed and tested to work seamlessly with the myQ app. They often offer features like integration directly into the myQ dashboard, allowing you to view your garage camera feed alongside your garage door status.
- Third-Party Cameras with myQ App Integration: Some general Wi-Fi cameras can be linked to the myQ app, allowing you to view their feeds within the myQ interface, though they might not offer the same level of direct control or notification synergy as certified cameras.
- General Wi-Fi Cameras (Standalone Viewing): You can always install any Wi-Fi camera and view its feed through its own dedicated app. While not directly integrated into myQ, you can still have them running while also monitoring your garage door status in the myQ app, giving you a multi-app view of your property.
The primary benefit of true integration is convenience. Instead of juggling multiple apps, you can potentially see your garage door status and camera feed in one place. This unified view is particularly useful for checking if the door is closed, who is approaching, or if any unusual activity is occurring.
The Benefits Of A Connected Garage Camera
Adding a camera to your myQ system extends the benefits of smart garage technology beyond simple remote control. The advantages are numerous and contribute significantly to overall home security and convenience.
- Enhanced Security Monitoring: The most obvious benefit is the ability to visually monitor your garage and its surroundings. This can deter potential burglars, vandals, or package thieves. You can see who is at your garage door or in your driveway in real-time.
- Activity Alerts: Many integrated cameras and the myQ app can send push notifications to your smartphone when motion is detected. This allows you to respond quickly to any suspicious activity, even when you’re away from home.
- Package Delivery Verification: If your garage is a common delivery point for packages, a camera can help you verify that deliveries have arrived safely and track their placement.
- Remote Visual Confirmation: You can check the status of your garage door (open or closed) and see a live video feed to confirm it’s secured. This eliminates the guesswork and anxiety of wondering if you remembered to close it.
- Evidence in Case of Incident: In the unfortunate event of a break-in, theft, or accident, video footage from your camera can serve as crucial evidence for law enforcement or insurance claims.
- Family and Pet Monitoring: For some, a garage camera can also be used to check on pets that might be temporarily housed in the garage or to see when children arrive home.
- Deterrent Effect: The visible presence of a camera can act as a significant deterrent to opportunistic crime.
Myq Compatibility Explained
Not all garage door opener cameras are created equal, and crucially, not all are compatible with the myQ ecosystem. Chamberlain Group offers specific recommendations and certified products to ensure a smooth integration.
Key aspects of myQ compatibility:
- MyQ-Certified Cameras: These are the most straightforward to integrate. Products like the LiftMaster Smart Video Doorbell or certain myQ-enabled cameras are designed to pair directly with your myQ account. When you purchase one of these, you’ll typically follow instructions within the myQ app to add the device.
- MyQ-Connected Garage Door Openers: If your garage door opener itself is myQ-enabled (look for the myQ logo or Wi-Fi connectivity features), it acts as the bridge. You can then add compatible accessories or cameras through the app.
- Third-Party Integrations: While less common for direct camera feeds within the myQ app itself, some smart home platforms that integrate with myQ might allow you to view a third-party camera’s feed through that platform, which in turn connects to myQ. However, for direct integration into the myQ app’s main dashboard, certified cameras are usually the way to go.
How to Check Compatibility:
- Check Your Garage Door Opener: If you already have a myQ-enabled opener, consult its manual or the Chamberlain Group website for a list of compatible accessories.
- Visit the myQ Website: The official myQ website (myq.com) usually has a “Works With” or “Shop” section that lists compatible cameras and devices.
- Look for the myQ Logo: When purchasing a camera, look for explicit mentions of myQ compatibility or the myQ logo on the packaging or product description.
In my experience, trying to force an incompatible camera to work with myQ is a recipe for frustration. It’s far more efficient to select a camera that is explicitly designed for the ecosystem.

Credit: www.youtube.com
Choosing The Right Camera For Your Myq System
Selecting the appropriate camera involves considering several factors beyond just myQ compatibility. You’ll want a camera that meets your specific surveillance needs, integrates well, and offers reliable performance.
Types Of Cameras Available
When thinking about adding video surveillance to your garage, you have a few primary options, each with its own set of pros and cons.
- Dedicated myQ Integrated Cameras: These are often the most seamless option. Brands like LiftMaster, a Chamberlain Group company, offer cameras designed to work directly within the myQ app. These might be specific garage door cameras or video doorbells that can be associated with your garage entry.
- Pros: Easiest integration, often optimized for garage environments, unified app experience.
- Cons: Can be more expensive, limited selection compared to general Wi-Fi cameras.
- General Wi-Fi Security Cameras (Viewable in myQ App): Some reputable brands offer Wi-Fi cameras that can be linked to your myQ account. While they might not be “certified” in the same way, the myQ app allows you to add and view their live feeds alongside your garage door status. Examples include certain models from Ring or other smart home brands that have partnered with myQ.
- Pros: Wider selection of features (e.g., pan/tilt, better night vision), potentially more budget-friendly options, familiar brands.
- Cons: Integration might be less deep than dedicated myQ cameras, may require separate setup for the camera itself.
- General Wi-Fi Security Cameras (Standalone App): These are any standard Wi-Fi security cameras you can purchase from popular brands (e.g., Arlo, Wyze, Google Nest Cam). You will manage and view these cameras through their own dedicated mobile applications. They won’t appear directly within the myQ app’s main interface, but you can still use them for surveillance while monitoring your garage door status in myQ.
- Pros: Vastest selection, most competitive pricing, advanced features available.
- Cons: Requires managing multiple apps, no direct integration with myQ controls or notifications.
Key Features To Consider
Beyond brand and compatibility, several features will determine how effective and useful your camera is.
- Resolution and Video Quality: Look for cameras with at least 1080p resolution for clear images. Higher resolutions (e.g., 2K, 4K) offer even more detail but require more bandwidth and storage.
- Night Vision: Essential for monitoring in low-light conditions or at night. Cameras use infrared (IR) LEDs for black-and-white night vision or sometimes color night vision technology.
- Field of View (FOV): A wider FOV (measured in degrees) allows the camera to see more of the area. A 130-160 degree FOV is common and generally sufficient for most garage and driveway applications.
- Motion Detection and Alerts: The ability to detect motion and send instant alerts to your smartphone is crucial for timely response. Some cameras offer customizable motion zones to reduce false alarms.
- Two-Way Audio: Allows you to speak and listen through the camera, useful for communicating with visitors or deterring intruders.
- Weather Resistance (IP Rating): If the camera will be exposed to the elements (e.g., mounted outside the garage door), ensure it has a suitable IP (Ingress Protection) rating for dust and water resistance (e.g., IP65 or higher).
- Storage Options:
- Cloud Storage: Most smart cameras offer subscription-based cloud storage for recorded footage. This is convenient for remote access but incurs ongoing costs.
- Local Storage: Some cameras support microSD cards for local recording, avoiding subscription fees but limiting access when away and risking data loss if the card is stolen.
- Power Source: Cameras can be powered by wired connections (requiring an outlet nearby) or batteries (offering more placement flexibility but needing recharging).
Installation Location Considerations
Where you place your camera is as important as the camera itself. Strategic placement maximizes its effectiveness and ensures you capture the most relevant footage.
Common Installation Spots:
- Above the Garage Door Opener: This is a popular indoor location. It provides a good vantage point of the garage interior and the area directly in front of the door. Ensure it’s out of reach of children or pets if necessary.
- On a Wall Near the Garage Door: Similar to the above, mounting on an adjacent wall can offer a different angle of the garage interior.
- Under the Eave (Exterior): For outdoor coverage of the driveway or the front of the garage door, mounting under an eave offers some protection from the weather. Ensure the camera has a wide enough FOV to capture the desired area.
- On a Post or Siding (Exterior): If you need to cover a wider area of the driveway or street, mounting on a visible post or siding can be effective. Always ensure the camera is weather-resistant.
Factors to Consider for Placement:
- Viewing Angle: Aim for a clear, unobstructed view of the primary areas you want to monitor (e.g., the entire garage interior, the driveway approach, the pedestrian door).
- Power Access: If using a wired camera, proximity to a power outlet is essential. Consider professional installation for routing power if needed.
- Wi-Fi Signal Strength: Ensure the chosen location has a strong and stable Wi-Fi signal. You may need a Wi-Fi extender if the signal is weak.
- Lighting Conditions: While night vision helps, good ambient light during the day improves video quality. Avoid pointing cameras directly into bright sunlight if possible.
- Vandalism/Tampering: For outdoor cameras, consider placing them high enough or in a location that makes them less susceptible to tampering or theft.

Credit: www.amazon.com
Step-by-step Installation And Setup Guide
The process of adding a camera to your myQ system generally involves setting up the camera itself and then linking it to your myQ account or app. The exact steps will vary based on the camera model and whether it’s a dedicated myQ camera or a third-party option.
Installing A Myq-certified Camera
These cameras are designed for the easiest integration.
- Unbox and Power On: Follow the manufacturer’s instructions to unbox your camera. Connect it to power. Many myQ-certified cameras will have an indicator light showing their status.
- Download the myQ App: If you don’t already have it, download the myQ app from your smartphone’s app store (iOS or Android). Create an account or log in.
- Add a New Device: Within the myQ app, navigate to the section for adding new devices. This is often found in the settings or by tapping a ‘+’ icon.
- Select Camera Type: Choose the option to add a camera or a specific myQ-compatible accessory.
- Follow In-App Instructions: The app will guide you through connecting the camera to your Wi-Fi network. This usually involves:
- Putting the camera into pairing mode (often by pressing a button).
- Entering your Wi-Fi network name (SSID) and password into the app.
- The app then communicates this information to the camera.
- Link to your myQ Account: Once the camera is connected to Wi-Fi, the app will prompt you to link it to your existing myQ account. Confirm the association.
- Placement and Mounting: Physically mount the camera in your desired location using the provided hardware. Ensure it’s secure and positioned for the best view.
- Final Configuration: In the myQ app, you can usually name your camera (e.g., “Garage Interior,” “Driveway Camera”) and adjust settings like motion detection sensitivity and notification preferences.
Installing A Third-party Wi-fi Camera For Myq Integration
If you’re using a camera that’s compatible with myQ but not a dedicated myQ product, the process involves two main stages: setting up the camera independently and then linking it.
Stage 1: Setting Up the Camera Independently
- Unbox and Power On: Connect the camera to power and follow the manufacturer’s instructions to put it into setup mode.
- Download the Camera’s App: Install the specific app provided by the camera manufacturer (e.g., Ring app, Wyze app, Google Home app).
- Create an Account: Create an account or log in to the camera manufacturer’s platform.
- Connect to Wi-Fi: Use the camera’s app to connect it to your home Wi-Fi network. This process is similar to adding a myQ-certified camera, requiring your Wi-Fi credentials.
- Configure Camera Settings: Set up basic camera settings like resolution, motion detection, and notification preferences within the camera’s native app.
- Physical Installation: Mount the camera in your chosen location.
Stage 2: Linking to the myQ App
- Open the myQ App: Log in to your myQ account.
- Add a Device: Navigate to the ‘Add Device’ or ‘Link Account’ section within the myQ app.
- Select Third-Party Integration: Look for an option to link a compatible smart home device or service. You may need to select the brand of your camera (e.g., Ring, Google Nest).
- Authorize Access: You will likely be redirected to the camera manufacturer’s login page. Enter your credentials for that service to authorize myQ to access your camera feed.
- Confirm Linking: Once authorized, you should see confirmation within the myQ app that the camera is linked.
- View Camera Feed: You should now be able to see the live feed of your third-party camera within the myQ app, often on a separate tab or by tapping on the linked device.
Post-installation Checks And Tips
After installation, a few checks ensure everything is working optimally.
- Test Motion Alerts: Intentionally trigger motion in front of the camera and verify that you receive notifications on your smartphone promptly.
- Check Video Quality: Review live and recorded footage to ensure clarity, especially during day and night. Adjust camera angle if needed.
- Verify Wi-Fi Stability: Monitor the camera feed for any interruptions. If you experience frequent disconnections, consider moving the camera closer to the router, upgrading your Wi-Fi, or using a Wi-Fi extender.
- Review Notification Settings: Fine-tune motion sensitivity and notification schedules within both the camera’s app and the myQ app to minimize false alerts and ensure you receive timely warnings.
- Explore Automation: If your camera and myQ system support it, explore creating automations. For example, you might set the camera to start recording when the garage door opens or trigger a light when motion is detected.
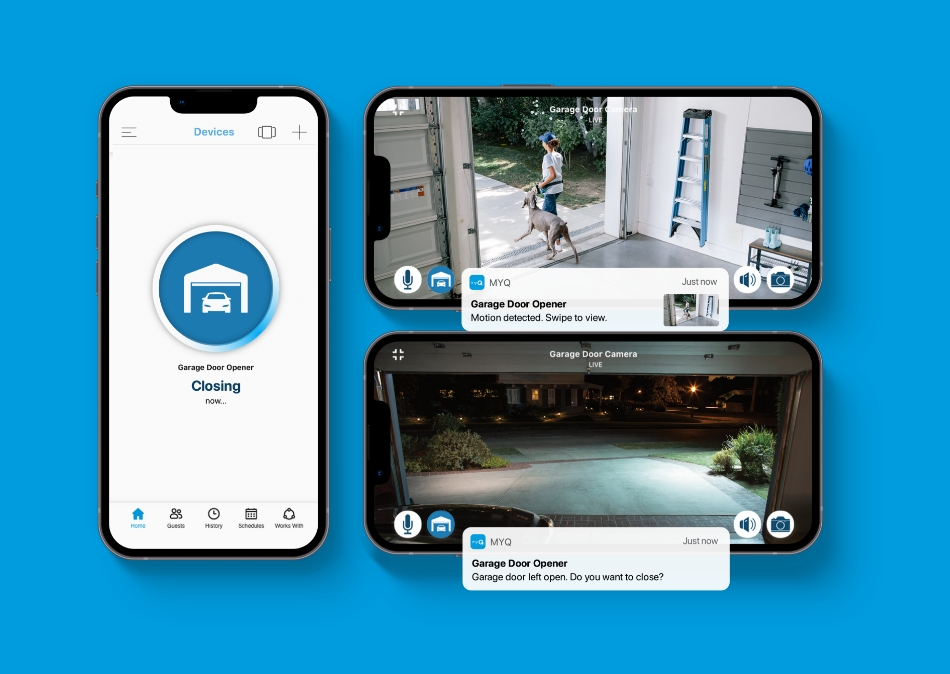
Credit: www.myq.com
Optimizing Camera Placement And Settings For Maximum Effectiveness
Simply installing a camera is only half the battle. To truly leverage its potential for security and convenience, you need to think strategically about its placement and configure its settings to suit your specific needs. This involves understanding the limitations and strengths of camera technology and tailoring it to your garage environment.
Strategic Placement For Optimal Coverage
The goal of camera placement is to capture the most relevant activity with the clearest view. This often means a balance between covering a wide area and ensuring sufficient detail.
- Garage Interior Coverage:
- High Corner Mount: Placing a camera in a high corner of the garage, facing inwards, provides a broad view of the entire space. This is ideal for monitoring the garage door itself, any pedestrian doors, and general activity within the garage.
- Near the Opener Unit: Mounting the camera near the garage door opener motor unit can offer a good angle, as these are often centrally located. Ensure it’s not obstructed by the opener itself.
- Consider the “Blind Spots”: Think about areas that might be hidden from view. If you have a large garage with multiple vehicles or storage areas, you might need to consider multiple cameras or a camera with a very wide field of view.
- Driveway and Exterior Coverage:
- Above Pedestrian Door: If your garage has a side or back door, mounting a camera above it can monitor who approaches that entry point.
- Facing the Driveway: For monitoring vehicles entering or leaving, or for package delivery verification, mount a camera on the exterior of the garage facing the driveway. Ensure it has adequate weather protection.
- Street View (if applicable): Some homeowners may opt for a camera positioned to view a portion of the street, monitoring approaching vehicles or pedestrians. This requires careful consideration of privacy regulations and neighborly relations.
- Factors Influencing Placement:
- Power Source: Wired cameras require proximity to an outlet. Battery-powered cameras offer flexibility but need periodic recharging or battery replacement. Solar-powered options exist but may be less reliable in shaded areas.
- Wi-Fi Signal: A strong, stable Wi-Fi connection is non-negotiable. Test the signal strength at your intended mounting location before drilling holes. You might need a Wi-Fi extender if the signal is weak.
- Lighting: While night vision is crucial, consider natural light. Avoid pointing cameras directly at the sun, as this can wash out the image. For outdoor cameras, consider how streetlights or porch lights might affect illumination.
- Height and Accessibility: Mount cameras high enough to avoid easy tampering but low enough to capture identifiable details (e.g., faces, license plates). Ensure you can safely access the camera for maintenance.
Configuring Settings For Smart Surveillance
Once positioned, the camera’s software settings are critical for effective surveillance and minimizing nuisance alerts.
- Motion Detection Zones: Most smart cameras allow you to define specific areas within the camera’s view where motion should be detected. This is incredibly useful for a garage. For example, you can set a zone that covers the driveway but ignores motion from trees swaying in the wind on the side. Or, within the garage, you can focus detection on the area around the car doors rather than the entire space.
- Sensitivity Levels: Adjusting motion sensitivity helps filter out minor movements (like dust motes or insects) while still capturing significant events. Experiment with different levels to find the right balance for your environment.
- Notification Preferences:
- Scheduled Notifications: Use the myQ app or the camera’s app to set schedules for when you want to receive motion alerts. You might want alerts all day, or only during specific hours when you’re typically away.
- Type of Alerts: Some systems allow you to differentiate between person detection, vehicle