Now Reading: How to Frame a Garage Door: Step-by-Step Guide for Beginners
- 01
How to Frame a Garage Door: Step-by-Step Guide for Beginners
Framing a garage door is a skill that pays off for homeowners and builders alike. Whether you are building a new garage, upgrading an old one, or simply want to add curb appeal, the way you frame the door opening affects everything—from insulation to safety to the look of your property.
While some may think this is a straightforward job, the truth is that careful planning, accurate measurements, and the right materials make all the difference. Many DIYers jump in without realizing the importance of details like header size, king studs, and opening clearances.
A well-framed garage door not only supports the weight of the structure above but ensures smooth installation and operation for years.
As someone who has guided dozens of homeowners through this process, I can tell you: skipping steps or using the wrong techniques can lead to major headaches down the road. In this comprehensive guide, you’ll learn everything you need to know about how to frame a garage door—from the basic concepts and tools to step-by-step instructions, common mistakes, and expert tips. You’ll also find practical tables comparing material options, example measurements for different door sizes, and answers to the top questions beginners ask. Let’s get started on creating a garage door frame that stands the test of time.
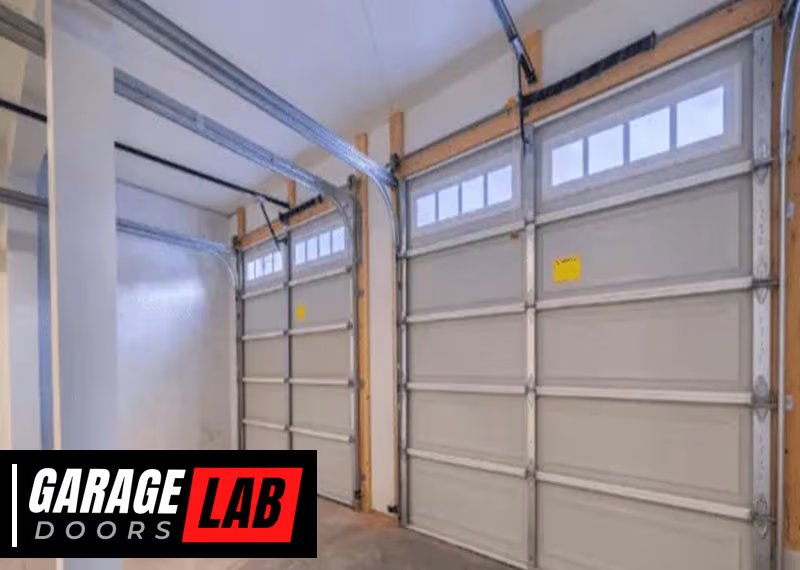
Understanding Garage Door Framing Basics
Before you pick up a saw or hammer, it’s essential to understand what framing a garage door really means. The frame is the structure that holds your garage door in place. It must be strong enough to support the weight of the door and, in most cases, part of the wall or roof above it.
The frame also needs to be square and level so your door opens and closes smoothly.
A standard garage door frame includes these key parts:
- Header: A horizontal beam above the door that supports the load from above.
- King studs: Vertical studs on each side of the opening that run from floor to ceiling.
- Trimmer (or jack) studs: Vertical studs inside the king studs that support the header.
- Sill plate: The bottom horizontal piece that sits on the floor.
- Cripple studs: Short studs above the header (if the wall is taller than the door plus header).
Why is proper framing important? If the frame is too weak, the wall can sag or collapse. If it’s not square, your door may jam or wear out quickly. Building codes also require specific framing methods for safety and insurance reasons.
Tools And Materials You’ll Need
Framing a garage door requires the right tools and materials. Skimping here can make your job harder and less safe. Here’s what you’ll need:
Essential Tools
- Measuring tape (at least 25 feet)
- Framing square
- Level (4 feet is ideal)
- Hammer or nail gun
- Circular saw or miter saw
- Pencil for marking
- Drill/driver
- Chalk line
- Safety glasses and ear protection
- Stepladder (if needed)
Materials
- 2×4 or 2×6 lumber for studs, headers, and plates (choose based on your garage’s wall thickness and local code)
- Nails (16d common for framing)
- Pressure-treated lumber for the sill plate (if in contact with concrete)
- Metal brackets or hurricane ties (in high-wind areas)
- Construction adhesive (optional, for extra hold)
- Shims for adjustments
Material Comparison For Garage Door Framing
Here is a quick look at the most common lumber choices for framing:
| Lumber Type | Best For | Pros | Cons |
|---|---|---|---|
| 2×4 | Standard single doors | Affordable, easy to handle | Less support for large openings |
| 2×6 | Double doors, high load walls | Stronger, better insulation space | Heavier, more expensive |
| Pressure-treated | Bottom plate/sill | Resistant to rot and insects | Costs more, can split easily |
Pro tip: Always check your local building code for required lumber sizes and header specifications.
Planning Your Garage Door Opening
Good planning saves time and prevents mistakes. Before you cut any wood, you need to decide on the garage door size and location.
Choosing The Right Door Size
Garage doors come in standard widths and heights. The most common sizes are:
- Single-car garage door: 8 feet wide x 7 feet high
- Double-car garage door: 16 feet wide x 7 feet high
Other sizes are available, but these are the most popular. Measure your opening and make sure you have enough space on each side for framing.
Insider insight: Leave at least 12 inches of clearance above the door for the opener and track system. Some beginners forget this, and then can’t fit the opener.
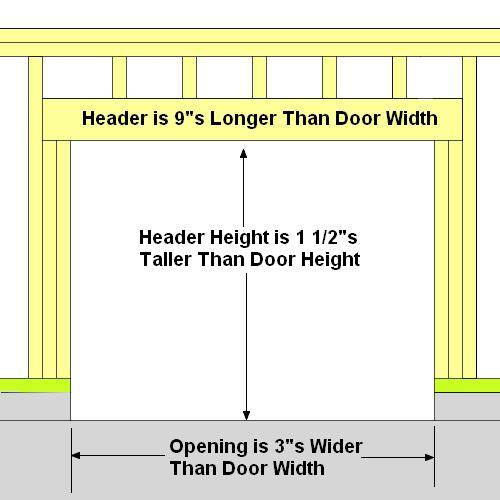
Calculating Rough Opening Size
The rough opening is the size of the hole in the wall before you add the frame. For most garage doors, the rough opening is the same width and height as the door itself. This makes installation easier and ensures a good seal.
Example: If your garage door is 8 feet wide by 7 feet high, the rough opening should also be 8 feet by 7 feet.
However, you need to add space for framing lumber. Here’s a quick guide:
| Door Size (feet) | Rough Opening (inches) | Framing Lumber |
|---|---|---|
| 8 x 7 | 96 x 84 | 2×4 or 2×6 |
| 9 x 7 | 108 x 84 | 2×4 or 2×6 |
| 16 x 7 | 192 x 84 | 2×6 recommended |
Key tip: Don’t make the opening larger than your door. The door needs to overlap the frame for weatherproofing.
Marking The Opening On The Wall
Once you know your rough opening size, use a measuring tape, level, and chalk line to mark the location on the wall. This is your guide for cutting and framing.
- Mark the width of the opening on the sill plate.
- Snap chalk lines for the sides and top.
- Double-check all measurements before cutting.
Step-by-step Guide: Framing A Garage Door
Now it’s time to start building. Follow these steps for a strong, square frame.
1. Prepare The Work Area
Clear the space inside and outside the garage. Make sure the floor is clean and there are no obstacles. Gather all tools and materials.
Safety reminder: Wear safety glasses and ear protection. Framing work creates dust and noise.
2. Remove Old Framing (if Replacing)
If you are replacing an old garage door or frame, carefully remove the existing trim, siding, and framing lumber. Use a pry bar and hammer. Check for rot, water damage, or insects. Repair any damage before building the new frame.
3. Cut The Rough Opening
Use a circular saw to cut the wall sheathing along your marked lines. Remove the old material to expose the studs behind. Cut carefully to avoid damaging the existing structure.
Pro tip: If you have to cut any load-bearing studs, support the ceiling or roof with temporary braces before removing them.
4. Build The Header
The header is the most critical part of the frame. It carries the weight from above and distributes it to the sides.
- For most garage doors, a double 2×12 with 1/2-inch plywood sandwiched between is strong enough. For smaller doors, a double 2×10 or 2×8 may be enough.
- Cut the header to the width of the rough opening.
- Nail the pieces together using 16d nails, spaced every 12 inches.
Tip: Always use the header size required by local code. For very wide doors, you may need engineered lumber or steel.
5. Install The King And Trimmer Studs
- Cut two king studs (full height of the wall) for each side of the opening.
- Cut two trimmer studs (from floor to bottom of header) for each side.
- Nail the trimmer studs to the inside of the king studs.
- Position these assemblies at each side of the rough opening.
Don’t forget: The trimmer studs must be directly under the ends of the header to carry the load.
6. Place The Header
- Lift the header into place above the opening, resting it on the trimmer studs.
- Nail the header to the king and trimmer studs.
- Use a level to check that the header is perfectly horizontal.
7. Add Cripple Studs (if Needed)
If your wall is taller than the door plus header, add cripple studs above the header to fill the space to the top plate. Space them 16 inches on center.
8. Frame The Sides And Sill
- Check that the side studs (king and trimmer) are plumb (vertical). Shim as needed.
- Nail the side studs to the floor, header, and top plate.
- If your garage floor is concrete, use pressure-treated lumber for the sill plate. Secure it to the slab with anchor bolts or masonry nails.
9. Double-check For Square And Level
- Measure diagonally from corner to corner. Both measurements should be the same.
- Use a level to check the top and sides.
- Adjust as needed before nailing everything securely.
10. Install Sheathing And Wrap
- Replace any wall sheathing you removed, cutting it to fit around the new frame.
- Install house wrap or vapor barrier for weather protection.
11. Add Trim And Seal
- Install exterior trim boards around the opening. These help seal out water and provide a surface for the door to close against.
- Caulk all seams to prevent drafts.
Expert insight: Many beginners forget to seal the bottom corners. This is a common spot for water leaks and rot.
Common Mistakes To Avoid
Even experienced DIYers can make errors when framing a garage door. Here are the most common mistakes and how to avoid them:
- Incorrect rough opening size: Triple-check your measurements before cutting. Too small, and your door won’t fit. Too large, and you’ll have gaps.
- Using undersized headers: Always follow your local code for header size. Using too small a header can cause sagging or collapse.
- Frame not square or level: If the frame is out of square, the door will bind and may not seal properly. Use a framing square and level often.
- Skipping pressure-treated lumber for sills: Regular lumber will rot when in contact with concrete. Use pressure-treated for all sill plates.
- Not securing framing properly: Use enough nails or screws. In high-wind areas, add metal brackets or hurricane ties.
Hidden insight: Some people forget to check for electrical wires or plumbing in the wall before cutting. Always check before you saw.
Adjusting For Different Types Of Garage Doors
Not all garage doors are the same. The way you frame can change depending on the type of door you want.
Sectional Overhead Doors
- Most common in the US.
- Standard framing as described above works for most.
- Need enough space above the opening for the track (usually 12–18 inches).
Roll-up Doors
- Used in commercial or small garages.
- Require less headroom, but the frame must be very square for the door to seal.
- Check manufacturer instructions for exact rough opening.
Carriage-style Or Swing-out Doors
- May require a center post if using two smaller doors.
- Frame must be very strong at the hinge points.
- Allow space for door swing outside.
Custom Or Oversize Doors
- May need engineered headers (LVL or steel).
- Check with a building professional before framing.

Insulation And Weatherproofing
The garage door frame is a weak spot for heat loss and water entry. Here’s how to make it better:
- Use foam backer rod and caulk around the door trim.
- Add weatherstripping to the door stops.
- Insulate any wall cavities around the door with fiberglass or spray foam.
- For extreme climates, consider insulated headers and jambs.
Extra tip: If your garage will be heated or cooled, spend time sealing and insulating the frame. This can save hundreds of dollars a year in energy costs.
Building Codes And Permits
In most areas, you must follow local building codes when framing a garage door. This may include:
- Minimum lumber sizes
- Header requirements
- Fastener types and spacing
- Wind and earthquake resistance
Always check with your city or county building department before starting. You may need a permit, inspection, or special materials. Failing to get a permit can cause problems if you sell your house or have an insurance claim.
For more details, refer to the International Code Council.
Example: Framing A 16-foot Double Garage Door
Let’s walk through a real-world example for a 16-foot wide double garage door.
- Choose door size: 16 feet wide x 7 feet high.
- Calculate rough opening: 192 inches wide x 84 inches high.
- Header size: Double 2x12s with 1/2-inch plywood (check local code).
- Cut and place king studs: Two full-length 2x6s on each side.
- Cut and place trimmer studs: Two 2x6s from floor to header.
- Assemble header and lift into place.
- Secure with nails and check level.
- Add cripple studs above header if wall is taller than 7 feet plus header.
- Replace sheathing, add trim, and seal.
Note: For a 16-foot span, the header is heavy. You may need two people or temporary supports to lift it safely.
Cost Breakdown: Diy Vs Hiring A Pro
Framing a garage door yourself can save money, but it takes time and skill. Here’s a basic cost comparison:
| Item | DIY Cost | Professional Cost |
|---|---|---|
| Lumber & fasteners | $100–$300 | Included in price |
| Tools (if not owned) | $100–$400 | Included in price |
| Labor | Free (your time) | $500–$1200 |
| Total | $200–$700 | $700–$1500 |
Practical advice: If you’re not comfortable with heavy construction, it’s smart to hire a pro for the framing. Mistakes can be expensive to fix.

Maintenance And Longevity Tips
Once your garage door frame is built, keeping it in good shape is key to long-term performance.
- Inspect for water leaks after heavy rain, especially at the bottom corners.
- Check for rot or insect damage yearly, especially if you live in a wet climate.
- Re-caulk trim every 2–3 years to keep out water and drafts.
- Tighten any loose nails or screws that may appear as the wood settles.
- Paint or stain exterior trim to protect against UV and moisture.
Non-obvious tip: If you see cracks in the drywall above the garage door, it may mean your header is sagging or the frame is shifting. Investigate quickly to prevent bigger problems.
When To Call A Professional
DIY framing is rewarding, but some situations call for expert help:
- The garage is attached to a multi-story house.
- The door opening is wider than 16 feet.
- Your area requires engineered headers or steel beams.
- You find structural damage, rot, or termites.
- The wall is load-bearing and supports part of the house.
A pro can ensure your frame is safe, code-compliant, and built to last.
Frequently Asked Questions
How Much Bigger Should The Rough Opening Be Than The Garage Door?
The rough opening should be the same size as the garage door—width and height. This allows the door to fit properly and seal well. The frame (king studs, trimmers, and header) is built around this opening. Do not make the opening larger or smaller than the door size.
What Size Header Do I Need For A 16-foot Garage Door?
For a 16-foot garage door, most building codes require at least a double 2×12 header with 1/2-inch plywood between. However, always check your local code, as some areas may require engineered lumber or steel for extra strength, especially in snow or high-wind regions.
Can I Use Regular 2×4 Lumber For The Whole Frame?
You can use 2x4s for framing single garage doors or non-load-bearing walls. For double doors or load-bearing walls, 2x6s are usually required for strength. The sill plate (bottom piece) should be pressure-treated if it touches concrete.
Do I Need A Building Permit To Frame A Garage Door?
In most cities and counties, yes, a permit is required. This ensures your work meets safety codes. Call your local building department before starting. Skipping the permit can cause trouble if you sell the house or need to file an insurance claim.
What If My Garage Floor Is Not Level?
If the garage floor slopes or is uneven, you can use shims under the sill plate to level it. Make sure the sides of the frame are perfectly vertical, even if the floor isn’t. Seal any gaps under the sill with caulk or foam to keep out water and air.
Framing a garage door is a practical project that, when done right, adds value, safety, and style to your home. By understanding the basics, using the right materials, and following each step carefully, you can achieve professional results—even as a DIYer.
Remember, preparation and accuracy are more important than speed. If you ever feel unsure, consult a building professional or your local code office for guidance. With patience and attention to detail, you’ll have a garage door frame that serves you well for decades.


