
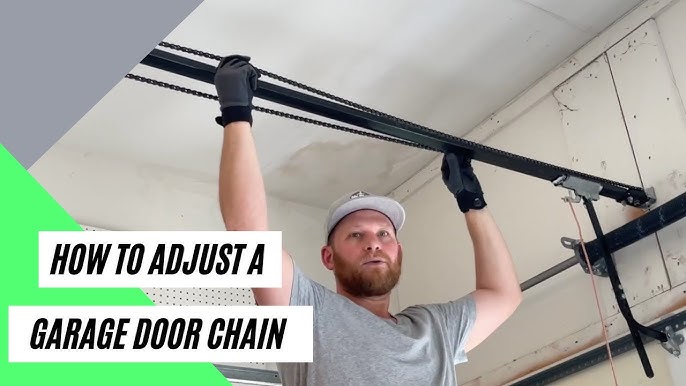
Adjusting the chain on a garage door opener might seem like a small task, but it makes a big difference in how your door works. A loose or tight chain can cause noise, slow operation, or even damage your garage door system.
Many homeowners ignore this maintenance until something breaks. But with the right steps, you can adjust your garage door opener chain safely and make your door work smoothly again.
Garage doors are heavy and move many times every day. Over time, the chain that lifts and lowers the door can stretch or become loose. If you hear rattling, notice jerky movement, or see the chain sagging, it’s a sign you need to adjust it.
Regular chain maintenance can prevent bigger problems and save you money on repairs.
This guide gives you all the details you need to adjust a garage door opener chain. You’ll learn how the chain works, what tools you need, safety tips, and a full, step-by-step process. You’ll also find solutions to common problems and answers to questions most people have.
Even if you’ve never done DIY repairs before, you can follow these instructions and feel confident about the job.
Understanding Garage Door Opener Chains
Before you start adjusting, it helps to understand how a garage door opener chain works. Most residential garage door openers use a chain-drive system. This system moves a trolley along a rail, which pulls or pushes the door open and closed. The chain is strong and reliable, but it does need care.
There are two main types of garage door opener chains:
- Full chain drive – The entire length is a metal chain, similar to a bicycle chain.
- Chain and cable drive – Part of the length is chain, and the rest is a steel cable.
Both types need the right tension. If the chain is too loose, it may slap against the rail or skip, making noise and causing uneven movement. If it’s too tight, it puts stress on the motor and gears, which can cause them to wear out faster.
Most chain adjustments are needed every 1–2 years, but heavy use or extreme temperatures can require more frequent checks.
Why Chain Adjustment Matters
Many homeowners don’t realize how important chain tension is. Here’s why you should check and adjust your chain regularly:
- Noise reduction – A loose chain rattles and can be loud enough to disturb your home.
- Longer opener life – Proper chain tension lowers strain on the motor and gears, reducing wear.
- Smoother door movement – The door opens and closes evenly, with less jerking or stalling.
- Safety – A chain that slips or skips can cause the door to jam or stop unexpectedly.
Ignoring chain tension can lead to expensive repairs. For example, a broken sprocket or a burned-out motor can cost $100–$300 to fix, while a chain adjustment is simple and nearly free if you do it yourself.
Tools And Materials You’ll Need
Before starting, gather these common tools:
- Wrench set (usually 7/16″ or 10mm)
- Screwdriver (flat or Phillips, depending on your model)
- Step ladder (tall enough to reach the opener safely)
- Protective gloves (to avoid pinching or grease)
- Work light (optional, for dark garages)
- Owner’s manual (helpful for model-specific instructions)
You won’t need expensive tools. Most people have these at home. If you’re unsure about your opener’s size, check the manual or look for the brand and model number on the unit.
Safety First: Precautions Before Adjusting
Working on your garage door opener is usually safe, but it’s best to take precautions:
- Unplug the opener – Always disconnect power before working to avoid accidental activation.
- Do not operate the door manually while adjusting – This prevents sudden chain movement.
- Wear gloves – Chains may have sharp edges or grease.
- Use a steady ladder – Avoid reaching or leaning to prevent falls.
- Read your opener’s manual – Some models have unique safety steps.
If you’re unsure about any step, stop and ask a professional for help. Never put your hands near the door springs or cables, as these are under high tension and can cause serious injury.
How To Identify Chain Tension Problems
You don’t need special tools to spot chain tension problems. Here are the most common signs:
- Sagging chain – The chain hangs down from the rail, usually ½ inch or more below the rail at the midpoint.
- Chain slaps or rattles – You hear loud noises when the opener runs.
- Jerky door movement – The door moves unevenly or stops and starts.
- Chain jumps off sprocket – In severe cases, the chain may fall off or skip teeth.
You can also do a simple test. With the opener unplugged, gently press upward on the chain at its lowest point. For most systems, the chain should have about ¼ inch to ½ inch of slack at the midpoint. More than this means it’s too loose; less means it’s too tight.
Step-by-step Guide: Adjusting The Garage Door Opener Chain
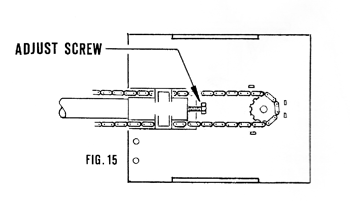
Follow these steps for a safe and accurate adjustment. Most chain-drive openers have a tension adjustment bolt and nut near the trolley assembly.
1. Unplug The Opener
Start by disconnecting the power. Unplug the opener from the wall outlet. If your opener is hardwired, turn off the breaker.
2. Set Up Your Ladder And Tools
Place your ladder under the opener. Make sure it’s steady. Gather your wrenches and other tools close by.
3. Locate The Chain Tension Mechanism
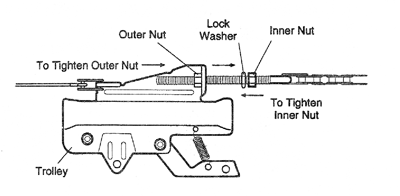
Find the chain tension adjustment. Most openers have this near the trolley, which is the part that moves along the rail. Look for a threaded rod with nuts on both sides of a bracket.
Example:
In a LiftMaster opener, the adjustment is usually at the trolley assembly. In a Genie opener, it may be at the chain’s end near the motor.
4. Check Chain Slack
Gently press upward on the chain at the midpoint of the rail. Measure the sag. For most brands, aim for ¼–½ inch of slack. If it’s more, you need to tighten. If less, loosen.
5. Loosen The Lock Nut
On the tension rod, you’ll see two nuts: a lock nut and an adjustment nut. The lock nut holds the adjustment in place.
- Use your wrench to loosen the lock nut (counterclockwise).
- Do not remove it completely; just loosen enough to allow the adjustment nut to turn.
6. Adjust The Chain Tension
- To tighten the chain (reduce slack): Turn the adjustment nut clockwise.
- To loosen the chain (increase slack): Turn the adjustment nut counterclockwise.
Make small turns (1/2 turn at a time) and check the slack after each adjustment.
Caution:
Do not overtighten. The chain should never be so tight that it’s pulling the rail upward or straining the motor.
7. Tighten The Lock Nut
Once you reach the correct tension, hold the adjustment nut in place and tighten the lock nut against it. This keeps the adjustment from moving.
8. Recheck Chain Slack
Double-check the chain’s slack at the midpoint. It should have just enough slack to move slightly but not sag visibly.
9. Plug In And Test The Opener
Restore power to the opener. Use the remote or wall button to open and close the door a few times. Watch the chain and listen for noise.
- If the chain runs smoothly and quietly, you’re done.
- If you still hear rattling or see sagging, repeat the steps for fine adjustment.
10. Lubricate The Chain (optional)
Some chains benefit from lubrication after adjustment. Use a garage door chain lubricant (not WD-40) and apply lightly to the chain. Wipe off excess with a rag.
11. Clean Up And Inspect
Put away your tools and clean up any drips. Check the opener and door for anything unusual.
Troubleshooting Common Problems
Sometimes, adjustment doesn’t solve every issue. Here are some problems you might run into and how to handle them:
Chain Won’t Stay Tight
If the chain keeps loosening, check for:
- Worn sprocket – The gear teeth may be worn down, causing the chain to slip.
- Stripped adjustment rod – The threads may be damaged and not holding.
- Stretched chain – Old chains stretch over time and may need replacement.
Replace worn parts as needed. For most DIYers, replacing a chain is possible, but if you’re unsure, call a professional.
Excessive Noise After Adjustment
If the opener is still noisy:
- Make sure the chain isn’t too tight.
- Lubricate the chain and trolley.
- Check for loose mounting bolts on the opener or rail.
Some noise is normal, but loud rattling or banging means something is wrong.
Chain Jumps Off Sprocket
This is a serious issue. Causes include:
- Chain too loose
- Misaligned rail or trolley
- Broken sprocket or gear
Turn off the opener and realign the chain. If it happens again, have the system inspected.
Door Still Moves Jerky
Even with the correct chain tension, you may see jerky movement. Possible reasons:
- Worn rollers or hinges
- Bent rail
- Imbalanced door springs
Chain adjustment alone will not fix these problems. Check the full door system.
Comparison: Chain Drive Vs. Belt Drive Vs. Screw Drive
Choosing the right opener type is important. Here’s how the three common types compare:
| Feature | Chain Drive | Belt Drive | Screw Drive |
|---|---|---|---|
| Noise Level | Moderate to Loud | Very Quiet | Moderate |
| Durability | High | High | Medium |
| Maintenance | Regular Chain Adjustment | Minimal | Lubrication |
| Cost | Low | Higher | Medium |
| Best For | Heavy Doors, Budget | Quiet Homes | Warm Climates |
Chain drive systems are the most common and affordable, but they need regular adjustment. Belt drives are quieter but cost more. Screw drives need less adjustment but may wear faster in cold climates.
Maintenance Tips To Keep Your Chain In Top Shape
Adjusting the chain is just one part of garage door maintenance. Here are more tips:
- Inspect chain tension every 6 months – Look for sagging, noise, or uneven movement.
- Lubricate chain and trolley annually – Use a silicone-based lubricant for smooth movement.
- Check mounting brackets – Tighten any loose bolts on the opener or rail.
- Clean the rail and chain – Dust and dirt can build up and cause wear.
- Test the door balance – Disconnect the opener and lift the door manually; it should stay halfway up. If not, springs may need adjustment.
- Listen for changes – Sudden new noises often mean something needs attention.
Consistent maintenance can extend your opener’s life by 5–10 years.
Comparing Diy Vs. Professional Chain Adjustment
You might wonder if you should adjust the chain yourself or hire a professional. Here’s a side-by-side look:
| Factor | DIY Adjustment | Professional Service |
|---|---|---|
| Cost | Free (if you have tools) | $50–$120 per visit |
| Time Required | 30–60 minutes | Depends on schedule |
| Skill Needed | Basic DIY skills | Expert knowledge |
| Risk | Low if instructions followed | Very low |
| Warranty Impact | May void some warranties | Usually maintains warranty |
If you feel comfortable with tools and follow safety steps, DIY is a good option. For complicated problems or if your opener is under warranty, a professional may be the better choice.
What If Chain Adjustment Doesn’t Fix The Problem?
Sometimes, even after a perfect adjustment, your garage door opener may still have issues. Here’s what to check next:
- Rollers and hinges – Worn parts can make the door hard to move.
- Door balance – If the springs are weak or broken, the opener must work harder.
- Opener settings – The force or travel limits may need adjustment.
- Electrical problems – Wires or sensors may be faulty.
If you’ve checked the chain and still have problems, consult your owner’s manual or call a garage door technician.
When To Replace The Chain
Chains last many years, but they do wear out. Replace the chain if:
- It is stretched out and can’t hold tension
- It has broken or missing links
- It makes loud grinding noises even after lubrication
Replacement chains cost $15–$40, depending on the model. Installation is similar to adjustment but requires removing the old chain and threading the new one. If you’re not confident, hire a professional.
Real-world Example: Adjusting A Liftmaster Chain
Let’s walk through a real example with a popular brand. The LiftMaster chain drive opener is common in US homes.
- The tension adjustment is at the trolley, about halfway along the rail.
- The recommended slack is ¼ inch at the midpoint.
- Adjustment is made with a 7/16″ wrench.
- The lock nut and adjustment nut are easy to reach.
Process:
Unplug the opener, loosen the lock nut, turn the adjustment nut clockwise to remove slack, retighten the lock nut, and plug in to test. On average, homeowners spend about 30 minutes on this task.
Tip:
If your chain is very loose, check the manual for the specific slack measurement. Over-tightening can void your warranty.
Key Mistakes To Avoid
Many first-timers make these errors:
- Over-tightening the chain – This strains the motor and gears, causing early failure.
- Forgetting to unplug the opener – Risk of electric shock or accidental activation.
- Skipping lubrication – Dry chains wear out faster and make more noise.
- Ignoring worn parts – Adjustment won’t fix a worn sprocket or bent rail.
- Not testing door balance – If springs are weak, the opener struggles even with a perfect chain.
Avoid these mistakes for a smooth, long-lasting garage door system.
How Often Should You Adjust The Chain?
Most chains only need adjustment every 1–2 years. However, inspect your system every six months. If you see sagging or hear new noises, check and adjust sooner.
Heavy use, extreme temperatures, and old openers may need more frequent checks. For example, homes with two or more cars and daily use may need annual adjustments.
What To Do If Chain Adjustment Fails
If you’ve tried all steps and the door still has issues:
- Check the owner’s manual – Some brands have unique steps.
- Call a professional – For complex problems or if you’re not comfortable.
- Consider upgrading – If your system is over 15 years old, a new opener may be more reliable and quieter.
Chain adjustment is just one part of garage door maintenance. Fixing problems early can save you money and stress.
Resources For More Information
If you need more technical details, check out the Wikipedia garage door opener entry for diagrams and system types.
Frequently Asked Questions
What Happens If My Garage Door Opener Chain Is Too Tight?
A chain that is too tight puts stress on the motor and gears. This can lead to early failure, increased noise, and even a bent rail. Always leave a little slack as recommended by your opener’s manual.
How Do I Know If My Chain Is Too Loose?
If the chain sags more than ½ inch at the midpoint or makes a slapping noise during operation, it’s too loose. This can cause the chain to jump off the sprocket or the door to move unevenly.
Can I Use Wd-40 To Lubricate My Garage Door Chain?
No, it’s better to use a silicone-based lubricant or a product made for garage door chains. WD-40 is a cleaner, not a long-term lubricant, and can attract dust.
Is Adjusting The Chain Dangerous?
Adjusting the chain is safe if you unplug the opener and follow instructions. Do not touch springs or cables, as they are under high tension and can be dangerous.
How Often Should I Check My Garage Door Opener Chain?
Check the chain every six months for sagging, noise, or movement problems. Adjust as needed, usually every 1–2 years depending on use.
Adjusting your garage door opener chain is a simple but important task. With the right tools and steps, you can keep your door running smoothly, reduce noise, and avoid expensive repairs. If you maintain your system regularly, your garage door opener can last many years without trouble. Remember, safety first—when in doubt, call a professional for help.