Now Reading: How to Disassemble a Garage Door: Step-by-Step Guide
- 01
How to Disassemble a Garage Door: Step-by-Step Guide
Disassembling a garage door is not a simple weekend project. It requires planning, the right tools, and a clear understanding of how garage doors work. Many people underestimate the complexity, leading to damaged parts or even injury. If you’re considering removing your garage door—maybe to replace it, repair the frame, or remodel your garage—doing it safely and efficiently is crucial.
This guide walks you through every step to disassemble a garage door, from preparation to final cleanup. You’ll learn what tools you need, the best order to remove parts, how to handle springs safely, and common mistakes to avoid. With over 2700 words of practical advice, this article is designed for homeowners, DIY enthusiasts, or anyone wanting to understand the process deeply. Read on to save time, protect yourself, and avoid costly errors.
Understanding Garage Door Types
Before you begin, it’s essential to know what type of garage door you have. The steps and risks can vary depending on the design.
Main Types Of Garage Doors
- Sectional doors: Made of several horizontal panels connected with hinges. Most common in modern homes.
- One-piece (tilt-up) doors: Single solid piece that swings out and up. More common in older homes.
- Roll-up doors: Used in commercial settings; roll around a drum above the opening.
This guide focuses mainly on sectional doors, but many steps apply to others. If your door is unusually heavy, old, or custom-built, consider consulting a professional.
Key Components
Understanding each part helps you disassemble the garage door safely:
- Springs (torsion or extension)
- Tracks
- Rollers
- Cables
- Hinges
- Panels or door sections
- Opener mechanism (if installed)
Each of these plays a role in balancing, moving, or securing the door. Mishandling any can cause injury or damage.
Safety Precautions
Garage doors are under high tension—especially the springs. Proper safety is non-negotiable.
Safety Gear
You’ll need:
- Safety glasses
- Work gloves
- Sturdy shoes
- Long-sleeved shirt and pants
Never wear loose clothing or jewelry. Torsion springs can snap with force strong enough to cause serious injury.
Environmental Safety
- Clear the area: Remove cars, bikes, and tools.
- Inform family or housemates: No one should enter the garage while you work.
- Good lighting: Shadows can hide danger.
Two-person Rule
Certain tasks (like removing panels) are much safer with help. Enlist a reliable partner, especially for lifting heavy parts.
Tools And Materials Checklist
Having the right tools ready will save time and frustration. Not every toolbox contains what you need for garage doors.
| Essential Tool | Purpose | Notes |
|---|---|---|
| Socket set | Removing bolts and nuts | Deep sockets for hard-to-reach places |
| Winding bars | Releasing torsion springs | Never use screwdrivers instead |
| Adjustable wrench | Loosening/tightening fasteners | |
| Pliers (locking and needle-nose) | Gripping cables, pins, and brackets | |
| Drill/driver | Removing screws | With various bits |
| Stepladder | Accessing overhead parts | Stable and rated for your weight |
| Flathead and Phillips screwdrivers | General removal tasks | |
| Clamps or locking pliers | Securing the door in place |
Tip: If you don’t own winding bars, buy or rent them. Do not improvise with other tools.
Preparing For Disassembly
Preparation is half the battle. A rushed start often leads to missing parts or dangerous mistakes.
Disconnect The Power
If your garage door has an automatic opener:
- Unplug the opener from the power outlet.
- Pull the emergency release cord (usually a red handle) to disconnect the door from the motor.
This step prevents accidental activation while you work.
Open The Door
Raise the door to the fully open position. This makes panels easier to remove and relieves tension in extension springs. Secure the door with locking pliers or clamps below the bottom roller on each side, so it cannot close unexpectedly.
Inspect And Photograph
Take clear photos of each part and connection. These will help you reassemble or identify issues later. Note any damage before starting.
Label Parts
As you remove components, label them with tape and marker. Small parts like hinges and bolts can look identical but fit only in specific places.
Non-obvious insight: Many people forget to measure the gap between the tracks and the door or the position of brackets. These details are vital when putting things back together.
Dealing With Garage Door Springs
Springs are the most dangerous part of any garage door system. Improper handling can lead to severe injury.
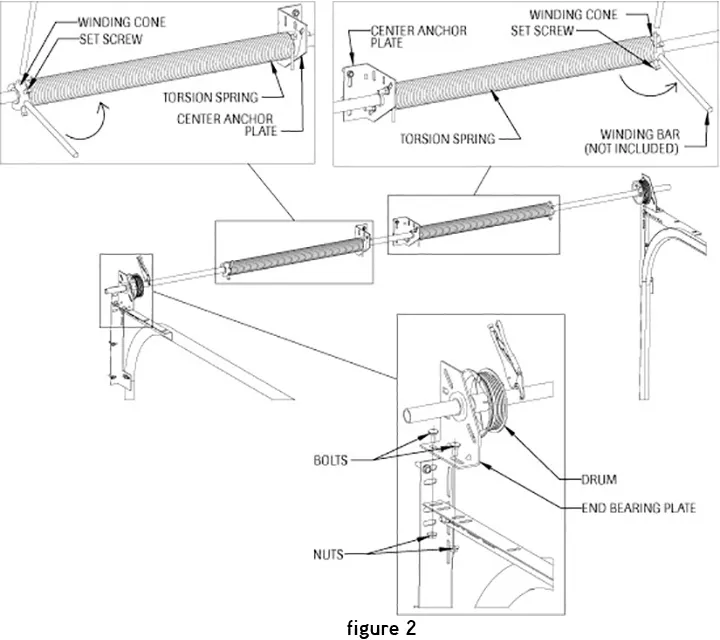
Types Of Springs
- Torsion springs: Mounted above the door, parallel to the top panel.
- Extension springs: Run along the tracks on either side.
Each type requires a different release method.
Releasing Tension: Torsion Springs
If you have torsion springs, the tension must be released before further disassembly.
- Insert a winding bar into one of the holes on the winding cone.
- Hold the bar firmly and loosen the set screws on the cone with a wrench.
- Carefully allow the spring to unwind, swapping winding bars as the tension releases.
- Repeat for the second spring if present.
Never use a screwdriver or makeshift bar—these can slip and cause injuries.
Releasing Tension: Extension Springs
- Open the door fully (using clamps to keep it open).
- Remove the safety cables.
- Disconnect the springs from the rear track hanger.
The door’s weight is now supported by the open position, but always work with caution.
Double-check Tension
After releasing, test that the springs no longer resist movement. If unsure, consult a professional.
Non-obvious insight: Even after “unwinding,” some residual tension can remain. Approach all spring parts as if they are still under load.
Removing The Opener Mechanism
Most modern garages have an opener attached to the door. Removing it first prevents accidental movement and damage.
- Disconnect the arm attached to the door (usually a pin or bolt).
- Remove mounting brackets from the ceiling or wall using a socket set or drill.
- Lower the opener assembly carefully to the ground.
Keep all mounting hardware in a labeled bag for later.
Tip: Mark the bracket positions on the ceiling or wall before removal. This makes reinstallation much easier.
Taking Down The Tracks And Hardware
Now the springs and opener are out of the way, it’s time to remove the tracks and hardware.
Side Tracks
- Unscrew the fasteners holding the vertical tracks to the wall.
- Support the track as you remove the last screw to prevent it from falling.
- Detach the horizontal tracks from the ceiling brackets.
Rollers And Hinges
- Remove the rollers from the track by sliding them out with the door partially lifted (if possible).
- Unscrew hinges from each panel as you go. Keep them organized.
Cables And Brackets
- Detach the lifting cables from the bottom bracket.
- Remove the cable drums if present on torsion systems.
Non-obvious insight: Not all bolts are the same size. Mixing them up will make reassembly frustrating. Keep hardware grouped by location.
Disassembling Door Panels
Sectional doors consist of several panels. Each must be removed in order, usually from top to bottom.
- With the door open and secured, unscrew the hinges connecting the top panel to the next one down.
- With help, lift the panel out of the tracks and set it aside.
- Repeat for each section, working downward.
Safety tip: The bottom panel is often the heaviest due to added reinforcement and brackets. Plan for extra support here.
Removing A One-piece Door
If your door is a single piece:
- Disconnect the springs and opener as above.
- Remove pivot pins or brackets holding the door to the frame.
- With a helper, swing the door out and lower it to the ground.

Removing The Frame (if Needed)
Sometimes, you need to remove the door frame to replace rotted wood or resize the opening.
- Remove any weatherstripping or trim with a pry bar.
- Unscrew or pry off the jambs (sides) and header (top).
- Check for nails or screws hidden under paint or caulk.
Tip: Take pictures of any wiring, sensors, or unusual fasteners for future reference.
Clean-up And Inspection
Once the door and hardware are removed, inspect the opening:
- Look for rot, rust, or cracks in the frame.
- Clean up all debris, screws, and tools.
- Store reusable parts in labeled containers.
Now is the ideal time to repair or upgrade insulation, weatherstripping, or the frame before installing a new door.
Common Mistakes To Avoid
Many DIYers make errors that cost time and money—or worse, cause injury. Here are the most common pitfalls:
- Skipping spring tension release: This is the most dangerous mistake.
- Not labeling parts: Leads to confusion when reassembling.
- Improper lifting: Panels can be heavier than expected. Always lift with your legs, not your back.
- Mixing hardware: Screws and bolts often look similar but fit only in certain places.
- Forgetting opener sensors: Some newer systems have safety sensors wired to the frame. Remove these carefully.
- Damaging the tracks: Bent tracks are hard to fix; handle gently.
- Ignoring rust or damage: If you spot rust, address it before reinstalling any door.
Non-obvious insight: Many people forget to check for overhead wiring, pipes, or other obstructions when removing tracks and opener brackets.
When To Call A Professional
Some situations are too risky for DIY. Seek help if:
- Your springs are very old, rusted, or broken.
- The door is exceptionally heavy or unusually large.
- You’re unsure about the spring type or release process.
- You lack the proper tools (especially winding bars).
Professional installers have the training and equipment to manage these hazards safely. For further reading, see this Wikipedia entry on garage doors.
Disposal And Recycling
Don’t just dump your old garage door. Many parts can be recycled or reused.
Metal Panels And Tracks
- Most scrap yards accept steel or aluminum panels and tracks.
- Remove all non-metal parts (weatherstripping, insulation) first.
Springs And Hardware
- Springs are usually steel and recyclable, but handle with care.
- Bolts, hinges, and brackets can be reused in other projects.
Wood Panels
- Dispose of treated wood according to local rules.
- Untreated wood can sometimes be composted or used for firewood.
Tip: Check with your city’s recycling center for specific guidelines.
Cost And Time Comparison
How long will this take? What might you pay if you hire someone? Here’s a practical comparison:
| Method | Estimated Time | Cost (USD) | Skill Level |
|---|---|---|---|
| DIY Disassembly | 3–5 hours | $0–$100 (tools/parts) | Intermediate–Advanced |
| Professional Removal | 1–2 hours | $150–$300 (labor only) | N/A |
If you already own the tools, DIY may save money. But professionals are faster and safer, especially for complex doors.

Step-by-step Timeline Example
To help you visualize the process, here’s a sample timeline for a standard sectional door:
| Step | Action | Estimated Time |
|---|---|---|
| 1 | Preparation and safety setup | 30 minutes |
| 2 | Spring tension release | 30–45 minutes |
| 3 | Remove opener and tracks | 45 minutes |
| 4 | Remove panels | 1–1.5 hours |
| 5 | Clean up and inspection | 30 minutes |
Plan for breaks, especially if working in hot or cold conditions.
Advanced Tips And Pro Insights
If you want to go beyond basic disassembly, these advanced tips will help:
- Photograph every step: Not just before and after, but during. This helps with hidden hardware or wiring.
- Store springs in a secured container: Even “spent” springs can snap unexpectedly if bent or dropped.
- Check for asbestos: If your home is older than 1980, door insulation or panels could contain asbestos. Handle with extreme caution.
- Lubricate moving parts before removal: Eases stubborn bolts and makes reinstallation smoother.
- Use painter’s tape for labeling: Easier to remove and doesn’t leave residue.
- Keep a magnet nearby: Collects dropped screws or hardware quickly.
Frequently Asked Questions
How Dangerous Is It To Disassemble A Garage Door By Myself?
Working with garage door springs can be very dangerous. Torsion springs, in particular, store enough energy to cause serious injury or even death if released improperly. Always wear safety gear, use the correct tools, and consider hiring a professional if you are unsure.
Can I Remove A Garage Door Alone, Or Do I Need Help?
While some steps can be done alone, it’s much safer and easier with at least one helper. Panels are heavy and awkward to handle by yourself. For large or insulated doors, always have a partner.
What Should I Do With The Old Garage Door Parts?
Most metal parts can be recycled at a local scrap yard. Springs require careful handling. Wood panels may need special disposal if treated. Check local recycling guidelines for details.
How Do I Know If My Springs Are Torsion Or Extension Type?
Torsion springs are mounted above the door opening, parallel to the top panel. Extension springs run along the tracks on the sides. If unsure, compare your setup to images in online guides or ask a garage door technician.
What If I Accidentally Damage The Garage Door Frame?
If you damage the frame, repair it before installing a new door. Use treated lumber for any replacements and ensure everything is level. Small cracks can be filled with wood filler, but large damage may require professional help.
Disassembling a garage door is a big project, but with the right preparation and safety steps, it’s manageable for an experienced DIYer. Take your time, follow each step carefully, and don’t hesitate to call for help if you encounter unexpected problems.
Your safety and the condition of your garage are worth the extra effort.


