Now Reading: How to Reset My Garage Door Opener: Easy Step-by-Step Guide
- 01
How to Reset My Garage Door Opener: Easy Step-by-Step Guide
Resetting your garage door opener may seem complicated, but it’s a skill every homeowner should know. Imagine your remote stops working, or you need to erase old codes for security. You might have moved into a new house, or perhaps you’re trying to connect a new remote or keypad.
In these moments, knowing how to reset your garage door opener saves you time, money, and stress.
This guide explains everything you need. Whether you have a modern opener with a “learn” button or an older model, you’ll learn what to do step by step. You’ll also discover why resetting is sometimes necessary, what to watch out for, and how to avoid common mistakes.
With simple words, practical tips, and real examples, you’ll soon feel confident handling your own garage door system.
Why Resetting Your Garage Door Opener Matters
People often underestimate the importance of a garage door opener reset. But there are several situations where it’s not just helpful—it’s essential:
- Security: If someone else has your old remote or code (like a previous homeowner or renter), resetting blocks their access.
- Lost or Stolen Remotes: If you lose a remote or suspect it’s been stolen, resetting ensures only new remotes work.
- Programming New Devices: When you buy a new remote or wireless keypad, you must often reset or reprogram the opener.
- System Glitches: If your opener acts strange—doors opening or closing on their own, or remotes not working—a reset can fix minor electronic issues.
It’s worth noting that modern garage door openers store remote and keypad codes in their memory. Resetting erases this memory, making your system safer and ready for new programming.
Another key reason is peace of mind. If you ever feel uncertain about who can access your garage, a quick reset returns control to you. For example, after lending a remote to a neighbor or allowing house-sitters access while you were away, a reset ensures only your current devices will work.
Types Of Garage Door Openers
Not all openers are the same. Knowing your type helps you follow the right steps.
| Opener Type | Common Brands | Main Features |
|---|---|---|
| Chain Drive | Chamberlain, LiftMaster | Durable, affordable, a bit noisy |
| Belt Drive | Genie, Chamberlain | Quieter, smooth operation, more expensive |
| Screw Drive | Genie, Craftsman | Low maintenance, medium noise |
| Direct Drive | Sommer | Very quiet, high-end technology |
Most modern openers, regardless of type, use a similar process for resetting. However, always check your user manual for brand-specific instructions.
Older openers, especially those made before 1993, might not have safety sensors or the same memory functions. If you’re not sure which type you have, look at the rail system and motor unit. Chain drives have a visible metal chain, belt drives use a rubber or fiberglass belt, and screw drives have a long threaded rod.
Direct drives are usually compact and much quieter. Understanding these differences helps you locate the reset button and troubleshoot issues more efficiently.
Signs Your Garage Door Opener Needs A Reset
It’s not always obvious when you should reset your system. Here are common signs:
- Remotes stop working after battery changes.
- Keypad or wall control doesn’t respond.
- The door opens or closes randomly.
- New remotes or keypads won’t program correctly.
- You notice security concerns (e.g., someone else may have a remote).
If you see these problems, a reset is often the fastest solution.
Sometimes, the need for a reset is more subtle. For example, if your door sometimes only opens halfway, then stops, or if you hear the opener motor running but nothing happens, these can be signs of a minor programming or electronic issue.
Before calling for help or replacing parts, a reset can quickly rule out memory glitches.
Safety Precautions Before You Start
Working with garage door openers is usually safe, but don’t forget these steps:
- Unplug the opener before touching wires or internal parts.
- Keep children and pets away from the area.
- Use a sturdy ladder if you need to reach the opener on the ceiling.
- Wear safety glasses to protect your eyes from dust or debris.
Never rush. Mistakes can lead to injury or damage to your system.
If your garage door springs or cables look worn, do not try to adjust or reset the opener until these are checked by a professional. The tension in these parts can be dangerous. Also, if you notice water around the opener or wiring, wait until everything is dry to avoid electric shocks.
Tools And Materials You May Need
You don’t need many tools, but having these ready helps:
- Flathead screwdriver (for some covers or battery compartments)
- Step ladder
- New remote or keypad (if programming a replacement)
- User manual (for reference, especially with older models)
- Flashlight (if your garage is dim)
A small notebook or your phone’s camera can also be helpful. You can use these to record wiring positions or steps during the process, which is useful if you get interrupted or need to backtrack.
How To Identify Your Garage Door Opener Model
Finding your opener’s model number makes everything easier. Here’s how:
- Look for a label on the main unit (often on the side or back).
- Brand name is usually visible on the cover.
- The model number might also appear in the user manual or on the remote itself.
Knowing your brand (like Chamberlain, LiftMaster, Genie, or Craftsman) ensures you follow the right process.
In some cases, a QR code may be present on the label. Scanning this with your smartphone can take you to the manufacturer’s support page for that model, making troubleshooting and finding instructions simpler.
Step-by-step: How To Reset A Garage Door Opener
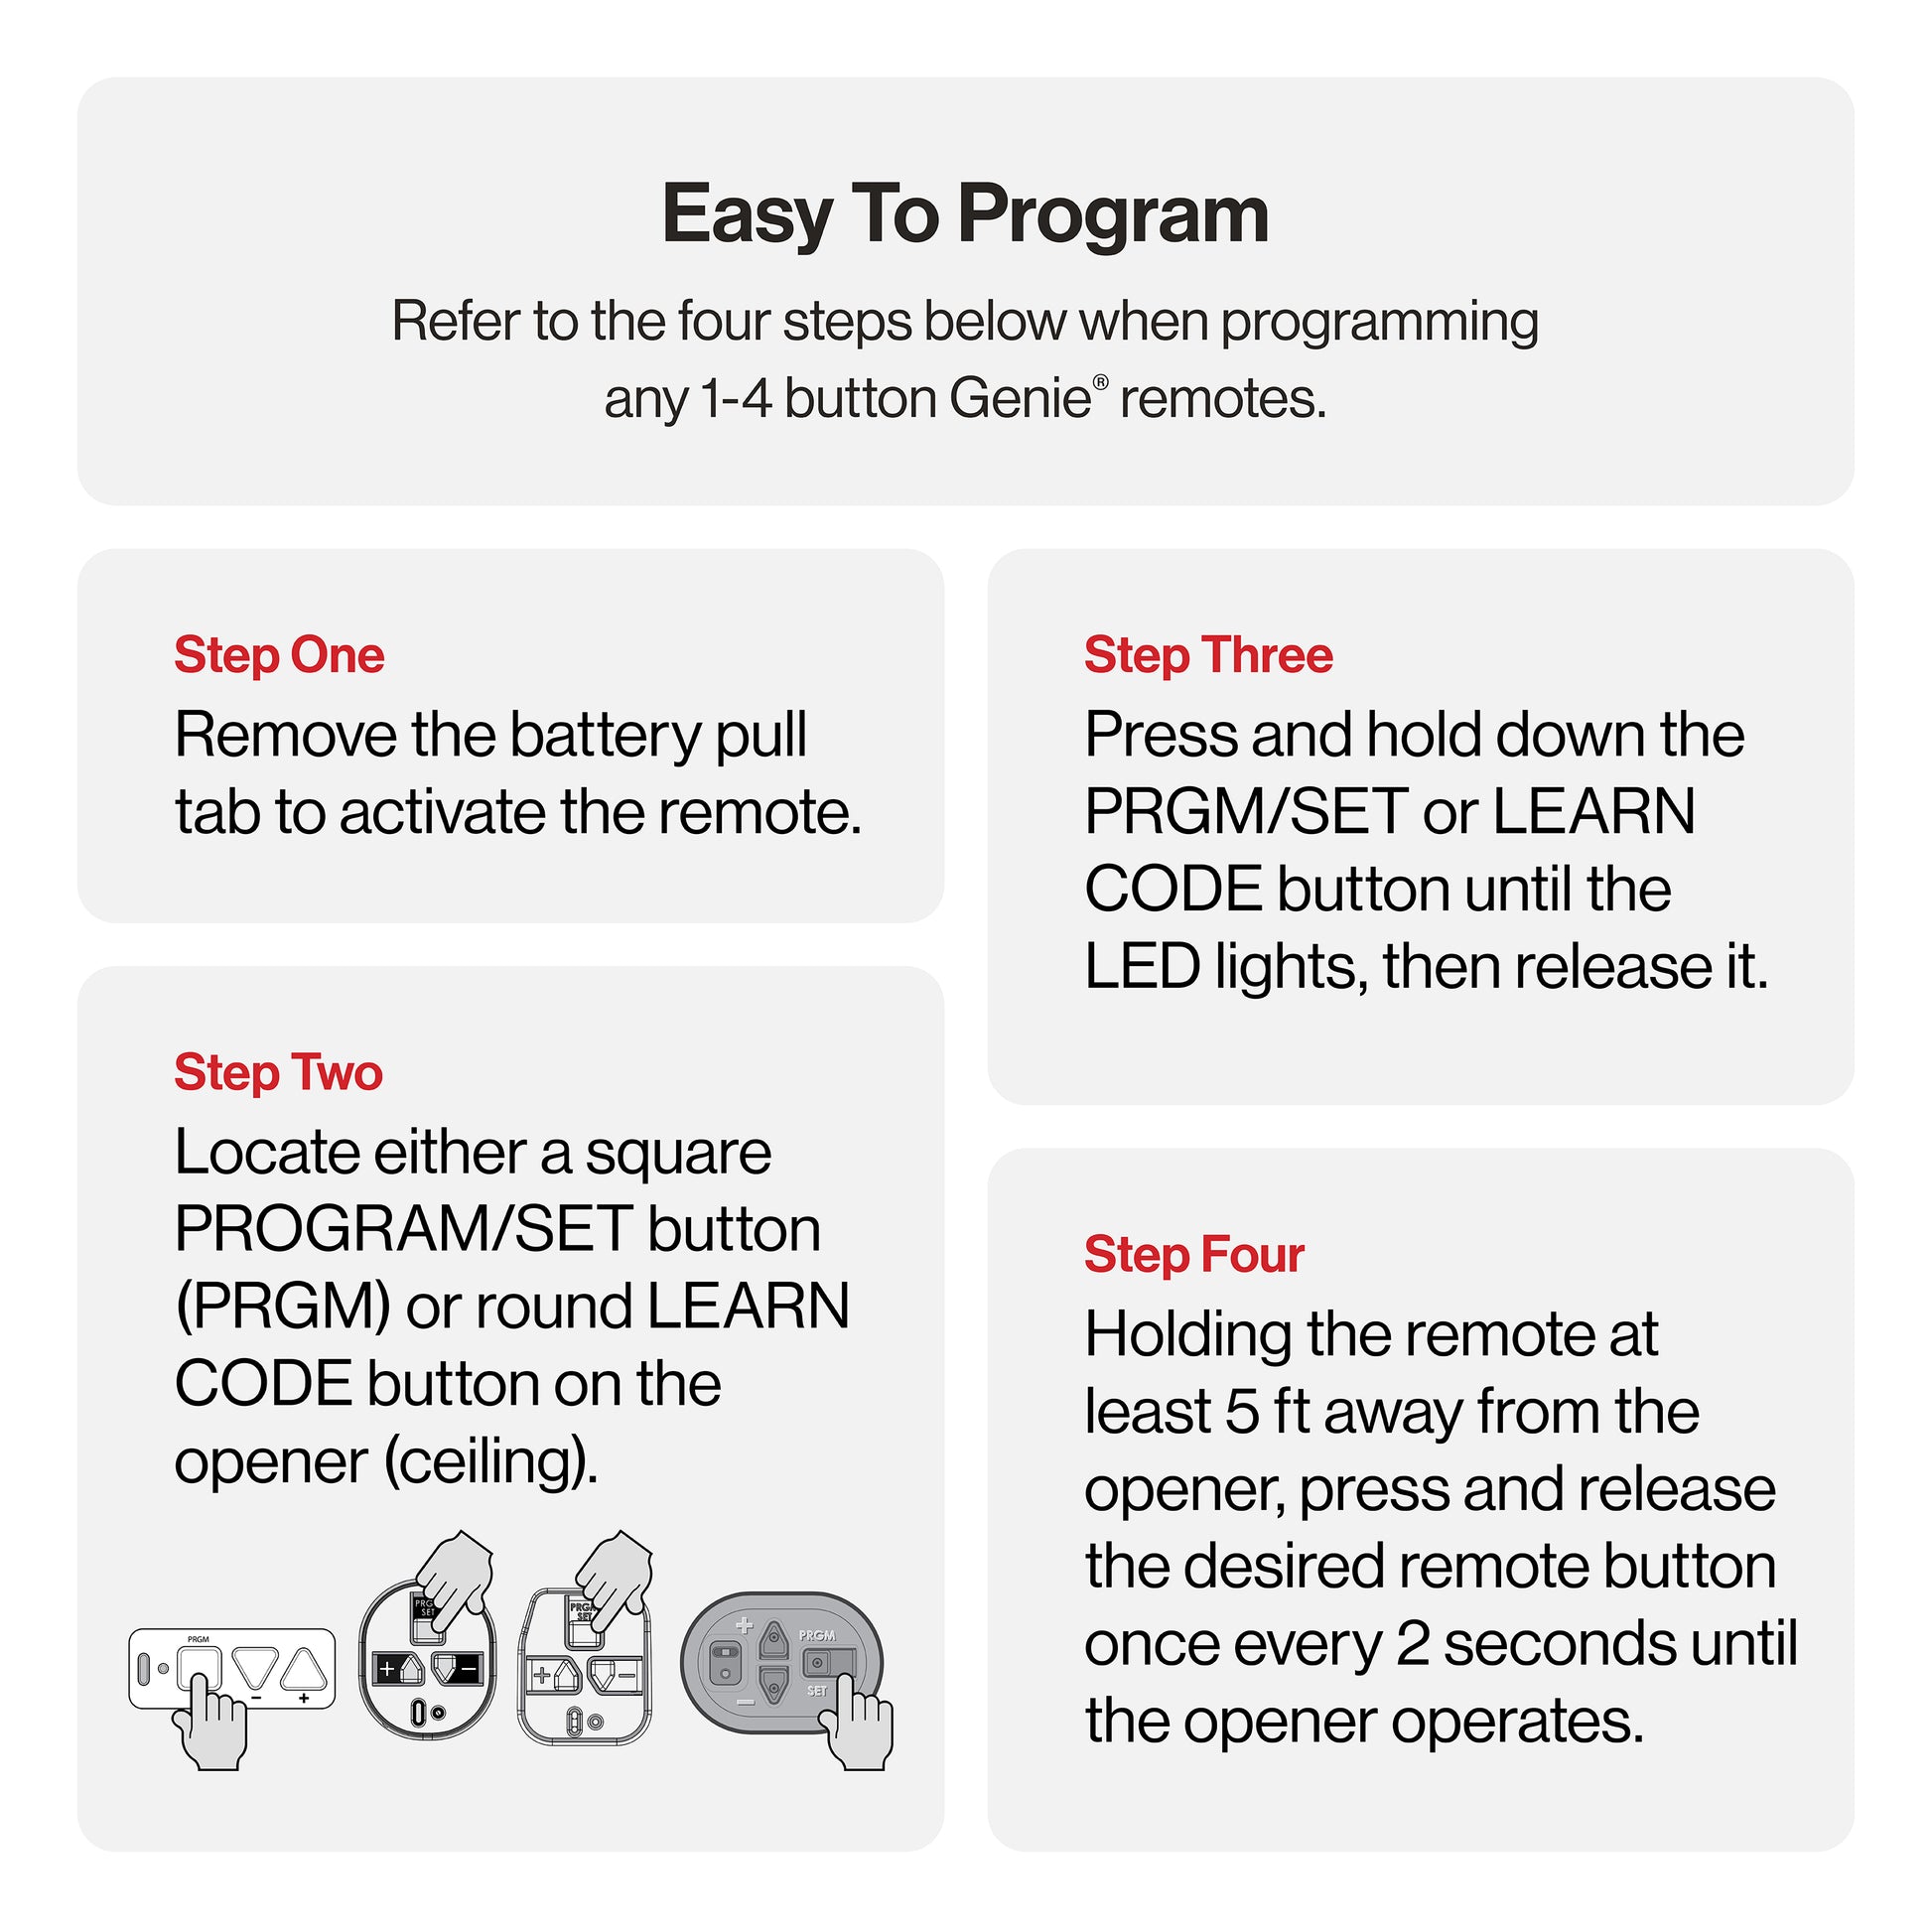
1. Locate The “learn” Or “program” Button
Most openers have a learn button. It’s usually near the antenna wire or under a light cover.
- Chamberlain/LiftMaster: Often a small, colored button (yellow, red, orange).
- Genie: Sometimes labeled “Learn Code” or “Program”.
If you can’t find it, check your manual or search for your model online.
Sometimes, dust or spider webs hide the button, so give the unit a quick wipe with a dry cloth. The light cover may need gentle prying with a screwdriver. Take care not to crack plastic parts.
2. Clear The Opener’s Memory
This step deletes all remotes and keypads from the opener’s memory.
- Press and hold the learn button (about 6-10 seconds).
- Wait for the indicator light to turn off or blink (depends on brand).
- Release the button. All codes are erased.
Non-obvious tip: Some openers need you to press the button twice—once to erase remote codes, and again for keypad codes. Check your manual for details.
If your unit has a beeping sound or a display, listen or watch for signals confirming the memory wipe. Some newer models show “Success” on a small screen. If you hear nothing and see no light, double-check the power supply.
3. Reprogram Remotes And Keypads
Now, you must add your remotes and keypads back.
- Press the learn button (don’t hold, just press and release).
- Within 30 seconds, press the remote button you want to program.
- You’ll hear a click or see the light flash. This means it worked.
- Repeat for each remote or keypad.
Insight: If you wait too long after pressing the learn button, the opener times out. Be ready with your remote before starting.
Some keypads require you to enter a PIN before programming. For example, you might need to enter “3570#” or another default code before pressing “Enter. ” This step varies, so refer to your specific instructions.
4. Test Your System
After resetting and reprogramming:
- Try each remote and keypad.
- Make sure the door opens and closes smoothly.
- Test the wall control (inside your garage).
If something doesn’t work, repeat the programming steps.
It’s smart to test from different spots—inside the garage, just outside, and from your car at the end of the driveway. This checks both range and proper function. If the door sticks or reverses before closing, inspect the safety sensors for dirt or misalignment.
How To Reset Other Types Of Garage Door Openers
Older openers or unusual brands may need different steps.
Genie Openers (intellicode Models)
- Find the Learn Code button (often behind the light lens).
- Press and release the button. Indicator light blinks.
- Within 30 seconds, press your remote button.
- Light stops blinking—programming is done.
To erase all codes: Hold the Learn Code button until the light turns off.
If you have several remotes, remember to program each one right after a reset. Genie models sometimes require you to press the remote button twice, so follow the prompts closely.
Dip Switch Openers
Some very old systems use DIP switches (tiny switches inside the remote and opener).
- Open the remote and the opener’s panel.
- Set the switches inside the remote to match the opener.
- No “reset” button is needed; changing the switch positions changes the code.
Non-obvious tip: If your neighbors have similar openers, make sure your DIP switches use a unique pattern for better security.
DIP switches are less secure than modern rolling code systems. If your opener uses these, consider upgrading for better safety, especially if your garage is attached to your home.
Resetting Smart Garage Door Openers
Modern openers may connect to Wi-Fi and use apps like myQ or Aladdin Connect.
- Open the app and go to settings.
- Look for “Factory Reset” or “Erase Devices”.
- Follow the on-screen steps.
After this, you’ll need to reconnect your phone and remotes. Always update your app to the latest version before starting.
For smart openers, take a screenshot of your device list and settings before resetting. This makes it easier to restore your preferences.
Common Problems And Troubleshooting
Resetting doesn’t always go smoothly. Here’s how to handle typical issues:
Remote Still Doesn’t Work
- Check the remote battery; replace if needed.
- Make sure you’re within range (try from inside the garage).
- Reprogram the remote—sometimes a step was missed.
If you have multiple remotes and only one fails, swap batteries or try the remote with another opener to see if the issue is with the remote or the system.
Keypad Not Responding
- Make sure the keypad battery is fresh.
- Enter the correct PIN. Some keypads need a specific sequence (like “#” before the code).
- Reset the keypad by removing the battery for 30 seconds, then try again.
Pay attention to the keypad backlight. If it doesn’t turn on, the battery or wiring may be at fault.
Door Moves On Its Own
- Double-check that all old remotes are erased.
- Look for stuck or damaged wall buttons.
- In rare cases, nearby devices (like baby monitors) can interfere—change your opener’s frequency if possible.
If the door moves at the same time every day, check for timer or scheduled open features set in the app or control panel.
Opener Light Blinks Or Stays On
- Blinking usually means safety sensor issues. Check for dirt or blockage near the sensors at the bottom of the door tracks.
- If the light stays on after a reset, unplug the opener for one minute, then plug it back in.
Sometimes spider webs or leaves can block the sensors, causing the opener to act as if something is in the way.
Wall Control Not Working
- Check for loose wires at the control panel and the opener.
- Test with a remote—if the remote works but the wall control doesn’t, the panel may need replacing.
If only the wall control fails, try replacing the cable or cleaning the contacts with a dry cloth.
Resetting For Security: When And Why
Many people don’t think about garage door security until there’s a problem. But a reset is smart in these cases:
- Moving into a new home: You don’t know who has old remotes.
- After a break-in: Erase all codes and set new ones.
- Giving access to service people: Consider using a temporary code, then reset when they’re done.
Insight: Some openers let you add a temporary PIN for visitors. Always delete these after use.
If you rent your home, resetting the opener between tenants is just as important as changing locks. This prevents unauthorized access and gives new tenants peace of mind.
How To Reset A Garage Door Opener Without A Remote
Lost all remotes? No problem. You can reset using just the opener unit:
- Unplug the opener for one minute.
- Press and hold the learn button (as explained above).
- Reprogram new remotes or keypads as needed.
If you don’t have a working remote or keypad, the wall control inside your garage can still open and close the door.
In emergencies, you can also use the manual release cord (usually a red handle) to open the door by hand. Just remember to re-engage the opener before using remotes again.
Programming A New Remote After Reset
Once you reset your opener, you’ll want to add new remotes.
- Buy a compatible remote (match the brand and frequency).
- Press the opener’s learn button.
- Within 30 seconds, press and hold your remote button.
- Look for a flash or click—this means it worked.
Repeat for each remote you want to use.
If you’re unsure about compatibility, check the opener’s manual or the manufacturer’s website. Some universal remotes work with many brands, but exact steps may differ.

Resetting Wireless Keypads
Keypads outside your garage let you enter a code instead of using a remote. To reset:
- Press and hold the “Program” or “Learn” button on the opener.
- Enter your new code on the keypad.
- Press the “Enter” button (some brands require a specific sequence, like holding for 5 seconds).
If you forget your old code, most keypads let you erase everything by removing the battery for a minute.
Tip: Use a code that’s hard to guess, but easy for you to remember.
Some newer keypads allow you to set a temporary code for guests or deliveries. Always remove these codes once they’re no longer needed to keep your system secure.
When To Call A Professional
Some problems need an expert:
- Wires are damaged or frayed
- The opener is very old (parts may be unavailable)
- You see sparks or smoke
- The door is off track or very heavy to lift
Professional help is best if you’re unsure or uncomfortable with electrical parts.
If the opener hums but the door doesn’t move, or if resets never seem to work, these are signs of motor or gear problems. A trained technician can quickly diagnose and fix these issues.
Cost And Time Required
Resetting your garage door opener is usually free and takes about 10-30 minutes. You may spend $20–$60 for a new remote or keypad.
| Task | Typical Time | Estimated Cost |
|---|---|---|
| Basic reset (DIY) | 10–20 minutes | $0 |
| Programming new remote | 5–10 minutes | $20–$40 |
| Professional service call | 30–60 minutes | $75–$150 |
It’s usually worth trying yourself before calling for help.
Some stores offer free programming if you buy a new remote from them. This can save you both time and money if you’re unsure about the steps.
Garage Door Opener Brands: Key Differences
Here’s a quick comparison of how some top brands handle resetting:
| Brand | Reset Button Label | Common Reset Method |
|---|---|---|
| Chamberlain | Learn | Hold for 6 seconds, light goes out |
| LiftMaster | Learn | Hold for 6–10 seconds |
| Genie | Learn Code | Hold until light turns off |
| Craftsman | Learn | Same as Chamberlain |
Most openers made after 1993 use similar steps, but always check for small differences.
If your opener is a lesser-known brand, look for support online or contact customer service. Many companies have helpful videos or guides to walk you through their specific process.
Preventing Future Problems
Once your system is working, take these steps to avoid more resets:
- Label your remotes (write “garage” on the back).
- Keep a spare battery on hand for remotes and keypads.
- Store your user manual in a safe place.
- Test your remotes and keypad every few months.
- If you move, always reset the system before leaving.
Non-obvious tip: Some newer openers let you check status or reset codes using a smartphone app. Update your app regularly for the best security.
Also, keep your garage opener’s firmware updated if it’s a smart model. Manufacturers often release updates that improve security and fix bugs. Consider setting a calendar reminder to check for updates once or twice a year.
Extra Tips For Smooth Resets
- Don’t rush through programming—read each step carefully.
- If you have multiple doors, make sure you’re resetting the right opener.
- Photograph the wiring before unplugging or removing covers, in case you need to reconnect something.
- Write down your new codes and keep them somewhere safe (not in your car).
If you’re ever stuck, the official manufacturer’s website is a great resource. For more details on garage door openers, see the Wikipedia garage door opener article.
Resetting your garage door opener is a simple way to boost your home’s security and keep your daily routine smooth. With the right approach, you’ll master this task in no time.
Frequently Asked Questions
How Often Should I Reset My Garage Door Opener?
You don’t need to reset often. Do it when you lose a remote, move into a new home, or notice security issues. Regular resets are not required unless you see problems.
Can I Reset My Garage Door Opener Without A Ladder?
Usually, you’ll need a ladder to reach the unit’s “learn” button. If your opener is low enough, you might manage without one, but safety is important. Don’t stretch or stand on unsafe surfaces.
What If The “learn” Button Is Missing Or Broken?
Some very old openers don’t have a learn button. They may use DIP switches instead. If the button is broken, you may need a professional to fix or replace the unit.
Will Resetting Erase My Car’s Built-in Remote (homelink)?
Yes. When you reset the opener’s memory, you’ll need to reprogram your car’s built-in remote. Follow your car’s manual for details.
Why Does My Garage Door Opener Keep Losing Its Memory?
This could be a sign of a weak backup battery, electrical problems, or a failing opener. If resets don’t last, have a professional check your system.
Resetting your garage door opener is a smart skill for any homeowner. With these clear steps and tips, you’ll keep your garage safe and working smoothly—no expert needed.


