Now Reading: How Do You Reset a Garage Door Opener: Simple Steps Explained
- 01
How Do You Reset a Garage Door Opener: Simple Steps Explained
How Do You Reset a Garage Door Opener: Simple Steps Explained
Resetting a garage door opener may sound technical, but most homeowners can do it themselves with the right guidance. Maybe your remote stopped working, or you’re moving into a new home and want a fresh start with your garage security.
Sometimes, there’s a power outage, or you need to add or remove a remote. No matter the reason, understanding how to reset a garage door opener can save time, money, and frustration.
Many people think garage door openers are complicated. In reality, the basics are simple once you know the steps. This article will walk you through everything you need to know about resetting a garage door opener, whether you have a modern system or an older model.
You’ll also learn about important safety tips, common mistakes to avoid, and how to handle remotes and keypads. With this information, you’ll feel confident and in control of your garage door’s security and operation.
Why Reset A Garage Door Opener?
Homeowners often reset their garage door openers for a variety of reasons. The most common is to restore security after losing a remote or moving into a new house. If someone else has a remote, they might access your garage unless you reset the system and clear the old codes.
Another reason is to fix technical problems. If the remote stops working or the opener behaves strangely, a reset can help clear minor software glitches. Sometimes, after a power surge or outage, your garage door opener may lose its settings.
Resetting it brings everything back to normal.
Adding or removing remote controls is also a common reason. If you have new family members, need to remove an old remote, or want to add a keypad, resetting the opener is often part of the process.
Types Of Garage Door Openers
Understanding your garage door opener type is essential before starting a reset. Different models and brands have their unique features, but they all fall into a few main categories.
Chain Drive
Chain drive openers are the most common and usually the most affordable. They use a metal chain to move the door. These openers are durable but can be noisy. Many older homes use this type.
Belt Drive
Belt drive openers use a rubber belt instead of a chain. They are quieter than chain drive models and often found in newer homes or attached garages where noise matters.
Screw Drive
Screw drive openers use a threaded steel rod to move the door. They require less maintenance but are not as quiet as belt drives.
Direct Drive
Direct drive openers have a motor that moves along a rail. These are quiet and reliable but less common in the US.
Smart Garage Door Openers
Smart openers connect to Wi-Fi and can be controlled with a smartphone app. Brands like Chamberlain and LiftMaster offer models with advanced features such as remote monitoring, scheduling, and notifications.
Comparison Of Opener Types
Here’s a comparison to help you understand the differences:
| Opener Type | Noise Level | Maintenance | Cost | Smart Features |
|---|---|---|---|---|
| Chain Drive | High | Moderate | Low | Rare |
| Belt Drive | Low | Low | Medium | Sometimes |
| Screw Drive | Medium | Low | Medium | Rare |
| Direct Drive | Very Low | Low | High | Rare |
| Smart Opener | Low | Low | High | Yes |
Basic Principles Behind Resetting
No matter the model or brand, the main idea is to erase the old codes stored in the opener’s memory and then reprogram new remotes or keypads. Most openers have a “Learn” or “Program” button, often located on the main unit inside the garage. When you press this button, you start the reset process.
For smart openers, resetting might include more steps, such as updating settings in a mobile app or reconnecting to Wi-Fi. Always check your opener’s manual for brand-specific instructions, but the principles are similar across major brands.
Tools And Preparation
Before you begin, gather a few basic tools and make sure you’re prepared:
- Ladder: Most openers are mounted on the ceiling.
- Flashlight: Helps you see the small buttons and wires.
- Screwdriver: In case you need to open a cover.
- Manual: If available, it’s always helpful.
- All remotes and keypads: You’ll need these to reprogram after the reset.
Safety is important. Make sure the garage is well-lit and the area around the opener is clear. Disconnect power if you’re working near wires or the motor.
Step-by-step: How To Reset A Garage Door Opener
Let’s walk through the most common process used by major brands like Chamberlain, LiftMaster, and Genie. If your opener is much older, or a rare brand, some steps might differ, but the main ideas will help.
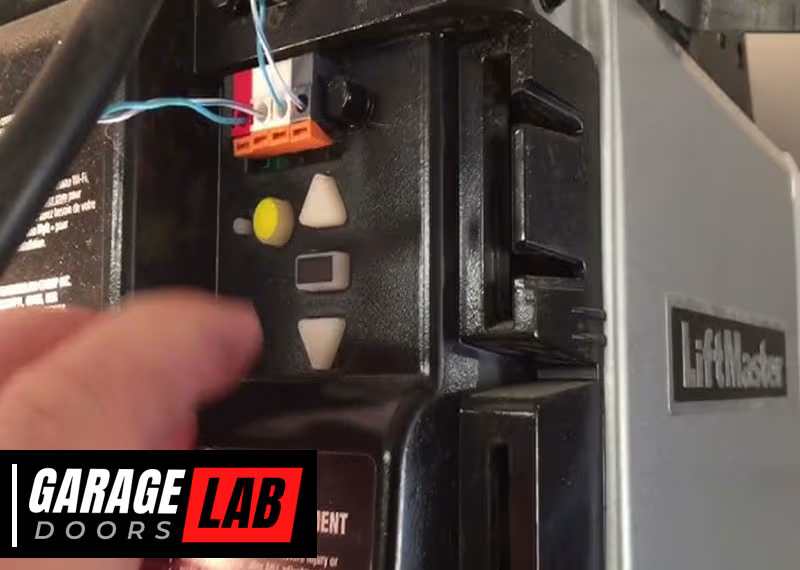
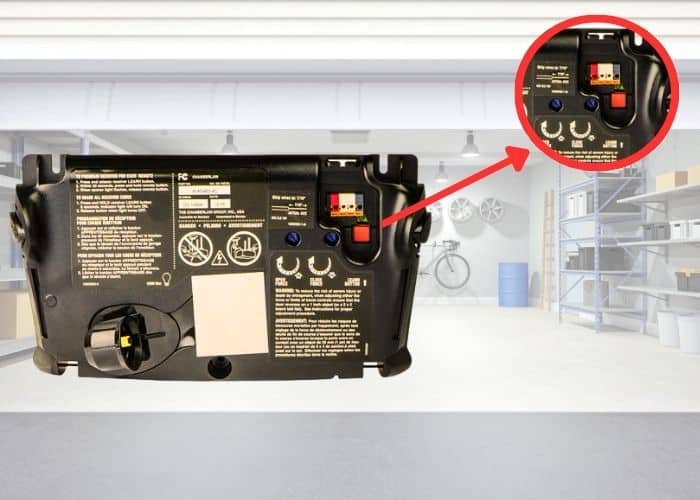
1. Locate The “learn” Or “program” Button
The “Learn” button is usually on the back or side of the opener’s main unit. For most modern openers, it’s under a small plastic cover. The button is often yellow, orange, red, or purple. Some older models use a switch instead.
If you cannot find this button, look in the manual or search for your model number online. Sometimes, the button is labeled as “Set” or “Smart”.
2. Clear The Opener’s Memory
To erase all remotes and keypads from the opener’s memory, press and hold the “Learn” button for about 6 to 10 seconds. The indicator light will usually turn off or blink, showing that the codes are erased. This step is key for security, especially if you lost a remote or moved into a new home.
Important tip: Clearing the memory removes all paired devices. You’ll need to reprogram each remote and keypad after this step.
3. Reprogram Remotes
After clearing the memory, you need to pair each remote:
- Press the “Learn” button briefly (1 second). The indicator light will turn on or start blinking.
- Within 30 seconds, press the button on your remote you want to use. The opener’s light will blink or you’ll hear a click, showing the pairing was successful.
- Repeat for each remote.
4. Reprogram Keypads
If you have a wireless keypad, you need to set it up again:
- Press the “Learn” button once.
- Within 30 seconds, enter your chosen code on the keypad and press the “Enter” button.
- The opener’s light will blink, showing the keypad is now connected.
5. Test Everything
After reprogramming, test all remotes and the keypad. Open and close the garage door using each device to make sure everything works.
6. For Smart Openers: Reset Wi-fi And App
If your opener is connected to Wi-Fi, you may need to reset or reconnect it. This often involves holding the “Learn” button for a longer time (15+ seconds) and then following the app’s instructions to connect to your home network again.
Non-obvious insight: Some smart openers keep old device information even after a normal reset. Check your app for a “Remove Device” or “Factory Reset” option to clear everything.
Brand-specific Reset Instructions
Different brands have small differences in their reset process. Here’s what you need to know for the most popular brands.
Chamberlain And Liftmaster
These brands are very similar because Chamberlain makes both. Their openers use a colored “Learn” button system.
- Yellow button: Supports advanced security codes.
- Purple, red, or orange button: Older models.
Steps:
- Hold the “Learn” button for 6-10 seconds until the light turns off.
- Pair remotes as above.
- For smart models, use the myQ app to reset Wi-Fi settings if needed.
Genie
Genie openers use a “Learn” or “Program” button, often behind a light lens or side panel.
Steps:
- Hold the “Learn” button until the indicator light goes out (about 10 seconds).
- Press the “Learn” button again to add each remote.
- For Genie Intellicode, follow the manual’s steps for reprogramming.
Craftsman
Craftsman openers often share hardware with Chamberlain/LiftMaster.
Steps:
- Hold the “Learn” button until the LED goes out.
- Pair remotes and keypads as usual.
Overhead Door
Overhead Door models may use a “Learn Code” button.
Steps:
- Press and hold “Learn Code” for 6 seconds to erase memory.
- Press again to program each remote.
Other Brands
For brands like Wayne Dalton, Linear, or older models, always check the manual. The general process is similar, but the button may have a different name or location.
Non-obvious insight: Some older openers use DIP switches instead of “Learn” buttons. In that case, you reset the system by matching the switch positions on both the opener and remote. Modern security standards no longer use DIP switches because they are less secure.
How To Reset A Remote Or Keypad Only
Sometimes you don’t need a full reset—just want to add or remove a remote or change a keypad code.
Adding A New Remote
- Press the “Learn” button on the opener.
- Within 30 seconds, press the button on the new remote.
Removing A Remote
Most openers do not let you remove just one remote. You need to clear all devices and reprogram only the remotes you want to keep.
Changing A Keypad Code
- Press the “Learn” button.
- Within 30 seconds, enter the new code on the keypad and press “Enter.”
Reset After Power Outage Or Electrical Problem
After a power outage, some openers lose their settings. In most cases, they remember the remotes and codes, but sometimes you may need to reset them if:
- The door won’t open or close.
- The opener behaves strangely (lights flash, beeping, or doesn’t respond).
Before resetting, try unplugging the opener for 30 seconds and then plugging it back in. This can fix simple software glitches. If problems continue, do a full reset as described above.
Resetting For Security When Moving Into A New Home
If you move into a new home, always reset the garage door opener. The previous owner’s remotes, or even a neighbor’s, could still open your door. Resetting ensures only your remotes and keypads can access the garage.
Practical tip: Do this on day one, before moving your things in. If your opener is very old and doesn’t have a “Learn” button, consider upgrading for better security.
Common Mistakes To Avoid
Resetting a garage door opener is usually straightforward, but some mistakes can cause problems.
- Not clearing the memory fully: If you don’t hold the “Learn” button long enough, old codes may stay in memory.
- Forgetting to reprogram all remotes: After a reset, old remotes won’t work until you pair them again.
- Ignoring the keypad: Keypads must also be reprogrammed, not just remotes.
- Resetting smart openers incorrectly: For Wi-Fi models, you may need to clear settings both on the device and in the app.
- Not checking the manual: Each brand can have small differences. When in doubt, read the instructions.

Troubleshooting After A Reset
Sometimes, things don’t work right after a reset. Here’s how to solve the most common problems:
Remote Doesn’t Work
- Try reprogramming. Sometimes, you need to press the remote button more than once.
- Check the remote’s battery.
- Make sure you’re within range (usually 50 feet or less).
Keypad Not Responding
- Make sure you entered the code within 30 seconds of pressing the “Learn” button.
- Replace the keypad battery.
- Check for stuck keys.
Door Won’t Move
- Double-check the opener is plugged in and has power.
- Make sure the opener is not locked (some models have a lock feature).
- Check the safety sensors near the door’s base.
Wi-fi Features Missing
- Reset Wi-Fi settings in the app and on the opener.
- Reconnect to your network following the manufacturer’s instructions.
How To Reset Dip Switch Openers
Older openers (before the 1990s) use DIP switches instead of rolling code technology. These are small switches inside the remote and the opener unit.
- Open the remote and the opener’s panel.
- Set the DIP switches to the same pattern (on/off).
- There is no “reset” button—just match the switches.
Security warning: DIP switch openers are easy to hack. If you have one, upgrade to a rolling code model for better protection.
Important Safety Tips
When resetting a garage door opener, always consider safety:
- Keep children and pets away from the area.
- Never stand directly under a moving door.
- Use a sturdy ladder and avoid overreaching.
- Disconnect power if you need to work on the wiring.
- Always test the safety sensors after a reset. Place an object under the door—if it does not reverse when closing, sensors need adjustment.
Non-obvious insight: Some openers have a “Vacation Lock” feature—a wall button that disables remote operation. If remotes don’t work after resetting, check if this feature is turned on by mistake.
Signs Your Garage Door Opener Needs A Reset
You may not always need a reset, but here are signs that it’s time:
- Remotes suddenly stop working, but the wall button still works.
- The keypad accepts your code, but nothing happens.
- The opener makes clicking or beeping sounds.
- The system acts strangely after a power surge or outage.
- You lost a remote and worry about security.
When To Call A Professional
Most resets are DIY-friendly, but call a pro if:
- You cannot find the “Learn” or “Program” button.
- The opener is very old or has unusual wiring.
- The door does not open/close after multiple resets.
- You see sparks, burning smells, or obvious wiring problems.
A professional can also help upgrade your opener or add advanced features like smart home integration.
Resetting Different Garage Door Remotes
Some homes have multiple remote types—keychain, visor clip, or wall-mounted. The reset process is usually the same, but here’s a quick overview:
Keychain Remotes
Small and portable. Pair as described above.
Visor Clip Remotes
Larger, usually with two or three buttons. Some can control multiple doors.
Wall-mounted Remotes
Rare, but some homes have them. Usually paired like a keypad.
What If You Lost All Remotes?
If all remotes are lost, you can still reset the opener using the main unit’s “Learn” button. After clearing the codes, buy a new compatible remote and pair it following the usual steps. For smart openers, you can often use the mobile app as a temporary remote until you get a replacement.
Comparing Reset Processes By Brand
Here’s a quick look at how the reset process compares for popular brands:
| Brand | Button Name | Clear Memory Time | Pairing Window | Smart Features |
|---|---|---|---|---|
| Chamberlain/LiftMaster | Learn | 6-10 sec | 30 sec | Yes |
| Genie | Program/Learn | 10 sec | 30 sec | Some models |
| Craftsman | Learn | 6-10 sec | 30 sec | No |
| Overhead Door | Learn Code | 6 sec | 30 sec | Some models |
Upgrading Your Opener For Easier Resets
If your opener is old and lacks a “Learn” button or rolling code technology, consider upgrading. New openers are more secure, support multiple remotes, and offer smart home features. They are also easier to reset and maintain.
Example: A modern Chamberlain smart opener lets you reset and manage remotes from your phone—no ladder needed.
Garage Door Opener Reset: Real-world Example
Let’s walk through a real example. You bought a house with a Chamberlain opener but no remotes. Here’s what you do:
- Get a compatible remote.
- Climb up and find the yellow “Learn” button.
- Hold it for 10 seconds to clear all codes.
- Press the “Learn” button again (1 second).
- Within 30 seconds, press your new remote’s button.
- The opener’s light blinks—now your remote works.
- Add any other remotes or a keypad if you have them.
Regular Maintenance After A Reset
Resetting solves security and technical issues, but regular maintenance keeps your garage door system running smoothly:
- Test the door balance and safety sensors monthly.
- Clean the photo-eye sensors with a soft cloth.
- Replace remote batteries yearly.
- Listen for unusual noises—these can signal worn parts.
Good maintenance means fewer resets and repairs in the future.
Frequently Asked Questions
How Do I Know If My Garage Door Opener Needs A Reset?
If remotes or keypads stop working, or the opener acts strangely after a power outage, a reset often solves the problem. If you move into a new home or lose a remote, always reset for security.
Can I Reset My Garage Door Opener Without A Remote?
Yes. Use the “Learn” or “Program” button on the opener unit itself. You do not need any remotes to clear the memory—just to reprogram new ones.
What If My Opener Doesn’t Have A “learn” Button?
Older models use DIP switches. Open the opener and remotes, and match the switch patterns. For better security, consider upgrading to a modern opener with rolling code technology.
How Do I Reset A Smart Garage Door Opener?
For Wi-Fi-connected openers, reset using the “Learn” button and follow your app’s instructions to reconnect to your network. Some models need a “Factory Reset” in the app as well. Check your manual for details or visit the manufacturer’s support website.
Is It Safe To Reset A Garage Door Opener Myself?
Most resets are safe if you follow basic precautions—use a sturdy ladder, keep the area clear, and test safety sensors when finished. If you see damaged wiring or feel unsure, call a professional.
Resetting your garage door opener is a useful skill that improves both security and convenience. Whether you’re dealing with lost remotes, moving into a new house, or troubleshooting after a power surge, the process is straightforward with a little patience and care. If you ever get stuck, check your manual or visit a trusted resource like the Wikipedia Garage Door Opener page for more help. Taking charge of your garage door opener means a safer, smoother experience every day.


