
Many homeowners rely on automatic garage doors for everyday convenience and security. When your garage door sensor is not working, it can quickly disrupt your routine. Maybe the door won’t close, it reverses for no reason, or the light flashes and nothing happens. It’s not just frustrating—it can also be unsafe. Understanding why your garage door sensor isn’t working and how to fix it is important for both safety and peace of mind.
Sensors are a critical safety feature. They prevent the door from closing if something, or someone, is in the way. But when these sensors malfunction, you might find yourself stuck inside or outside your garage, or worse, with an unsafe door.
This guide will walk you through everything you need to know about troubleshooting, repairing, and maintaining your garage door sensors. Whether you’re facing a minor alignment issue or suspect a deeper electrical fault, you’ll find the answers here.
How Garage Door Sensors Work
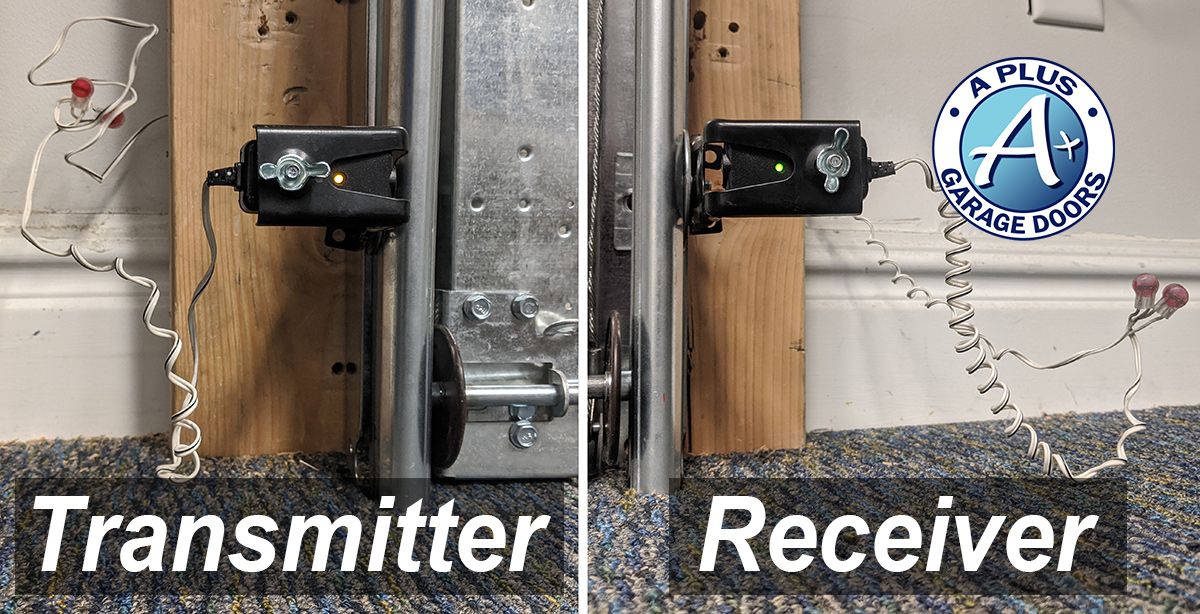
Garage door sensors use a simple but effective technology. Two small devices are placed on either side of the garage door, usually six inches above the ground. They use infrared light to create an invisible beam. When something breaks this beam, the sensor tells the garage door opener to stop closing and reverse.
- Sender sensor: Emits the infrared beam.
- Receiver sensor: Detects the beam from the sender.
If the sensors can’t communicate, the door won’t close. This is a federal safety standard (UL 325) in the US. It has prevented thousands of injuries since its introduction. Most modern garage doors have indicator lights on the sensors—one is usually green (receiver) and the other yellow or orange (sender).
Signs Your Garage Door Sensor Is Not Working
It’s not always obvious that the sensor is to blame. Here are some clear signs to look for:
- Door reverses when closing: The door starts to close but immediately goes back up.
- Flashing lights: The opener or sensor lights blink several times, signaling an error.
- Door won’t close unless you hold the wall button: You can override the sensors by holding the wall control. If this works, the sensors are likely the issue.
- One or both sensor lights are off or flickering: A solid light means a healthy connection. Flickering or no light signals a problem.
- Obvious obstruction or dirt: Something is blocking the sensor or the lens is dirty.
If you see these symptoms, it’s time for a closer look.
Common Causes Of Garage Door Sensor Problems
Many things can disrupt the function of your garage door sensors. Knowing what to check first can save you time and money.
1. Sensor Misalignment
Sensors must face each other directly. Even a small bump can move them out of position. Children, pets, or tools near the sensors can cause them to shift.
2. Dirty Or Obstructed Lenses
Dust, spider webs, or debris on the sensor lens can block the beam. Even sunlight glare or rainwater can affect performance.
3. Wiring Issues
Loose, frayed, or damaged wires can break the sensor’s connection. Sometimes, rodents chew on the wires, or they get snagged by tools.
4. Faulty Sensors
Like any electronic device, sensors can fail over time. Manufacturing defects, electrical surges, or age can cause them to stop working.
5. Power Supply Problems
If there’s no power to the sensors or opener, nothing will work. Check for tripped breakers or unplugged units.
6. Sunlight Interference
Direct sunlight can sometimes “blind” the sensor. This is more common with older models.
7. Moisture And Weather Damage
Heavy rain, snow, or condensation inside the sensors can cause short circuits.
8. Physical Damage
Sensors are often close to the ground and can be hit by bikes, balls, or feet.
Step-by-step Troubleshooting Guide
Before you call a professional, try these steps. Most garage door sensor problems can be fixed with basic tools and a little patience.
1. Check For Obstructions
Carefully inspect both sensors. Remove any objects, cobwebs, or dirt. Even small debris can block the beam.
2. Clean The Sensor Lenses
Use a soft cloth to gently wipe the lenses. Avoid harsh chemicals that might scratch the surface.
3. Check Sensor Alignment
Each sensor should have a light—usually green or yellow. Both lights should be solid. If one is off or blinking, gently move the sensor until both lights are steady.
How To Align Sensors:
- Loosen the wing nut on the sensor bracket.
- Adjust the sensor until the light stays on.
- Tighten the bracket to hold the sensor in place.
4. Inspect Wiring
Check for loose or broken wires at the sensors and the opener. If you see damage, turn off the power before touching anything. Repair or replace any problem wires.
5. Test The Sensors
After adjusting and cleaning, try closing the door. If the door works with the remote, you’ve likely fixed the problem.
6. Override The Sensors
Hold down the wall control button. If the door closes, the issue is with the sensors—not the opener.
7. Check The Power Supply
Make sure the opener is plugged in and the breaker is not tripped. Some openers have a reset button.
8. Look For Sunlight Issues
If the problem only happens during certain times of day, shield the sensor from sunlight. You can use a piece of cardboard as a temporary fix.
9. Swap Sensors (if Possible)
If you have a matching set, switch the sensors. If the problem moves, the sensor is bad.
10. Replace The Sensors
If none of these steps work, it’s time for new sensors. Always buy compatible parts for your opener brand.

Comparing Common Garage Door Sensor Problems
Here’s a simple comparison to help you understand which symptoms point to which issues.
| Symptom | Likely Cause | Quick Fix |
|---|---|---|
| Door reverses when closing | Misalignment, obstruction | Clean and realign sensors |
| Sensor light off or blinking | Wiring issue, power loss | Check wires and power |
| Door only closes with wall button held | Sensor problem | Troubleshoot sensors |
| Door won’t operate at all | No power, faulty opener | Check outlet and circuit breaker |
| Door closes randomly | Interference, bad wiring | Inspect wiring, shield sensors |
How To Replace Garage Door Sensors
If you’ve tried every step and your garage door sensor is not working, replacement is the best option. Here’s how to do it safely and correctly.
Tools And Materials Needed
- Compatible replacement sensors (check your opener brand)
- Screwdriver
- Wire strippers
- Electrical tape
- Ladder
- Safety glasses
Step-by-step Process
- Unplug the opener: Always start by cutting power to avoid electric shock.
- Remove old sensors: Unscrew the sensor brackets. Carefully disconnect the wires.
- Prepare new sensors: Connect the new sensors’ wires to the opener’s wires—match color to color (usually white to white, black to black). Use wire nuts or electrical tape for a secure connection.
- Install new sensors: Attach the sensors to the brackets and mount them in place.
- Align sensors: Make sure both lights are solid before tightening.
- Test the system: Plug in the opener, and test the door several times.
Practical Tips
- Use the manufacturer’s instructions for your model.
- If you have old wiring, consider replacing it at the same time.
- Mark the old sensor positions before removal for easier alignment.

Preventing Future Sensor Problems
Keeping your sensors in good shape is easier than you think. Here are some habits to adopt:
- Clean regularly: Dust and dirt build up quickly near the ground.
- Check alignment monthly: Small bumps can move sensors out of place.
- Protect the area: Keep tools, bikes, and children away from the sensors.
- Check wires for damage: Look for signs of chewing or fraying.
- Cover sensors in harsh weather: Use plastic covers during heavy rain or snow.
Advanced Troubleshooting Tips
Some sensor issues can be hard to spot. Here are some less obvious problems and solutions.
Electrical Interference
Nearby electronics, LED lights, or even your car’s remote can cause signal issues. If the problem started after adding a new device, try unplugging it.
Faulty Opener Logic Board
If you’ve replaced the sensors and wiring, the opener’s control board might be faulty. This is a more expensive fix and often requires a professional.
Old Sensor Models
Older sensors are less tolerant of sunlight and vibration. Upgrading to a newer model can solve persistent issues.
Hidden Obstructions
Small objects, like leaves or insects, can block the beam without being obvious. Shine a flashlight through the sensor path to check.
Loose Mounting Brackets
Over time, brackets can wiggle loose. Always make sure sensors are firmly attached.
When To Call A Professional
Sometimes, the problem is too complex or dangerous for a DIY fix. Here’s when you should get help:
- Repeated sensor failures: If you replace sensors often, you might have a wiring or control board issue.
- Electrical shorts or sparks: These are serious and require a licensed electrician.
- Garage door is off track: Never try to force the door—call a pro.
- No obvious solution after troubleshooting: Save time and avoid frustration.
A professional can usually diagnose and fix the problem in under an hour.
Comparing Diy Vs Professional Repair
Here’s how DIY repair stacks up against hiring a pro.
| Factor | DIY | Professional |
|---|---|---|
| Cost | Low (parts only) | Higher (parts + labor) |
| Time | 1-2 hours | Usually less than 1 hour |
| Safety | Moderate (risk of electric shock) | High (trained technician) |
| Result | Good if basic problem | Guaranteed fix |
Real-world Example: A Homeowner’s Experience
Let’s look at a true story. Sarah noticed her garage door would only close if she held the wall button. She checked the sensors and saw one light blinking. After cleaning the lenses, the problem continued. She tried realigning the sensors but still had no luck.
On closer inspection, she found the sensor wire was chewed—her dog was the culprit. Replacing the wire fixed the problem.
Insight: Sometimes the problem isn’t the sensor itself, but the wiring—often hidden from view.
Costs Of Repair And Replacement
Understanding the potential costs can help you plan.
- Cleaning and adjustment: Free (DIY)
- Wiring repair: $10–$30 for supplies
- Replacement sensors: $20–$50 per set
- Professional service call: $75–$150
Tip: If your opener is more than 15 years old, replacing the whole unit might be a better value. New openers have better safety features and reliability.
Garage Door Sensor Brands And Compatibility
Not all sensors work with all openers. Here are some major brands:
- Chamberlain / LiftMaster / Craftsman: Often interchangeable, but check the model number.
- Genie: Uses a different frequency—only Genie sensors will work.
- Overhead Door, Marantec, Linear: Each has unique connectors.
Non-obvious tip: Some universal sensors claim to work with all brands, but they may not support advanced features or last as long. Always read reviews and check with your manufacturer.
How Weather Affects Garage Door Sensors
Weather can have a big impact on sensor function.
- Extreme heat: Can warp plastic housings, changing alignment.
- Cold and frost: Moisture can freeze on the lens.
- Heavy rain/snow: Water inside the sensor can cause shorts.
Solution: Use weatherproof covers designed for your sensor model. Keep the area around the sensors clear of snow and ice.
Garage Door Sensor Maintenance Schedule
A little regular care goes a long way. Here’s a simple plan:
| Task | Frequency | Why |
|---|---|---|
| Clean lenses | Monthly | Prevents dust blockage |
| Check alignment | Quarterly | Fixes minor shifts |
| Inspect wiring | Twice a year | Stops early wear |
| Test door safety | Every 2 months | Ensures function |
| Protect from weather | Before storms | Prevents water damage |
Upgrading Your Garage Door Opener For Better Sensor Performance
If you have frequent sensor issues, upgrading the opener may help. Newer models use self-diagnosing sensors that alert you to the exact problem. Some also have wireless sensors—no wires to damage.
Benefits of upgrading:
- Improved safety features
- Longer sensor life
- Better performance in bad weather
- Smartphone alerts for problems
Before upgrading, check your local building codes and safety standards. For more details on standards, visit the Wikipedia: Garage Door Opener page.
Frequently Asked Questions
Why Does My Garage Door Only Close When I Hold The Wall Button?
This is a safety override. It means the sensors are not working correctly—either blocked, misaligned, or faulty. Fix the sensors before using the door normally.
Can I Bypass Garage Door Sensors Permanently?
It is not recommended. Bypassing the sensors removes an important safety feature and can lead to injury or property damage. Always repair or replace faulty sensors.
How Do I Know If My Sensors Are Aligned Correctly?
Both sensors should show a solid light. If one is blinking or off, they are not aligned. Adjust until both lights stay steady.
Are Universal Garage Door Sensors Reliable?
Some are, but not all. It’s best to use sensors made for your opener’s brand and model to ensure full compatibility and safety.
What Is The Lifespan Of A Typical Garage Door Sensor?
Most last 7–10 years with proper care. Exposure to weather, physical damage, or power surges can shorten their life.
If you follow these guidelines, your garage door sensors should work reliably for years. Regular maintenance and prompt troubleshooting save time, money, and keep your family safe. If you’re ever unsure, don’t hesitate to call a professional—they’re there to help.