Now Reading: How To Adjust Belt Tension On Chamberlain Garage Door Opener
- 01
How To Adjust Belt Tension On Chamberlain Garage Door Opener

A properly functioning garage door opener is essential for both convenience and security. Among the most common brands, Chamberlain garage door openers are known for their reliability. However, like any mechanical system, they can occasionally require adjustments, with belt tension being a frequent area needing attention.
A loose or overly tight belt can lead to a host of problems, from noisy operation and reduced efficiency to premature wear and tear on the opener’s components. Understanding how to adjust the belt tension on your Chamberlain garage door opener is a valuable skill that can save you time and money on service calls.
This guide will walk you through the process of assessing and adjusting the belt tension on your Chamberlain garage door opener. We’ll cover the signs that indicate a need for adjustment, the tools you’ll likely need, and a step-by-step procedure to ensure you achieve the correct tension for optimal performance and longevity of your opener system.
Whether you’re a seasoned DIYer or new to garage door maintenance, this comprehensive walkthrough aims to equip you with the knowledge to tackle this common task with confidence.
Key Takeaways
- Identify the Problem: Recognize the signs of improper belt tension, such as sagging, excessive slack, or a strained, noisy belt.
- Gather Your Tools: Ensure you have essential tools like a ladder, adjustable wrench or socket set, and potentially a measuring tape.
- Safety First: Always disconnect power to the opener and disengage the emergency release mechanism before making any adjustments.
- Locate the Tensioning Mechanism: On Chamberlain openers, the belt tension is typically adjusted via a threaded rod or bolt near the motor unit or at the end of the rail.
- Adjust in Small Increments: Make gradual adjustments, turning the tensioning bolt no more than a quarter or half turn at a time.
- Test Thoroughly: After each adjustment, re-engage the opener, reconnect power, and test the door’s operation multiple times to check for smooth movement and proper engagement.
- Consult the Manual: Refer to your specific Chamberlain model’s owner’s manual for precise instructions and diagrams.

Credit: www.youtube.com
Understanding Garage Door Opener Belt Tension
The belt in a garage door opener system functions much like a car’s timing belt, transferring power from the motor to the garage door. It moves along a pulley system, usually on a rail above the door, to lift and lower the door.
The tension of this belt is critical. Too loose, and it can slip on the pulleys, leading to inconsistent operation, grinding noises, and a failure to lift or lower the door completely. Too tight, and it can put excessive strain on the motor, the pulleys, and the belt itself, potentially causing premature failure of these components.
Why Belt Tension Matters
Proper belt tension ensures that the power from the motor is efficiently transferred to the garage door. When the tension is correct, the belt grips the pulleys firmly, allowing for smooth, quiet, and reliable operation. This efficiency translates to less wear and tear on the entire system.
A belt that’s too loose might cause the opener to struggle, making unusual noises as it attempts to engage the door. Conversely, an overly tight belt can feel like it’s “straining” the system, leading to humming sounds from the motor or a feeling of resistance that shouldn’t be there.
In the long run, both extremes can shorten the lifespan of your garage door opener.
Signs Of Improper Belt Tension
Several indicators can signal that your Chamberlain garage door opener’s belt tension needs adjustment. Being aware of these signs allows for proactive maintenance, preventing minor issues from escalating into major repairs.
- Sagging Belt: The most obvious sign of a loose belt is visible sagging. If you can easily push the belt down significantly, or if it appears to hang loosely in the middle of the rail, it’s likely too slack. A properly tensioned belt should be taut, with minimal sag.
- Slipping or Grinding Noises: When the belt is too loose, it can slip on the drive sprocket or the pulley at the end of the rail. This often manifests as a grinding, squealing, or popping sound, especially when the opener is in motion.
- Inconsistent Door Movement: A loose belt can cause the garage door to move erratically. It might start to lift or lower and then stop, or it might move slower than usual.
- Excessive Strain or Humming: While less common than with a loose belt, an extremely tight belt can cause the motor to hum loudly or seem to struggle, even when the door is moving freely. This is because the motor is working against excessive friction.
- Visible Wear on the Belt or Pulleys: In severe cases of incorrect tension, you might notice premature wear patterns on the belt itself or on the teeth of the pulleys it engages with.
Tools And Preparation
Before you begin adjusting the belt tension, it’s crucial to gather the necessary tools and take essential safety precautions. Attempting this task without the right equipment or without prioritizing safety can lead to frustration or injury.
Essential Tools
Most Chamberlain garage door opener models have a similar adjustment mechanism, typically involving a threaded rod or bolt. You’ll likely need:
- Ladder: A sturdy ladder is necessary to safely reach the motor unit and the rail. Ensure it’s placed on a stable surface.
- Adjustable Wrench or Socket Set: The exact size will depend on your specific Chamberlain model, but a set of common metric or SAE sockets and a wrench will likely cover it. An adjustable wrench can also work if you don’t have the precise socket size.
- Screwdriver (Phillips or Flathead): Some models might require a screwdriver for minor adjustments or to access certain covers.
- Safety Glasses: Always protect your eyes when working on mechanical equipment.
- Work Gloves: These can improve your grip and protect your hands.
- Measuring Tape (Optional but Recommended): For more precise adjustments, you might want to measure the belt’s sag before and after.
Safety Precautions
Working with garage door openers involves moving parts and electrical components, so safety is paramount.
- Disconnect Power: Crucially, unplug the garage door opener from the electrical outlet. Do not rely solely on the wall switch, as it might not cut all power to the unit.
- Disengage the Opener: Locate the emergency release cord (usually a red rope hanging from the opener’s trolley). Pull this cord firmly to disengage the opener from the garage door. This allows you to move the door manually.
- Secure the Door: If you are working on the belt and need to move the door, it’s advisable to secure the door in a partially open or closed position using C-clamps or a vise grip on the track to prevent it from falling unexpectedly. This is especially important if you suspect the springs are not functioning correctly.
- Read Your Manual: Always refer to your specific Chamberlain garage door opener model’s owner’s manual. It will provide model-specific details about the adjustment mechanism and any unique safety considerations. You can usually find these manuals on the Chamberlain website by searching for your model number.

Credit: www.youtube.com
Locating The Belt Tension Adjustment Mechanism
Chamberlain garage door openers typically feature a tension adjustment mechanism designed to allow for easy fine-tuning of the belt. Understanding where this is located on your specific model is the first step in the adjustment process.
Common Adjustment Points
On most Chamberlain chain drive and belt drive openers, the tension adjustment is integrated into the rail system. There are generally two primary locations where you might find this adjustment:
- Near the Motor Unit: Some models have the adjustment screw or bolt located on the motor unit itself, or on the bracket that attaches the rail to the motor unit. This adjustment often directly impacts the tension of the belt as it engages with the drive sprocket.
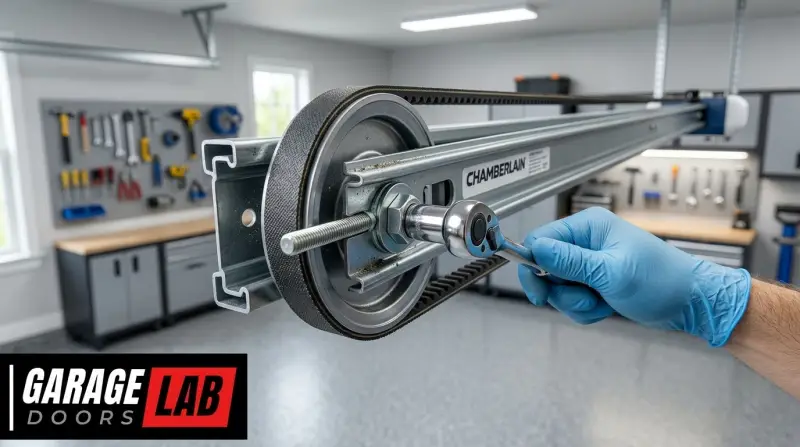
- At the End of the Rail: The most common location for belt tension adjustment is at the trolley end of the rail, furthest from the motor unit. Here, you’ll often find a threaded rod that runs through a bracket. Turning a nut on this rod or turning the rod itself will either tighten or loosen the belt. This mechanism is designed to apply tension to the belt as it moves along the rail.
Identifying Your Model’s Mechanism
To accurately identify the adjustment mechanism for your specific Chamberlain opener, consult your owner’s manual. It will contain diagrams and descriptions tailored to your model. If you don’t have the manual, you can typically download a PDF version from the Chamberlain website by entering your model number.
Look for sections related to “belt adjustment,” “maintenance,” or “troubleshooting. “
Pro Tip: Take a clear photo of the area around the motor unit and the trolley end of the rail. This can be helpful when you’re searching for online guides or if you need to show it to a technician.

Credit: learngaragedoors.com
Step-by-step Belt Tension Adjustment
Once you’ve identified the adjustment mechanism and performed the necessary safety steps, you can proceed with adjusting the belt tension. The goal is to achieve a taut belt without over-tightening it.
Step 1: Assess Current Tension
With the power disconnected and the opener disengaged, manually move the garage door through its full range of motion. Observe the belt as it moves.
- Check for Sag: Gently push down on the belt in the middle of the rail. If it sags more than about half an inch (1.27 cm), it’s likely too loose.
- Listen for Friction: While moving the door manually, listen for any unusual sounds that might indicate the belt is too tight or rubbing excessively.
Step 2: Make The Adjustment
The adjustment process typically involves turning a threaded rod or a nut.
- Locate the Adjustment Bolt/Rod: Find the threaded rod or adjustment bolt, usually located at the end of the rail or near the motor unit.
- Turn in Small Increments:
- To tighten the belt, you will generally turn the adjustment mechanism in a clockwise direction.
- To loosen the belt, turn it in a counter-clockwise direction.
- Make adjustments in quarter or half-turn increments. Over-adjusting can quickly lead to the opposite problem (too tight).
- Specific Mechanism Types:
- Threaded Rod with Nuts: If you see a threaded rod with nuts on either side, loosen the nuts slightly, then turn the rod itself to adjust tension. Once the desired tension is achieved, re-tighten the nuts.
- Single Adjustment Bolt: Some models have a single bolt that directly adjusts tension. Simply turn this bolt to tighten or loosen.
Step 3: Test The Adjustment
After each small adjustment, you need to test the result.
- Re-engage the Opener: Reconnect the emergency release cord to the trolley mechanism.
- Restore Power: Plug the garage door opener back into the electrical outlet.
- Operate the Door: Use your remote or the wall button to open and close the garage door completely, at least two or three times.
- Observe and Listen: Pay close attention to the operation. Does the belt move smoothly? Are there any grinding or slipping noises? Does the door move at a consistent speed?
Step 4: Repeat If Necessary
If the belt is still too loose or now seems too tight, repeat steps 2 and 3. Continue making small adjustments and testing until the belt has the correct tension.
What is the correct tension? The belt should be taut but not strained. It should have minimal sag (less than half an inch) when you press on it and should not make noise when the opener operates. In my experience, finding this sweet spot often requires a few iterations of small adjustments and testing.
Troubleshooting Common Issues
Even with careful adjustment, you might encounter some common problems. Understanding these issues and their solutions can help you resolve them effectively.
Belt Still Slipping After Adjustment
If the belt continues to slip despite tightening, the issue might be more complex than just tension.
- Worn Belt or Pulleys: The teeth on the belt or the pulley might be worn down, preventing proper grip. Inspect both for damage. If worn, they will need replacement.
- Misaligned Rail: If the rail is not perfectly straight or is misaligned with the motor unit, it can cause the belt to bind or slip. Check for any bends or shifts in the rail.
- Obstructions: Debris or foreign objects caught in the pulley system can impede smooth operation and cause slippage.
Opener Motor Humming But Not Moving Door
This often indicates the opener is encountering too much resistance, which can be caused by an incorrectly tensioned belt.
- Belt Too Tight: An overly tight belt creates significant drag on the motor. Loosen the belt slightly using the adjustment mechanism.
- Binding Door: The garage door itself might be binding due to issues with the rollers, tracks, or springs. Ensure the door moves freely by hand (with the opener disengaged) before adjusting the belt. You might need to address issues like those described in how to lube garage door rollers if friction is the cause.
Noisy Operation After Adjustment
While some initial noise might occur as the belt settles, persistent or new noises often point to an issue.
- Over-Tightening: A belt that is too tight can cause a high-pitched whine or a strained humming sound from the motor.
- Dry Rollers or Hinges: If the rest of the garage door mechanism is not properly lubricated, it can transfer noise to the opener system. Ensure rollers and hinges are clean and lubricated as per recommendations in guides like how do you lubricate garage door rollers.
- Damaged Belt or Pulleys: Cracked belts or damaged pulley teeth can create irregular noises.
How do you adjust a Chamberlain garage door opener often involves more than just the belt; sometimes, the overall calibration of the opener might be off.
When To Call A Professional
While adjusting belt tension is a manageable DIY task for many homeowners, there are situations where it’s best to call a qualified garage door technician.
Signs You Need Professional Help
- Uncertainty About the Process: If you’ve read through the steps and still feel uncomfortable or unsure about performing the adjustment, it’s safer to let a professional handle it.
- Persistent Problems: If you’ve attempted to adjust the belt tension and the problem persists, or if new issues arise, a technician can diagnose underlying problems that might be beyond simple belt adjustment. This could include motor issues, spring problems, or electrical faults.
- Visible Damage: If you notice significant wear, cracks, or damage to the belt, pulleys, or other components, a professional can replace the parts and ensure correct installation.
- Complex Opener Models: Some newer or more advanced Chamberlain models might have more intricate adjustment systems or integrated safety features that are best handled by an expert.
- Safety Concerns: If you are uncomfortable working on a ladder, with electrical components, or with the heavy garage door mechanism, do not hesitate to call a professional. The cost of a service call is often less than the potential cost of an injury or further damage.
A professional technician has the experience, specialized tools, and knowledge to quickly and safely diagnose and fix any garage door opener issue, ensuring your system operates correctly and safely. They can also perform a comprehensive inspection of your entire garage door system, identifying potential problems before they become serious.
Comparison Of Belt Tension Issues
Understanding the distinct characteristics of different belt tension problems can help in diagnosis. Here’s a table outlining common issues and their typical symptoms:
| Issue | Primary Symptoms | Likely Cause | Typical Solution |
|---|---|---|---|
| Loose Belt | Sagging belt, slipping noises (grinding, popping), inconsistent door movement, opener struggles to lift/lower door. | Belt has stretched over time or was not properly tensioned initially. | Tighten the belt tension adjustment mechanism. |
| Overly Tight Belt | Motor humming loudly, strained operation, potential overheating of the motor, increased wear on belt and pulleys. | Belt has been over-tensioned during adjustment. | Loosen the belt tension adjustment mechanism. |
| Worn Belt or Pulleys | Slipping noises even with correct tension, visible cracks or fraying on belt, worn teeth on pulleys. | Normal wear and tear, or improper tension leading to accelerated wear. | Replace worn belt and/or pulleys. |
| Misaligned Rail | Belt rubbing against the rail, inconsistent belt movement, noises from friction, potential belt damage. | Rail is bent, loose, or not properly secured. | Straighten and/or secure the rail. |
This table highlights how distinct symptoms can point to specific causes, guiding your troubleshooting process. For instance, if you hear grinding noises but the belt looks taut, the problem might be worn pulleys rather than just incorrect tension.
Maintaining Your Chamberlain Opener’s Belt
Regular maintenance can help prevent issues with belt tension and ensure the longevity of your Chamberlain garage door opener. Adhering to a maintenance schedule is key to avoiding unexpected problems.
Regular Inspections
Make it a habit to visually inspect your garage door opener’s belt at least twice a year. Look for any signs of sagging, fraying, or damage. While you’re at it, check the pulleys for any debris or wear. This quick check can catch minor issues before they become major problems.
Lubrication
While the belt itself typically doesn’t require lubrication, other moving parts of your garage door system do. Ensuring the rollers, hinges, and tracks are clean and properly lubricated can reduce the overall strain on the opener and prevent noises from being transferred. For guidance, refer to resources on how to lube garage door rollers for smooth, quiet operation.
Cleaning The Belt And Pulleys
Periodically, especially if you notice dust or grime build-up, gently clean the belt and the pulleys with a damp cloth. This can help maintain good traction between the belt and the pulleys, reducing the chance of slippage. Avoid using any lubricants directly on the belt or pulleys, as this can attract dirt and cause them to slip.
Professional Tune-ups
Consider having a professional garage door technician perform a full inspection and tune-up of your garage door system annually. They can identify potential issues with springs, cables, and the opener itself that you might miss, ensuring everything is in safe working order.
This is particularly important for complex systems or if you’re nearing the typical lifespan of your opener, which can range from 10-15 years depending on usage and maintenance. According to industry estimates, the average garage door opener has a lifespan of around 10,000 to 15,000 cycles.
Frequently Asked Questions
How Often Should I Check My Chamberlain Garage Door Opener Belt Tension?
It’s recommended to visually inspect your garage door opener’s belt tension at least twice a year. More frequent checks might be necessary if you notice any unusual noises or erratic door operation.
Can A Loose Belt Damage My Chamberlain Garage Door Opener?
Yes, a loose belt can cause several problems. It can lead to slipping, grinding noises, inconsistent door movement, and increased wear on the belt, pulleys, and motor. In severe cases, it might prevent the opener from lifting or lowering the door effectively, potentially causing further damage to the opener’s drive mechanism.
What Is The Maximum Sag Allowed For A Garage Door Opener Belt?
Ideally, the belt should have very little sag. As a general guideline, you should be able to press down on the belt in the middle of the rail and have it move no more than half an inch (1.27 cm). If it sags significantly more than this, it likely needs tightening.
Do I Need To Disconnect Power Before Adjusting The Belt Tension?
Absolutely, yes. It is critical to unplug the garage door opener from the power outlet and disengage the opener from the door using the emergency release cord before attempting any adjustments. This prevents accidental activation of the opener and potential injury.
My Chamberlain Opener Has A Chain Drive. How Do I Adjust The Chain Tension?
The process for adjusting a chain drive opener is similar but involves a different mechanism. Chain tension is typically adjusted using take-up bolts located on the chain drive rail, often near the motor unit. These bolts allow you to push the motor unit slightly away from the door, thus tightening the chain. Refer to your specific Chamberlain chain drive model’s manual for precise instructions, as the adjustment points can vary. You can find guides on how to adjust chain on garage door opener for smooth operation