
Programming your LiftMaster Elite Series garage door opener might seem like a technical task, but it’s a crucial step in ensuring your home’s security and convenience. These advanced openers offer robust features, and understanding how to program them, whether it’s for a new remote, a keypad, or even a replacement unit, is a skill every homeowner with this system should possess.
This guide will walk you through the essential programming steps, demystifying the process and empowering you to take control of your garage access.
Key Takeaways
- Understand Your Model: LiftMaster Elite Series openers have various models, each with slightly different programming sequences. Always consult your owner’s manual.
- Remote Control Programming: The most common task involves programming a new remote or replacing an existing one, typically done using the opener’s “Learn” button.
- Keypad Setup: Wireless keypads require a specific sequence of button presses on both the keypad and the opener’s “Learn” button to synchronize.
- Vehicle Remote Integration: Programming a HomeLink or similar in-car remote system involves a specific pairing process with the garage door opener.
- Troubleshooting Common Issues: Understanding error codes or common problems can help you resolve programming glitches quickly.
- Safety First: Always ensure the garage door is in a safe, disengaged state during programming to prevent accidental movement.
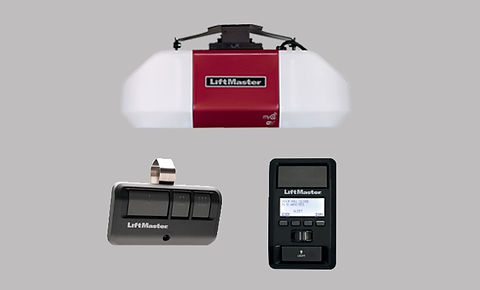
Credit: www.pristinegaragedoorservice.com
Understanding Your Liftmaster Elite Series Opener
LiftMaster’s Elite Series represents a range of garage door openers designed for enhanced performance, security, and connectivity. These openers often feature advanced rolling code technology, ensuring that each time you use your remote, a new, unique code is sent to the opener, preventing unauthorized access.
This security feature means that programming new remotes or keypads is a deliberate process designed to authenticate your devices. Before you begin any programming, it’s essential to identify your specific opener model. You can usually find this information on a label on the motor unit itself, often located on the back or side.
Knowing your model number is critical because the exact location of buttons and the specific sequence of operations can vary slightly between models.
For instance, some Elite Series openers might have a prominent “Learn” button on the back panel, while others might have it integrated near the power cord or on the logic board itself. The color of the “Learn” button is also a significant indicator; LiftMaster often uses different colors (like purple, red/orange, green, or yellow) to denote different radio frequency families and security protocols.
Understanding which color your opener has can sometimes help you quickly identify the correct programming procedure, though always deferring to your owner’s manual is the safest bet. Familiarizing yourself with the basic components, such as the motor unit, the drive mechanism (chain, belt, or screw), and the remote control, will also make the programming process more intuitive.
Locating The “learn” Button
The “Learn” button is the central component for most programming tasks on your LiftMaster Elite Series opener. Its location is paramount. Typically, you’ll find it on the motor unit of the garage door opener itself.
- On the Back Panel: This is the most common location. Look for a small, often colored button (purple, red/orange, green, yellow, or black) on the rear casing of the motor unit.
- Under the Light Cover: Some models might have the Learn button concealed beneath a removable light cover. You may need to gently pry open the cover to access it.
- On the Logic Board: In some rare cases, especially with older models or if the panel is damaged, the Learn button might be directly on the main electronic circuit board inside the opener. This requires opening the casing and should be done with caution, ensuring the opener is unplugged.
The color of the Learn button is a key indicator of the opener’s radio frequency and security system, which can be important for compatibility with remotes and keypads. For example, purple buttons typically indicate Security+ 315 MHz, while red/orange might indicate Security+ 390 MHz.
Always refer to your opener’s manual to confirm the button’s color and its corresponding function for your specific model.
Essential Tools And Preparations
Before you start programming, ensure you have a few things ready:
- Owner’s Manual: This is your most valuable resource. It will have model-specific instructions.
- Ladder: You’ll need a stable ladder to safely reach the motor unit.
- A Working Remote: You’ll need at least one existing, programmed remote to help with some programming sequences.
- New Remote/Keypad: The device you intend to program.
- Pen and Paper: To jot down codes or sequences if necessary.
Safety is paramount. Before beginning any programming that involves interacting with the motor unit, ensure the garage door is fully closed and that no one is in the path of the door. It’s also wise to unplug the opener if you need to access internal components, though most programming doesn’t require this.

Credit: www.youtube.com
Programming A Liftmaster Elite Series Remote Control
Programming a new remote control for your LiftMaster Elite Series opener is one of the most frequent tasks homeowners undertake. This is essential when you get a new vehicle, lose a remote, or simply want an additional one. The process relies heavily on the opener’s “Learn” button.
Step-by-step Remote Programming
- Locate the “Learn” Button: As discussed, find the Learn button on your LiftMaster Elite Series motor unit.
- Press and Release the “Learn” Button: Press the button firmly and then release it. A red or orange LED next to the button will illuminate, indicating the opener is in programming mode. You typically have about 30 seconds to complete the next step.
- Press the Remote Button: Immediately press and hold the desired button on your new remote control.
- Observe the Opener: Continue holding the remote button. After a few seconds, the overhead garage door opener lights will blink, or you will hear an audible “click” from the motor unit. This signifies that the remote has been successfully programmed.
- Test the Remote: Release the button on the remote. Step away from the opener and press the programmed button on your remote again. The garage door should now operate.
If the opener lights do not blink or you don’t hear a click, the programming was unsuccessful. You may need to repeat the process, ensuring you press the buttons within the allotted time frame. Sometimes, interference from other devices can disrupt the signal.
Programming Multiple Remotes
If you are programming more than one remote, you generally need to repeat the process for each individual remote. After successfully programming the first remote, the opener will likely exit programming mode. You will need to press and release the “Learn” button again and then press the button on the next remote you wish to program.
Each remote can be programmed to a different button if your remote has multiple buttons, allowing you to control different doors or gates.
Programming With Existing Remotes
In some cases, you might need to program a new remote while an existing, working remote is present. The general procedure remains the same: use the “Learn” button on the motor unit. The opener doesn’t “know” which remote is new or old; it simply learns the signal from any remote button pressed while it’s in learning mode. If you’re trying to *replace* a lost remote, you don’t need the old one if you’re using the opener’s Learn button. However, if you were using a remote as a “master” to program others (a less common method), then the working remote would be essential.

Credit: a1garage.com
Programming A Liftmaster Elite Series Keypad
Wireless keypads offer a convenient way to access your garage without a remote. Programming a LiftMaster keypad involves a slightly different sequence, ensuring that only authorized codes can operate your opener.
Step-by-step Keypad Programming
- Locate the “Learn” Button and LED: Find the “Learn” button and its associated LED on your garage door opener motor unit.
- Press and Release the “Learn” Button: Press and release the Learn button. The LED will illuminate.
- Enter Your Desired PIN: On the wireless keypad, enter your Personal Identification Number (PIN). This is typically a 4-digit code you choose. Press the “ENTER” or “PROG” button on the keypad.
- Press the Keypad’s “ENTER” Button Again: Within a few seconds, press the “ENTER” button on the keypad again.
- Observe the Opener: The overhead garage door opener lights will blink, or you will hear a click, indicating the PIN has been accepted and programmed.
- Test the Keypad: Enter your PIN on the keypad and press the “ENTER” button. The garage door should operate.
Important Notes for Keypad Programming:
- PIN Selection: Choose a PIN that is easy for you to remember but difficult for others to guess. Avoid sequences like “1111” or “1234.”
- PIN Reset: If you need to change your PIN, you will typically need to reprogram the keypad using the same process. This also applies if you’re replacing the keypad’s battery, as some models may lose their programming.
- Multiple Keypads: If you have multiple keypads, each will need to be programmed individually using this method.
Changing The Keypad Pin
To change the PIN on your LiftMaster keypad, you’ll essentially follow the same programming steps. The process will overwrite the old PIN with a new one.
- Access the “Learn” button on the motor unit and initiate programming mode (LED illuminates).
- On the keypad, enter your new desired PIN.
- Press the “ENTER” or “PROG” button on the keypad.
- Press the “ENTER” button on the keypad again.
- The opener will confirm the programming.
This ensures that your old PIN is no longer valid and only your new PIN will grant access.
Programming Homelink Or Car Remote Systems
Many modern vehicles come equipped with integrated HomeLink or similar car remote systems. These systems allow you to program your car’s built-in buttons to operate your garage door opener, eliminating the need for a separate remote. Programming HomeLink requires a specific procedure that often involves both the car’s buttons and the garage door opener’s “Learn” button.
Homelink Programming Steps
- Prepare Your Vehicle: Park your car within range of the garage door opener, but ideally not directly underneath it. Turn the ignition to the “ON” or “Accessory” position (do not start the engine).
- Clear Existing Codes (If Necessary): For initial setup or if you suspect the HomeLink buttons are already programmed, press and hold the two outer HomeLink buttons simultaneously for about 10-20 seconds. The LED indicator on the HomeLink system will begin to flash rapidly, indicating it has been cleared.
- Program the HomeLink Button: Place your existing garage door remote (one that currently works) about 1-3 inches away from the HomeLink transceiver (often located on the visor or in the overhead console). Press and hold the desired HomeLink button in your car, and simultaneously press and hold the button on your garage door remote.
- Observe HomeLink LED: Continue holding both buttons. The HomeLink LED will first flash slowly, then rapidly. Once it flashes rapidly, release both buttons. This indicates that the HomeLink system has learned the remote’s signal.
- Program the Opener: Now, you need to link the learned signal to your actual garage door opener. Locate the “Learn” button on your LiftMaster Elite Series motor unit. Press and release the Learn button.
- Activate HomeLink: Within 30 seconds, press and hold the programmed HomeLink button in your car. The garage door opener lights should blink, or you’ll hear a click, confirming the connection.
- Test: Release the HomeLink button. Your garage door should now operate when you press the programmed HomeLink button.
Important Considerations for HomeLink:
- Rolling Code Compatibility: Most modern HomeLink systems are designed to work with rolling code technology. However, older HomeLink versions might not be compatible with newer rolling code openers. In such cases, you might need a HomeLink compatibility bridge or a specific adapter. Always check the HomeLink website or your vehicle’s manual for compatibility information.
- Second Person: Having a second person to press the opener’s Learn button while you activate the HomeLink button from inside the car can make this process much easier.
- Multiple Buttons: You can program multiple HomeLink buttons to operate different garage doors or gates, repeating the process for each.
Troubleshooting Common Programming Issues
Even with clear instructions, programming issues can arise. Understanding common problems and their solutions can save you time and frustration.
Remote Not Responding After Programming
- Incorrect Button Press: Ensure you pressed the remote button firmly and held it long enough for the opener lights to flash or the click to occur.
- Battery Issues: Check the battery in the new remote. A weak battery might not transmit a strong enough signal.
- Range Problems: Try programming the remote closer to the motor unit. Sometimes, initial programming is best done with minimal distance.
- Compatibility: Verify that the remote is compatible with your specific LiftMaster Elite Series model. Not all LiftMaster remotes work with all LiftMaster openers. Check the frequency and security type (e.g., Security+, Security+ 2.0).
- Opener Limit Reached: Most openers can only store a certain number of remote codes. If the memory is full, you may need to erase all codes and reprogram all your remotes. Refer to your manual for instructions on clearing the opener’s memory. This is often done by pressing and holding the Learn button for an extended period (e.g., 30 seconds) until the LED goes out.
Keypad Not Working
- Incorrect PIN Entry: Double-check that you are entering the correct PIN and pressing the “ENTER” button.
- Battery: The keypad itself may have batteries that need replacement. A low battery can cause erratic behavior or prevent programming.
- Programming Sequence Errors: Ensure you followed the exact sequence of pressing the opener’s Learn button, entering the PIN, and pressing the keypad’s Enter button.
- Lockout Mode: Some systems may enter a lockout mode after too many incorrect PIN attempts. This usually resolves itself after a period or requires a reset.
- Keypad Failure: In rare cases, the keypad itself might be faulty and require replacement.
Homelink Not Connecting
- Compatibility: As mentioned, ensure your HomeLink version is compatible with your opener. Visit HomeLink’s official website for compatibility checkers.
- Incorrect Sequence: The two-step process (programming the remote signal to HomeLink, then linking HomeLink to the opener) must be followed precisely.
- Distance and Interference: Ensure you are within the correct range and that there are no significant sources of radio interference (like metal structures or other powerful transmitters) between the car and the opener.
- Opener Memory Full: If your opener has reached its limit for stored devices, you may need to clear its memory and reprogram all devices.
Advanced Programming And Features
Beyond basic remote and keypad programming, some LiftMaster Elite Series openers offer advanced features that might require specific programming steps.
Programming Myq® Enabled Devices
If your Elite Series opener is MyQ® enabled, it can connect to your home Wi-Fi network, allowing you to control and monitor your garage door via a smartphone app.
- Download the MyQ® App: Get the LiftMaster MyQ® app from your device’s app store.
- Connect the Hub/Opener: Follow the app’s instructions to connect your opener to your home Wi-Fi network. This usually involves pressing a button on the opener or a separate gateway device and following on-screen prompts.
- Create an Account: Set up your MyQ® account within the app.
- Add Your Opener: Link your garage door opener to your account through the app.
- Program Accessories: The app can often guide you through programming additional MyQ® accessories, such as smart lighting or security sensors.
Setting Travel Limits And Force Adjustment
While not strictly “programming” in the sense of adding devices, setting travel limits (how far the door opens and closes) and force adjustments (how much force the opener uses) are critical for safe and proper operation. These are usually set when the opener is first installed but can be readjusted if needed.
- Travel Limits: This involves manually moving the door to the fully open and fully closed positions and then using buttons on the motor unit to set these points. Your manual will detail the specific button presses and LED indicators for this.
- Force Adjustment: This setting determines the amount of force the opener applies before stopping or reversing. It’s a crucial safety feature. Adjustments are typically made via a dial or buttons on the motor unit, with instructions in your manual to test the force by placing a 2×4 board in the door’s path. If the door hits the obstruction, it should reverse immediately.
These settings are vital for preventing the door from damaging itself, your property, or causing injury. For detailed instructions on setting limits and force, consult your specific LiftMaster Elite Series owner’s manual.
Comparison Of Liftmaster Elite Series Opener Technologies
LiftMaster has evolved its technology over the years, and understanding these differences can be important, especially when purchasing new accessories. The primary distinctions lie in their security protocols and radio frequencies.
| Feature/Technology | Security+ (Red/Orange, Green, Yellow Button) | Security+ 2.0 (Purple, 8365-2664, 8500W, etc.) | MyQ® Connectivity |
|---|---|---|---|
| **Radio Frequency** | 390 MHz (common) | 310 MHz, 315 MHz, 390 MHz (auto-sensing) | Wi-Fi (2.4 GHz) |
| **Code Type** | Rolling Code | Enhanced Rolling Code (Redundant signal) | N/A |
| **Security Level** | High | Very High | High (Encrypted) |
| **Range** | Standard | Extended | Internet-based |
| **Compatibility** | Older remotes (e.g., 371LM, 373LM) | Newer remotes (e.g., 891LM, 893LM), Keypads (e.g., 877LM) | MyQ® accessories, smartphone app |
| **Programming** | Learn button (color-coded) | Learn button (often purple), specific sequences | App-guided setup |
Example: If you have an older LiftMaster opener with a green learn button (Security+ 390 MHz), you need a compatible remote like the 371LM or 373LM. If you have a newer model with a purple learn button (Security+ 2.0), you’ll need a remote like the 891LM or 893LM. Using an incompatible remote will not work. Always check the specifications of your opener and the accessory you intend to program.
Frequently Asked Questions
What If My Liftmaster Opener Doesn’t Have A Visible “learn” Button?
If you cannot locate the “Learn” button on the exterior of your motor unit, it might be concealed under the light cover, on the internal logic board, or your opener might be an older model with a different programming method.
Consult your owner’s manual, or if you no longer have it, search online for your specific model number. In some cases, older models might require a wiring connection to a wall button for programming.
How Do I Clear All Programmed Remotes From My Liftmaster Opener?
To clear all programmed remotes and keypads, you typically need to press and hold the “Learn” button on the motor unit for an extended period, usually about 30 seconds. The LED indicator next to the button will flash rapidly and then go out, signaling that all codes have been erased. After this, you will need to reprogram all remotes and keypads you wish to use. This is a useful step if you suspect a lost remote could still access your garage. For more details, refer to Chamberlain Group’s official support on clearing opener codes.
Can I Program A Universal Remote To My Liftmaster Elite Series Opener?
Yes, universal remotes are often compatible with LiftMaster openers. However, you must ensure the universal remote is designed to work with the specific Security+ or Security+ 2. 0 protocol and frequency your LiftMaster opener uses. Follow the universal remote’s programming instructions, which will typically involve a learning or auto-scan mode to detect the opener’s signal.
You will likely still need access to the opener’s “Learn” button during the process.