
A loose or overtightened garage door chain can lead to a host of problems, from an unusually noisy operation to a complete failure of your automatic opener. Understanding how to properly adjust the chain tension is a crucial maintenance task that can save you time, money, and frustration.
This guide will walk you through the process step-by-step, explaining the importance of correct tension, the tools you’ll need, and how to perform the adjustment safely and effectively.
Key Takeaways
- Safety First: Always disconnect power to the garage door opener before beginning any adjustments.
- Tools Required: You’ll typically need a ladder, adjustable wrench, pliers, and possibly a screwdriver.
- Identifying the Problem: Listen for grinding noises, observe jerky movements, or check for excessive slack or tautness in the chain.
- Locating the Adjustment Mechanism: Most openers have an adjustment nut or bolt on the motor unit or trolley.
- The Adjustment Process: Loosen the locking nut, turn the adjustment bolt clockwise to tighten or counterclockwise to loosen, and re-secure the locking nut.
- Testing: Manually operate the door and then test the opener to ensure smooth, safe operation.
- When to Call a Pro: If you’re unsure, uncomfortable, or the problem persists, seek professional help.
Understanding Garage Door Chain Tension
The chain on your garage door opener is analogous to the drive belt on a car or the chain on a bicycle. Its primary function is to transmit power from the motor to the garage door itself, lifting and lowering it smoothly. The tension of this chain is critical for its efficient and safe operation.
Why Correct Chain Tension Matters
- Smooth Operation: A properly tensioned chain ensures that the opener engages with the door smoothly, without jerking or skipping. This reduces wear and tear on the opener’s motor, gears, and the chain itself.
- Noise Reduction: Excessive slack can cause the chain to sag and slap against its housing or other components, leading to a noisy garage door. Conversely, an overly tight chain can create a humming or grinding sound as it strains the motor.
- Preventing Damage: A loose chain can derail, causing significant damage to the opener mechanism and potentially the door itself. An overtightened chain puts undue stress on the motor, leading to premature failure.
- Safety: A properly functioning opener, reliant on correct chain tension, is a key safety feature. It ensures the door moves predictably and reliably.
Signs Of Incorrect Chain Tension
Several indicators can signal that your garage door opener chain needs adjustment:
- Visible Slack: When the door is closed, you can see a significant sag in the chain between the motor unit and the trolley. The chain should be taut but not stretched.
- Jerky Movement: The door opens or closes in a jerky, uneven fashion, rather than a smooth, consistent motion.
- Grinding or Squealing Noises: Unusual sounds emanating from the motor unit during operation often point to issues with the chain or its tension.
- Chain Slipping: You might hear a distinct “slipping” sound, indicating the chain is not properly engaging with the sprocket.
- Opener Struggles: The motor seems to be working harder than usual, or the door doesn’t move at all.
In my experience, most homeowners notice issues with chain tension when they hear new, unpleasant noises or when the door’s movement becomes noticeably erratic. Early detection and adjustment can prevent more costly repairs down the line.

Credit: www.diychatroom.com
Preparing For The Adjustment
Before you grab your tools, it’s essential to prioritize safety and gather everything you’ll need. Attempting to adjust the chain without proper preparation can be dangerous.
Safety Precautions
The most critical safety step is to disconnect the power to your garage door opener. This prevents the door from accidentally starting to move while you are working on it, which could cause serious injury.
- Locate the Power Source: Find the power cord that plugs into the ceiling outlet or the circuit breaker that controls the garage door opener.
- Unplug or Flip the Breaker: Unplug the opener from the outlet or flip the corresponding circuit breaker to the “off” position.
- Verify Power is Off: Try operating the opener using the remote or wall button to confirm that it is indeed not receiving power.
Tools You’ll Need
The tools required for chain tension adjustment are generally common household items.
- Ladder: You’ll need a sturdy ladder to safely reach the garage door opener motor unit, which is typically mounted on the ceiling.
- Adjustable Wrench: This will be used to loosen and tighten nuts that secure the chain tensioning mechanism.
- Pliers: Needle-nose or standard pliers can be helpful for manipulating small parts or holding nuts in place.
- Screwdriver (Phillips or Flathead): Some adjustment mechanisms may require a screwdriver.
- Safety Glasses: Always wear safety glasses to protect your eyes from any debris that might fall.
- Work Gloves: These can improve your grip and protect your hands.

Credit: www.youtube.com
Locating The Chain Adjustment Mechanism
The location of the chain adjustment mechanism varies depending on the manufacturer and model of your garage door opener. However, it’s most commonly found in one of two places:
On The Motor Unit
Many garage door openers have the adjustment mechanism integrated directly into the motor unit itself, which is mounted at the end of the horizontal track above the garage door.
- Adjustment Bolts/Nuts: Look for a bolt or nut assembly near where the chain connects to the motor unit or along the trolley mechanism. This assembly is designed to move the sprocket or the motor unit slightly, thereby adjusting the chain’s tautness.
- Tensioning Sprocket: Some models have a separate tensioning sprocket that can be moved to alter the chain’s length.
On The Trolley Assembly
The trolley is the part that moves along the horizontal track, connecting to the garage door via a vertical arm. In some designs, the adjustment mechanism is located on or near the trolley.
- Sliding Mechanism: The trolley might have a mechanism that allows it to slide slightly forward or backward along the track, which in turn adjusts the chain.
Pro Tip: Consult your garage door opener’s owner’s manual. It will provide specific diagrams and instructions for your model, clearly indicating the location and operation of the chain adjustment mechanism. If you don’t have the manual, you can usually find a digital version on the manufacturer’s website by searching for your opener’s model number.
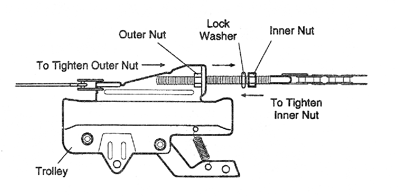
Credit: www.naturalhandyman.com
Adjusting The Chain Tension: Step-by-step
Once you’ve located the adjustment mechanism and have your tools ready, you can proceed with the adjustment. Remember to work slowly and deliberately.
Step 1: Assess The Current Tension
Before making any adjustments, take a moment to re-evaluate the chain’s tension.
- With the power off, move the garage door to the fully closed position.
- Gently push on the chain midway between the motor unit and the trolley. There should be about 1/4 to 1/2 inch of play (sag).
- If there is significantly more sag, the chain is too loose.
- If the chain feels extremely tight with no discernible play, it is too tight.
Step 2: Loosen The Locking Mechanism
Most adjustment mechanisms have a locking nut or bolt that secures the adjustment screw in place.
- Using your adjustable wrench, loosen this locking nut. You typically only need to loosen it a few turns to allow the adjustment bolt to turn. Do not remove the nut completely.
Step 3: Adjust The Tension
Now, you’ll turn the adjustment bolt to tighten or loosen the chain.
- To Tighten the Chain (Reduce Slack): Turn the adjustment bolt clockwise. This usually moves the sprocket or motor unit further away, taking up slack.
- To Loosen the Chain (Increase Slack): Turn the adjustment bolt counterclockwise. This usually moves the sprocket or motor unit closer, creating more slack.
Important Considerations:
- Make Small Adjustments: Adjust the bolt in small increments, perhaps a quarter or half turn at a time.
- Check Tension Frequently: After each small adjustment, check the chain’s play by pushing on it. You’re aiming for that 1/4 to 1/2 inch of sag.
- Observe the Door: As you adjust, pay attention to how the chain moves along the sprocket. It should mesh smoothly.
Step 4: Re-secure The Locking Mechanism
Once you’ve achieved the desired tension, you need to lock the adjustment in place.
- Tighten the locking nut firmly with your adjustable wrench. This prevents the adjustment bolt from vibrating loose over time. Ensure it’s snug, but avoid overtightening, which could strip the threads.
Step 5: Test The Operation
This is a critical step to ensure the adjustment was successful and safe.
- Restore Power: Plug the opener back in or flip the circuit breaker back to the “on” position.
- Manual Operation Test:
- Disengage the opener (usually via a red emergency release cord).
- Manually lift and lower the garage door. It should move smoothly and with reasonable effort. There should be no binding or excessive weight. This test helps ensure the door’s balance is correct and not being hindered by chain tension.
- Opener Operation Test:
- Re-engage the opener mechanism.
- Use the remote control or wall button to operate the door.
- Observe the movement: Is it smooth? Are there any unusual noises? Does it travel its full range without hesitation?
- Listen carefully for any grinding, slipping, or straining sounds.
- Check the chain’s tension again while the opener is running. It should remain taut but not overly stretched.
If the door operates smoothly and quietly, you’ve successfully adjusted the chain tension. If you encounter any issues, repeat the adjustment process, making smaller changes and re-testing thoroughly.
Common Issues And Troubleshooting
Even with careful adjustments, you might encounter some common problems. Here’s how to troubleshoot them:
Chain Still Too Loose Or Too Tight
- Cause: You may have not made a large enough adjustment, or the locking nut might have slipped.
- Solution: Repeat the adjustment process, ensuring you make slightly larger turns of the adjustment bolt. Double-check that the locking nut is securely tightened. If the issue persists, there might be a problem with the sprocket or the chain itself (e.g., worn teeth, stretched links).
Grinding Noises Persist
- Cause: The grinding could be due to worn sprocket teeth, a damaged chain, or misalignment of the track. It’s also possible that the opener’s internal gears are damaged.
- Solution: Inspect the sprocket on the motor unit for worn or broken teeth. Check the chain for any kinks or damaged links. If the track appears misaligned, it may need to be adjusted. If the noise seems to come from within the motor unit, it’s time to contact a professional. You can also check out our guide on how to lube garage door rollers, as lubrication can sometimes resolve minor noise issues.
Opener Struggles Or Stops Mid-travel
- Cause: This could be due to overtightening the chain, causing excessive strain on the motor. It could also indicate a problem with the door’s balance, worn-out opener components, or obstruction.
- Solution: Loosen the chain slightly and re-test. Ensure the door is properly balanced by checking its manual operation effort. Inspect the track and surrounding area for any obstructions. If the motor still struggles, it might require professional diagnosis.
Chain Derails
- Cause: This is a clear sign of excessive looseness or a misaligned track or sprocket.
- Solution: Immediately disconnect power. Re-align the track if necessary. Then, tighten the chain significantly more than you think you need, and test thoroughly. If it derails again, the sprocket or the track may be damaged and require replacement.
When To Call A Professional
While adjusting garage door chain tension is a manageable DIY task for many, there are situations where it’s best to call in an expert:
- Uncertainty or Discomfort: If you’re not confident in your ability to perform the adjustment safely or correctly, don’t hesitate to seek professional help.
- Persistent Problems: If you’ve tried adjusting the chain and the problem persists, or if new issues arise, a professional technician can diagnose the root cause.
- Signs of Major Damage: If you notice significant wear on the sprocket, damaged chain links, or bent tracks, these are issues that often require professional repair or replacement.
- Electrical Issues: If you suspect electrical problems with the opener itself, leave it to a qualified technician.
- Complex Opener Models: Some high-end or commercial garage door openers have more intricate adjustment mechanisms that may be best handled by a professional.
A professional garage door technician has the experience and specialized tools to quickly and accurately diagnose and fix chain tension issues, as well as any related problems. The average cost for a garage door opener repair, which could include chain adjustment, can range from $100 to $350, depending on the complexity of the issue. Understanding garage door costs can help you budget for potential repairs.
Alternative And Related Adjustments
While chain tension is crucial, other adjustments on your garage door opener can affect its overall performance and are sometimes confused with chain issues.
Travel Limit Adjustments
Garage door openers have travel limits that tell the door when to stop opening or closing. If these limits are set incorrectly, the door might not close completely, or it might hit the ceiling when opening. These are adjusted via specific screws or buttons on the motor unit, separate from the chain tension mechanism. Improper travel limits can sometimes be mistaken for chain problems because the door doesn’t move to its expected end position.
Force Adjustments
Most openers also have force adjustments, which set the amount of force the opener uses to open and close the door. If this is set too low, the opener might struggle to lift a heavy door, even with perfect chain tension. If it’s set too high, it can be a safety hazard. These adjustments are also separate from chain tension.
Door Balance
A garage door should be properly balanced. This means when you disengage the opener, you should be able to lift and lower the door manually with relative ease. If the door is too heavy or too light to lift, it indicates a problem with the spring system, not the chain. An unbalanced door puts excessive strain on the opener, regardless of chain tension. If you suspect an imbalance, do not attempt to adjust the springs yourself, as they are under extreme tension and can cause serious injury. This is a job for a professional.
Chain Lubrication
While not an adjustment, proper lubrication is vital for chain longevity and smooth operation. A dry chain can create friction, noise, and wear. Use a garage door lubricant (silicone-based sprays are often recommended) on the chain, following the manufacturer’s guidelines. This is often done in conjunction with lubricating the garage door rollers, which also contribute to smooth movement.
Maintaining Optimal Chain Tension
Regular maintenance is key to preventing issues with your garage door opener chain.
- Monthly Checks: Visually inspect the chain for any signs of wear, damage, or excessive slack. Listen for unusual noises during operation.
- Annual Professional Inspection: Consider having a garage door professional inspect your entire system annually. They can identify potential issues with the chain, sprockets, motor, and springs before they become major problems.
- Address Noises Promptly: Don’t ignore new or unusual sounds. A small issue like slightly loose chain tension can often be fixed easily, but ignoring it can lead to significant damage.
By performing these simple checks and addressing any potential issues promptly, you can ensure your garage door opener operates reliably and safely for years to come. Understanding how to adjust the chain is a valuable skill for any homeowner.
Frequently Asked Questions
How Often Should I Check My Garage Door Chain Tension?
It’s recommended to perform a visual check of your garage door chain tension at least once a month. Listen for any new noises during operation. A more thorough inspection, including checking the tension, can be done annually as part of your garage door maintenance routine.
Can A Loose Chain Damage My Garage Door Opener?
Yes, a loose chain can cause significant damage. It can slip off the sprocket, leading to the opener not functioning at all and potentially damaging the motor or other internal components. It can also cause the chain to slap against its housing or other parts, leading to premature wear and tear.
What Happens If I Overtighten The Garage Door Chain?
Overtightening the chain puts excessive strain on the garage door opener’s motor and gears. This can cause the motor to overheat, wear out faster, or even fail prematurely. It can also lead to increased noise and vibration during operation. The chain itself can also stretch or break under extreme tension.
Do All Garage Door Openers Have Adjustable Chains?
Most chain-driven garage door openers have some form of chain tension adjustment. However, the exact mechanism can vary significantly by brand and model. Some newer openers might use a belt drive system, which has different adjustment procedures or may not require manual tensioning.
Always refer to your specific owner’s manual for guidance.
Is It Safe To Adjust The Chain If My Opener Is Old?
If your garage door opener is very old, its components may be worn out. While you can still attempt to adjust the chain tension, be aware that worn sprockets, a stretched chain, or a failing motor could mean that even with proper tension, the opener may not operate reliably or safely. In such cases, it might be more cost-effective and safer in the long run to consider replacing the opener. adjusting a Chamberlain garage door opener, for example, often involves a straightforward process, but the underlying condition of the unit is paramount.
Ensuring your garage door chain has the correct tension is a vital part of maintaining your opener’s functionality and longevity. By following these steps, you can confidently perform this adjustment yourself, saving on potential service calls and keeping your garage door operating smoothly and reliably.
Remember, safety should always be your top priority, and if you encounter any difficulties or are unsure about any step, seeking professional assistance is always the best course of action.