
A garage door that refuses to open all the way is more than just an inconvenience; it’s a potential security risk, a barrier to your daily routine, and a source of significant frustration. Whether you’re rushing to get to work, trying to get groceries inside, or simply want to park your car, a malfunctioning garage door can bring your day to a screeching halt.
Understanding the common culprits behind this issue is the first step towards a swift and effective resolution, preventing minor glitches from escalating into major repairs.
This comprehensive guide will equip you with the knowledge to diagnose why your garage door might not be opening fully. We’ll explore the various mechanical and electrical components that could be at play, from simple obstructions to more complex sensor or motor issues.
By breaking down the problem into manageable steps, you can identify the root cause and determine whether a DIY fix is within reach or if it’s time to call in a professional.
Key Takeaways
- Obstructions are the simplest cause: Always check the door’s path for physical blockages first.
- Sensor alignment is crucial: Misaligned or dirty safety sensors are a frequent reason for doors stopping mid-open.
- Limit settings need calibration: Incorrectly set open-limit settings will prevent the door from reaching its full height.
- Tension springs are vital: Broken or weakened torsion springs can prevent the door from lifting properly.
- Opener chain/belt issues: A loose or damaged chain/belt can hinder the opener’s ability to lift the door.
- Remote/button malfunctions: Sometimes, the problem lies with the activation device, not the door itself.
- Safety features are paramount: Never bypass safety mechanisms; address the underlying issue.
- Professional help is advised: For complex mechanical or electrical issues, consult a qualified garage door technician.
Credit: www.reddit.com
Common Reasons Your Garage Door Stops Mid-open
When your garage door hesitates or stops completely before reaching its full open position, it’s usually a sign that something is preventing its normal operation or a safety mechanism has been triggered. Pinpointing the exact cause requires a systematic approach, examining both the door itself and the automated opener system.
Many of these issues are surprisingly common and can often be resolved with a bit of troubleshooting.
Obstructions In The Doorway
The most straightforward reason for a garage door not opening all the way is a physical obstruction. This could be anything from a misplaced item left in the garage to debris that has accumulated on the floor.
- Check the Floor: Walk the entire length of the garage door’s path on the floor. Look for rocks, tools, toys, or any other objects that might be preventing the door from clearing the ground.
- Inspect the Tracks: Examine the vertical and horizontal tracks on both sides of the garage door. Debris, bent sections, or even ice buildup in colder climates can impede the rollers and stop the door’s upward movement.
- Look for Door Warping: In rare cases, the garage door itself might have warped or become slightly detached from its rollers, causing it to bind in the tracks.
Safety Sensor Malfunctions
Modern garage door openers are equipped with safety sensors located near the bottom of the tracks on each side. These sensors emit an invisible beam; if this beam is broken while the door is closing, it will immediately reverse. However, they can also cause issues when the door is *opening*. If the sensors are misaligned, dirty, or obstructed, the opener might interpret this as an ongoing obstruction, causing the door to stop prematurely.
- Alignment Issues: The sensors must be perfectly aligned to “see” each other. Even a slight misalignment can trigger a safety stop.
- Dirt and Debris: Dust, cobwebs, or smudges on the sensor lenses can interfere with the beam.
- Damaged Sensors: Bent or broken sensors will not function correctly.
- Wiring Problems: Loose or damaged wiring to the sensors can also cause intermittent issues.
Incorrect Travel Limit Settings
Garage door openers have limit settings that tell the door how far to open and close. These are typically adjustable and can sometimes become dislodged or incorrectly set, especially after a power surge or manual override.
- Open Limit Setting: If the open limit is set too low, the opener will think the door has reached its fully open position even when it hasn’t. This is a very common cause of the problem.
- Adjustment Process: Most openers have a dial or buttons on the motor unit to adjust these limits. The exact procedure varies by manufacturer and model. Refer to your opener’s manual for specific instructions. For example, adjusting the travel limits on a Chamberlain opener follows a specific sequence of button presses.
Problems With The Torsion Springs Or Extension Springs
Garage doors are balanced by torsion springs (mounted above the door) or extension springs (running alongside the horizontal tracks). These springs store energy to help lift the heavy door, making it easier for the opener to do its job.
- Broken Torsion Spring: A broken torsion spring is a serious issue. The door will feel extremely heavy, and the opener will struggle or be unable to lift it fully. You might hear a loud snap when a torsion spring breaks. Warning: Torsion springs are under immense tension and can cause severe injury if handled improperly. Always call a professional for spring replacement.
- Weakened Springs: Over time, springs can lose tension. A weakened spring might lift the door partway but not have enough power to complete the travel, especially if the door is heavy or the opener is struggling.
- Extension Springs: If your system uses extension springs, check if they are properly attached and not stretched out excessively. A broken or dislodged extension spring will prevent the door from lifting smoothly.
Issues With The Opener’s Drive Mechanism
The drive mechanism of the garage door opener (chain, belt, or screw drive) is responsible for moving the door. Problems within this system can directly affect the door’s ability to open fully.
- Loose or Damaged Chain/Belt: Over time, the chain or belt that connects the opener motor to the door can become loose or worn. A loose chain might skip teeth on the sprocket, causing the opener to stop lifting the door before it’s fully open. A damaged belt can also slip. You might hear grinding or skipping noises. For chain-driven openers, you might need to adjust the chain on the garage door opener if it has become slack.
- Worn Sprockets or Pulleys: The sprockets (on chain drives) or pulleys (on belt drives) can wear down, preventing the chain or belt from engaging properly.
- Stripped Gears: Internal gears within the opener motor can strip, leading to a lack of power or complete failure to move the door.

Credit: www.reddit.com
Troubleshooting Steps For A Garage Door That Won’t Open All The Way
When your garage door decides to stop halfway, it’s crucial to approach the problem methodically. Rushing can lead to misdiagnosis or even further damage. By following these steps, you can systematically identify the cause and determine the best course of action.
1. Check For Obvious Obstructions
Before diving into more complex mechanical or electrical issues, always perform a thorough visual inspection for anything blocking the door’s path.
- Clear the Floor: Remove any items from the direct path of the garage door on the floor. This includes anything that might have fallen or been placed there.
- Inspect Tracks: Look closely at the vertical and horizontal tracks. Ensure there are no bent sections, debris, or objects lodged within them that could be catching the rollers. Sometimes, a small pebble or a piece of wood can cause significant problems.
- Examine Rollers: While you’re inspecting the tracks, check the rollers themselves. Ensure they are all present, properly seated in the tracks, and not excessively worn or damaged.
2. Test The Door Manually
To understand if the issue lies with the opener system or the door’s balance, it’s essential to test its manual operation.
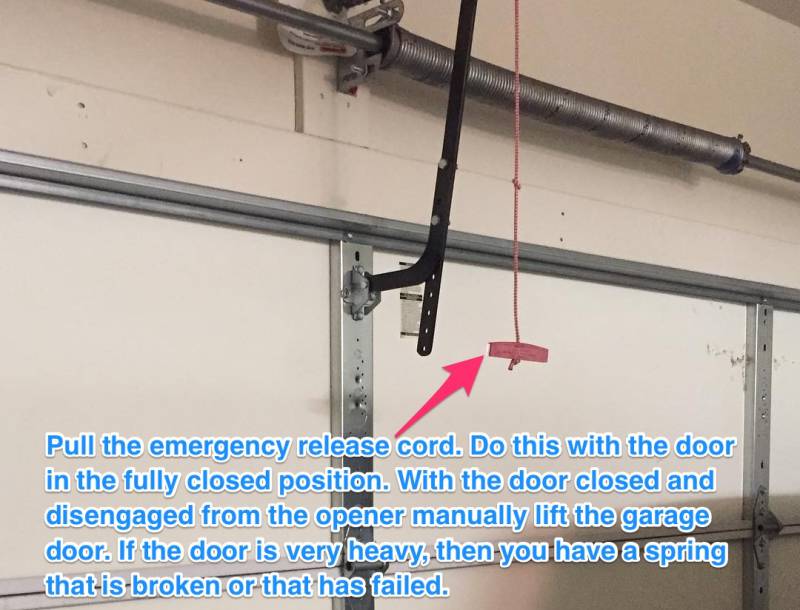
- Disengage the Opener: Locate the emergency release cord (usually a red handle) hanging from the opener’s trolley. Pull it down and toward the opener motor to disengage the opener from the door.
- Lift the Door by Hand: Carefully try to lift the garage door manually. It should lift smoothly and with moderate effort, staying in place when you let go (indicating it’s properly balanced).
- If the door is very heavy and difficult to lift: This strongly suggests a problem with the spring system (torsion or extension springs). Warning: Do not attempt to adjust or repair springs yourself, as they are under extreme tension and can cause serious injury. Contact a professional immediately.
- If the door moves smoothly but stops halfway: This points towards an issue with the opener’s travel limits or a problem with the drive mechanism (chain, belt).
- If the door is jerky or binds: This could indicate bent tracks, damaged rollers, or a problem with the door’s balance or cables.
3. Inspect The Safety Sensors
The safety sensors are a common culprit for doors stopping prematurely, especially during opening cycles.
- Locate Sensors: Identify the two sensors, one on each side of the garage door track, usually about 6 inches off the ground.
- Check Indicator Lights: Most sensors have small LED indicator lights. One sensor typically has a solid light (power indicator), and the other has a light that blinks or is off when the beam is broken. Consult your opener’s manual to understand what the lights indicate for your specific model.
- If both lights are off or blinking erratically: This usually indicates a power issue or a complete loss of signal between the sensors. Check the wiring connections at both the sensor and the motor unit.
- If one light is solid and the other is off/blinking: This suggests the beam is not being received.
- Clean the Sensors: Gently wipe the lenses of both sensors with a soft, dry cloth. Dust, dirt, or cobwebs can easily obstruct the beam.
- Realign the Sensors: If cleaning doesn’t help, try realigning them. Loosen the mounting bracket slightly and gently adjust the sensor until the indicator lights show a proper connection (usually a solid light on both, or one solid and one blinking, depending on the model). Tighten the bracket.
- Check for Obstructions: Ensure nothing is physically blocking the path between the two sensors.
4. Examine The Opener’s Drive Mechanism
If the door moves freely when disengaged from the opener, the problem likely lies within the opener itself.
- Listen for Sounds: When you try to operate the door with the opener, listen for unusual noises. Grinding, squealing, or skipping sounds can indicate worn gears, a loose chain, or a damaged belt.
- Inspect the Chain or Belt: Visually inspect the chain (on chain-drive openers) or belt (on belt-drive openers). Look for any signs of damage, fraying, or excessive slack. A loose chain might need adjustment. You can learn more about how to adjust the chain on your garage door opener for optimal performance.
- Check the Trolley and Rail: Ensure the trolley (the part that moves along the rail and connects to the door via an arm) is moving smoothly. Check for any obstructions or damage to the rail itself.
5. Verify Travel Limit Settings
Incorrectly set travel limits are a frequent cause of doors stopping before they are fully open.
- Consult Your Manual: Each garage door opener model has a specific procedure for adjusting travel limits. Refer to your owner’s manual. You can often find manuals online by searching for your opener’s brand and model number.
- Access Adjustment Controls: The adjustment controls are typically located on the motor unit. They might be dials, buttons, or a combination.
- Adjust the Open Limit: You will likely need to adjust the open limit setting. The goal is to set it so the door stops just as it reaches its fully open position, but not before. This often involves running the door up, stopping it manually or with the remote at the desired height, and then adjusting the setting. Some systems require you to press and hold a button while the door operates.
- Test Thoroughly: After adjusting the limits, test the door’s operation multiple times to ensure it opens and closes correctly and consistently. You might need to make fine-tuning adjustments. If you’re having trouble with a specific brand, like Liftmaster, you might need to know how to reset Liftmaster garage door opener remote or the opener itself, which can sometimes resolve limit setting glitches.
6. Check The Remote Control And Wall Button
Sometimes, the issue isn’t with the door or the opener mechanism itself, but with the device you’re using to activate it.
- Test the Wall Button: Try operating the door using the button located inside your garage. If it works correctly from the wall button but not the remote, the problem is likely with the remote or its programming.
- Replace Remote Batteries: The simplest fix is often to replace the batteries in your remote control. Weak batteries can cause intermittent or failed signals.
- Reprogram the Remote: If new batteries don’t help, the remote might have lost its programming. You may need to reprogram it. The process varies significantly by manufacturer. For instance, you might need to learn how to reset a garage door remote or specifically a Craftsman remote by following a guide on how to reset garage door remote Craftsman.
- Check Keypad: If you use a wireless keypad, ensure it’s also functioning correctly. Batteries might need replacing, or it might require reprogramming, similar to a remote. You may need to learn how to reprogram a Genie garage door keypad or a Chamberlain keypad.
Credit: www.h2ouse.org
Understanding Garage Door Spring Systems
The spring system is arguably the most critical component for the safe and efficient operation of a garage door. Garage doors are heavy, often weighing between 150 to 350 pounds or more. Springs counterbalance this weight, allowing the opener to lift and lower the door with relative ease. When the spring system fails, the door can become unbalanced, feel excessively heavy, or refuse to move properly.
Torsion Springs
Torsion springs are mounted on a rod above the garage door, running parallel to the top of the door opening. As the door closes, the springs wind tighter, storing energy. As the door opens, the springs unwind, releasing this energy to help lift the door.
- How They Work: A torsion spring system typically involves one or two springs. Cables run from the bottom corners of the door up to drums on the ends of the torsion spring rod. As the springs unwind, they turn the rod, which in turn winds the cables around the drums, lifting the door.
- Common Issues:
- Breakage: Torsion springs have a finite lifespan, measured in cycles (one cycle is one full open and close). Over time, they can fatigue and break, often with a loud snap. A broken torsion spring means the door is no longer balanced and will likely not open properly, if at all.
- Loss of Tension: Even without breaking, springs can lose tension over time. This makes the door heavier for the opener to lift.
- Safety Concerns: Warning: Torsion springs are under extreme tension. Never attempt to repair or replace torsion springs yourself. This is a job strictly for qualified garage door technicians who have the specialized tools and knowledge to handle them safely. Improper handling can lead to severe injury or death.
Extension Springs
Extension springs are used in some garage door systems, particularly older ones or those with low headroom. They run parallel to the horizontal tracks, above the door.
- How They Work: When the door is closed, the extension springs are stretched, storing energy. As the door opens, the springs shorten, assisting in lifting the door. Safety cables run through the center of extension springs to contain them if they break.
- Common Issues:
- Breakage: Like torsion springs, extension springs can break. If one breaks, the door will become unbalanced and difficult to lift.
- Sagging: The springs can sag over time, losing their effectiveness.
- Improper Installation: If the springs are not correctly installed or if the safety cables are missing or improperly attached, it poses a significant safety risk.
- Safety Concerns: While generally considered less dangerous to replace than torsion springs, extension springs are still under significant tension. It is highly recommended to have a professional handle their replacement to ensure proper installation and safety.
Identifying Spring Problems
- Door Feels Heavy: If the door feels significantly heavier than usual when you try to lift it manually, suspect a spring issue.
- Loud Noise: A loud snap or bang often indicates a broken spring.
- Door Stops Mid-Travel: While other issues can cause this, an unbalanced door due to spring problems is a possibility.
- Visual Inspection: If you can safely access the springs, look for obvious breaks, cracks, or excessive sagging. Ensure the door is fully closed before attempting any visual inspection of springs and cables.
The Role Of The Garage Door Opener Motor And Drive System
The garage door opener motor is the “brain and brawn” of the automated system. It converts electrical energy into the mechanical force needed to lift and lower the door. The drive system is the mechanism that transmits this force from the motor to the door itself. Problems in either of these areas can easily lead to a door that doesn’t open all the way.
Motor Unit Issues
The motor itself can develop problems over time.
- Overheating: If the motor overheats, its internal thermal protection might shut it down temporarily. This can happen if the door is struggling to move due to other issues (like stiff rollers or binding tracks).
- Worn Gears: Inside the motor housing are gears that transmit power. These gears can wear down or strip, especially under heavy load or with age. This can result in grinding noises and a loss of lifting power.
- Capacitor Failure: The motor’s capacitor helps provide the initial surge of power needed to start the motor. A failing capacitor can lead to the motor humming but not turning, or having insufficient power to lift the door.
Drive System Components
The components that physically move the door are crucial.
- Chain Drive: This system uses a chain running along a rail, similar to a bicycle chain. The chain is connected to a trolley, which moves along the rail and is attached to the door via an opener arm.
- Loose Chain: Over time, the chain can stretch and become loose. A loose chain might skip teeth on the drive sprocket, causing the opener to stop lifting the door before it’s fully open. This is why knowing how to adjust the chain on a garage door opener is a valuable skill.
- Damaged Sprocket: The drive sprocket on the motor unit can become worn or damaged, preventing the chain from engaging properly.
- Belt Drive: Similar to a chain drive, but uses a rubber belt instead of a chain. Belts are generally quieter.
- Loose or Damaged Belt: A belt can stretch, fray, or break. A loose belt may slip on the pulleys, hindering operation.
- Worn Pulleys: The pulleys at either end of the belt can wear down.
- Screw Drive: This system uses a threaded steel rod that the trolley moves along.
- Lubrication Issues: Screw drives require specific lubrication. If the rod becomes dry or dirty, the trolley can bind, preventing smooth movement.
- Stripped Threads: The threads on the rod or within the trolley can become stripped.
The Trolley And Opener Arm
The trolley is the component that travels along the opener’s rail. It connects to the door via an opener arm.
- Binding Trolley: If the trolley gets stuck or binds on the rail, the opener will stop. This could be due to debris on the rail or damage to the trolley mechanism.
- Loose or Bent Opener Arm: The arm connecting the trolley to the door can become loose, bent, or even break, especially if the door encounters resistance. This can prevent the opener from effectively pulling the door upward.
When To Call A Professional
If you suspect issues with the motor, gears, capacitors, or any part of the drive system that requires disassembly of