
The Genie screw drive garage door opener is a robust and reliable system, but like any mechanical device, parts can wear out. One of the most common components that may require replacement is the screw drive carriage. This crucial part connects the garage door to the screw drive mechanism, allowing it to move up and down. When the carriage becomes damaged or worn, it can lead to a noisy garage door, slow operation, or even complete failure. Understanding how to replace this component is a valuable skill for any homeowner with a Genie screw drive opener, potentially saving you time and money on professional service calls.
This comprehensive guide will walk you through the process of replacing your Genie screw drive carriage. We’ll cover everything from identifying the problem and gathering the necessary tools to safely removing the old carriage and installing the new one. We’ll also discuss preventative maintenance tips to extend the life of your garage door opener and its components.
Key Takeaways
- The screw drive carriage is a vital component of Genie screw drive openers, responsible for moving the garage door.
- Signs of a failing carriage include unusual noises, slow or jerky door movement, and difficulty operating.
- Before starting, disconnect power to the opener and disengage the emergency release cord.
- Essential tools include a ladder, wrenches, screwdrivers, pliers, safety glasses, and work gloves.
- A replacement carriage kit specific to your Genie model is required.
- The replacement process involves disassembling the trolley assembly, removing the old carriage, and installing the new one, followed by reconnecting and testing.
- Regular maintenance, such as lubricating the screw and checking for loose parts, can prevent premature wear.
Understanding The Genie Screw Drive Carriage
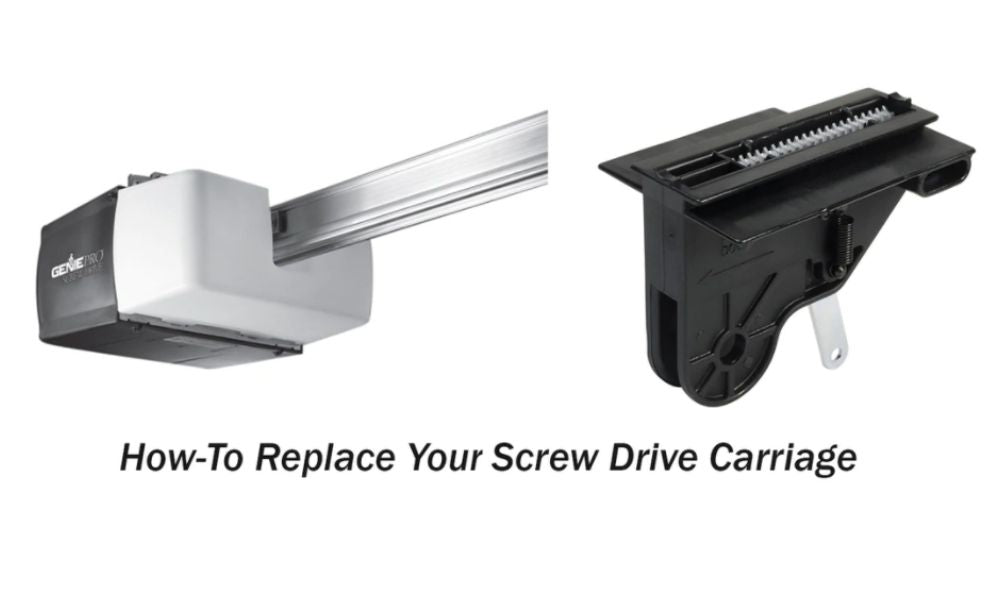
The screw drive carriage, often referred to as the trolley assembly, is a complex yet essential part of your Genie garage door opener. It’s the component that travels along the screw drive shaft, which is mounted horizontally above your garage door. The carriage has a mechanism that attaches to the trolley arm, which in turn connects to the garage door itself. As the motor rotates the screw drive shaft, the carriage moves along its length, pulling or pushing the trolley arm and thus opening or closing the door.
Components Of The Screw Drive Carriage Assembly
The carriage assembly isn’t just a single piece; it’s a system. Understanding its parts helps in diagnosing issues and performing the replacement correctly.
- Carriage Body: This is the main housing, often made of metal or durable plastic, that slides along the screw. It contains the internal mechanism that engages with the screw.
- Drive Sprocket/Gears: Inside the carriage, gears mesh with the threads of the screw drive shaft. These gears are what propel the carriage. Wear and tear on these gears is a common reason for replacement.
- Trolley Arm Attachment Point: This is where the trolley arm, the link to your garage door, connects to the carriage.
- Emergency Release Mechanism: Most Genie carriages have a manual release lever or cord. This allows you to disengage the opener from the door for manual operation in case of power outages or emergencies. Knowing how to use this is vital.
- Limit/Travel Sensors: Some models incorporate sensors within the carriage that tell the opener when the door has reached its fully open or closed position.
Common Issues Indicating Carriage Problems
Several symptoms can point to a worn or damaged screw drive carriage. Recognizing these early can prevent more significant damage or inconvenience.
- Grinding or Stripping Noises: If you hear loud grinding, scraping, or stripping sounds when the opener is operating, it’s often a sign that the gears within the carriage are damaged or not properly engaging with the screw.
- Jerky or Slow Door Movement: A carriage with worn gears or a damaged sliding mechanism can cause the door to move in a hesitant, jerky manner or at a significantly slower pace than usual.
- Door Stops Mid-Travel: If the door frequently stops unexpectedly during its travel, it could indicate that the carriage is slipping on the screw or that its internal sensors are malfunctioning.
- Carriage Detachment from Screw: In severe cases, the carriage might become completely dislodged from the screw shaft, rendering the opener inoperable.
- Visible Cracks or Damage: A visual inspection of the carriage might reveal cracks in the plastic housing, bent metal components, or worn gear teeth.
Credit: store.geniecompany.com
Preparing For The Replacement
Before you begin the physical replacement of the Genie screw drive carriage, thorough preparation is crucial for safety and efficiency. This involves gathering the right tools, acquiring the correct replacement part, and understanding the safety precautions.
Essential Tools And Materials
Having all the necessary tools readily available will streamline the process and prevent frustrating interruptions.
- Ladder: A sturdy step ladder is essential for reaching the opener mechanism mounted on the ceiling. Ensure it’s stable and placed on a level surface.
- Safety Glasses: Always wear safety glasses to protect your eyes from falling debris or accidental slips.
- Work Gloves: Work gloves provide a better grip and protect your hands from sharp edges or grease.
- Wrenches and Socket Set: You’ll likely need a set of adjustable wrenches or a socket set with various sizes to loosen and tighten bolts and nuts.
- Screwdrivers: Both Phillips head and flathead screwdrivers in various sizes will be required for removing screws from the opener housing and the carriage assembly.
- Pliers: Pliers can be useful for holding small parts, pulling cotter pins, or manipulating cables.
- Penetrating Oil (Optional): For stubborn or rusted bolts, a bit of penetrating oil can help loosen them.
- Rag or Towel: To clean up any grease or debris.
- Replacement Genie Screw Drive Carriage Kit: This is the most critical part. Ensure you purchase a kit specifically designed for your Genie opener model. These kits often include the carriage, trolley arm, and necessary hardware. You can usually find the model number on the side of the opener motor unit.
Sourcing The Correct Replacement Part
Purchasing the right replacement carriage is paramount. Using an incompatible part can lead to malfunction, damage to the opener, or even safety hazards.
- Identify Your Genie Opener Model: Locate the model number and serial number on the main housing of your Genie garage door opener. This information is usually found on a sticker on the side or back of the motor unit.
- Consult Your Owner’s Manual: If you still have the owner’s manual for your Genie opener, it will likely list compatible replacement parts or provide a part number for the screw drive carriage.
- Online Parts Retailers: Many reputable online retailers specialize in garage door opener parts. Use your model number to search their inventory for the correct screw drive carriage assembly or trolley kit.
- Genie Official Website: The official Genie garage door opener website is another excellent resource for finding genuine replacement parts.
- Check Kit Contents: When ordering, verify that the kit includes all the necessary components, such as the carriage, trolley arm, and any specialized fasteners.
Crucial Safety Precautions
Working with garage door openers involves moving parts and electrical components, making safety the absolute top priority.
- Disconnect Power: Before doing anything else, turn off the power to the garage door opener at the circuit breaker. Never rely solely on unplugging the unit, as accidental re-energization can occur.
- Engage the Emergency Release: Locate the emergency release cord (usually a red rope hanging from the trolley). Pull this cord firmly to disengage the opener from the garage door. This prevents the door from being pulled down unexpectedly by the opener mechanism while you’re working on it. You should now be able to lift and lower the door manually.
- Secure the Garage Door: If the garage door is heavy, use wood blocks or clamps to secure it in the open or closed position to prevent it from falling or rolling unexpectedly.
- Work on a Stable Ladder: Ensure your ladder is on a flat, stable surface and properly positioned. Avoid overreaching.
- Keep Children and Pets Away: Ensure that children and pets are kept away from the work area during the entire process.
- Understand Manual Operation: Familiarize yourself with how to manually open and close your garage door using the release cord. This is critical if you need to move the door during the repair. This guide explains the process in detail.

Credit: www.amazon.com
Step-by-step Guide To Replacing The Screw Drive Carriage
With the necessary tools and safety precautions in place, you’re ready to tackle the replacement of the Genie screw drive carriage. This process requires patience and attention to detail.
Step 1: Disengage The Opener And Secure The Door
As mentioned in the safety section, this is the first physical step.
- Confirm Power is Off: Double-check that the circuit breaker for the opener is in the “off” position.
- Pull the Emergency Release Cord: Firmly pull the red emergency release cord. You should hear or feel a mechanism disengage.
- Test Manual Operation: Gently try to lift and lower the garage door by hand. It should move freely without resistance from the opener. If it’s still engaged, pull the cord again or consult your opener’s manual.
- Secure the Door: If you plan to work with the door in the open position, use clamps or blocks to hold it in place. If working with the door closed, ensure it’s stable.
Step 2: Access The Carriage Assembly
You’ll need to get close to the opener’s trolley mechanism.
- Position the Ladder: Place your ladder safely beneath the opener unit.
- Locate the Trolley: The carriage assembly is part of the trolley that moves along the screw drive shaft. It’s typically positioned near the motor unit when the door is closed.
- Examine the Connection: Observe how the trolley arm connects the carriage to the garage door. Note the bolts, pins, or clips that secure it.
Step 3: Remove The Old Carriage
This is where you’ll carefully detach the faulty component.
- Loosen Trolley Arm Connection: Using the appropriate wrench or screwdriver, loosen and remove the bolts or pins that connect the trolley arm to the carriage. You may need to slide the trolley arm off the carriage or detach it completely. Keep these fasteners safe, as you might reuse them.
- Access the Carriage on the Screw: The carriage typically slides onto the screw drive shaft. You might need to move the carriage along the shaft to access its mounting points or release it.
- Remove Carriage Securing Mechanism: Look for bolts, nuts, or retaining clips that hold the carriage onto the screw drive shaft or its mounting bracket. Carefully loosen and remove these fasteners. In some Genie models, the carriage might be secured by a U-bolt or similar clamp.
- Slide the Old Carriage Off: Once all fasteners are removed, carefully slide the old carriage off the screw drive shaft. It might require some wiggling. Be prepared for it to be greasy.
Step 4: Install The New Carriage
Now, you’ll install the replacement part.
- Clean the Screw Shaft (Optional but Recommended): Before sliding on the new carriage, take a moment to wipe down the screw drive shaft with a clean rag. Remove any old grease, dirt, or debris. This ensures the new carriage meshes properly. Proper lubrication of related components is also key for overall smooth operation.
- Slide the New Carriage On: Carefully slide the new carriage onto the screw drive shaft, ensuring it’s oriented correctly. The gears inside the carriage should align with the threads of the screw.
- Secure the New Carriage: Reinstall the bolts, nuts, or retaining clips that hold the carriage in place on the screw shaft. Tighten them securely, but avoid over-tightening, which could strip the threads or damage the carriage. Refer to your replacement kit’s instructions for specific torque recommendations if available.
- Reattach the Trolley Arm: Align the trolley arm with the attachment point on the new carriage. Reinsert and tighten the bolts or pins that connect them. Ensure the connection is secure.
Step 5: Reconnect And Test
The final steps involve reconnecting the opener and testing its functionality.
- Re-engage the Opener: Move the trolley assembly along the screw shaft until it’s positioned correctly to re-engage with the opener mechanism. Ensure the emergency release lever on the carriage is in the engaged position (usually by lifting it back into place).
- Reconnect Power: Go back to the circuit breaker and turn the power to the opener back on.
- Initial Test: Press the button on your wall control or remote. The opener should now engage the carriage, and the door should begin to move.
- Observe Operation: Watch the door closely as it opens and closes. Listen for any unusual noises. Ensure the movement is smooth and that the door reaches its full open and closed limits without issue.
- Check Limit Settings: In some cases, replacing the carriage might require you to reset or adjust the travel limits of your garage door opener. Consult your opener’s manual for instructions on how to do this. This ensures the door stops at the correct positions. If your opener has separate limit adjustment screws, you might need to adjust them like you would for other opener brands.
- Test Remote and Keypad: Verify that your garage door remote and keypad are still functioning correctly. If not, you may need to reset your remotes or reprogram your Genie keypad.

Credit: www.youtube.com
Troubleshooting Common Issues Post-replacement
Even with careful work, you might encounter minor issues after replacing the carriage. Here are some common problems and their solutions.
Issue: Opener Not Engaging Or Moving The Door
- Possible Cause: The emergency release cord is still engaged, or the trolley mechanism isn’t properly connected.
- Solution:
- Verify the emergency release lever on the carriage is fully engaged.
- Ensure the trolley arm is securely bolted to the carriage.
- Check that the carriage is properly seated on the screw drive shaft and its fasteners are tight.
- Confirm power is restored at the breaker.
Issue: Loud Noises Persist
- Possible Cause: The new carriage may not be meshing perfectly with the screw, or there might be other worn components.
- Solution:
- Ensure the new carriage was installed correctly and is aligned with the screw threads.
- Inspect the screw drive shaft for any bends or damage that might be causing interference.
- Consider lubricating the screw drive shaft. While Genie screw drives often have pre-greased shafts, a light application of garage door lubricant can sometimes help. Follow manufacturer recommendations for lubrication.
- Listen carefully to pinpoint the source of the noise. It might be coming from the motor unit or other parts of the opener system.
Issue: Door Stops Prematurely Or Travels Too Far
- Possible Cause: The travel limit settings need adjustment.
- Solution:
- Refer to your Genie opener’s manual to adjust the open and close travel limits. This usually involves turning adjustment screws on the motor unit.
- Ensure the limit sensors on the carriage (if applicable) are clean and unobstructed.
Issue: Remote Or Keypad Not Working
- Possible Cause: The replacement process may have inadvertently caused a communication issue, or the opener’s memory was cleared.
- Solution:
- Reprogram your remotes and keypad to the opener. This is a common procedure outlined in your Genie opener’s manual. You may need to press a “Learn” button on the motor unit. Resetting Genie remotes is usually straightforward.
Maintaining Your Genie Screw Drive Opener
Preventative maintenance is key to ensuring the longevity and reliable operation of your Genie screw drive opener and its components, including the carriage. Regular checks can help you catch potential issues before they become major problems.
Regular Lubrication
While the screw drive itself is designed to be low-maintenance, other moving parts benefit from lubrication.
- Screw Drive Shaft: Genie openers typically come with a pre-lubricated screw drive shaft. However, over time, the lubricant can dry out or attract dirt. Periodically inspect the shaft. If it appears dry or dusty, clean it thoroughly with a rag and apply a light coat of specialized garage door lubricant (avoid petroleum-based lubricants like WD-40, which can attract dust).
- Rollers and Hinges: Don’t forget the rollers on the garage door itself and the door hinges. Lubricating these components periodically can significantly reduce strain on the opener system. Use a silicone-based spray lubricant designed for garage doors. For detailed instructions, refer to guides on lubricating garage door rollers.
Inspecting For Wear And Tear
Make it a habit to visually inspect your opener and door system periodically.
- Check the Screw Shaft: Look for any signs of bending, damage, or excessive wear on the screw drive shaft.
- Examine the Carriage: While the carriage is difficult to inspect closely without removal, listen for any new noises. If you notice cracks or significant wear on the exterior of the carriage, it might be time for a replacement.
- Inspect Belts and Chains (if applicable): Though screw drives don’t have belts or chains in the same way as other openers, ensure all mounting hardware for the opener and the screw shaft are tight.
- Check Trolley Arm and Connections: Ensure the trolley arm is not bent and that all connections to the carriage and the door are secure.
Testing The Emergency Release
It’s a good practice to test the emergency release mechanism every few months.
- Operation: Pull the red cord to disengage the opener. Ensure the door moves freely. Re-engage the opener by lifting the lever on the trolley until it clicks. Test the opener again to ensure it re-engages properly. This ensures you can operate the door manually if the power goes out.
Cleaning The Motor Unit And Sensors
Keep the opener’s motor unit clean and free of dust and debris. Also, ensure any external sensors (like photo-eyes) are clean and unobstructed. While the carriage itself doesn’t have external sensors in most Genie screw drives, keeping the overall system clean contributes to better performance.
When To Call A Professional
While replacing a Genie screw drive carriage is a manageable DIY project for many homeowners, there are situations where calling a professional garage door technician is the wiser choice.
- Lack of Confidence or Experience: If you’re uncomfortable working with heights, electrical components, or heavy machinery, it’s best to leave the job to an expert.
- Persistent Problems: If you’ve replaced the carriage and are still experiencing issues, a professional can diagnose more complex problems within the opener motor or the door mechanism itself.
- Damaged Screw Shaft: If your inspection reveals that the screw drive shaft is bent, stripped, or significantly damaged, this is a more involved repair that often requires specialized tools and expertise.
- Safety Concerns: If you have any doubts about the safety of performing the repair yourself, always err on the side of caution and contact a professional. The cost of professional service is often less than the potential cost of injury or further damage.
- Complex Opener Models: Some advanced Genie models might have unique components or procedures that are best handled by technicians familiar with them.
Frequently Asked Questions
How Often Should A Genie Screw Drive Carriage Need Replacement?
The lifespan of a Genie screw drive carriage can vary significantly based on usage, environmental factors, and maintenance. On average, with proper care, a carriage can last anywhere from **7