
When your garage door is opened manually, it often disconnects from the automatic opener system. This is a safety feature designed to prevent damage or injury if the opener were to try and operate while the door is being moved by hand.
However, after manual operation, the garage door opener will not respond to remote or wall button commands until the door is properly re-engaged or “reset” with the opener system. This process ensures that the opener can once again safely and reliably control the garage door’s movement.
Key Takeaways
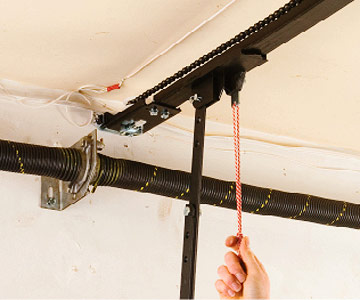
- Manual Disengagement: Opening a garage door manually typically involves pulling a red emergency release cord, which disengages the drive mechanism from the door.
- Re-engagement is Crucial: For the automatic opener to work again, the door must be re-engaged with the opener’s trolley or drive.
- Safety First: Always ensure the garage door is in a closed or partially closed position before attempting to re-engage it to avoid unexpected movement.
- Opener Type Matters: The specific steps for resetting vary slightly depending on whether you have a chain drive, belt drive, or screw drive opener.
- Troubleshooting Common Issues: If the door doesn’t re-engage, check for obstructions, ensure the trolley is correctly positioned, and verify the opener’s power and limit settings.
- When to Call a Pro: For persistent issues or if you’re uncomfortable with the process, professional garage door technicians can safely resolve the problem.
Credit: www.garagedoorssandiego.net
Understanding The Manual Release Mechanism
Garage door openers are equipped with a manual release cord, typically bright red, designed for emergencies. This cord is attached to a mechanism called the trolley, which rides along the opener’s rail. When you pull this cord, it disengages a lever on the trolley, effectively disconnecting the opener’s motor and drive system (chain, belt, or screw) from the garage door itself. This allows you to lift or lower the door by hand.
Why Manual Release Is Necessary
The primary reason for the manual release is safety. In situations like a power outage, a malfunction where the door is stuck, or even during maintenance, you need a way to operate the door without the opener. Forcing the door with the opener engaged could lead to damage to the opener, the door, or even cause serious injury. The manual release provides a failsafe, allowing for immediate manual control.
The Disconnection Process
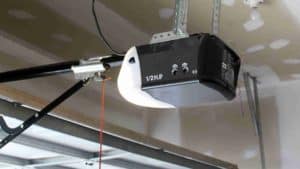
When the red cord is pulled, a spring-loaded latch within the trolley disengages from a drive sprocket or gear. This detachment means that even if the opener motor is running, the chain, belt, or screw will spin freely without moving the door. The door is now under the control of its torsion springs or extension springs, which counterbalance its weight. This is why a properly balanced garage door can be lifted and lowered relatively easily by hand.
Identifying Manual Operation
You’ll know your garage door has been operated manually if:
- You recently pulled the red emergency release cord.
- The garage door opener remote or wall button does not activate the door.
- The opener motor runs, but the door does not move.
- The trolley on the opener rail moves freely along the track without the door following it.
Understanding this disconnection is the first step in knowing how to properly reset your garage door system.
Credit: www.garagedoorrepair.com
Steps To Reset Your Garage Door After Manual Opening
Resetting your garage door after manual operation is a straightforward process, but it requires attention to detail and a focus on safety. The goal is to re-engage the opener’s trolley with the drive mechanism. The exact steps can vary slightly based on the type of garage door opener you have (chain, belt, or screw drive) and the manufacturer (LiftMaster, Chamberlain, Genie, Craftsman, etc.).
Safety Precautions Before You Begin
Before you attempt any reset procedure, it’s crucial to prioritize safety.
- Clear the Area: Ensure there are no people, pets, or obstructions in the path of the garage door. A garage door is a heavy object and can cause significant damage or injury if it moves unexpectedly.
- Check Door Balance: A properly balanced garage door should stay open on its own when partially lifted. If it slams shut or is excessively heavy, the spring system may be faulty. Do not attempt to reset the opener if the door is not balanced, as this can strain the opener motor. You might need to address lubrication of rollers for smoother operation, but balance issues require professional attention.
- Power Off (Optional but Recommended): For added safety, you can unplug the garage door opener unit from the electrical outlet. This prevents accidental activation while you are working.
The Re-engagement Process: General Steps
Most garage door openers are reset by reconnecting the trolley to the drive mechanism. This is typically achieved by moving the trolley to a specific position on the rail.
- Locate the Trolley: The trolley is the component that moves along the opener’s rail, pulled by the chain, belt, or screw. It’s usually where the emergency release cord attaches.
- Position the Garage Door: It’s best to have the garage door in the fully closed position or at least significantly lowered. This ensures the trolley can re-engage at the correct starting point. If the door is partially open, you might need to carefully lift it to the fully closed position by hand.
- Re-engage the Trolley: This is the core step and varies by opener type.
- Chain/Belt Drive: You will typically need to move the trolley along the rail until it clicks or locks back onto the chain or belt. Sometimes, you might need to push or pull the trolley firmly to achieve this. On some models, you may need to operate the opener’s manual release mechanism in reverse or push a lever on the trolley itself.
- Screw Drive: Screw drive openers often have a slightly different mechanism. You might need to manually move the trolley back to the motor head end of the rail. There might be a specific slot or tab that needs to align.
- Test the Opener: Once you believe the trolley is re-engaged, plug the opener back in (if you unplugged it) and try operating it with the remote control or wall button. The door should now move.
- Check for Smooth Operation: Listen for any unusual noises and observe if the door moves smoothly through its entire range of motion.
Specific Manufacturer Examples
While the general principles are the same, manufacturers often have slight variations.
- LiftMaster/Chamberlain: For many LiftMaster and Chamberlain models, after pulling the red cord, you simply need to move the trolley back towards the motor unit until it clicks into place. Sometimes, you might need to manually push the trolley until it engages with the chain or belt. If the trolley has a lever, ensure it’s in the engaged position. You can find more detailed instructions on how to reset a LiftMaster opener.
- Genie: Genie openers often work similarly. After manual operation, you’ll need to reconnect the trolley. On some models, this involves moving the trolley to the end of the rail nearest the motor. You might need to pull the red cord away from the motor unit to re-engage it. For specific keypad issues related to Genie, you might need to reprogram the Genie keypad.
If you have trouble with a specific model, consulting the owner’s manual is always the best course of action.

Credit: www.titangaragedoorsne.com
Troubleshooting Common Re-engagement Issues
Even with the correct steps, you might encounter problems when trying to reset your garage door opener after manual operation. Most issues stem from the trolley not fully re-engaging or from other underlying problems with the opener or door system.
Trolley Not Re-engaging
This is the most frequent problem. You pull the cord, move the door, and then try to re-engage the trolley, but it just slides freely.
- Ensure Door is Closed: Make sure the door is completely down. If it’s even slightly ajar, the trolley might not be able to engage properly with the drive mechanism.
- Firmly Push/Pull Trolley: Sometimes, a gentle push isn’t enough. You may need to apply more force to get the trolley to snap or click back into place on the chain or belt.
- Check for Obstructions: Inspect the rail and the drive mechanism (chain/belt) for any debris, fallen tools, or other objects that might be preventing the trolley from seating correctly.
- Verify Trolley Position: On some openers, the trolley needs to be at a specific point on the rail to engage. Consult your manual to ensure it’s in the correct starting position (usually at the motor unit end).
- Re-pull the Red Cord: In some cases, pulling the red cord again and then attempting to re-engage might help reset the internal trolley mechanism.
Opener Motor Runs, But Door Doesn’t Move After Reset
If you believe you’ve successfully re-engaged the trolley, but the opener motor runs without moving the door, the issue might be more complex.
- Drive Mechanism Issue: The chain or belt might be broken, loose, or have missing teeth. Check the condition of the drive mechanism along the entire rail. If you have a chain drive, you might need to learn how to adjust the chain if it’s too slack.
- Internal Motor Problem: The motor itself might be failing or have an internal gear issue. Listen for grinding noises or a complete lack of motor sound.
- Limit Settings: The opener’s travel limit settings might be incorrectly set, preventing the door from moving. These settings tell the opener when to stop opening and closing. After a manual operation, these can sometimes be disrupted. You may need to reprogram them. This is a common step in overall opener resets, as detailed in guides on resetting your garage door opener.
Opener Works Intermittently
If the opener works sometimes but not others after the manual reset, it could indicate a loose connection, a failing capacitor in the motor, or intermittent issues with the logic board.
- Check Electrical Connections: Ensure the opener is securely plugged into the outlet and that there are no loose wires on the motor unit itself.
- Remote/Keypad Issues: Sometimes, the problem isn’t with the opener’s re-engagement but with the remote or keypad. Try using the wall button. If the wall button works but the remote doesn’t, you may need to reset your garage door remote or reprogram it. For Craftsman remotes, there are specific guides on resetting Craftsman garage door remotes.
Understanding Different Opener Drive Systems
The mechanism by which your garage door opener operates influences how you reset it after manual disengagement. The three primary drive systems are chain drive, belt drive, and screw drive. Each has its own characteristics and potential quirks when it comes to re-engagement.
Chain Drive Openers
Chain drive openers are the most common and often the most robust. They use a metal chain, similar to a bicycle chain, to move the trolley along a steel rail.
- Re-engagement: After pulling the red cord, the trolley is disconnected from the chain. To re-engage, you typically need to move the trolley back towards the motor unit until it clicks onto the moving chain. You might hear a distinct “clunk” when it reconnects.
- Potential Issues: If the chain is excessively slack or broken, the trolley may not be able to engage. You might need to adjust the chain tension. Adjusting the chain is a common maintenance task for chain drive openers.
Belt Drive Openers
Belt drive openers use a rubber or composite belt that runs along the rail, offering a quieter operation compared to chain drives.
- Re-engagement: Similar to chain drives, pulling the red cord disengages the trolley from the belt. To re-engage, you usually push the trolley back towards the motor unit until it latches onto the belt. The process is often smoother and quieter than with chain drives.
- Potential Issues: The belt itself can become worn or stretched over time. While less common than with chains, a severely stretched belt might cause engagement issues. Belt drive openers are generally quieter, but if you notice squeaking, ensuring proper lubrication of related components like garage door rollers can help.
Screw Drive Openers
Screw drive openers use a threaded steel rod (the “screw”) that the trolley moves along. These are known for their speed but can be noisier and require more maintenance in certain climates.
- Re-engagement: The trolley on a screw drive opener typically needs to be manually moved back to the motor unit end of the rail to re-engage with the screw mechanism. There might be a specific slot or lever that needs to align. Unlike chain and belt drives, you often don’t hear a distinct “click” of re-engagement; instead, the trolley will simply stop moving freely once it’s correctly positioned on the screw.
- Potential Issues: The screw itself can become misaligned or damaged. In humid or cold environments, the screw might rust or freeze, impeding movement. Regular lubrication of the screw is essential for proper function. For Chamberlain openers specifically, you might need to adjustments if operation becomes erratic.
When To Seek Professional Assistance
While resetting a garage door opener after manual operation is often a DIY task, there are situations where calling a professional garage door technician is the wisest course of action. Attempting complex repairs without the necessary knowledge or tools can lead to further damage or safety hazards.
Signs You Should Call A Pro
- Persistent Re-engagement Problems: If you’ve followed all the steps and the trolley still won’t re-engage, or if the opener continues to malfunction after you believe it’s reset, there might be a more significant issue with the opener’s internal components, the drive mechanism, or the trolley itself.
- Damaged Door or Opener Components: If you notice any bent tracks, broken springs, frayed cables, damaged rollers, or visible damage to the opener’s motor unit or rail, it’s best to let a professional assess and repair the damage.
- Unbalanced Garage Door: As mentioned earlier, if the garage door is difficult to lift manually or slams shut, the spring system is likely failing. This is a dangerous situation, as springs store a tremendous amount of energy. Never attempt to adjust or repair garage door springs yourself.
- Opener Motor Not Working: If the opener motor makes no sound at all, or if it makes unusual grinding or buzzing noises that don’t resolve after re-engagement, the motor itself might be burned out or the internal gearing stripped.
- Safety Sensor Malfunctions: If the opener reverses immediately after starting to close, and you’ve confirmed the door isn’t obstructed, the safety sensors at the bottom of the door track might be misaligned, dirty, or damaged.
- Lack of Confidence or Time: Garage door systems are heavy and complex. If you’re not comfortable working with mechanical systems, lack the necessary tools, or simply don’t have the time to troubleshoot, hiring a professional ensures the job is done correctly and safely. The overall cost of a new garage door can range significantly, so preventative maintenance and professional repairs are often more economical in the long run. See garage door cost factors for more information.
What A Professional Can Do
A qualified garage door technician has the expertise, specialized tools, and replacement parts to:
- Diagnose the exact cause of the problem.
- Safely repair or replace broken springs, cables, or rollers.
- Properly re-engage or replace the opener trolley and drive mechanism.
- Adjust and balance the garage door.
- Reprogram remotes, keypads, and opener limits.
- Ensure all safety features are functioning correctly.
A professional service call ensures that your garage door system is not only functional but also safe to operate.
Maintaining Your Garage Door System For Fewer Issues
Preventative maintenance is key to minimizing the need for manual overrides and subsequent resets. By regularly caring for your garage door system, you can ensure smoother operation and longevity, reducing the likelihood of unexpected problems.
Regular Inspections And Lubrication
- Lubricate Moving Parts: Regularly lubricate the rollers, hinges, and tracks of your garage door. Use a silicone-based spray lubricant specifically designed for garage doors. This reduces friction and wear. Aim to do this at least twice a year, or more often if you live in an area with extreme temperatures or heavy use. Don’t forget to check out guides on lubricating garage door rollers for detailed instructions.
- Check the Springs and Cables: Visually inspect the torsion springs (mounted above the door) and extension springs (running along the tracks) for any signs of wear, rust, or damage. Also, check the lifting cables for fraying or kinks. Never attempt to adjust or repair springs or cables yourself due to the high tension and risk of injury.
- Inspect the Opener Chain/Belt: Check the opener’s drive mechanism (chain or belt) for proper tension and signs of wear. A chain that is too loose can slip, and a belt that is frayed can break.
- Test the Balance: Periodically (e.g., every few months), manually disengage the opener and lift the door halfway. It should stay in place. If it drifts up or down, the spring system needs adjustment by a professional.
Opener Maintenance
- Clean the Rail and Trolley: Keep the opener’s rail and trolley free of dust, dirt, and debris.
- Check Drive Mechanism: Ensure the chain or belt is clean and free of obstructions.
- Test Safety Features: Regularly test your photo-eye sensors and auto-reverse function. To test the auto-reverse, place a piece of wood (like a 2×4) on the ground in the door’s path. When the door hits it, it should immediately reverse. If it doesn’t, the opener’s limit settings or safety sensors need adjustment. You may need to reset your entire opener or recalibrate these settings.
- Listen for Unusual Noises: Pay attention to any new squeaks, rattles, or grinding sounds. These can be early indicators of a problem that needs attention.
Battery Backup And Remote Maintenance
- Battery Backup: If your opener has a battery backup, test it annually and replace the battery according to the manufacturer’s recommendations (typically every 3-5 years). This ensures you can still operate the door during power outages.
- Remote Batteries: Replace batteries in your remotes and keypads as needed. Weak batteries can cause intermittent signal issues. If a remote stops working entirely, you might need to reset and reprogram the remote.
By incorporating these maintenance practices into your routine, you can significantly reduce the chances of needing to manually operate your garage door and, consequently, the need to reset the opener system.