Now Reading: How to Reset Genie Garage Door Remote Easily and Quickly
- 01
How to Reset Genie Garage Door Remote Easily and Quickly
If your Genie garage door remote has stopped working or you just want to reprogram it for better security, you are not alone. Many homeowners face this situation, especially after changing batteries, moving to a new home, or experiencing interference with their remote.
Resetting your Genie garage door remote can solve most issues and give you peace of mind. While it might sound technical, the process is simpler than most people think.
This guide will show you, step by step, how to reset your Genie garage door remote. You will learn about the different types of remotes, the safety precautions you should take, and what to do if something doesn’t work as expected.
Whether you are a new homeowner or someone who has used garage door openers for years, you’ll find practical advice and tips that are often missing from standard user manuals.
Let’s make your Genie garage door remote work smoothly again—safely, efficiently, and with confidence.
Understanding Genie Garage Door Remotes
Before you start resetting your remote, it helps to know which Genie remote you have. Genie has released many remote models over the years, and the process can vary slightly depending on your device.
Most Genie remotes fall into one of these categories:
- Single-button remotes – These have one button that opens or closes your garage door.
- Multi-button remotes – These have two or three buttons, allowing you to control multiple doors or gate systems.
- Keypad remotes – Wall-mounted keypads that let you enter a code to operate the door.
Some newer Genie remotes use Intellicode technology, which changes the security code each time you press the button. Older remotes may use a fixed code with physical DIP switches. Knowing your remote type is important because the reset steps may be different.
How To Identify Your Remote Model
Look for the model number on the back of your remote or inside the battery compartment. This number is usually printed on a sticker. If you can’t find it, check the user manual or visit the Genie website for pictures that match your remote.
Why Reset Your Genie Garage Door Remote?
Resetting is necessary in several situations:
- You bought a new remote and want to pair it with your opener.
- The remote has stopped working after a battery change.
- You lost a remote and want to remove it for security reasons.
- You moved into a new home and want to clear old remotes.
- You suspect someone else has access to your opener.
Resetting ensures only authorized remotes can control your garage door.
Safety Precautions Before You Start
Working with garage doors and remotes involves electricity and moving parts. Before you reset anything, keep these safety tips in mind:
- Unplug the garage door opener if you need to access the main unit.
- Keep children and pets away from the area during the reset process.
- Do not stand under the garage door while operating the remote.
- Wear gloves and safety glasses if you are opening the main unit.
If you are unsure about any step or feel uncomfortable, contact a professional for help.
What You Need To Reset A Genie Garage Door Remote
The tools and items you may need include:
- Your Genie remote control
- A ladder (to reach the garage door opener)
- The user manual (if available)
- A new battery (if your remote is not working)
- A pen or small screwdriver (to press buttons on the opener unit)
Having these items ready will make the process smoother.
Step-by-step Guide: How To Reset Genie Garage Door Remote
Resetting your remote usually involves two main actions: clearing old codes from the opener and programming the remote again. Here’s a detailed breakdown for different Genie systems.
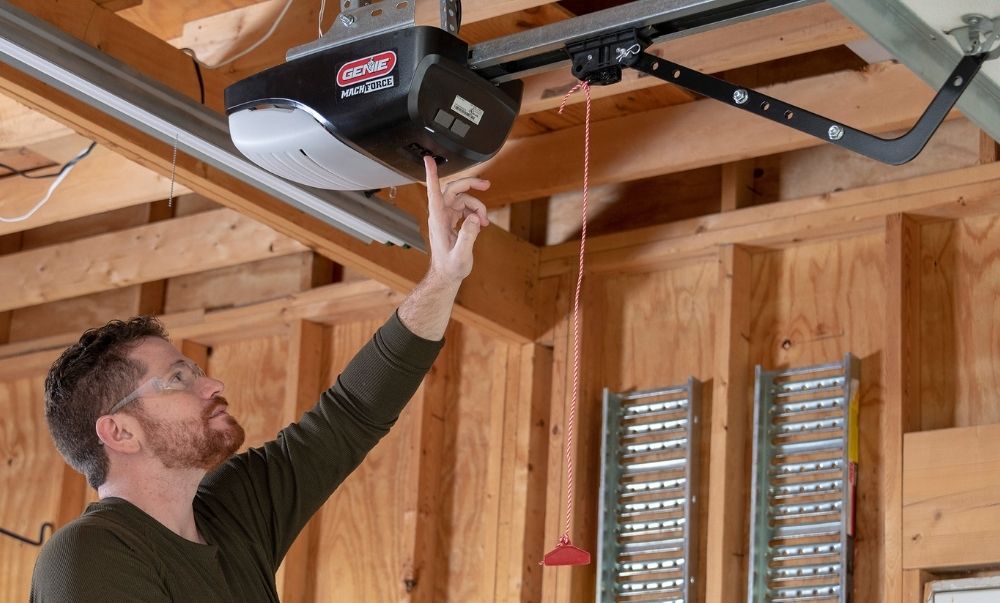
1. Locate The “learn” Or “program” Button
The “Learn” or “Program” button is usually on the motor unit of your garage door opener, which hangs from the ceiling. You may need a ladder to reach it.
- On most Genie models, the button is behind the light lens cover or near the antenna wire.
- The button may be labeled as “Learn,” “Program,” “Set,” or use a color code like red, purple, or black.
2. Clear All Existing Remote Codes
If you want to erase all old remotes for security, follow these steps:
- Press and hold the “Learn” or “Program” button for about 10 seconds.
- The indicator light will turn off or blink, showing all codes are erased.
- Release the button. Now, none of the old remotes will work.
Important: If you only want to add a new remote and keep the old ones, skip this step.
3. Program Your Genie Remote
Now, you can add your remote back to the opener.
- Briefly press and release the “Learn” or “Program” button. The indicator light will start flashing.
- Within 30 seconds, press the button on your remote once. Some models require you to press and hold for a few seconds.
- The indicator light on the opener will flash or turn solid, confirming the remote is programmed.
- Test the remote by pressing the button. The garage door should move.
Tip: If you have a multi-button remote, repeat the process for each button you want to program.
4. Resetting Keypad Remotes
If you have a Genie wireless keypad, you can reset and program it like this:
- Open the keypad cover.
- Press “Program” and 3, 5, 7 at the same time. The indicator will blink.
- Enter your new PIN (3-8 digits), then press “Program” again.
- Go to the opener, press and release the “Learn” button.
- Enter your PIN on the keypad and press “Send” or “Up/Down”. The door should move.
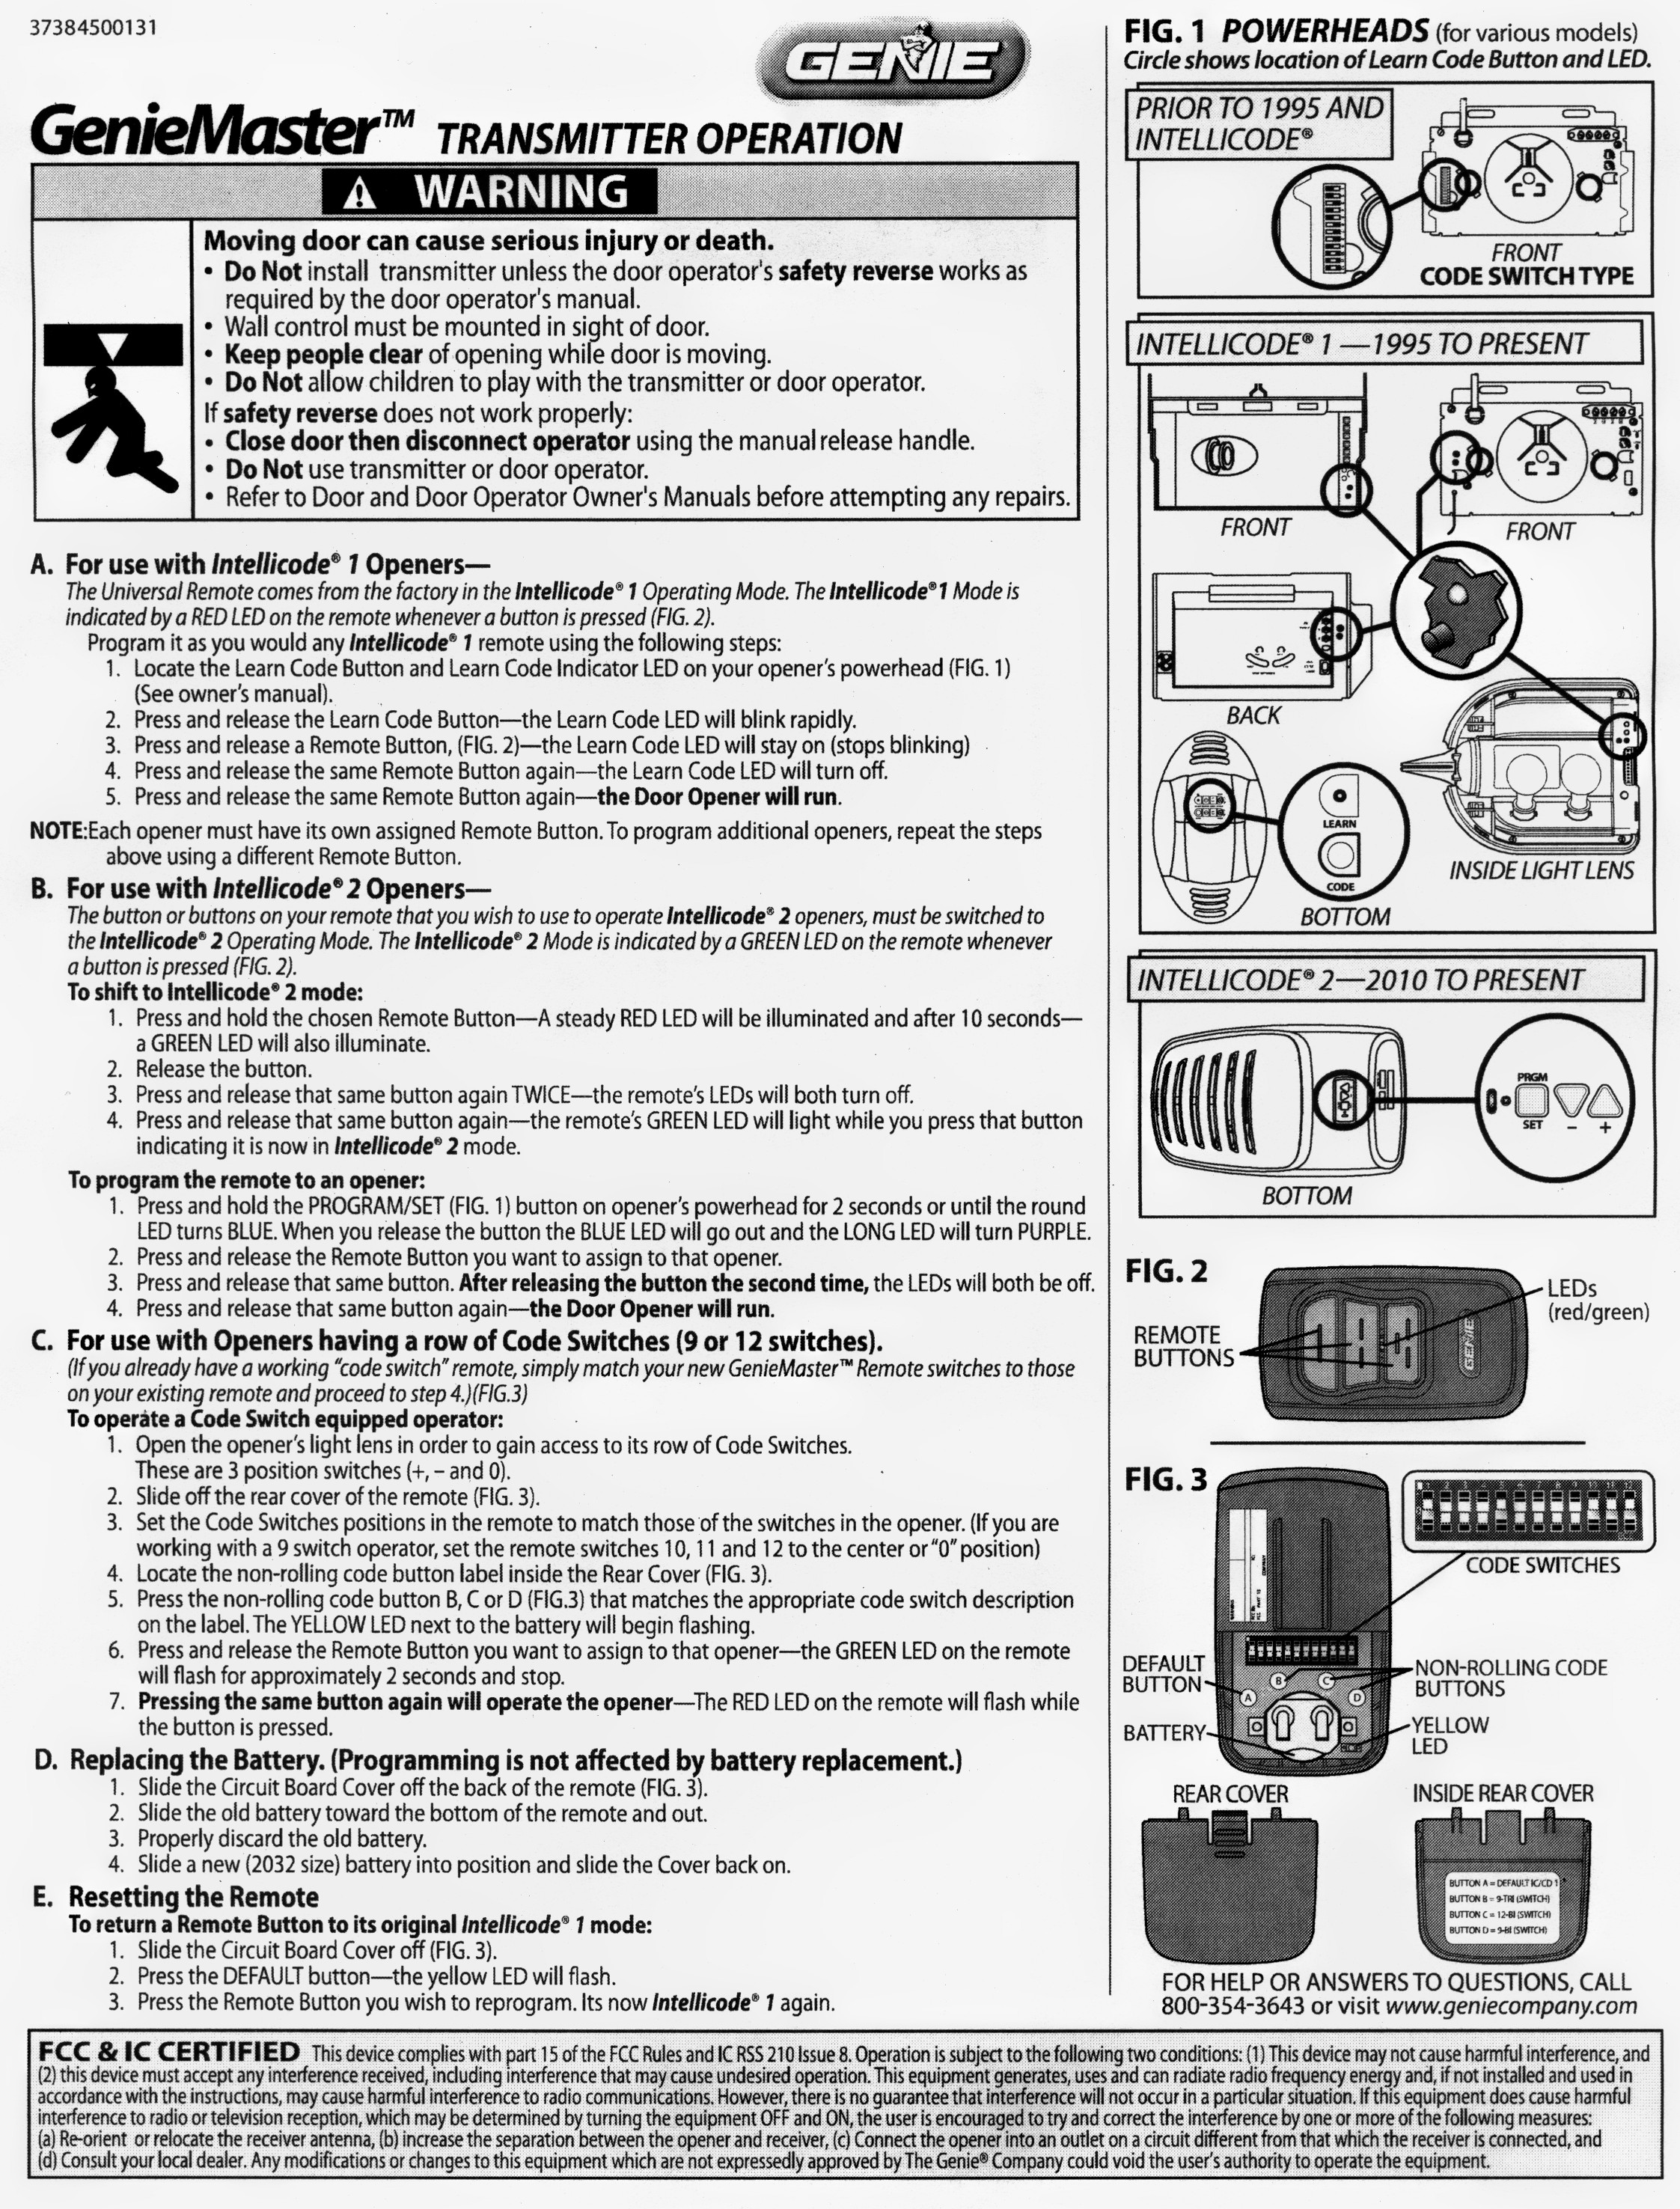
5. Resetting Older Genie Remotes (dip Switch Models)
Some older Genie remotes use physical switches to set the code:
- Open the remote and locate the row of DIP switches.
- Match the positions to the switches inside the opener’s control box.
- Close the remote and test.
This method is less secure than Intellicode. Consider upgrading to a newer remote if possible.
6. Testing Your Remote
After programming, always check:
- Does the remote work from different locations in the garage and driveway?
- Do all buttons function as expected?
- Does the keypad PIN open and close the door correctly?
If not, repeat the programming steps or check the troubleshooting section below.
Genie Remote Programming: Quick Comparison
To help you see how different Genie systems compare, here’s a summary:
| Remote Type | Reset Method | Programming Steps | Security Level |
|---|---|---|---|
| Intellicode (newer) | Erase with “Learn” button | Press “Learn”, then remote button | High (rolling code) |
| DIP Switch (older) | Match switch positions | Set switches in remote & opener | Low (fixed code) |
| Keypad | Reset PIN, reprogram | Enter PIN, press “Learn” on opener | High (PIN + rolling code) |
Common Problems And Troubleshooting
Even with careful steps, sometimes things don’t work the first time. Here’s how to solve the most common issues.
Remote Not Working After Reset
- Check the battery. Weak batteries can prevent the remote from programming or working.
- Make sure you pressed the right buttons in the right order.
- Distance matters. Stand within 10-15 feet of the opener when programming.
- Check for interference. LED lights, wireless routers, or other electronics can disrupt the signal.
Opener Light Doesn’t Blink Or Respond
- Indicator light not flashing? Try pressing the “Learn” button more firmly or check if the opener is plugged in.
- No response after several tries? Unplug the opener for 1 minute, then try again.
Remote Works Only Sometimes
- Signal range issues are common. Try replacing the battery first.
- Physical obstructions like metal doors or walls can block the signal.
Lost Remote Still Opens Door
- If you lost a remote, always erase all codes and program only the remotes you still have. This prevents unwanted access.
Keypad Not Accepting New Pin
- Enter the PIN slowly. Some keypads are sensitive to timing.
- Replace the keypad battery if the buttons feel unresponsive.
Understanding Genie Remote Security
Genie’s Intellicode technology is a rolling code system. This means every time you use your remote, it sends a new code. This prevents hackers from “capturing” your code and using it later. Older remotes with DIP switches send the same code every time, making them less secure.
Non-obvious insight: Even if your remote is old, many Genie openers are compatible with new Intellicode remotes. Upgrading improves both security and reliability.
Another insight: If you have smart home devices or a wireless alarm system, make sure they do not use the same frequency as your Genie opener. Overlap can cause interference.
How To Reset Multiple Genie Remotes
If you have more than one remote or keypad, you’ll need to repeat the programming steps for each device.
- Press the “Learn” button on the opener.
- Within 30 seconds, press the button on the first remote.
- Repeat for each remote or keypad.
Tip: You can program up to seven remotes/keypads to most Genie openers. If you try to add an eighth, the oldest will be erased automatically.
What To Do If Resetting Does Not Work
Sometimes, your Genie opener or remote may not respond to any reset or programming attempts. Here’s what you can do:
- Check for physical damage on the remote, especially after drops.
- Replace the batteries—even new remotes may come with weak batteries from storage.
- Inspect the opener’s antenna wire. If it’s broken or missing, replace it.
- Try a “power cycle.” Unplug the opener for 1-2 minutes, then plug it back in.
- Check for compatibility. Some very old Genie openers may not work with newer remotes.
If all else fails, consult your user manual or contact Genie customer support.
When Should You Replace A Genie Remote?
While most remotes last for years, there are times when replacement is the best option:
- Physical wear: Buttons are stuck, cracked, or missing.
- Water damage: Remote got wet and stopped working.
- Obsolete technology: Fixed code/DIP switch remotes are less secure.
- Lost or stolen remote: Always erase and replace.
Modern Genie remotes cost $25–$50 and are available online or at hardware stores. Make sure to buy the right model for your opener.
Genie Remotes Vs Other Brands
It’s common to wonder how Genie remotes compare to other brands like Chamberlain or LiftMaster. Here are some key differences:
| Brand | Programming Method | Security Technology | Max Remotes Supported |
|---|---|---|---|
| Genie | Learn button, DIP switches | Intellicode (rolling code) | Up to 7 |
| Chamberlain/LiftMaster | Learn button, MyQ app | Security+ (rolling code) | Up to 8 |
| Craftsman | Learn button, DIP switches | Security+ (rolling code) | Up to 5 |
Key takeaway: Genie remotes are easy to program and offer strong security with Intellicode. They are also widely compatible with older and newer Genie openers.
Genie Remote Reset: Real-world Example
Let’s look at a practical example. Lisa just moved into a new house with a Genie opener but didn’t get any remotes from the previous owner. She buys a new Genie Intellicode remote.
- Lisa climbs up to her opener and finds the “Learn” button near the light.
- She presses and holds it for 10 seconds to erase all old remotes.
- She presses the “Learn” button again (just once).
- Within 30 seconds, she presses the button on her new remote.
- The opener light blinks, confirming the reset and programming worked.
- She tests the remote—her garage door opens smoothly.
Lisa now knows only her remote can open the door. She writes down the steps for future reference.
Maintenance Tips For Genie Garage Door Remotes
To keep your remote working well:
- Replace batteries every 1–2 years. Weak batteries can cause signal problems.
- Clean the remote regularly with a dry cloth to avoid dust buildup.
- Store remotes in a safe place, not in your car’s glove box, which can get very hot or cold.
- Check the opener’s antenna for damage twice a year.
- If you lose a remote, erase all codes and reprogram the remotes you still have.
Genie Remote Reset: Do’s And Don’ts
Here are some practical do’s and don’ts to make the process smooth:
Do:
- Read your opener’s user manual for model-specific tips.
- Use new batteries for programming.
- Program all remotes and keypads at the same session.
- Test your remotes from both inside and outside the garage.
Don’t:
- Don’t press the “Learn” button too long unless you want to erase all remotes.
- Don’t forget to erase old remotes after moving into a new home.
- Don’t use damaged or cracked remotes.
- Don’t let children play with garage door remotes.
Frequently Missed Details (beginner Insights)
- Indicator lights can be different colors. Some Genie openers use red, purple, or green lights to indicate programming status. Always check which color your opener uses.
- Not all Genie remotes work with all openers. Always check compatibility before buying a new remote.
- Programming window is short. Most openers give you about 30 seconds to press the remote button after the “Learn” button. Be ready before you start.
- Keypad codes can be changed anytime. If you forget your PIN, reset the keypad by erasing all codes and reprogramming.
- Weather can affect remote range. Cold temperatures can reduce battery life and signal range.
Genie Remote Reset: Step-by-step Recap
If you want a quick summary to keep handy:
- Locate the “Learn” or “Program” button on your Genie opener.
- Press and hold to erase all remotes (if needed).
- Press and release to start programming mode.
- Press the button on your remote within 30 seconds.
- Test your remote.
- Repeat for each device.
- Always erase all remotes if security is a concern.
Where To Find More Help
If you run into problems, Genie’s official website has manuals, troubleshooting guides, and a customer support number. You can also visit Genie Company Support for detailed instructions and model-specific help.
Frequently Asked Questions
How Do I Know If My Genie Remote Is Compatible With My Opener?
Check the model number on both the remote and the opener. Most Genie openers made after 1997 use Intellicode technology, which is compatible with newer remotes. If your opener uses DIP switches, you need a matching remote with DIP switches.
Genie’s website lists all compatible remotes by opener model.
Can I Reset My Genie Remote Without A Ladder?
If your opener is installed low enough, you may reach the “Learn” button without a ladder. However, in most garages, the opener is mounted near the ceiling. For safety, always use a sturdy ladder. Never stand on unstable surfaces.
What Should I Do If My Keypad Stops Working After A Reset?
Replace the keypad batteries first. If it still doesn’t work, erase all codes from the opener and reprogram the keypad. Make sure you enter the new PIN slowly and follow the correct sequence. Sometimes, direct sunlight or weather can damage keypads, so check for physical signs of wear.
How Do I Erase A Lost Or Stolen Genie Remote?
Press and hold the “Learn” or “Program” button on the opener for about 10 seconds. This erases all stored remotes and keypads. Then, reprogram only the devices you still have. This prevents unauthorized access.
Why Does My Remote Only Work Up Close?
Weak batteries, interference from other electronics, or a damaged antenna can reduce range. Try replacing the battery, moving wireless devices away from the opener, or checking the antenna wire on the opener unit.
Resetting a Genie garage door remote is a straightforward task when you know the right steps. With a little patience and the guidance above, you can secure your garage and enjoy reliable, smooth operation for years to come.


