Now Reading: How to Level a Garage Door: Step-by-Step DIY Guide
- 01
How to Level a Garage Door: Step-by-Step DIY Guide
A garage door is often the biggest moving object in a home. It protects your cars, tools, and belongings, and also keeps your house secure. But over time, garage doors can become uneven or unlevel. This can cause loud noises, gaps that let in water or pests, and even safety risks.
If your garage door isn’t closing smoothly or looks tilted, it’s time to fix it. Learning how to level a garage door is not just about appearance—it’s about safety, performance, and saving money on repairs.
Many homeowners think leveling a garage door is complicated or risky. In reality, with careful steps and the right tools, it’s a task you can do yourself. This article will guide you through every part of leveling a garage door, from spotting problems to making adjustments, and keeping your door balanced for years to come.
Whether you have a manual or automatic door, you’ll find practical advice here. You’ll also see common mistakes, helpful tips, and answers to real questions people ask about garage doors.
By the end, you’ll know how to fix a garage door that won’t close evenly, avoid costly errors, and keep your home safe. Let’s get started.
Understanding Garage Door Leveling
Leveling a garage door means making sure the bottom edge sits flat against the floor when closed. If the door is not level, you might see one side higher than the other or gaps along the floor. This is not just a cosmetic issue. A garage door that’s not level can:
- Let in water during rain
- Allow pests or rodents to enter
- Create security risks
- Cause the door to wear unevenly
- Make the opener work harder (if automatic)
- Lead to loud noises or jerky movements
Why Garage Doors Become Unlevel
Garage doors can lose their level for several reasons. Some common causes are:
- Settling foundation: The garage floor may sink or crack over time.
- Damaged springs: Springs help balance the door. When they wear out, the door can tilt.
- Loose cables: Cables keep the door aligned as it moves. Loose or frayed cables can make the door uneven.
- Worn rollers: Rollers guide the door along tracks. If they wear out, the door may not move evenly.
- Misaligned tracks: Tracks can bend or shift, making the door tilt.
- Weatherstripping wear: The rubber seal at the bottom may become uneven.
Understanding these causes helps you fix the problem and prevent future issues.
Signs Your Garage Door Needs Leveling
Before you start fixing your garage door, you need to know if it’s really unlevel. Here are clear signs to look for:
- One side of the door is visibly higher or lower.
- The door doesn’t close fully, leaving a gap at the bottom.
- The door makes unusual noises when opening or closing.
- The door moves slowly or jerks.
- Light, water, or debris comes in under the door.
- The door opener struggles or reverses unexpectedly.
If you notice any of these, leveling your garage door is necessary.
Tools And Materials Needed
Leveling a garage door is easier if you have the right tools. You’ll need:
- Tape measure
- Carpenter’s level
- Adjustable wrench
- Screwdriver set
- Pliers
- Stepladder
- Safety gloves
- Safety glasses
- Lubricant (garage door grease or spray)
- Replacement rollers (if needed)
- Replacement cables (if needed)
- Weatherstripping (if needed)
Having these tools ready will make the job smoother and safer.
Safety Precautions
Garage doors are heavy and can be dangerous if handled improperly. Here’s how to stay safe:
- Always disconnect the garage door opener before starting.
- Wear safety gloves and glasses to protect your hands and eyes.
- Never adjust or remove springs unless you are trained. Springs can snap and cause injury.
- Use a stepladder safely—make sure it’s stable.
- Don’t force the door. If it won’t move, check for stuck parts.
- If you feel unsure, call a professional.
Many beginners overlook safety. It’s better to take extra time than risk injury.
Step-by-step Guide To Level A Garage Door
Leveling a garage door involves several steps. Follow these carefully for the best results.
1. Inspect The Door
Start by closing the garage door fully. Stand outside and look at the bottom edge. Is one side higher? Use a carpenter’s level to check if the door is flat. Measure the gap between the door and the floor at both ends.
2. Check Tracks And Rollers
Open the door halfway. Inspect the tracks on both sides. Are they straight? Look for dents or bends. Next, examine the rollers. Are they worn, cracked, or not rolling smoothly? Old rollers can make the door tilt.
If you find damaged rollers, replace them:
- Remove the old roller by unbolting it.
- Insert the new roller and secure it.
- Repeat for each damaged roller.
Lubricate all rollers with garage door grease.
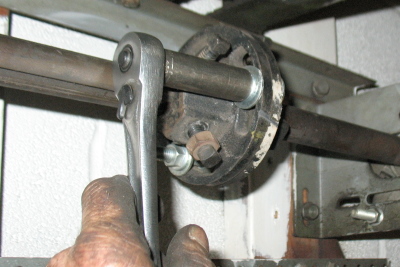
3. Inspect And Adjust Cables
Cables help lift and lower the door evenly. If one cable is loose or frayed, the door will tilt. Look for signs of wear.
To adjust cables:
- Find the cable drum at the top of each side.
- Use an adjustable wrench to loosen the drum slightly.
- Tighten the cable on the lower side until the door sits level.
- Retighten the drum.
If cables are damaged, replace them. Make sure both cables have equal tension.
4. Examine Springs
Springs balance the weight of the door. There are two main types:
- Torsion springs (above the door)
- Extension springs (along the sides)
If one spring is weaker, the door will tilt. Do not adjust springs unless you are trained. Instead, check if the springs look stretched or broken. If so, call a professional for spring replacement.
5. Adjust The Door Opener
If you have an automatic opener, it may need adjustment. Most openers have limit settings. These control how far the door opens and closes.
- Locate the limit adjustment screws on your opener.
- Use a screwdriver to adjust the “close” limit so the door sits level.
- Test the door after each adjustment.
If the opener still struggles, check for other issues like track misalignment.
6. Replace Or Adjust Weatherstripping
Sometimes the door is level but the weatherstripping is uneven. Remove the old strip and install a new one. Make sure it sits flat along the entire bottom edge. This prevents gaps and improves insulation.
7. Final Level Check
Close the door fully. Use a carpenter’s level again. The bottom edge should sit flat against the floor. Check for any gaps. Open and close the door several times to make sure it stays level.
8. Lubricate Moving Parts
Once you’re finished, lubricate all moving parts—rollers, tracks, hinges, and springs (if safe). This keeps the door running smoothly.
9. Reconnect The Opener
If you disconnected the automatic opener, reconnect it. Test the door several times.
10. Clean Up
Clear away tools and old parts. Sweep the area so nothing blocks the door.
Common Mistakes When Leveling A Garage Door
Many people make mistakes when trying to level a garage door. Here are some you should avoid:
- Ignoring safety: Not wearing gloves or glasses can lead to injury.
- Forcing the door: Pushing or pulling hard can damage tracks or rollers.
- Adjusting springs without training: Springs are dangerous. Call a pro if needed.
- Not checking cables: Loose cables are often missed but are a major cause of uneven doors.
- Failing to lubricate: Dry parts wear out faster and cause noise.
- Skipping the level check: Always use a carpenter’s level to confirm your work.
- Adjusting only the opener: If the door itself is unlevel, changing opener settings won’t help.
Avoiding these mistakes saves time and prevents extra repairs.
Practical Tips For Maintaining A Level Garage Door
Once your garage door is level, you want to keep it that way. Here are tips for long-term maintenance:
- Inspect monthly: Check tracks, rollers, and cables for wear.
- Lubricate every 3 months: Use garage door grease on all moving parts.
- Clean tracks: Remove dirt and debris regularly.
- Check weatherstripping: Replace it if worn or torn.
- Watch for new cracks in the floor: These can cause the door to tilt.
- Test the opener: Make sure it opens and closes smoothly.
- Don’t overload the door: Hanging items or storing heavy objects near the tracks can cause bending.
These simple habits prevent most leveling problems.
When To Call A Professional
Sometimes, leveling a garage door is not a simple DIY job. You should call a professional if:
- The springs are broken or need adjustment.
- The cables are badly frayed or snapped.
- The tracks are bent or damaged beyond repair.
- You feel unsure or unsafe about the process.
- The door is very heavy or old.
Professional garage door technicians have special tools and training. They can fix dangerous problems quickly. This is especially important for spring repairs, which cause thousands of injuries each year in the US.
Comparing Manual Vs Automatic Garage Doors
Both manual and automatic garage doors can become unlevel, but the process to fix them is a bit different. Here’s a quick comparison:
| Feature | Manual Garage Door | Automatic Garage Door |
|---|---|---|
| Leveling Difficulty | Usually easier | May require opener adjustment |
| Common Issues | Roller, track, cable problems | Roller, track, cable, opener settings |
| Safety Concerns | Springs and cables | Springs, cables, electrical parts |
| Maintenance Needs | Lubrication, inspection | Lubrication, inspection, opener check |
| Professional Help | Less often needed | Sometimes needed for opener issues |
Most automatic doors need an extra step—adjusting the opener’s limit settings. Manual doors are simpler but still require care with springs and cables.
Key Data On Garage Door Problems
Garage doors are a major part of home safety. Here are some facts:
- The average garage door weighs 150–300 pounds.
- About 20,000 injuries related to garage doors happen every year in the US.
- Most leveling issues are caused by worn rollers or cables.
- Professional garage door repair costs $150–$350 on average.
- Regular maintenance can reduce breakdowns by up to 60%.
These numbers show why leveling and maintaining your garage door is important.
Weather Impact On Garage Door Leveling
Weather plays a big role in garage door performance. Here’s how:
- Extreme heat can cause metal parts to expand, changing alignment.
- Cold weather makes metal contract, sometimes causing gaps.
- Moisture can make wooden doors swell or rot, leading to uneven closing.
- Snow and ice can block the door’s path or freeze the weatherstripping.
- Wind can shake the door, loosening tracks or cables.
If you live in a place with harsh weather, check your garage door more often. Use weather-resistant parts when possible.
Garage Door Leveling For Different Door Types
Not all garage doors are the same. Here’s how leveling differs by type:
Sectional Garage Doors
These are the most common, made of panels that bend as the door opens. Leveling is usually about adjusting cables, rollers, and tracks.
One-piece Garage Doors
These doors swing up in one piece. Leveling often involves checking the pivot points and springs. If the door is heavy, spring adjustment is key.
Roll-up Garage Doors
Roll-up doors are common in commercial garages. Leveling usually means adjusting the bottom bar and checking the guides.
Custom Or Wooden Garage Doors
Wooden doors can warp or swell. Leveling may require sanding the bottom edge or replacing weatherstripping.
Knowing your door type helps you pick the right method and tools.
Step-by-step Example: Leveling A Sectional Garage Door
Let’s look at a practical example for a sectional garage door:
- Close the door and use a carpenter’s level to check the bottom edge.
- If one side is higher, open the door halfway.
- Check the rollers on both sides. Replace any that are worn.
- Inspect the cables. If one is loose, use an adjustable wrench to tighten the cable drum on the lower side.
- Check the tracks for bends. Straighten with pliers if needed.
- Adjust the opener’s close limit setting if you have an automatic door.
- Replace weatherstripping if gaps remain.
- Close the door and check the level again. Repeat adjustments if necessary.
This example shows that leveling is a step-by-step process, not a one-time fix.
Comparing Garage Door Leveling To Other Home Repairs
How does leveling a garage door compare to other common home repairs? Here’s a quick look:
| Repair Task | Difficulty | Safety Risk | DIY Friendly |
|---|---|---|---|
| Garage Door Leveling | Moderate | High (springs/cables) | Yes, with care |
| Replacing Faucet | Easy | Low | Yes |
| Installing Ceiling Fan | Moderate | Medium (electricity) | Yes |
| Fixing Door Lock | Easy | Low | Yes |
| Garage Door Spring Replacement | Hard | Very High | No, call pro |
Leveling a garage door is more complex than many repairs, but still doable if you follow safety steps.
Real-life Example: Avoiding Costly Mistakes
A homeowner in Texas tried to level his garage door by adjusting only the opener. He ignored the loose cable on one side. After two weeks, the door jammed and needed a $300 professional repair. If he had checked the cables first, he would have saved money and trouble.
This shows that skipping steps or not checking cables is a common and costly mistake.
Non-obvious Insights For Beginners
Many beginners miss these points:
- The garage floor is not always flat. Even if your door looks level, the floor may have dips or slopes. Use a level, not just your eyes.
- Weatherstripping can mask problems. Sometimes, a worn or thick weatherstrip makes the door look unlevel. Always check the actual door edge.
- Lubrication matters more than you think. Dry rollers and tracks cause uneven movement, even if everything looks fine.
- Cable tension should match on both sides. If one cable is tighter, the door will tilt. Measure or feel both cables before adjusting.
- Doors can shift after storms or earthquakes. If your area has extreme weather, check your door after each event.
Not knowing these can lead to repeated leveling problems.
How To Prevent Garage Door Leveling Issues
Prevention is the best cure. Here’s what you can do:
- Inspect all moving parts regularly.
- Lubricate at least four times a year.
- Replace worn parts before they fail.
- Keep the floor clean and dry.
- Avoid hitting the door with vehicles or tools.
- Upgrade to heavy-duty rollers and cables if your door is large.
- Consider weather-resistant weatherstripping.
These actions will keep your garage door level and working well.
Garage Door Leveling And Home Value
A level garage door helps your home in several ways:
- Improves curb appeal: A tilted door looks bad and can lower your home’s value.
- Enhances security: Gaps make it easier for intruders to enter.
- Reduces maintenance costs: A level door wears evenly and lasts longer.
- Increases comfort: Keeps water, wind, and pests out.
If you plan to sell your home, fixing the garage door is a smart move.
Garage Door Leveling And Energy Efficiency
A level garage door can also save energy. Gaps let in cold air during winter and hot air during summer. This makes your heating or cooling system work harder. Sealing gaps with proper leveling and weatherstripping can cut energy bills by up to 10% in some homes.
How Often Should You Level A Garage Door?
Most doors need checking every 6–12 months. If you notice changes, check sooner. After extreme weather or impacts, check right away.

Garage Door Leveling Resources
For more details and safety tips, check the official guidance from the International Door Association. Their site has best practices and safety warnings for homeowners.
Frequently Asked Questions
How Do I Know If My Garage Door Is Unlevel?
Look for gaps at the bottom, uneven closing, or strange noises. Use a carpenter’s level to check the bottom edge. If one side is higher, your door is unlevel.
Can I Level A Garage Door Myself?
Yes, you can. Most leveling tasks are DIY, like adjusting cables, tracks, and rollers. But avoid adjusting springs unless you are trained. Always follow safety steps.
What If My Garage Door Keeps Becoming Unlevel?
If your door tilts often, check for foundation issues, worn parts, or bad weatherstripping. You may need stronger cables or rollers. Regular maintenance helps prevent this.
Is Leveling A Garage Door Expensive?
DIY leveling usually costs less than $50 for tools and parts. Professional repair costs $150–$350. Regular maintenance is cheaper than big repairs.
How Long Does It Take To Level A Garage Door?
Most DIY jobs take 1–2 hours. If you need to replace parts or call a professional, it may take longer. Always take time for safety.
A garage door that closes smoothly and evenly is more than just convenient—it’s essential for security, comfort, and home value. By following these steps and tips, you can level your garage door, avoid mistakes, and keep your garage safe for years.
Take care of your door, and it will take care of your home.


