Now Reading: How to Change Code on Liftmaster Garage Door Opener Easily
- 01
How to Change Code on Liftmaster Garage Door Opener Easily

Many homeowners want to keep their homes safe, but sometimes forget about the security of their garage. The Liftmaster garage door opener is a popular choice, trusted for its reliability and advanced features. However, if you move into a new house, lose a remote, or just want better protection, changing the access code is essential. Thieves can copy old codes, and old remotes may still work if you do not reset the system. Understanding how to change the code on your Liftmaster opener will protect your family and property.
This guide walks you through everything you need to know about updating your Liftmaster’s code. Whether you have a keypad, remote, or wall control, you will find clear steps and practical tips. Many beginners make small mistakes that leave their garage less secure.
You will learn how to avoid these, and get answers to the most common questions at the end. With a little patience and the right instructions, you can easily update your code and feel confident about your garage’s security.
Why Changing Your Liftmaster Code Matters
Garage doors are often the largest entry point to your home. If someone has your code or a lost remote, they could get inside easily. Changing your code after moving in, losing a remote, or for regular security is just as important as updating the locks on your doors.
Studies show that over 9% of break-ins in the United States happen through the garage, either because the door was left unlocked or the security was outdated. Also, many older garage door openers use fixed codes that can be hacked with simple devices. Modern Liftmaster openers use rolling codes, but if you do not reset the system after a remote is lost, you are still at risk.
Regularly updating your opener code:
- Stops old remotes from working
- Prevents “code grabber” attacks
- Gives you control over who can enter
Types Of Liftmaster Garage Door Openers
Before you begin, it helps to know which Liftmaster model you have. There are differences in the way you change codes, depending on the system. Here’s a quick overview:
| Model Type | Key Feature | Code Change Method |
|---|---|---|
| Older Models (pre-1993) | Manual dip switches | Change switches on opener and remote |
| Security+ (1993-2011) | Learn button, rolling code | Use learn button to program |
| Security+ 2.0 (2011+) | Enhanced encryption, MyQ compatible | Use learn button, keypad, or MyQ app |
Most people today have Security+ or Security+ 2. 0 models. If you are unsure, check your opener motor unit (usually in the garage ceiling) for a colored “learn” button. The color will help you know which remotes and keypads are compatible.
Tools And Preparation
Before you start, gather a few simple items:
- A sturdy ladder (if your opener is mounted on the ceiling)
- Your garage door remote(s) and keypad (if you have one)
- A pen and paper to write down new codes
- Your smartphone (if using the MyQ app)
Safety first: Always unplug the opener if you need to handle wiring or open the case. But for most code changes, you can leave it plugged in.
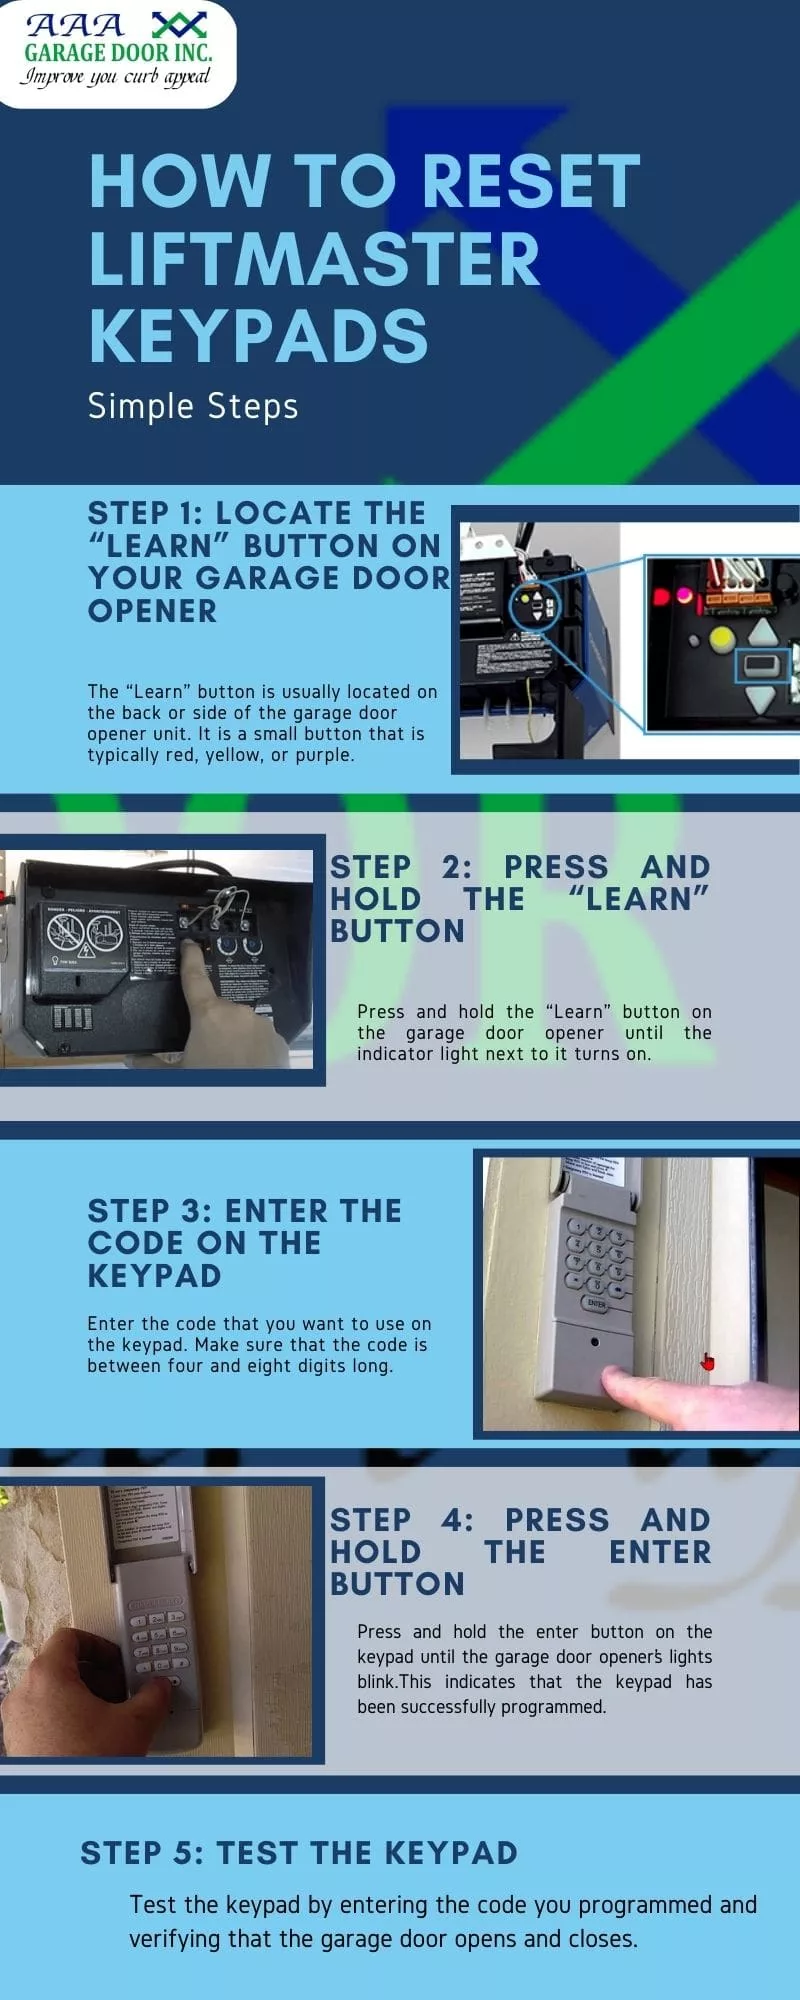
Understanding “learn” Buttons
The learn button is key to programming new codes. This button is usually on the back or side of the opener unit. The color of the button is important because it matches to certain remotes and keypads:
- Yellow (Security+ 2.0): Most models after 2011
- Purple: 2005–2011 models
- Red/Orange: 1997–2005 models
- Green: 1993–1997 models
Pressing the learn button puts your opener in programming mode. You have 30 seconds to complete programming after pressing it, so have your remote or keypad ready.
How To Change Code Using A Remote Control
If you want to change the code used by your garage door remote, follow these steps:
- Locate the learn button on your opener motor unit. You may need to remove a small light cover.
- Press and release the learn button. The indicator light will turn on.
- Press the button on your remote that you want to program. Hold it for a few seconds until you hear a click or see the opener lights flash.
- Test the remote by pressing the programmed button again. The door should move.
- Repeat for other remotes if needed.
This process erases the old code and sets a new one for each remote. If you want to remove all remotes (for example, after losing one), hold down the learn button for 6–10 seconds until the light turns off. This clears the memory.
Non-obvious tip: If you hold the learn button too long, you will erase all devices, including keypads and car HomeLink systems. Be ready to reprogram everything.
How To Change Code On A Liftmaster Keypad
The wireless keypad is often used by families or to give temporary access. Changing its code is a bit different from the remote.
- Enter your current code, then press and hold the “#” button until the light blinks.
- Enter your new 4-digit code, then press “Enter.”
- The opener lights will blink, or you will hear a click to confirm.
- Test the new code by entering it on the keypad and pressing “Enter.” The door should operate.
If you forgot your old code, you need to reset the keypad:
- Go to the opener motor unit and find the learn button.
- Press and release the learn button (do not hold).
- Within 30 seconds, enter a new 4-digit code on the keypad and press “Enter.”
Non-obvious tip: Some keypads have a battery. If the keypad stops working after you change the code, replace the battery before troubleshooting further.
Changing Code Using The Myq App
If your Liftmaster opener is MyQ compatible (most Security+ 2.0 models), you can change access codes through the app.
- Open the MyQ app on your phone.
- Go to “Device Management.”
- Choose your garage door opener.
- Tap “Add Keypad PIN” or “Change PIN.”
- Enter the new code and save.
You can also delete old codes or assign temporary codes for guests. MyQ lets you see access history, so you know who opens the garage and when.
How To Change Code On Older Liftmaster Models (dip Switches)
Before 1993, Liftmaster openers used physical dip switches. These are small toggle switches inside both the opener and the remote.
- Unplug the opener.
- Open the battery cover on your remote.
- Find the row of 8–12 small switches.
- Copy the switch positions to the opener unit (usually under the light cover).
- Make sure both patterns match exactly.
- Plug the opener back in and test.
These older systems are less secure. Thieves can scan for these codes, so if you have a dip switch model, consider upgrading for better safety.
Erasing All Codes And Starting Fresh
Sometimes, you need to erase all codes from your opener. This is common if you lose a remote or buy a new house.
- Press and hold the learn button on the opener for 6–10 seconds.
- The indicator light will turn off, showing memory is cleared.
- Reprogram each remote and keypad with your new code.
Resetting is important after moving into a new home. Many previous owners forget to clear old codes, so old remotes may still open the door.
Comparing Code Change Methods
Depending on your opener model and devices, there are a few ways to change the code. Here is a quick comparison to help you choose the best method:
| Method | Speed | Security Level | Tools Needed |
|---|---|---|---|
| Remote Programming | Fast (1–2 min) | High (rolling code) | Remote, ladder |
| Keypad Reprogram | Medium (2–3 min) | High (rolling code) | Keypad, ladder |
| MyQ App | Very fast (1 min) | Very high (cloud-based) | Smartphone |
| Dip Switch | Slow (5 min) | Low (fixed code) | Screwdriver |
Most homeowners prefer the remote or keypad method. The MyQ app is best for those who want mobile access and tracking.
Step-by-step Example: Changing A Code On A Security+ 2.0 Model
Let’s walk through a real example for a Security+ 2.0 opener (yellow learn button):
- Climb the ladder and find the yellow learn button on the back of the opener.
- Press and release the learn button. The yellow LED will light up for 30 seconds.
- On your remote, press the button you wish to program. Hold until the LED blinks or the opener clicks.
- Repeat for every remote you want to use.
- For the keypad, within 30 seconds of pressing the learn button, enter your chosen 4-digit code and press “Enter.”
- The opener light will blink to confirm.
- Test each device to make sure it works.
If you wait too long after pressing the learn button, you may need to start over. Always program within the 30-second window.
Common Mistakes And How To Avoid Them
Many people run into small problems when changing codes. Here are the most common mistakes and how to avoid them:
- Holding the learn button too long: This erases all codes, not just one. Only press and release unless you want a full reset.
- Waiting too long to program: The system times out after 30 seconds. Have your remote or keypad ready before starting.
- Not matching dip switches: For older models, the remote and opener must match exactly.
- Using weak codes: Avoid easy numbers like 1234 or your address. Use unique combinations for better security.
- Forgetting to test: Always test your new code with all devices before putting the ladder away.
- Overlooking keypad batteries: If the keypad fails, check or replace the battery first.
Tips For Choosing A Secure Code
A strong code is important for keeping your home secure. Here are some suggestions:
- Avoid simple codes (1234, 0000, your birthday)
- Mix numbers: Use random combinations, not just patterns
- Change codes regularly: At least once a year, or whenever you lose a remote
- Don’t share your code with people you don’t trust
Some newer keypads allow up to 8 different codes. Use this feature for guests, workers, or deliveries. You can delete or change these at any time.
When To Change Your Garage Door Code
You do not need to change your code every week, but there are certain times when it is smart to update:
- After moving into a new home
- When you lose a remote or keypad
- After a break-in or attempted break-in
- If you give out a temporary code to a worker or neighbor
- Every 6–12 months as a routine safety step
Keeping your code fresh means one less way for someone to get inside.
Troubleshooting Problems
If your new code does not work, try these steps:
- Check the battery in your remote or keypad.
- Make sure you programmed within 30 seconds after pressing the learn button.
- Erase all codes and start over if you are unsure which devices are programmed.
- Inspect for interference: LED light bulbs near the opener can cause problems with remotes—try replacing them with standard bulbs.
- Check for physical damage: Remotes and keypads can wear out over time.
If problems continue, review your opener’s manual. You can also find helpful guides on the official Liftmaster support website.
Upgrading For Better Security
If your opener is more than 20 years old or uses dip switches, consider upgrading. Modern Liftmaster models have Security+ 2.0 with rolling codes and optional MyQ smart features. These are much harder for thieves to hack.
Many insurance companies offer discounts for homes with smart garage security. Upgrading also lets you control your garage from your phone, get alerts, and set temporary codes for guests.
Keeping Track Of Your Codes
With multiple remotes and keypads, it is easy to forget which code goes with which device. Here are some ways to stay organized:
- Write down your codes in a secure notebook, not on your phone.
- Label your remotes (“car 1”, “car 2”, “spare”).
- Set reminders to change codes every year.
- For MyQ users, review the access log regularly.
Keeping good records makes it easier to reset or update your system if you ever need to.
Safety Tips When Working With Garage Door Openers
While changing codes is a safe process, always take care:
- Use a sturdy ladder and have someone with you if possible.
- Do not touch the opener’s wiring unless unplugged.
- Keep remotes out of reach of children.
- If your opener does not respond, do not force it—check for jams or call a professional.
Garage doors are heavy, and the springs can be dangerous if handled incorrectly. For anything other than changing codes, leave repairs to a trained technician.
Real-world Example: New Homeowner Scenario
Imagine you just bought a house with a Liftmaster opener. The old owners gave you two remotes and a keypad. Here’s what you should do:
- Erase all codes by holding the learn button for 10 seconds.
- Reprogram your remotes with your own code.
- Set a new keypad code (not something easy like your address).
- Test all devices to make sure the old codes don’t work.
- Change the keypad battery if it’s more than a year old.
By following these steps, you can be sure that only you and your family can open the garage.
Advanced Features: Temporary And Guest Codes
Many newer Liftmaster keypads support guest codes. Here’s how to set one:
- Enter your main code, then press “.”
- Enter a temporary 4-digit code, then press “#.”
- This code will work for a set number of uses or time.
Example: You can give a delivery person a code that works only once. After that, it will no longer open the door. This is much safer than sharing your main code.
MyQ users can create and delete guest codes from their phones, and even get alerts when someone uses them.

Comparing Liftmaster To Other Brands
How does Liftmaster’s code-changing process compare to other brands like Genie or Chamberlain?
| Feature | Liftmaster | Genie | Chamberlain |
|---|---|---|---|
| Rolling Code | Yes | Yes | Yes |
| Smartphone Control | MyQ App | Aladdin Connect | MyQ App |
| Temporary Codes | Yes | No | Yes |
| Code Change Difficulty | Easy | Medium | Easy |
Liftmaster stands out for its simple programming and guest code options. Other brands are similar but may lack some advanced features.
Security Trends: The Future Of Garage Door Access
As technology improves, garage door openers are becoming smarter. Liftmaster’s MyQ system can link with Amazon Key for package delivery, or with security systems for real-time alerts. In 2023, over 45% of new garage doors sold in the US were smart-enabled.
Biometric options (like fingerprint or facial recognition) are being tested in high-end systems. But for most homes, strong PIN codes and regular code changes are the best protection.
Frequently Asked Questions
How Often Should I Change My Liftmaster Garage Code?
It is smart to change your code every 6–12 months, and always after moving in, losing a remote, or giving out a temporary code.
Can I Program Multiple Remotes To The Same Liftmaster Opener?
Yes, most Liftmaster openers support up to 8–12 remotes. Program each remote using the learn button. If you erase all codes, you will need to reprogram every remote.
What Should I Do If My Keypad Stops Working After Changing The Code?
First, replace the keypad battery. If it still does not work, reset the keypad by clearing all codes and programming it again from scratch.
Is It Safe To Share My Garage Code With Others?
Only share your code with people you trust. For guests or workers, use a temporary guest code if your keypad supports it. Delete the code when it is no longer needed.
Where Can I Find More Help For My Liftmaster Opener?
You can get official instructions, troubleshooting tips, and download manuals from the Liftmaster support website.
Changing the code on your Liftmaster garage door opener is a simple but important step for home security. With clear steps, practical tips, and the right tools, you can keep your garage—and your family—safe from unwanted entry. Don’t put it off: take a few minutes today to update your code, and enjoy peace of mind for months to come.


