Now Reading: How to Connect Garage Door Opener: Easy Step-by-Step Guide
- 01
How to Connect Garage Door Opener: Easy Step-by-Step Guide
Connecting a garage door opener might sound complex, but with the right steps and some patience, you can do it yourself—even if you have never handled electrical work before. A garage door opener makes life easier by letting you open and close your garage door with a button press or even your phone. This guide will walk you through everything: the tools, the installation process, Wi-Fi and smart features, troubleshooting, and advanced tips. By the end, you’ll not only have a connected garage door opener but also a deeper understanding of how it works.
Understanding Garage Door Opener Types
Before you start, it’s important to know the type of garage door opener you have or want to connect. There are a few common types:
- Chain Drive Openers: These use a metal chain to move the door. They are reliable and affordable, but they can be noisy.
- Belt Drive Openers: Instead of a chain, a rubber belt moves the door. These are quieter but usually cost more.
- Screw Drive Openers: A threaded steel rod moves the door. They need less maintenance but can be noisy in cold climates.
- Direct Drive Openers: The motor itself moves along a rail. They are quiet and smooth, but usually more expensive.
- Smart Garage Door Openers: These can connect to Wi-Fi and be controlled via smartphone apps or smart home systems.
Most modern openers, especially those bought in the last five years, are compatible with remote controls, keypads, and smart devices. Older models may need extra accessories to connect to Wi-Fi or smart features.
Tools And Materials You Need
Gathering your tools before you start saves time. Here’s what you’ll usually need:
- Step ladder (to reach ceiling mounts)
- Power drill and bits
- Screwdriver set (flat and Phillips head)
- Adjustable wrench
- Pliers
- Wire stripper/cutter
- Measuring tape
- Level
- Pencil/marker
- Safety glasses and gloves
- Smartphone or tablet (if connecting to Wi-Fi)
Many garage door openers come with a detailed instruction manual. Always check the manual for any special tools your model might require.
Safety First: Preparing Your Garage
Safety is key. A garage door is heavy and the opener uses electricity. Take these steps before you start:
- Disconnect power: Unplug the garage door opener before doing any work.
- Clear the area: Move cars, bikes, and tools away from the work area.
- Check the door balance: Manually open the door halfway. If it stays, the springs are balanced. If it moves, call a professional.
- Read the manual: Every opener is a bit different. Review all warnings.
If your garage door is damaged or springs are broken, stop and call a trained technician. Trying to fix these issues yourself can be dangerous.
Step-by-step: Installing And Connecting A Garage Door Opener
The heart of this guide is the installation and connection process. Let’s go through each stage.
1. Assembling The Opener
Most openers come in pieces. Follow your manual, but the basic steps are:
- Lay out all parts on the floor.
- Assemble the rail and attach it to the power unit (the motor).
- Slide the trolley (the part that pulls the door) onto the rail.
- Secure the belt or chain as directed.
Check that all bolts are tight. A loose rail can make the opener noisy and cause problems later.
2. Mounting The Opener To The Ceiling
Garage door openers are heavy. Get help if you need it. Here’s how:
- Hold the opener in place using a ladder.
- Mark ceiling joists for mounting brackets.
- Attach brackets with lag screws into the joists (never just drywall).
- Use a level to make sure the rail is straight.
If your ceiling is high, you might need extra hanging straps. Don’t skip using solid wood for mounting. Drywall alone cannot hold the weight safely.
3. Connecting The Door Arm
The door arm links the opener to your garage door. Steps include:
- Attach the curved arm to the trolley.
- Connect the straight arm to the garage door bracket.
- Bolt the two arms together.
The arm should be straight when the door is closed. Adjust for smooth operation.
4. Wiring The Safety Sensors
Modern openers have photoelectric safety sensors at the base of the door tracks. These stop the door if something is in the way.
- Mount the sensors 4–6 inches above the floor, facing each other.
- Run wires up the wall to the opener motor.
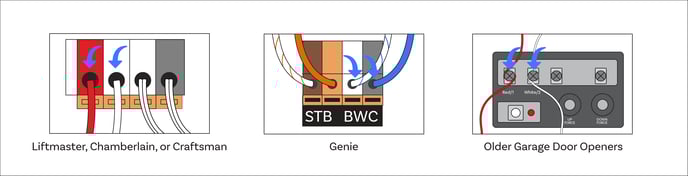
- Connect wires according to your manual (usually color-coded: White to white, black to black).
Test sensors by blocking the beam—if the door reverses, they work.
5. Installing The Wall Control Panel
Most openers include a wall-mounted button near the garage entry door.
- Mount the control at eye level.
- Run low-voltage wire from the control to the opener motor.
- Secure wires with staples (don’t pinch them).
- Connect wires as shown in your manual.
6. Powering Up And Testing
Plug the opener in. Test with the remote or wall button:
- The door should open and close smoothly.
- The light on the motor unit should turn on.
- If the door does not move, check wiring and connections.
Pro tip: If you have issues, unplug the opener and double-check all steps.
Connecting Your Garage Door Opener To Remote Controls
Almost all openers include one or two remote controls. Pairing them is usually simple:
- Press the “Learn” button on the opener motor unit. This button is often near the antenna wire.
- Within 30 seconds, press the button on your remote.
- The opener light will blink to confirm pairing.
You can pair multiple remotes, and many openers allow connecting keypads for outside access.
Common mistake: If you press the remote before the “Learn” button, pairing will fail. Always follow the correct sequence.
Adding Keypads And Extra Accessories
External keypads let you open the garage without a remote—helpful for kids or if you forget your keys.
- Mount the keypad outside your garage, usually above the door jamb.
- Program a secure PIN (never use simple codes like 1234).
- Pair the keypad using the same “Learn” button method as remotes.
Other accessories include backup batteries, additional wall controls, and car-integrated remotes (like HomeLink). Always buy accessories compatible with your opener’s brand and model.
Connecting To Wi-fi And Smart Home Systems
Smart garage door openers let you control your door from anywhere using your smartphone. This is one of the most useful upgrades you can make.
Requirements For Wi-fi Connection
- Wi-Fi enabled opener: Most openers made after 2017 have this feature.
- Strong Wi-Fi signal: The opener needs a good signal in your garage.
- Smartphone or tablet: For app setup.
If your opener is not Wi-Fi enabled, you can often add a smart garage controller (like Chamberlain’s MyQ Smart Garage Hub).
How To Connect To Wi-fi
- Download the manufacturer’s app (such as MyQ, Genie Aladdin Connect, or Nexx).
- Create an account and log in.
- Select “Add Device” and follow in-app instructions.
- Press the “Wi-Fi” or “Learn” button on your opener.
- Connect your phone to the opener’s Wi-Fi signal when prompted.
- Enter your home Wi-Fi password to link the opener.
Once connected, you can open, close, or check the status of your garage door from anywhere.
Integrating With Smart Home Platforms
Many smart garage openers work with Google Assistant, Amazon Alexa, Apple HomeKit, and other smart home systems.
- In the garage app, look for “Works with…” options.
- Follow prompts to connect your opener to your preferred system.
- Set up voice control or automation routines, like closing the door at night automatically.
Non-obvious insight: Some smart openers require a paid subscription for advanced features (like alerts or voice commands). Check before buying.
Troubleshooting Common Problems
Even with careful installation, you may face some issues. Here are solutions to common problems:
The Door Won’t Open Or Close
- Check power—make sure the opener is plugged in.
- Test remotes and wall controls. If none work, the opener may have lost power or a fuse is blown.
- Inspect safety sensors—if misaligned or dirty, the door won’t close.
Remotes Or Keypads Won’t Work
- Check the battery in the remote.
- Re-pair remotes using the “Learn” button.
- Make sure you are within range (usually 50–100 feet).
The Door Reverses Or Won’t Close All The Way
- Clean and align photo sensors.
- Adjust the down force and travel limits (see your manual).
- Remove any obstructions from the door path.
Wi-fi Or App Connection Fails
- Move your router closer to the garage or use a Wi-Fi extender.
- Reset the opener’s Wi-Fi settings and re-connect.
- Make sure your phone’s Bluetooth and Wi-Fi are enabled during setup.
The Opener Makes Loud Noises
- Lubricate metal parts (rails, hinges, rollers) with garage door lubricant.
- Tighten all bolts and screws.
- If the chain or belt is loose, adjust tension as shown in the manual.
Comparing Garage Door Opener Features
To help you choose or understand your system, see how opener types compare:
| Type | Noise Level | Maintenance | Cost | Best For |
|---|---|---|---|---|
| Chain Drive | High | Medium | Low | Detached garages |
| Belt Drive | Low | Low | Medium-High | Attached garages |
| Screw Drive | Medium | Low | Medium | Warm climates |
| Direct Drive | Very Low | Very Low | High | Quiet operation |
| Smart Opener | Low | Low | Medium-High | Smart homes |
Non-obvious insight: The quietest openers (belt and direct drive) are best if your garage is under a bedroom or living space.
Advanced Tips For A Secure And Reliable Connection
- Change your default codes: Always set a new PIN for keypads and apps.
- Enable alerts: Many apps will send notifications if your door is left open.
- Check for updates: Manufacturers often release firmware updates to fix bugs or add features.
- Test your system monthly: Open and close the door, test remotes, and check sensors.
If you travel, use your smart app to check and control your garage from afar. This helps prevent break-ins or leaving the door open by mistake.

Garage Door Opener Compatibility Overview
Not every remote or smart device works with all openers. Here is how some popular systems compare:
| Brand | Remote Control | Keypad | Wi-Fi Ready | Smart Home Compatible |
|---|---|---|---|---|
| Chamberlain/LiftMaster | Yes | Yes | Yes | Google, Apple, Amazon |
| Genie | Yes | Yes | Some models | Google, Amazon |
| Craftsman | Yes | Yes | Some models | Limited |
| Sommer | Yes | Yes | Optional | Google, Amazon |
| Skylink | Yes | Yes | Yes | Google, Amazon |
Pro tip: Always check your model number on the manufacturer’s website for a full list of compatible accessories.
Maintenance And Longevity Tips
A connected garage door opener should work reliably for years. To keep it running smoothly:
- Lubricate moving parts every 6–12 months.
- Test safety sensors and auto-reverse monthly.
- Replace remote batteries yearly.
- Update smart apps and firmware when prompted.
- Inspect wiring for wear or damage.
If your opener is over 15 years old, consider upgrading. New models are safer and offer better connectivity.
When To Call A Professional
DIY is rewarding, but some problems need an expert:
- The door is off its track.
- The springs are broken.
- Electrical issues or burning smells.
- You cannot get the opener to respond after checking all connections.
A professional will have the right tools and training to fix complex issues safely.
Real-world Example: Connecting A Wi-fi Opener
Let’s look at a practical example. Maria bought a Chamberlain MyQ Wi-Fi garage door opener.
- She installed the opener following the manual, including safety sensors and wall control.
- Using the MyQ app, she created an account, pressed the “Wi-Fi” button on the opener, and followed prompts to connect to her home’s Wi-Fi.
- She paired her remote and keypad using the “Learn” button.
- The app showed her door status and let her close it from her office miles away.
Her tip: “Test the Wi-Fi signal before mounting the opener. My phone showed only one bar, so I added a Wi-Fi extender. Now the app works every time!”
Energy Efficiency And Battery Backup
Many new garage door openers include battery backup. This means your door will work even during a power outage. If your opener does not have this, you can often add a battery backup unit.
Energy-efficient openers use LED lighting and standby power modes. Look for openers with an ENERGY STAR rating if you want to save on electricity.
Security Considerations
Garage doors are a common entry point for burglars. Make your system safer:
- Use rolling code remotes (changes the code each time).
- Never leave remotes in unlocked cars.
- Set up alerts for any door activity.
- Regularly check that your Wi-Fi network is secure.
Some apps let you check a full history of door openings and closings. This is useful if you have kids or want to monitor who uses the garage.
Environmental Factors
Your garage’s environment affects your opener’s reliability:
- Cold weather can stiffen lubricants or cause metal parts to shrink.
- Heat and humidity can cause electronics to fail sooner.
- If you live near the ocean, salt air may corrode metal.
Choose an opener rated for your climate. Use weatherproofing and proper lubricants for best results.
Cost Overview
Here’s a quick look at the typical costs for garage door opener systems:
| Feature | Low-End | Mid-Range | High-End |
|---|---|---|---|
| Opener Unit | $120 | $180–$250 | $350–$600 |
| Installation (DIY) | $0 | $0 | $0 |
| Installation (Pro) | $125 | $200 | $350 |
| Wi-Fi Adapter | $40 | $60 | $100 |
| Keypad | $20 | $35 | $60 |
Pro tip: DIY installation saves money, but always factor in your time and skill level.
Frequently Asked Questions
How Do I Reset My Garage Door Opener?
To reset most openers, unplug the unit for 30 seconds, then plug it back in. For remotes and keypads, press and hold the “Learn” button on the opener until the light blinks (usually 6–10 seconds). This erases all paired devices.
You will need to re-pair remotes and keypads after this.
Can I Add Wi-fi To An Older Garage Door Opener?
Yes, you can use a smart garage controller (like Chamberlain’s MyQ Smart Garage Hub or Nexx Garage). These devices connect to your existing opener and add Wi-Fi control. Make sure your opener has standard terminals and is compatible by checking the manufacturer’s site.
Why Won’t My Garage Door Close All The Way?
This is often due to misaligned safety sensors. Make sure the sensors are facing each other and the lenses are clean. Obstructions, dirt, or wiring issues can also cause the door to reverse. Adjust settings for travel limits if needed.
Is It Safe To Install A Garage Door Opener Myself?
Most people can install an opener with basic tools and by following the manual. However, if your door springs are broken or the door is unbalanced, call a professional. Always unplug the opener before working on it and wear safety gear.
What Should I Do If My Smart Garage App Stops Working?
First, check your Wi-Fi connection and the opener’s power. Restart your phone, update the app, and try reconnecting. If the problem continues, reset the Wi-Fi settings on your opener and re-add the device in the app. If you need further help, contact the manufacturer or check their support site, such as the Chamberlain Group Support.
Bringing your garage door opener online adds convenience, security, and peace of mind. With the steps and tips here, you’re ready to connect your system and enjoy smarter home living—no electrician required.


