Now Reading: How to Set Liftmaster Garage Door Opener: Step-by-Step Guide
- 01
How to Set Liftmaster Garage Door Opener: Step-by-Step Guide
Setting up a LiftMaster garage door opener can look complicated, but with the right steps and a clear understanding, almost anyone can do it. Whether you’re replacing an old unit or installing a brand-new opener for the first time, knowing the process will save you time and stress. This guide will walk you through every step of setting your LiftMaster opener, from unpacking the box to fine-tuning the final settings. Along the way, you’ll learn helpful tips, common mistakes to avoid, and how to make sure your garage door works safely and smoothly.
Many people get stuck not because the task is too hard, but because they miss small details—like setting travel limits, connecting the safety sensors, or programming the remote. This article will make sure you understand every part, even if you’ve never done this before.
You’ll find simple explanations, real examples, and clear instructions that match the way LiftMaster openers are built today.
Understanding Your Liftmaster Garage Door Opener
Before you start, it’s important to know what makes LiftMaster openers unique. LiftMaster is one of the most popular garage door opener brands in the United States. Their openers are known for reliability, quiet operation, and advanced safety features. Most models today use a chain drive, belt drive, or wall mount system. The main parts include the motor unit, rail assembly, trolley, safety sensors, wall control panel, and remote controls.
LiftMaster openers often come with extra features like Wi-Fi connectivity and battery backup. While these features can be set up after the basic installation, you’ll want to understand their location and function from the start.
Main Components At A Glance
Here’s a quick look at the key parts you’ll be handling:
| Component | Function | Placement |
|---|---|---|
| Motor unit | Drives the movement of the door | Mounted on ceiling/wall |
| Rail assembly | Holds and guides the trolley | Connects motor to door |
| Trolley | Connects rail to door arm | Slides along rail |
| Safety sensors | Detect obstacles in door’s path | Near bottom of door tracks |
| Wall control panel | Opens/closes door from inside | Wall near entry door |
| Remote controls | Wireless operation | Kept in vehicles or pockets |
Knowing these basics will make the next steps much easier to follow.
Pre-installation Preparation
A smooth installation starts with good preparation. Rushing can lead to mistakes or skipped steps. Take some time to get everything ready.
What You Need
Before you begin, gather these tools and materials:
- Stepladder (6–8 feet is usually right)
- Drill and bits (1/4” and 3/16”)
- Screwdrivers (flat and Phillips)
- Wrench set
- Tape measure
- Level
- Pencil or marker
- Pliers
- Hammer
- Stud finder
- Adjustable socket wrench
- Safety glasses and gloves
Also, check that your package includes all parts listed in the manual. If something is missing, contact LiftMaster support before starting.
Clear The Work Area
Remove any cars, bikes, or storage bins from the area around your garage door. You’ll need space to work above, around, and under the door. If you have an old opener, disconnect it and remove any brackets or wiring that won’t be reused.
Review The Manual
Even if you’re following this guide, always read your LiftMaster opener’s manual. There can be differences in model numbers, especially for Wi-Fi or wall-mount designs. Some steps or wire colors might be unique to your unit.
A common mistake: Many people skip reading the manual and miss important safety warnings or installation tips. Don’t rush—spend five minutes reading the instructions.
Assembling The Rail And Trolley
The first physical task is putting together the rail and trolley system. This is what connects the opener to your garage door and allows smooth movement.
- Lay Out Rail Sections: Most rails come in 3 to 5 sections for easy shipping. Place them on the ground in order.
- Connect Rails: Use the provided bolts or snap-in locks to join the sections. Make sure the rail is straight and all pieces are tightly connected.
- Install the Trolley: Slide the trolley onto the rail before you attach the rail to the motor. The trolley is what moves back and forth to open or close the door.
- Attach Rail to Motor Unit: Lift the assembled rail and connect it to the motor unit using the included mounting bracket and hardware.
- Secure Idler Pulley: At the end of the rail, install the idler pulley (if your model uses one). This keeps the chain or belt tight.
- Thread the Chain or Belt: Feed the chain or belt through the rail, following the instructions for your specific model. Attach it to the trolley and motor sprocket.
Non-obvious tip: Lay a blanket under the parts as you assemble. This protects both the rail and your garage floor from scratches.
Mounting The Opener On The Ceiling Or Wall
With the rail and trolley attached, the next step is to mount the opener to your garage ceiling (for most chain or belt drive models) or wall (for wall mount models).
Ceiling Mount (chain/belt Drive)
- Find the Center: Measure the width of your garage door. Mark the centerline on the ceiling above the door.
- Locate Ceiling Joists: Use a stud finder to find strong ceiling joists. Do not mount directly into drywall.
- Install Mounting Bracket: Secure the provided ceiling bracket to the joist using lag screws.
- Lift and Attach Opener: With help, lift the opener and rest the rail on a ladder. Bolt the motor unit to the ceiling bracket. Make sure the unit is level and the rail is straight toward the door.
- Secure Front End of Rail: Attach the header bracket above the door (on the wall), and connect the front of the rail to it.
- Add Hanging Supports: For extra stability, use angle iron supports from the ceiling to the opener body.
Wall Mount (jackshaft Models)
LiftMaster wall mount openers are installed beside the garage door, not above it.
- Attach Mounting Plate: Position the mounting plate on the wall next to the torsion bar. Secure it with lag screws.
- Mount Opener: Slide the opener onto the shaft and lock it in place.
- Secure Power and Wires: Make sure the power outlet is within reach.
Experience-based advice: If your ceiling is finished with drywall, use a drill to make a small test hole to confirm joist location. Ceiling mounting errors are one of the most common causes of unstable or noisy openers.
Connecting The Door Arm And Brackets
The door arm is what physically connects your opener’s trolley to the garage door itself.
- Attach Door Bracket: Find the center of the top panel on your garage door. Secure the metal door bracket using the included bolts.
- Connect Curved Door Arm: Bolt one end of the curved arm to the door bracket.
- Attach Straight Door Arm: Connect the straight arm to the trolley. Then, join the two arms together using bolts and nuts. Most setups use an “L” or “Z” shape for smooth movement.
- Check Movement: Manually open and close the door using the release handle. Make sure the arms do not bind or catch.
Non-obvious insight: Use the pre-punched holes in the arms to adjust the length and angle. Proper alignment reduces stress on the door and the opener.
Wiring The Safety Sensors
Modern LiftMaster garage door openers require safety sensors to prevent accidents. These sensors stop the door if a person, pet, or object is detected.
Installing The Sensors
- Mount Sensors: Place the sensors on each side of the garage door, about 6 inches above the floor. Use the sensor brackets and screws provided.
- Face Sensors Toward Each Other: Make sure both sensors “see” each other directly. A misalignment will cause the opener to blink and not close.
- Run Wires: Route the wires along the wall and ceiling to the opener motor. Use insulated staples or cable clips to keep wires neat and protected.
- Connect Wires to Opener: Most models use color-coded terminals (white and black/white). Insert the wires according to your manual.
Common Sensor Problems
- Blinking lights: Usually means sensors are not aligned.
- No light: Check the wiring for loose connections.
- Door only opens, not closes: Safety sensors are not working.
Pro tip: Secure sensor wires away from moving parts or sharp edges. Damaged wires can cause mysterious malfunctions later.
Installing The Wall Control Panel
The wall control panel lets you operate the door from inside your garage. It’s also used for programming remotes and adjusting settings.
- Choose Location: Pick a spot near the entry door but out of reach of small children. Standard height is about 5 feet from the floor.
- Mount the Panel: Use the screws provided to attach the panel to the wall.
- Run the Wires: Route the low-voltage wire along the wall and ceiling to the opener.
- Connect to Opener: Attach the wires to the designated terminals on the opener unit.
Some advanced wall panels include motion sensors, timers, and light controls. Always check your manual for special wiring needs.
Beginner mistake: Many people overtighten the wall panel screws, which can crack the plastic. Hand-tighten only.
Powering Up And Initial Safety Checks
With the hardware installed, it’s time to plug in the opener and do some basic checks before programming.
Power On
- Plug the opener into a grounded outlet. Never use an extension cord.
- The opener’s lights should turn on. If not, check your electrical connections.
Safety Checks
- Manually Test the Door: Pull the emergency release cord. Open and close the door by hand. It should move smoothly without sticking.
- Check Balance: Open the door halfway by hand. If it stays in place, the springs are balanced. If it falls or shoots up, call a professional to adjust the springs.
- Reconnect Opener: Push the trolley back until it clicks into place.
Important: Never adjust garage door springs yourself. They are under high tension and can cause serious injury if handled incorrectly.

Setting The Travel And Force Limits
Now you’ll set how far the door opens and closes, and how much force the opener uses. This step is critical for safety and smooth operation.
Setting Travel Limits
- Locate Adjustment Screws or Buttons: Most LiftMaster units have “Up” and “Down” screws or electronic buttons on the side or back of the motor.
- Set the Up Position: Hold the “Up” button (or turn the screw) until the door opens to your desired height.
- Set the Down Position: Hold the “Down” button (or turn the screw) until the door closes completely.
Test the door after each adjustment. Make small changes until the door stops at the right spots.
Setting Force Limits
Force settings control how hard the opener pushes or pulls the door. If set too high, the door won’t stop if blocked. If set too low, the door may reverse for no reason.
- Find Force Adjustment Dials: Usually located near the travel limit controls.
- Adjust Open Force: Turn the dial until the door opens smoothly but stops if blocked.
- Adjust Close Force: Turn the dial until the door closes firmly but reverses if it hits an obstacle.
Test by placing a 2×4 board flat on the floor under the door. The door should touch and then reverse upward.
Non-obvious insight: Some newer models have automatic force adjustment. If your opener “learns” force by itself, follow the manual’s instructions for a self-test cycle.
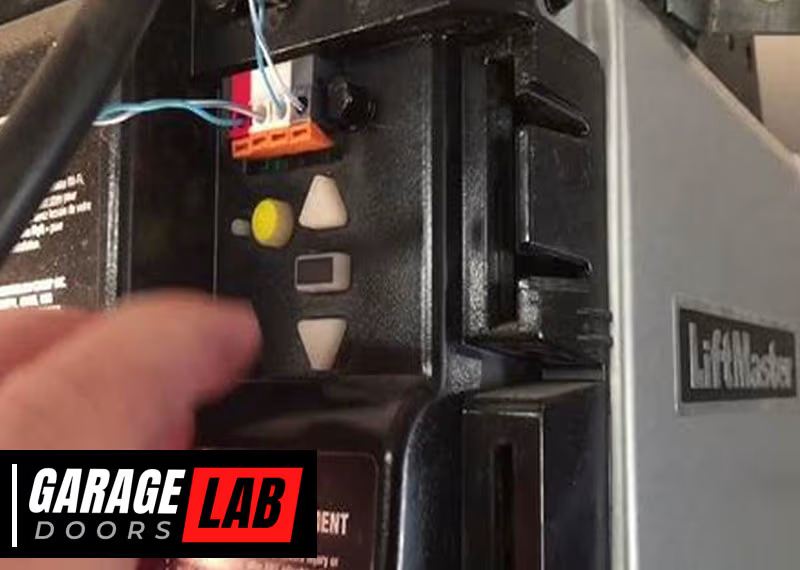
Programming Remote Controls And Keypads
With the physical installation done, it’s time to program your LiftMaster remotes and keypads.
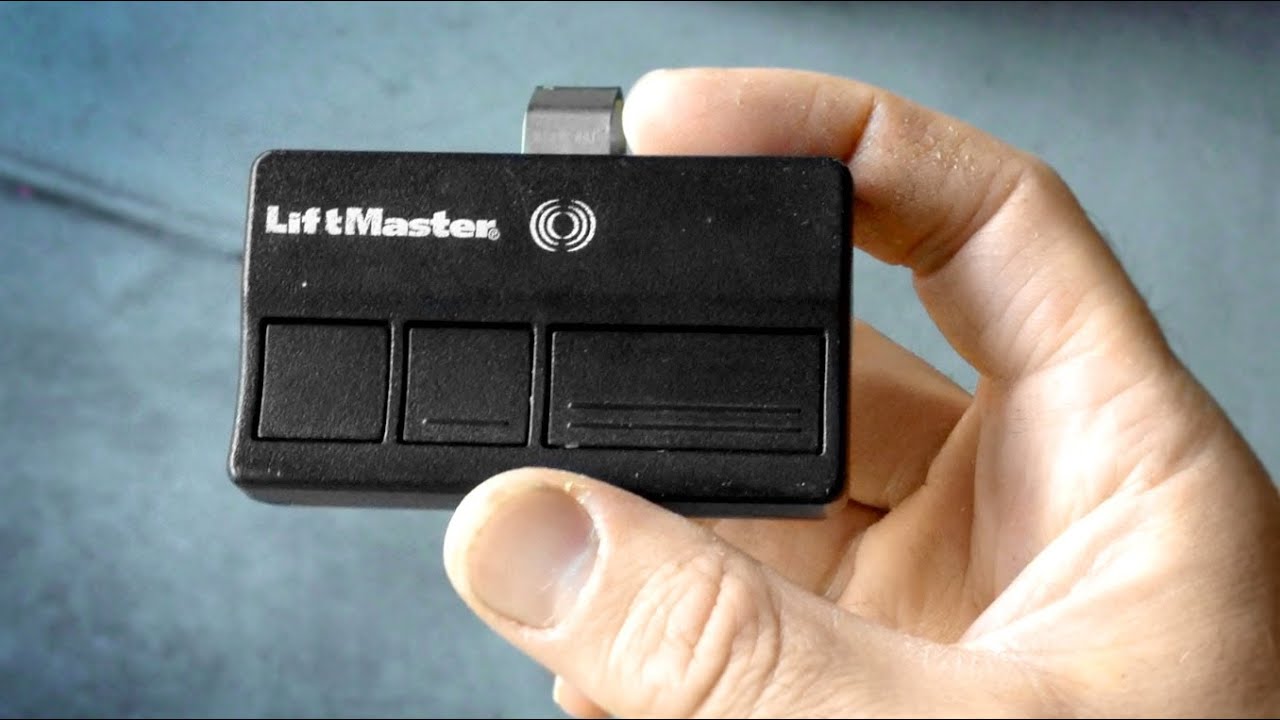
Programming A Remote Control
- Find the Learn Button: Usually a colored button on the back or side of the motor unit.
- Press and Release Learn Button: The indicator light will glow for 30 seconds.
- Press Remote Button: Within 30 seconds, press the button on your remote you want to program.
- Test Operation: The door should move when you press the remote. Repeat for extra remotes.
Programming A Wireless Keypad
- Enter Programming Mode: Press and release the Learn button on the opener.
- Enter PIN on Keypad: Within 30 seconds, enter your chosen 4-digit PIN, then press the Enter button.
- Test Keypad: Enter your PIN and press Enter to open/close the door.
Security tip: Change your PIN regularly and don’t use obvious combinations like “1234.”
Connecting Wi-fi And Myq Features
Many modern LiftMaster openers include Wi-Fi and support for the MyQ app, which lets you control the door from your smartphone.
Connecting To Wi-fi
- Download the MyQ App: Available for iOS and Android.
- Create an Account: Follow the prompts in the app.
- Pair the Opener: In the app, select “Add Device” and follow the instructions. You may need to press the Learn button on your opener.
- Connect to Home Wi-Fi: Enter your Wi-Fi name and password in the app.
- Finish Setup: Test by opening and closing the door from your phone.
Non-obvious advice: Place your router as close as possible to the garage for best signal. Weak Wi-Fi is a common source of MyQ setup frustration.
Testing And Fine-tuning
Never skip testing. Proper testing will reveal problems before they become real issues.
Functional Tests
- Remote Operation: Try opening and closing the door with each remote and the wall button.
- Safety Reversal: Place an object under the door. The door should reverse on contact.
- Sensor Test: Block the safety sensor beam with your hand—the door should not close.
- Manual Release: Pull the emergency cord and operate the door by hand.
Noise And Vibration
Listen for unusual noises. A properly installed opener should be smooth and quiet. Rattling or banging means something is loose.
Practical tip: A little white lithium grease on the rail can reduce noise and extend the life of the system.

Common Mistakes And Troubleshooting
Even with careful work, mistakes can happen. Here are some frequent problems and how to fix them.
Door Won’t Close
- Sensor alignment: Check for blinking sensor lights.
- Wiring issues: Inspect all connections.
- Travel limits not set: Adjust close limit as needed.
Remote Control Doesn’t Work
- Dead batteries: Replace with fresh ones.
- Not programmed: Repeat the programming steps.
- Out of range: Test closer to the opener.
Opener Makes Loud Noise
- Loose mounting: Tighten all bolts and supports.
- Dry rail or chain: Apply a small amount of lubricant.
- Door imbalance: Check springs and rollers.
Door Stops Midway
- Force setting too low: Increase slightly.
- Obstruction on track: Remove any objects.
- Weak springs: Contact a garage door professional.
Maintenance Tips For Long-term Performance
A little care goes a long way. Here’s how to keep your LiftMaster opener running smoothly:
- Lubricate moving parts every 6 months. Use garage door lubricant, not WD-40.
- Check the balance of your door twice a year.
- Test safety reversal and sensors monthly.
- Clean the photo-eyes gently with a soft cloth.
- Replace remote batteries yearly.
- Inspect mounting hardware and tighten any loose bolts.
Pro tip: Write the installation date on the opener with a marker. This helps you track service intervals and warranty coverage.
Comparing Liftmaster Models: Features That Affect Setup
If you’re still shopping for a LiftMaster opener, it helps to know how different models compare. Some models offer easier installation, quieter operation, or more advanced features.
| Model | Drive Type | Wi-Fi | Battery Backup | Best For |
|---|---|---|---|---|
| LiftMaster 8500 | Wall Mount | Yes | Yes | Limited headroom garages |
| LiftMaster 8160W | Chain | Yes | No | Standard doors, budget choice |
| LiftMaster 87504-267 | Belt | Yes | Yes | Quiet operation, premium features |
Choosing the right model at the start can make setup and daily use much easier.
Safety And Compliance Considerations
LiftMaster openers are designed with safety as a priority, but correct installation is essential.
- UL 325 Compliance: All modern openers must reverse if an obstacle is detected. Don’t bypass or disable sensors.
- Child Safety: Keep remotes out of reach of children. Teach family members how to use the emergency release.
- Professional Help: If you are not comfortable with any part of the installation, call a certified installer.
For more on safety standards, visit the UL website.
Frequently Asked Questions
How Long Does It Take To Install A Liftmaster Garage Door Opener?
Most installations take about 4–6 hours for someone with basic DIY skills. If you have a complex setup or need to replace old wiring, it may take longer.
Can I Install A Liftmaster Opener Myself, Or Do I Need A Professional?
Many homeowners can install a LiftMaster opener with careful attention to the instructions. However, if you are not comfortable with tools, ladders, or wiring, hiring a professional is safer.
Why Won’t My Liftmaster Opener Close All The Way?
The most common causes are misaligned safety sensors, incorrectly set travel limits, or an obstruction in the door path. Check for blinking sensor lights and adjust as needed.
How Do I Reset My Liftmaster Garage Door Opener?
To reset, unplug the opener for 30 seconds, then plug it back in. You can also erase all programmed remotes by holding the Learn button for about 10 seconds until the indicator light goes out.
What Should I Do If My Opener Is Noisy After Installation?
Check that all mounting bolts are tight, the chain or belt is lubricated, and the door is balanced. If noise continues, check for bent tracks or worn rollers.
Setting up your LiftMaster garage door opener the right way will give you years of reliable use. By following each step carefully, paying attention to details, and testing all safety features, you’ll enjoy smooth and quiet operation for a long time. Whether you’re a first-timer or a seasoned DIYer, always put safety first and don’t hesitate to ask for help if you get stuck. A well-installed opener is not just a convenience—it’s a key part of your home’s safety and security.


