Now Reading: How to Fix Garage Door Spring: A Step-by-Step Repair Guide
- 01
How to Fix Garage Door Spring: A Step-by-Step Repair Guide
A garage door is more than just a way to protect your car. It keeps your home safe and helps make life easier every day. But when the garage door spring breaks, everything stops working smoothly. The heavy door may not open. The automatic opener might strain or fail. Many people feel stuck and worried about safety.
Fixing a garage door spring is not like changing a lightbulb. It involves tension, heavy parts, and real risk if you do not know what you’re doing. But if you want to learn, you can do it safely with the right steps. This guide will help you understand how garage door springs work, signs of damage, and how to fix or replace them. It will also cover the tools you need, safety tips, common mistakes, and when you should call a professional.
Let’s make your garage door safe and smooth again, step by step.
Understanding Garage Door Springs
Before you fix anything, you need to know how the parts work together.
What Do Garage Door Springs Do?
Garage doors are heavy—sometimes over 200 pounds. Garage door springs help lift this weight. They store energy when the door is closed and release it to help open the door. Without springs, the opener motor or your arms would have to lift all the weight.
Types Of Garage Door Springs
There are two main types:
- Torsion springs: These sit above the door and twist to store energy.
- Extension springs: These run along the sides of the door and stretch to store energy.
Here’s a quick comparison to help you see the difference:
| Spring Type | Location | Lifespan | Safety | Common Use |
|---|---|---|---|---|
| Torsion | Above door (on shaft) | 15,000 – 20,000 cycles | Safer, less likely to fly off | Modern homes |
| Extension | Along door sides | 7,000 – 10,000 cycles | More dangerous if broken | Older homes |
Torsion springs last longer and are safer, so most new homes use them.
How Long Do Springs Last?
A “cycle” means one opening and closing of the door. Most springs last 7-10 years with normal use (about 4 cycles a day).
But heavy doors, cold climates, or poor maintenance can shorten this time.
Signs Your Garage Door Spring Is Broken
Not sure if the spring is the problem? Here are signs to check:
- Door is heavy: If you can barely lift it, the spring isn’t helping.
- Door doesn’t open fully: The motor may struggle or stop halfway.
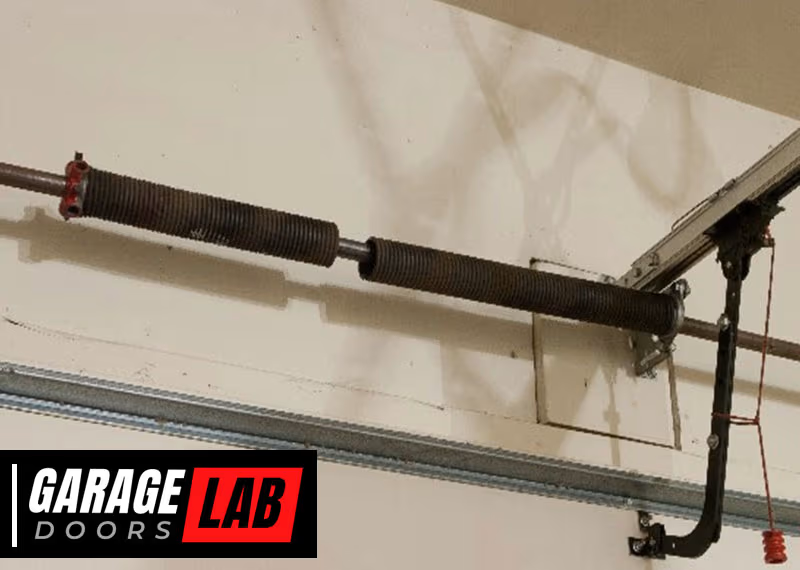
- Loud bang: When a spring breaks, it can make a noise like a gunshot.
- Gaps in the spring: If you see a 2-inch gap in a torsion spring, it’s broken.
- Cables are loose: The lift cables may dangle.
- Door is crooked: One side may hang lower.
If you notice these problems, stop using the door. Trying to force it can damage the opener or cause injury.
Safety Precautions Before You Start
Working with garage door springs is dangerous. The springs are under high tension and can snap with great force. Always follow these safety steps:
- Unplug the opener: Disconnect power so the door can’t move by accident.
- Wear safety glasses and gloves: Protect your eyes and hands from metal parts.
- Use proper tools: Never use makeshift tools—buy winding bars for torsion springs.
- Do not rush: Take your time and double-check each step.
- Work with a partner if possible: They can help hold parts or call for help if needed.
Never try to fix a spring if you feel unsure or scared. Serious injuries can happen. It is always better to call a professional if you have doubts.
Tools And Materials Needed
Having the right tools makes the job safer and easier. Here’s what you should have before you start:
For Torsion Spring Replacement
- Winding bars (2): Special steel rods for winding/unwinding torsion springs
- Socket wrench set: For removing bolts
- Clamps or locking pliers: To hold the door in place
- Ladder: Strong and stable
- Tape measure: To measure spring size
- Marker or chalk: To mark shaft positions
- Safety glasses and gloves
For Extension Spring Replacement
- C-clamps or vice grips
- Wrench set
- Pliers
- Tape measure
- New extension springs
- Safety gear
For both types, always buy replacement springs that match the size, length, and weight rating of your old ones. Using the wrong spring can ruin your door or cause injury.
How To Identify Your Spring Type And Size
Before buying new springs, you must know what you need.
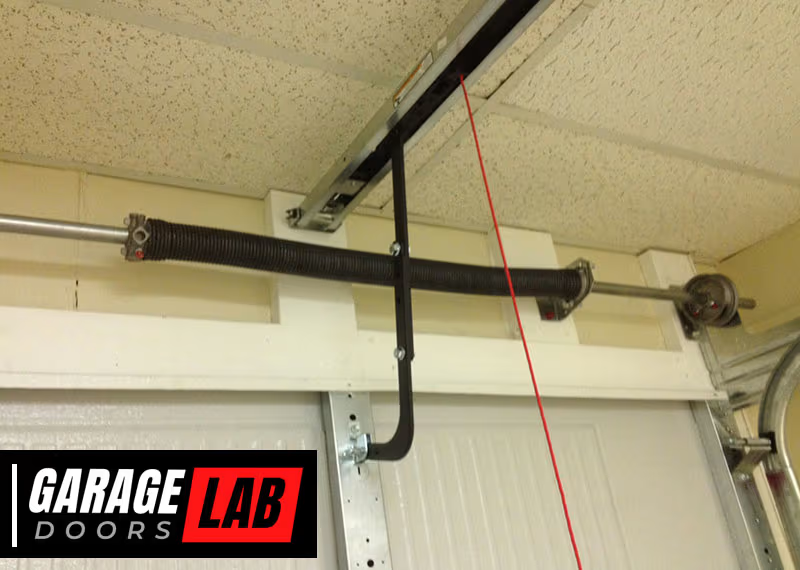
Torsion Springs
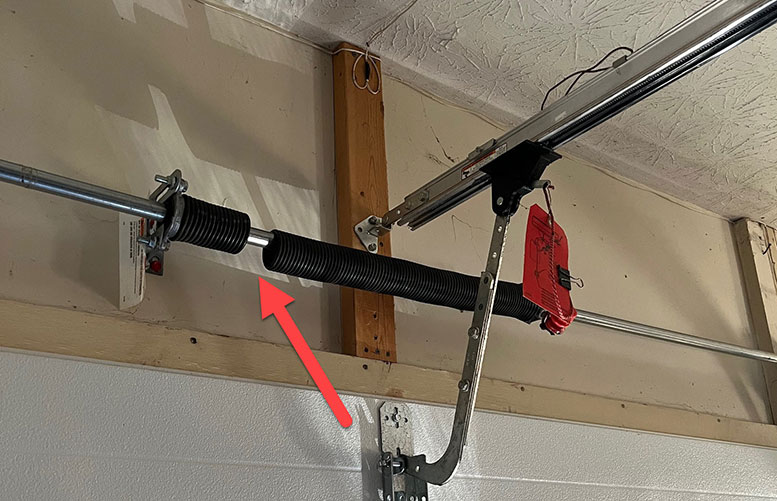
- Look above your door: If you see a long metal tube with a spring coiled around it, you have a torsion spring.
- Measure the spring: Measure the length (when relaxed), inside diameter, and wire thickness. Most springs have color coding or a part number.
Extension Springs
- Check the sides of the door: Extension springs run parallel to the tracks.
- Measure length: When the door is closed and the spring is relaxed.
- Check color code: Many springs have a painted color to show their strength.
Never guess the size. If in doubt, bring the old spring to the store or ask for help with the measurements.
Step-by-step Guide: How To Fix Garage Door Spring
Now you’re ready to begin. The method depends on the type of spring you have.
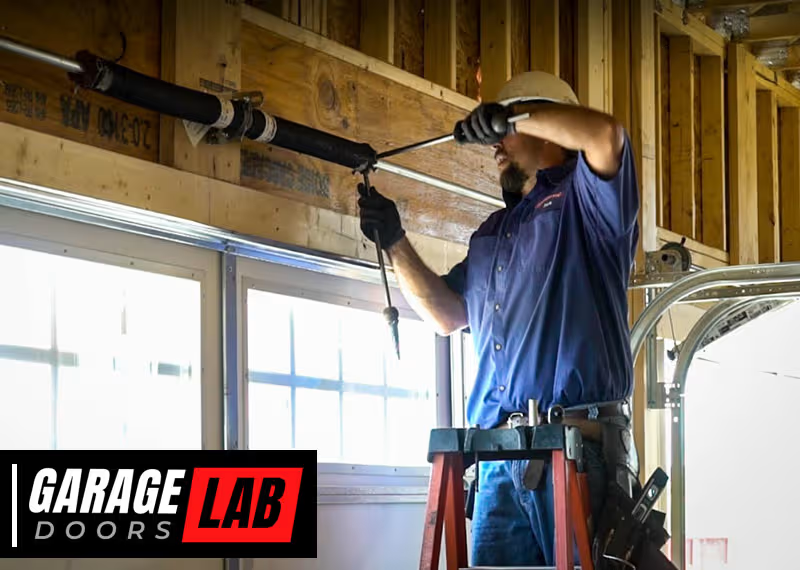
Torsion Spring Replacement
Warning: Torsion springs are very dangerous. If you are not 100% confident, hire a professional.
1. Disconnect Power And Secure The Door
- Unplug the garage door opener.
- Pull the emergency release cord to disconnect the door from the opener.
- Open the door fully by hand (if possible), and secure it with clamps on both tracks, just below the bottom roller.
2. Loosen The Broken Spring’s Tension
- Insert a winding bar into the winding cone of the broken spring.
- Hold the bar firmly and loosen the set screws with a wrench.
- Carefully turn the winding bar down, releasing tension. Insert the second bar before removing the first for safety.
- Repeat until all tension is released and the spring is loose.
3. Remove The Broken Spring
- Slide the spring toward the end bracket.
- Remove the bolts holding the spring in place.
- Slide off the spring, cable drum, and bearing if needed.
4. Install The New Spring
- Slide the new spring onto the shaft, making sure it faces the right direction (left and right springs are different).
- Reinstall the cable drum and bearing.
- Tighten the set screws loosely.
5. Wind The New Spring
- Use the winding bars to turn the spring the correct number of times (usually 30-36 quarter turns for a standard 7-foot door).
- The spring should feel tight but not overstretched.
- Tighten the set screws fully.
6. Test And Adjust
- Remove the clamps.
- Slowly lift and lower the door by hand. It should stay in place at the halfway point. If not, add or remove a quarter turn.
- Reconnect the opener and test its operation.
Extension Spring Replacement
Extension springs are a little easier but still require care.
1. Disconnect Power And Secure The Door
- Unplug the opener.
- Use the emergency release to disconnect the door.
- Open the door fully and secure it with clamps.
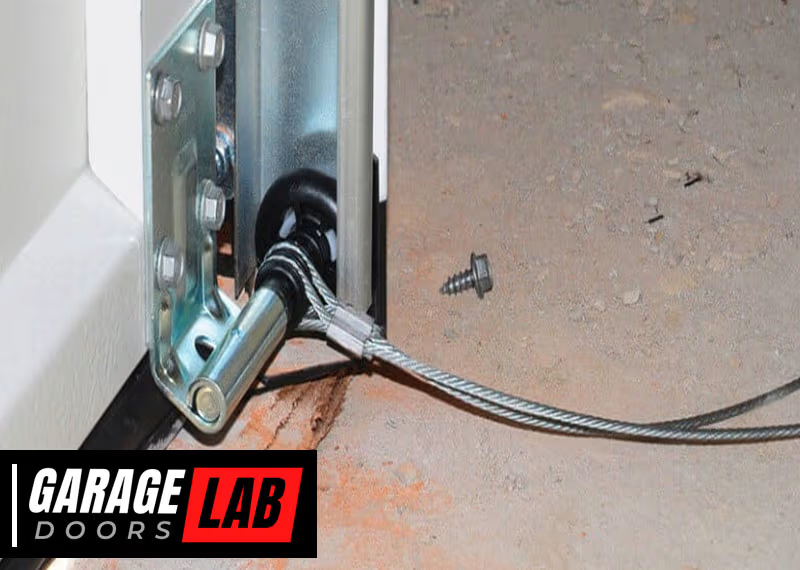
2. Remove The Broken Spring
- Disconnect the safety cable running through the spring.
- Unhook the spring from the track support and the pulley.
- Remove the old spring.
3. Install The New Spring
- Attach the new spring to the track support and pulley.
- Thread the safety cable through the spring.
- Make sure all hardware is tight and secure.
4. Test And Adjust
- Remove the clamps.
- Operate the door by hand to check balance.
- Reconnect the opener and test.
Common Mistakes And How To Avoid Them
Many people make mistakes that can damage the door or cause injury. Here are the most common:
- Using the wrong spring type or size: Always match the old spring’s size and strength. If you’re not sure, ask for help.
- Not releasing tension safely: Rushing this step can cause the spring to snap back. Always use winding bars and go slowly.
- Skipping safety cables on extension springs: These cables keep broken springs from flying off.
- Forgetting to test the door balance: A poorly balanced door will stress the opener and wear out parts quickly.
- Overtightening set screws: This can strip the shaft or damage parts.
- Not replacing both springs: If one spring breaks, the other is probably close to failure. Replace both for best performance.
When To Call A Professional
Fixing a garage door spring is not for everyone. Call a professional if:
- You feel nervous or unsure at any step.
- Your door uses a complicated or custom spring system.
- The spring is very large or the shaft is bent.
- You have a heavy double or commercial door.
- You have tried fixing it but the door is still not working right.
A good technician can fix most problems in under an hour, and their work is insured if something goes wrong.
Cost Of Garage Door Spring Replacement
Prices depend on the door type, spring quality, and your location. Here’s a comparison to help you budget:
| Type | DIY Cost (per spring) | Professional Cost (per spring) | Average Labor Time |
|---|---|---|---|
| Torsion | $40 – $100 | $150 – $350 | 1 – 2 hours |
| Extension | $20 – $60 | $100 – $250 | 1 hour |
Always buy quality springs—they last longer and are safer. Cheap springs can break faster and cause more repairs.
Tips For Extending Spring Life
You can’t stop springs from wearing out, but you can help them last longer:
- Lubricate springs twice a year: Use a silicone-based spray, not WD-40.
- Keep door balanced: Test by lifting the door halfway by hand. It should stay in place.
- Fix door problems early: If the door jerks or squeaks, check for bent tracks or loose bolts.
- Avoid slamming the door: Close it gently, especially if you operate it by hand.
- Schedule annual inspections: A technician can spot problems before they get worse.

Garage Door Spring Safety And Insurance
Many homeowners do not realize that working on garage door springs can affect their insurance. If you injure yourself or damage property, some policies may not cover DIY repairs.
- Always check your home insurance before starting.
- Save receipts and take photos if you do your own work.
- If you hire a pro, make sure they are insured and give a warranty.
This extra step can save you from big costs later.
Troubleshooting: Other Garage Door Problems After Spring Replacement
Sometimes the door still acts up after you replace the spring. Here are common issues and quick checks:
Door Won’t Open Or Close Fully
- Limit switch may need adjustment: Adjust the opener’s limit screws.
- Cables may be off track: Make sure they are wrapped correctly on the drums.
Door Is Noisy
- Check for loose bolts: Tighten hardware on tracks and rollers.
- Lubricate moving parts: Springs, rollers, and hinges should all be smooth.
Door Jerks Or Moves Unevenly
- Cables may be uneven: Rewind the cables evenly on both sides.
- Tracks may be bent: Straighten or replace as needed.
Opener Struggles Or Fails
- Spring may be wrong size: If the door is still heavy, check your spring specs.
- Opener force setting: Adjust the opener’s force setting following the manual.
If these simple fixes do not work, call a technician.

Advantages And Disadvantages: Diy Vs. Professional Repair
Let’s compare the options if you’re still unsure.
| Factor | DIY | Professional |
|---|---|---|
| Cost | Lower, pay for parts only | Higher, includes labor |
| Safety | High risk if inexperienced | Very safe |
| Time | 2-4 hours (learning curve) | 1-2 hours |
| Warranty | Usually none | Often 1-3 years |
| Tools Needed | Must buy/borrow | Already owned by pro |
DIY can save money and teach valuable skills, but only if you are careful. Otherwise, hiring a pro is safer and may save money in the long run.
Non-obvious Insights For Beginners
- Springs Always Work in Pairs: If your door has two springs, always replace both. The old one will break soon after the new one.
- High-Lift Systems Need Special Springs: Some garages have doors that go up higher before bending. These need custom springs, not standard ones.
Most people skip these details, which can lead to fast wear or repeat repairs.
Where To Buy Replacement Springs
You can find garage door springs at hardware stores, online sellers, or through local repair companies. For best results:
- Match the exact size and rating.
- Buy from reputable brands.
- Ask for a warranty on parts.
If you are unsure, take the old spring to the store for comparison.
For more technical details about garage door springs, you can visit the Wikipedia page on Garage Door Openers.
Frequently Asked Questions
What Happens If I Use The Wrong Size Spring?
Using the wrong size spring makes your door too heavy or too light. This stresses the opener, wears out parts, and can cause accidents. Always use the spring size that matches your door’s weight and height.
Can I Fix A Garage Door Spring Alone?
You can, but it is risky. Many injuries happen from springs snapping or tools slipping. If you do not have the right tools or experience, it’s safer to work with a partner or call a professional.
How Long Do Garage Door Springs Last?
Most springs last 7–10 years with regular use (about 10,000 cycles). High-quality torsion springs can last up to 20,000 cycles. If you use your garage door more often, the springs will wear out faster.
Is It Safe To Open The Garage Door With A Broken Spring?
No. The opener may lift the door, but it will be under heavy strain and can break. The door might also fall suddenly. Always repair or replace the spring before using the door again.
How Can I Make My Garage Door Springs Last Longer?
Lubricate them twice a year, keep the door balanced, fix problems early, and avoid slamming the door. Annual inspections by a professional also help spot small problems before they become serious.
Fixing a garage door spring takes skill, patience, and the right safety steps. Whether you do it yourself or hire a professional, knowing how the system works will keep your home safer and your door running smoothly.