Now Reading: How to Align Sensors on Garage Door for Smooth Operation
- 01
How to Align Sensors on Garage Door for Smooth Operation
When your garage door refuses to close or constantly reverses before hitting the floor, the issue often points to misaligned sensors. These small devices, usually located near the base of your garage door tracks, are essential for safety. They ensure nothing is in the way when the door closes.
For homeowners, aligning these sensors can seem tricky, especially if you’re not familiar with garage door systems. But with the right approach, you can fix sensor alignment issues yourself and save money on service calls.
This guide will walk you step by step through how to align sensors on your garage door. You’ll learn what causes misalignment, how to diagnose sensor problems, and the exact procedures for aligning them. We’ll cover tools you need, common mistakes, and advanced troubleshooting tips for persistent issues.
By the end, you’ll be able to handle most sensor alignment problems like a pro, with practical guidance and real-world examples to help you succeed.
How Garage Door Sensors Work
Garage door sensors are a safety feature required in the United States since 1993. They use an infrared beam that stretches across the bottom of the garage opening. When something breaks this beam, the door stops closing or reverses. The system usually consists of two units:
- Sender sensor: Emits the infrared beam.
- Receiver sensor: Detects the beam from the sender.
If the sensors become misaligned, the beam can’t travel directly from one to the other. The door thinks something is in the way and refuses to close. Understanding this mechanism is key to troubleshooting.
Why Sensor Alignment Matters
Misaligned sensors make your garage door unreliable and unsafe. Common symptoms include:
- Door won’t close or reverses immediately.
- Blinking sensor indicator lights.
- Error codes on the garage door opener.
Proper alignment keeps your door operating smoothly and protects children, pets, and property from accidents.
Identifying Sensor Alignment Problems
Before you start adjusting, you need to confirm that alignment is the real issue. Sensor problems can sometimes be caused by other things, like wiring faults or dirt.
Signs Of Misaligned Sensors
- Blinking lights: Most sensors have an LED light. If one or both are blinking or off, alignment is likely the problem.
- Door reverses: The door starts to close but reverses before hitting the ground.
- Manual hold to close: The door only closes if you hold the wall button down.
- No visible beam: Even though you can’t see infrared, if nothing blocks the path and the door still won’t close, misalignment is a probable cause.
Ruling Out Other Issues
Before adjusting:
- Clean the sensor lenses with a soft cloth.
- Check for spider webs or dust.
- Make sure nothing (bikes, trash cans, tools) blocks the sensor path.
- Examine wires for damage or loose connections.
If these steps don’t fix the problem, proceed with alignment.

Tools And Preparation
Aligning sensors is a simple process, but having the right tools helps:
- Screwdriver (usually Phillips or flathead)
- Measuring tape or ruler
- Level (bubble or laser)
- Soft cloth
- Masking tape (optional)
- Flashlight (if lighting is poor)
Before starting, unplug the garage door opener for safety. Make sure the area around the sensors is clear.
Step-by-step Guide: How To Align Sensors On Garage Door
Follow these steps for accurate alignment. Each step is important; skipping one can lead to frustration.
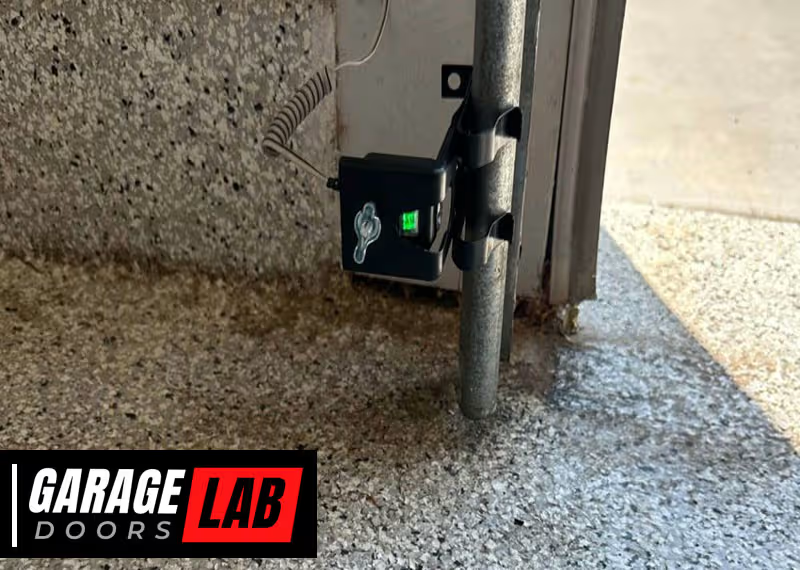
1. Locate The Sensors
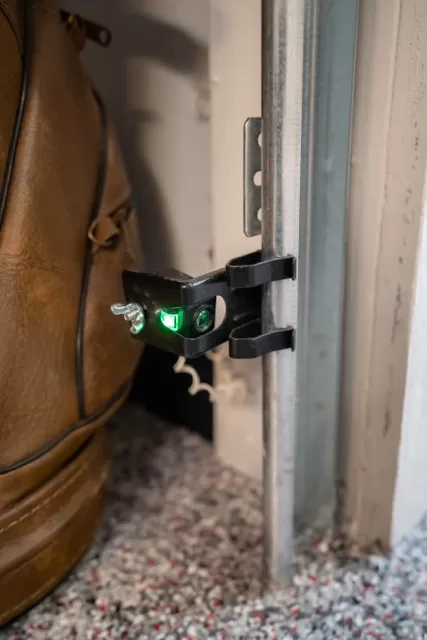
Sensors are installed on both sides of the garage door, about 4-6 inches from the ground. Look for small plastic boxes attached to the metal track or wall. One side will have a green or orange light (sender), and the other will have a similar indicator (receiver).
2. Check Sensor Height
Use a measuring tape to make sure both sensors are mounted at the same height. Even a small difference (less than half an inch) can break the beam.
- Measure from the ground to the center of each sensor.
- If heights differ, loosen the mounting bracket screw and adjust accordingly.
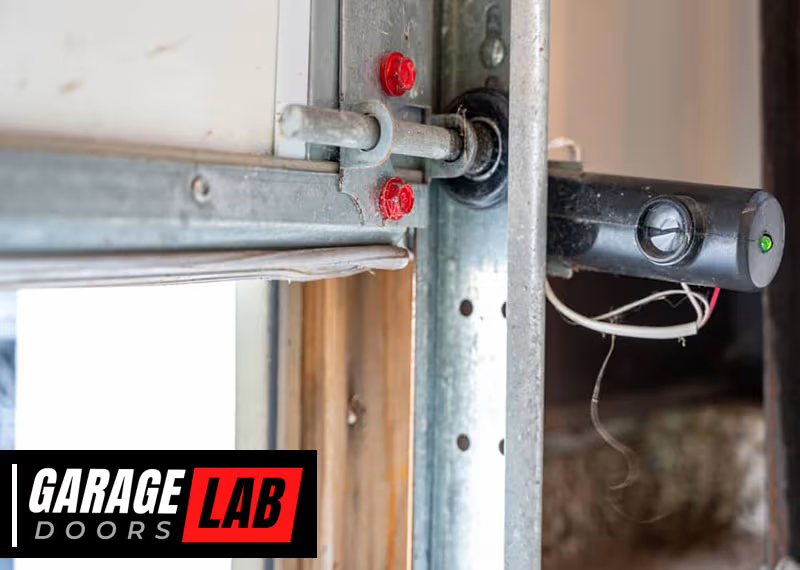
3. Inspect Sensor Brackets
Sensor brackets can become bent if hit by bikes, tools, or even feet. Check if brackets are straight and tight. If bent, gently bend back into position using your hand or pliers.
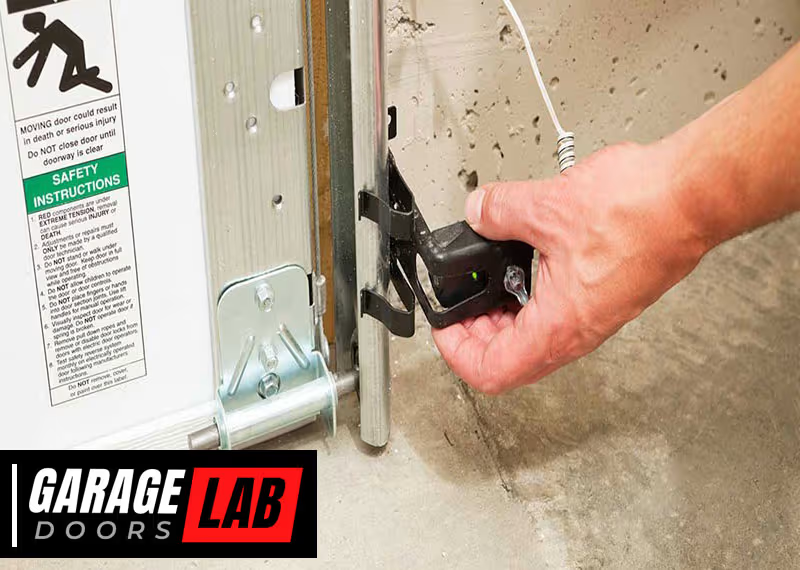
4. Loosen The Sensors
Most sensors are secured with a single screw or wing nut. Loosen (do not remove) the screw so you can move the sensor head side to side and up or down.
- Do this for both sensors.
5. Align The Sensors Visually
Gently adjust both sensors so they face each other directly. A straight line across the garage opening is best. You can use a string or a laser level for precision.
Using A String For Alignment
- Tape a string to the center of one sensor lens.
- Stretch the string across to the other sensor.
- Adjust both sensors until the string is centered on both lenses.
Using A Laser Level
If you have a laser level, place it on one sensor. Move the other sensor until the laser points directly at its lens.
6. Tighten The Sensors
Once aligned, carefully tighten the screws. Hold the sensor steady while tightening to avoid shifting.
7. Confirm Led Lights
Check the indicator lights on both sensors.
- Solid light: Sensors are aligned.
- Blinking or off: Realign until both are solid.
If lights remain off, re-check wiring and connections.
8. Test The Door Operation
Plug in the opener and try closing the door.
- If the door closes smoothly, the sensors are aligned.
- If the door reverses, check for obstacles, dirty lenses, or repeat alignment.
9. Fine-tuning
Even if the door works, small adjustments can help. Gently tap sensors or brackets for micro-adjustments if the beam is sensitive to vibration.
Common Mistakes To Avoid
Many homeowners make the same errors when aligning sensors. Here’s how to avoid them:
- Ignoring sensor height: Both sensors must be at the same level. Even a small difference matters.
- Over-tightening screws: This can shift the sensor out of alignment.
- Not checking for obstacles: A leaf, cobweb, or toy can block the beam.
- Skipping cleaning: Dust on the lens can make the sensor act as if it’s misaligned.
- Not testing after adjustment: Always test the door before finishing.
Troubleshooting Persistent Sensor Problems
Sometimes, even after perfect alignment, problems remain. Here’s what to check next.
1. Wiring Issues
Look for loose or frayed wires at the sensor or opener. Movement, weather, or animals can damage wires.
- Gently tug wires to check for loose connections.
- If wires are damaged, replace or repair as needed.
2. Sunlight Or Reflections
Bright sunlight or shiny floors can interfere with the infrared beam.
- Try shading the sensors with a small piece of cardboard.
- Paint the floor under the sensors with a matte finish to reduce glare.
3. Faulty Sensors
Sensors have a lifespan. If one is damaged by water, impact, or age, it may need replacement.
- Swap sensors left to right (if possible). If the problem follows the sensor, replace it.
- New sensors can be purchased from the opener’s manufacturer.
4. Opener Logic Board
Rarely, the opener’s main board can malfunction, misreading sensor signals.
- Consult the opener’s manual for error codes.
- Consider professional help if you suspect a board issue.
Table: Common Sensor Problems And Causes
Here’s a quick reference for diagnosing sensor issues:
| Symptom | Possible Cause | Solution |
|---|---|---|
| Blinking sensor light | Misalignment or obstruction | Clean, realign, check for objects |
| Both lights off | No power or broken wire | Check wiring and connections |
| One light solid, one off | Defective sensor or severe misalignment | Replace sensor, realign |
| Door reverses immediately | Blocked beam or dirty lens | Remove blockage, clean lenses |
Advanced Alignment Techniques
For some garages, standard alignment is not enough. Here are expert tips for more challenging situations.
Dealing With Uneven Floors
If your garage floor slopes, sensors may not align even at the same height.
- Use a level to check both sensor positions.
- Build up the lower side with a small wood block or bracket extension.
Vibration Problems
Older doors or openers vibrate more, shaking sensors out of place.
- Add foam padding behind brackets to absorb vibration.
- Use lock washers to keep screws tight.
Multi-door Garages
If you have two doors side by side, sensor signals can interfere.
- Check that sensors are aimed only at each other, not across bays.
- Separate each pair with a divider if needed.
Extreme Weather
Cold, heat, and humidity can affect sensor operation.
- Use weatherproof covers or move sensors slightly higher above snow/rain splash zone.
- Check regularly during seasonal changes.
Table: Sensor Alignment Tools Comparison
Choosing the right tool can make alignment easier. Here’s a side-by-side look:
| Tool | Accuracy | Ease of Use | Cost | Best For |
|---|---|---|---|---|
| String | Medium | Easy | Low | Quick checks |
| Bubble Level | High | Medium | Low | Most homeowners |
| Laser Level | Very High | Medium | Medium-High | Precision jobs |
| Tape Measure | High (for height) | Easy | Low | Checking heights |
Real-world Example: Successful Sensor Alignment
Consider Lisa, a homeowner in Ohio. Her garage door stopped closing after a child’s toy bumped the sensor. The indicator light started blinking, and she had to hold the wall button to close the door. By following these steps, she:
- Noticed one sensor was slightly higher than the other.
- Used a measuring tape and bubble level to adjust both sensors.
- Cleaned the lenses, tightened the brackets, and tested the door.
- The light turned solid, and the door worked perfectly.
Lisa’s experience shows that attention to detail and patience pays off.
Preventing Future Sensor Issues
Once your sensors are aligned, a little maintenance can prevent future problems.
- Regular cleaning: Wipe lenses every few months.
- Keep area clear: Don’t store bikes, tools, or bins near sensors.
- Check after storms: Heavy rain or wind can shift brackets.
- Tighten screws: Give brackets a quick check twice a year.
Table: Maintenance Schedule For Garage Door Sensors
A simple routine can keep sensors working year-round:
| Task | Frequency | Notes |
|---|---|---|
| Clean lenses | Every 3 months | Use soft cloth, no chemicals |
| Check alignment | Every 6 months | Quick visual check |
| Tighten screws | Every 6 months | Do not overtighten |
| Inspect wiring | Annually | Look for wear, damage |
When To Call A Professional
Some sensor issues are beyond DIY. Call a garage door technician if:
- Wires are damaged inside the wall.
- Sensors have obvious water damage.
- The opener’s board gives persistent error codes.
- Alignment efforts fail after several tries.
A professional has specialized tools and experience to handle complex problems. Don’t risk your safety or the door’s function if you’re unsure.
Non-obvious Insights For Diy Success
Many guides skip these advanced tips, but they can make a big difference:
- Use your smartphone camera: The infrared beam may show up as a faint light on your phone’s camera. Use this trick to check if the sender emits a beam.
- Check for sensor “drift”: Over time, temperature changes can cause brackets to expand or contract, shifting sensors. Mark bracket positions with a pencil so you can quickly spot movement.
- Label wires before disconnecting: If you ever need to replace a sensor, label wires with tape to avoid mix-ups during reinstallation.
Safety Reminders
- Always unplug the opener before working on sensors.
- Don’t bypass or disable sensors; this creates a safety hazard.
- Teach children not to play near sensors or the bottom of the garage door.
External Resource
For more details on garage door safety standards and regulations, visit the official CPSC Garage Door Safety Guide.
Frequently Asked Questions
What Happens If Garage Door Sensors Are Not Aligned?
If sensors are not aligned, the garage door will not close normally. It may reverse, stop halfway, or only close if you hold the wall button. Misaligned sensors prevent the infrared beam from passing, making the system think something is in the way.
Can Sunlight Affect Garage Door Sensors?
Yes, direct sunlight or strong reflections can interfere with the infrared beam. This can cause the sensors to act as if something blocks the path. Shading the sensors or adjusting their angle can help.
How Do I Know If A Sensor Is Broken Or Just Misaligned?
If alignment steps do not fix the problem and cleaning doesn’t help, try swapping sensors left to right. If the problem follows the sensor, it’s likely defective. Also, check if the indicator light stays off even after checking wiring and alignment.
Is It Safe To Bypass Garage Door Sensors?
No, bypassing or disabling sensors is unsafe and can cause injury or property damage. Sensors are a critical safety feature required by law. Always repair or replace, never bypass.
How Often Should I Check My Garage Door Sensors?
Check sensor alignment and cleanliness every 3 to 6 months. Also, check after storms or if the door behaves strangely. Regular checks keep your door safe and working.
Garage door sensors are simple but vital. With careful attention and these expert tips, you can keep your system safe and reliable for years. If you ever face persistent problems, don’t hesitate to call a professional. Taking the time to align and maintain your sensors protects your family, pets, and property—making your garage a safer place for everyone.