
When your Craftsman garage door opener chain starts to sag or become loose, it’s more than just an annoyance; it’s a potential safety hazard and can lead to operational issues. A loose chain can slip off its sprocket, causing the door to malfunction or, worse, fall unexpectedly. Fortunately, tightening this chain is a common DIY maintenance task that most homeowners can handle with a few basic tools and a bit of guidance. This process ensures your garage door operates smoothly and reliably, providing the security and convenience you expect.
Understanding why your garage door opener chain might loosen over time is key to preventative maintenance. Chain stretch is a natural phenomenon due to the constant tension and movement. Factors like wear and tear, improper initial installation, or even extreme temperature fluctuations can contribute to a slack chain. Addressing this promptly can save you from more significant repairs down the line and keep your garage door system functioning optimally.
Key Takeaways
- A sagging garage door chain on a Craftsman opener requires prompt attention to prevent operational issues and safety hazards.
- The primary tool for tightening the chain is the tension adjustment nut located on the opener’s motor unit.
- Always disconnect power to the opener before starting any maintenance to avoid electrical shock.
- Manual operation of the garage door is necessary to test chain tension after adjustment.
- A properly tensioned chain should have about 1/4 to 1/2 inch of slack.
- If issues persist after tightening, consult the owner’s manual or a professional garage door technician.
- Regular maintenance, including checking chain tension, is crucial for the longevity and safe operation of your garage door opener.

Credit: www.youtube.com
Understanding Craftsman Garage Door Opener Chains
Craftsman garage door openers, like many others, utilize a chain drive system to lift and lower the garage door. This system consists of a motor, a trolley that moves along a rail, and a chain that connects the motor to the trolley. The chain operates much like a bicycle chain, engaging with a sprocket on the motor unit. When the motor turns the sprocket, the chain moves, pulling or pushing the trolley, which in turn moves the garage door.
The chain drive is favored for its durability and lifting power, making it suitable for heavier doors. However, the constant pulling and releasing of tension can cause the chain to stretch over time. This stretch leads to slack, which can manifest as a noisy operation, a jerky door movement, or the chain slipping off the sprocket. In some cases, a very loose chain might even prevent the opener from engaging properly.
Common Causes Of A Loose Chain
Several factors can contribute to a garage door opener chain becoming loose:
- Chain Stretch: This is the most common cause. Over thousands of cycles, the metal links in the chain can elongate slightly. This gradual stretching increases the overall length of the chain, leading to slack.
- Wear and Tear: Continuous friction between the chain, sprocket, and trolley can wear down the components. Worn sprockets or chain links can affect how tightly the chain engages, making it seem looser.
- Improper Initial Installation: If the chain wasn’t tensioned correctly when the opener was first installed, it might loosen more quickly than expected.
- Environmental Factors: Extreme temperature changes can cause metal components to expand and contract, potentially affecting chain tension over time. While less common, significant fluctuations could contribute to loosening.
- Lubrication Issues: While not a direct cause of loosening, a lack of proper lubrication, as discussed in how to lubricate garage door rollers, can increase friction and wear, indirectly leading to faster chain degradation and potential slack.
Signs Your Chain Needs Tightening
Recognizing the signs of a loose chain is crucial for timely intervention. Don’t wait for a complete failure. Here are common indicators:
- Sagging Appearance: Visually inspect the chain. If it appears to be hanging lower than usual, especially in the middle of the rail, it’s likely loose.
- Grinding or Rattling Noises: A loose chain can make grinding sounds as it slips on the sprocket or rattling noises as it moves unevenly.
- Jerky Door Movement: When the opener tries to move the door, a loose chain might cause the door to move in a stuttering or jerky fashion instead of a smooth ascent or descent.
- Opener Motor Strain: You might hear the motor straining more than usual as it struggles to pull the slack chain and engage properly.
- Chain Slipping: In severe cases, you might hear a distinct slipping sound as the chain disengages from the sprocket, potentially causing the door to stop moving or even drop partially.
Safety Precautions Before You Begin
Before attempting to tighten the chain on your Craftsman garage door opener, prioritizing safety is paramount. Garage door openers are powerful machines, and working with them involves risks if proper precautions aren’t taken.
Disconnecting Power
The most critical safety step is to disconnect the power supply to the garage door opener. This prevents the motor from accidentally engaging while you are working on the chain, which could lead to serious injury.
- Unplug the Opener: Locate the power cord for your Craftsman opener, which is usually plugged into a ceiling outlet. Unplug it completely.
- Flip the Breaker (Optional but Recommended): For added safety, you can also go to your home’s electrical panel and flip the breaker that controls the garage door opener circuit. This ensures no power can reach the unit.
Disengaging The Opener
Once the power is off, you need to disengage the opener mechanism from the garage door itself. This allows you to move the door manually, which is necessary for checking and adjusting the chain tension.
- Locate the Emergency Release Cord: Most garage door openers have a red emergency release cord hanging from the trolley mechanism on the rail.
- Pull the Cord: With the power off, pull this cord firmly. You should hear or feel a mechanism disengage, separating the trolley from the chain and drive mechanism. This allows you to lift or lower the door by hand.
Personal Protective Equipment (ppe)
While this is a relatively simple task, wearing appropriate PPE can prevent minor injuries.
- Safety Glasses: Protect your eyes from dust or debris that might fall from the opener unit or rail.
- Gloves: Protect your hands from grease, sharp edges, or potential pinch points.
- Sturdy Footwear: Wear closed-toe shoes to protect your feet.

Credit: www.youtube.com
Locating The Tension Adjustment Mechanism
Craftsman garage door openers typically have a straightforward mechanism for adjusting chain tension. The adjustment is usually made directly on the motor unit or the rail assembly.
Identifying The Tension Adjustment Nut
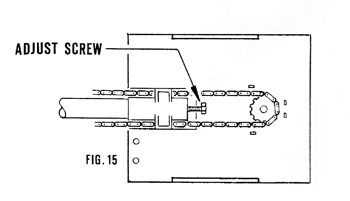
The primary component for adjusting chain tension is often a large nut or a bolt assembly located near the motor unit where the chain attaches to the rail. This nut is designed to either tighten or loosen the chain by moving the motor or a tensioning pulley.
- Motor Unit Location: On many Craftsman models, the chain connects to a bracket that can be moved slightly forward or backward along the rail. This bracket is often secured by bolts that, when loosened, allow for adjustment. The tension adjustment nut is typically part of this bracket system.
- Rail Assembly: Some designs might have a separate tensioning pulley system integrated into the rail, often at the far end from the motor. This pulley will have an adjustment mechanism.
Consulting Your Owner’s Manual
If you’re unsure about the exact location of the adjustment mechanism on your specific Craftsman model, the owner’s manual is your best resource. It will provide detailed diagrams and instructions tailored to your opener. If you no longer have the physical manual, you can often find a digital version on the Craftsman website by searching for your opener’s model number. Searching online for “[Your Craftsman Model Number] chain adjustment” can also yield helpful results, including videos and forum discussions.
Credit: www.naturalhandyman.com
The Step-by-step Process For Tightening The Chain
Once you’ve identified the adjustment mechanism and ensured all safety precautions are in place, you can proceed with tightening the chain. This process involves making small, incremental adjustments and testing the tension frequently.
Step 1: Loosen The Securing Bolts
Before you can adjust the tension, you’ll likely need to loosen the bolts that hold the motor unit or the tensioning bracket in place.
- Identify Bolts: Locate the bolts that secure the motor unit to the mounting bracket or the trolley adjustment bracket to the rail.
- Loosen, Don’t Remove: Use an appropriate wrench or socket to slightly loosen these bolts. You don’t need to remove them entirely; just loosen them enough so that the bracket or motor can be moved.
Step 2: Adjust The Tension
With the bolts loosened, you can now adjust the chain tension.
- Using the Adjustment Nut: If your model has a specific tension adjustment nut, turn it clockwise to tighten the chain. If it’s a bracket that moves, you might need to use a pry bar or screwdriver to gently shift the bracket forward along the rail.
- Incremental Adjustments: Make small adjustments. Over-tightening can damage the chain, sprocket, or motor. A quarter turn of the nut or a slight shift of the bracket is usually sufficient for each adjustment.
- Check for Slack: After each adjustment, gently try to move the chain by hand. You’re aiming for a specific amount of slack.
Step 3: Check The Chain Slack
Proper chain tension is crucial. Too tight, and you risk damaging components; too loose, and it won’t function correctly.
- The 1/4 to 1/2 Inch Rule: The ideal slack for a garage door opener chain is typically between 1/4 inch and 1/2 inch. You can measure this by gently pushing the chain upwards or downwards in the middle of its longest span. It should have a little give but not sag significantly.
- Manual Door Test: With the opener still disengaged, manually move the garage door through its entire range of motion. Listen for any unusual noises (grinding, squeaking) and feel for consistent resistance. The door should move smoothly without binding. If you notice issues, you might need to adjust the tension further or check other components.
Step 4: Retighten The Securing Bolts
Once you’ve achieved the desired tension and confirmed smooth manual operation, secure the mechanism.
- Tighten Firmly: Retighten the bolts you loosened in Step 1. Ensure they are snug to prevent the adjustment from loosening over time. Avoid over-tightening, which could strip the threads.
Step 5: Re-engage The Opener And Restore Power
The final steps involve reconnecting the opener to the door and restoring power.
- Re-engage Opener: Pull the emergency release cord again to re-engage the trolley with the chain. You may need to move the trolley by hand until it locks onto the chain mechanism. Refer to your manual if this step is tricky.
- Restore Power: Plug the opener back in or flip the circuit breaker back on.
Step 6: Test The Opener
Perform a final test to ensure everything is working correctly.
- Test Remotely: Use your remote control to operate the garage door. Watch and listen carefully as it opens and closes.
- Observe Operation: The door should now move smoothly, without jerking, grinding, or excessive noise. The chain should remain engaged with the sprocket throughout the entire cycle.
Pro Tip: If your Craftsman opener has a screw drive or belt drive instead of a chain, the adjustment procedures will differ significantly. Always refer to your specific model’s manual for the correct maintenance steps.
When To Seek Professional Help
While tightening a garage door opener chain is often a manageable DIY task, there are situations where it’s best to call a professional. Recognizing these instances can prevent further damage or injury.
Signs Of More Serious Issues
If you observe any of the following, it’s a strong indicator that the problem extends beyond simple chain tension:
- Damaged Chain: Inspect the chain for broken or bent links, excessive rust, or wear. A damaged chain needs to be replaced, not just tightened.
- Worn Sprocket: Check the sprocket on the motor unit. If the teeth are dull, chipped, or rounded, the sprocket is worn and needs replacement. A worn sprocket won’t properly engage the chain, even if the chain is tensioned correctly.
- Damaged Rail or Trolley: Look for any bends, cracks, or obstructions in the opener rail or damage to the trolley mechanism. These can impede smooth operation and affect chain function.
- Motor Problems: If the motor itself is making unusual noises, smells burnt, or fails to engage the drive mechanism even after the chain is properly tensioned, there might be an internal motor issue.
- Persistent Slipping: If the chain continues to slip even after adjustment, or if it feels excessively tight, there could be underlying issues with the motor’s mounting or the alignment of the rail.
The Cost-benefit Of Diy Vs. Professional
For many homeowners, the decision to DIY or call a professional hinges on confidence, available tools, and the complexity of the issue.
- DIY Benefits: Saving money on labor costs is the primary advantage. It also provides a sense of accomplishment and a deeper understanding of your home’s mechanics. Tasks like simple chain tightening are well within the reach of many DIYers.
- Professional Benefits: Professionals have the specialized tools, knowledge, and experience to diagnose and fix complex problems quickly and safely. They can also identify potential future issues during their inspection. For safety-critical components or if you’re uncomfortable with the process, professional help is advisable. The cost of a professional service call can range from $100 to $300 depending on your location and the complexity of the repair, according to industry estimates. However, this cost can be well worth it to ensure safety and prevent more expensive repairs. For context on overall garage door costs, you can explore how much a garage door costs.
When To Call A Technician Immediately
Certain situations warrant an immediate call to a qualified garage door technician:
- Safety Concerns: If you suspect any structural issues with the door or opener that could lead to a collapse or injury.
- Electrical Faults: If you notice sparks, smoke, or a burning smell from the opener unit.
- Lack of Confidence: If at any point you feel unsure or unsafe performing the task.
Maintaining Your Craftsman Garage Door Opener Chain
Regular maintenance is key to ensuring the longevity and reliable performance of your Craftsman garage door opener chain. Proactive care can prevent most common issues, including excessive loosening.
Regular Inspection Schedule
Establish a routine for checking your garage door opener system.
- Monthly Visual Checks: Once a month, visually inspect the chain for any signs of wear, rust, or sagging. Check that it’s properly seated on the sprocket.
- Quarterly Tension Check: Every three months, perform a more thorough check of the chain tension. Manually operate the door and listen for unusual noises.
- Annual Professional Tune-Up: Consider having a professional inspect and service your entire garage door system annually. They can identify issues you might miss and perform necessary lubrication and adjustments.
Lubrication Best Practices
Proper lubrication reduces friction and wear, which can indirectly help maintain chain tension and extend its lifespan.
- Use Appropriate Lubricant: Use a garage door lubricant specifically designed for the purpose. Avoid using WD-40 or oil-based lubricants, as they can attract dust and grime, which can worsen wear. Silicone-based or white lithium grease sprays are often recommended. You can find more details on this in how to lube garage door rollers, which often applies to other moving parts as well.
- Apply Sparingly: Apply lubricant sparingly to the chain, focusing on the links. Do not over-apply, as excess lubricant can drip and collect dirt.
- Frequency: Lubricate the chain approximately once or twice a year, or more often if you live in a particularly dusty or harsh environment.
Understanding Chain Replacement
Chains do not last forever. Eventually, they will wear out and require replacement.
- Lifespan: A garage door opener chain can last anywhere from 5 to 15 years, depending on usage, maintenance, and environmental factors.
- Replacement Indicators: Signs that a chain needs replacement include visible wear on the links, excessive stretching that cannot be adjusted, or frequent slipping.
- DIY vs. Professional Replacement: Replacing a garage door opener chain is a more involved task than simply adjusting tension. It requires removing the old chain, installing the new one, and ensuring proper alignment and tension. While possible for experienced DIYers, it’s often a job best left to professionals, especially if you need to replace the sprocket simultaneously.
Frequently Asked Questions
How Much Slack Should A Garage Door Opener Chain Have?
A properly tensioned garage door opener chain should have approximately 1/4 to 1/2 inch of slack. You can test this by gently pushing the chain up or down in the middle of its longest run. Too little slack can put excessive strain on the motor and components, while too much slack can cause it to slip off the sprocket or operate noisily.
Can I Tighten The Chain On My Craftsman Opener If I Don’t Have The Manual?
Yes, in most cases. Craftsman openers typically have a tension adjustment nut or a movable bracket near the motor unit or at the end of the rail. You’ll need to loosen securing bolts, make small adjustments to the nut or bracket, and re-tighten.
If you’re unsure, searching online for your specific Craftsman model number and “chain adjustment” will often yield helpful guides or videos. Remember to always disconnect power first.
What Happens If I Over-tighten The Garage Door Chain?
Over-tightening a garage door opener chain can lead to several problems. It puts excessive stress on the motor, the sprocket, and the chain itself, which can cause premature wear or even damage. The opener might become noisier, and you could experience binding or struggle during operation. In severe cases, over-tightening can lead to component failure, requiring more costly repairs. Always aim for the recommended 1/4 to 1/2 inch of slack.
Do I Need To Disengage The Garage Door From The Opener To Check Chain Tension?
Yes, absolutely. You must disengage the opener from the door using the emergency release cord. This allows you to move the door manually to check for smooth operation and to adjust the chain tension without the motor interfering. It’s also a critical safety step to prevent the door from moving unexpectedly while you’re working on it.
How Often Should I Lubricate My Craftsman Garage Door Opener Chain?
It’s generally recommended to lubricate your Craftsman garage door opener chain once or twice a year. However, this can vary based on your climate and how frequently you use your garage door. In very dusty or humid environments, you might need to lubricate more often. Always use a lubricant specifically designed for garage door openers, and apply it sparingly to the chain links.
Your Craftsman garage door opener chain is a vital component for its smooth and safe operation. By understanding the signs of a loose chain, following proper safety procedures, and performing regular maintenance, you can keep your opener functioning reliably for years to come.
Whether you choose to tackle the adjustment yourself or call in a professional, addressing a sagging chain promptly is essential for preventing more significant issues and ensuring the security of your home.