
The modern garage door opener has evolved from a simple convenience to a sophisticated smart home device. Among the leading innovators in this space is myQ, a technology platform that allows users to monitor and control their garage doors remotely via a smartphone app. Connecting your existing garage door opener to the myQ system can transform your ordinary garage into a connected hub, offering enhanced security, convenience, and peace of mind. This process, while seemingly technical, is designed to be accessible to most homeowners, empowering them to integrate their garage door with their digital lives.
This guide will walk you through the entire process of connecting your garage door opener to myQ, covering everything from understanding compatibility to troubleshooting common issues. We’ll explore the benefits of a connected garage and provide step-by-step instructions to ensure a smooth and successful integration.
Whether you’re looking to receive notifications when your garage door is opened or closed, or you want to grant temporary access to family members, understanding how to connect to myQ is the first crucial step.
Key Takeaways
- Compatibility is Paramount: Not all garage door openers are compatible with myQ. Older models or those from specific brands may require a myQ Smart Garage Hub or a myQ-enabled garage door opener.
- The myQ App is Central: The myQ app serves as your primary interface for controlling and monitoring your garage door, receiving alerts, and managing access.
- Installation Varies: The installation process differs depending on whether you have a myQ-compatible opener or need to use the myQ Smart Garage Hub.
- Connectivity is Key: A stable Wi-Fi connection is essential for the myQ system to function correctly, allowing for remote access and real-time notifications.
- Security Features: MyQ offers features like activity logs and temporary access codes, enhancing the security of your home.
- Troubleshooting Common Issues: Understanding potential problems like Wi-Fi connectivity or sensor malfunctions can help resolve issues quickly.

Credit: www.youtube.com
Understanding Myq And Garage Door Connectivity
MyQ is a proprietary technology developed by Chamberlain Group, a prominent manufacturer of garage door openers and access solutions. At its core, myQ enables smart connectivity for garage doors, allowing users to interact with their garage door opener through a dedicated mobile application.
This connectivity bridges the gap between traditional garage door functionality and the expanding world of smart home automation.
The primary benefit of connecting your garage door opener to myQ is the ability to remote monitoring and control. This means you can check the status of your garage door (open or closed) from anywhere in the world using your smartphone, tablet, or computer. Furthermore, you can open or close the garage door remotely, which is incredibly useful if you’re on your way home and want to let someone in, or if you’ve left home and forgotten to close the door.
Beyond basic control, myQ offers a suite of features designed to enhance security and convenience:
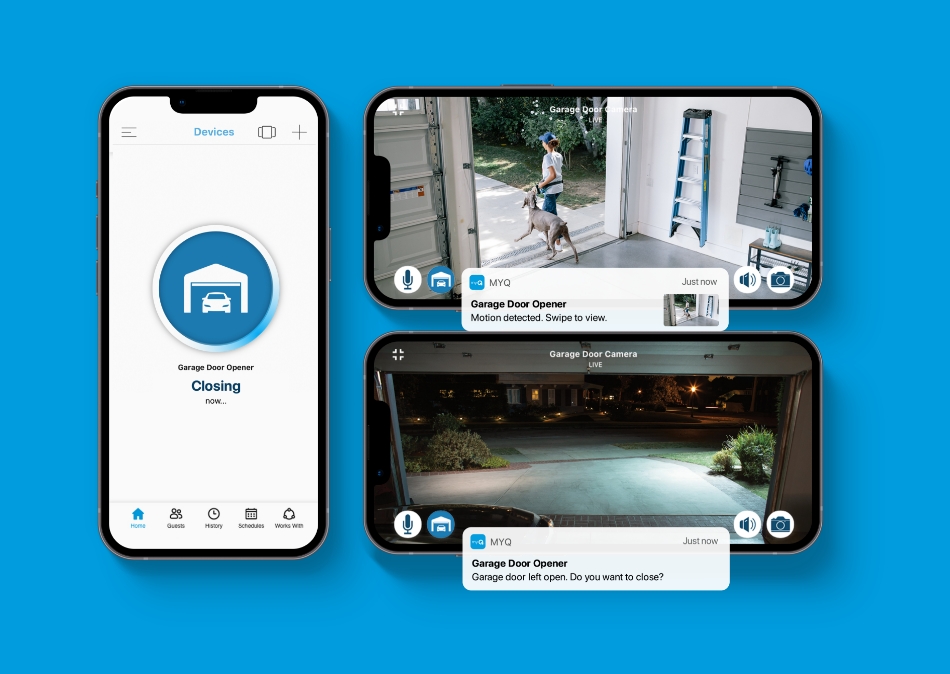
- Real-time Alerts: Receive instant notifications on your smartphone when your garage door is opened, closed, or even if it has been left open for a predetermined period. This proactive approach helps prevent potential security breaches and ensures you’re always aware of your garage’s status.
- Activity Log: MyQ maintains a history of all garage door activity, showing who operated the door and at what time. This log provides an extra layer of security and accountability.
- Guest Access: You can grant temporary or recurring access to family members, friends, or service providers through the myQ app. This eliminates the need for physical keys or remote openers, offering a more secure and manageable way to provide access.
- Smart Home Integration: MyQ can often integrate with other smart home platforms and voice assistants, allowing for voice control of your garage door or inclusion in automated routines (e.g., “Goodnight” scene that closes the garage door).
The underlying technology relies on a Wi-Fi connection. Either your garage door opener is manufactured with built-in myQ Wi-Fi connectivity, or you can add it to an existing compatible opener using a myQ Smart Garage Hub. This hub acts as a bridge, connecting your non-Wi-Fi enabled opener to your home’s wireless network and the myQ cloud.
Myq Compatibility Explained
Before you can connect your garage door opener to myQ, it’s crucial to determine if it’s compatible. myQ compatibility is generally found in garage door openers manufactured by Chamberlain, LiftMaster, and Craftsman, especially those produced from 2010 onwards. These openers typically feature a Yellow Learn Button or a Purple Learn Button on the motor unit, indicating built-in myQ capabilities.
If your opener has a Red/Orange Learn Button, Green Learn Button, or Blue/Black Learn Button, it likely does not have built-in myQ connectivity. However, this doesn’t mean you’re out of luck. For these openers, the solution is the myQ Smart Garage Hub. This standalone device is designed to add myQ functionality to a wide range of older or non-Wi-Fi enabled garage door openers. The hub typically includes a sensor that attaches to your garage door and a hub unit that connects to your Wi-Fi.
To check for compatibility, you can:
- Examine your garage door opener: Look for the color of the Learn button on the motor unit. Consult your opener’s manual or the manufacturer’s website for specific compatibility information related to the Learn button color.
- Check the myQ website: MyQ provides a compatibility checker tool on its official website where you can input your garage door opener’s model or serial number to determine if it’s compatible or if the Smart Garage Hub is the recommended solution.
- Consult your opener’s manual: The owner’s manual for your garage door opener will usually specify whether it supports myQ connectivity.
Understanding your opener’s compatibility is the foundational step in this process. Investing in a myQ-enabled opener or the Smart Garage Hub ensures that the subsequent connection steps will be straightforward and successful, leading to a fully functional smart garage experience.
Credit: www.myq.com
Connecting A Myq-enabled Garage Door Opener
If your garage door opener is already equipped with built-in myQ technology, the connection process is generally more streamlined. These openers, often identified by their Yellow, Purple, or myQ-branded Learn buttons, are designed to connect directly to your home Wi-Fi network and the myQ cloud service.
The primary tool for this setup is the myQ mobile application, available for both iOS and Android devices. You’ll need to download this app from your device’s app store and create a myQ account. Once your account is set up, the app will guide you through the process of adding your garage door opener.
Step-by-step Connection Guide
- Download the myQ App: Search for “myQ” in the Apple App Store or Google Play Store and download the official application.
- Create a myQ Account: Open the app and follow the prompts to create a new account. You’ll need to provide an email address and create a password.
- Add a New Device: Once logged in, navigate to the section for adding a new device. This is typically found by tapping a “+” icon or selecting an “Add Device” option within the app’s menu.
- Select Your Device Type: Choose the option that best describes your device. In this case, you would select “Garage Door Opener” or a similar option that indicates built-in Wi-Fi.
- Connect to Wi-Fi: The app will guide you through connecting your garage door opener to your home Wi-Fi network. This usually involves putting the opener into pairing mode (often by pressing and holding the Learn button on the motor unit for a few seconds until an LED indicator flashes) and then selecting your Wi-Fi network and entering its password within the app.
- Pro Tip: Ensure your smartphone is connected to the 2.4 GHz Wi-Fi band during this process, as most myQ devices do not support 5 GHz networks. It’s also beneficial to be close to your Wi-Fi router for a strong signal.
- Pairing the Opener: Follow the on-screen instructions to initiate the pairing process between the opener and your myQ account. This may involve pressing the Learn button again briefly to confirm the connection.
- Configure Settings: Once connected, the app will prompt you to name your garage door opener (e.g., “Main Garage Door”) and configure notification settings. You can choose what events trigger an alert (door opening, closing, left open) and how you wish to be notified (push notification, email).
- Test the System: After setup, perform a test to ensure everything is working correctly. Close the garage door using your physical remote or wall button, then open the myQ app to verify that the status updates correctly. Try operating the door through the app as well.
This direct connection method is the most integrated way to bring your garage door into the myQ ecosystem. It leverages the built-in capabilities of newer openers, requiring minimal additional hardware.
Installing The Myq Smart Garage Hub
For homeowners with older or non-Wi-Fi enabled garage door openers, the myQ Smart Garage Hub is the key to unlocking smart connectivity. This system consists of two main components: the Smart Garage Hub itself, which connects to your home Wi-Fi, and a door sensor that detects the open/closed status of your garage door. This setup allows you to control and monitor your existing opener without replacing the entire unit.
The installation process for the Smart Garage Hub involves physically installing the sensor on your garage door and then connecting the hub to your Wi-Fi network via the myQ app.
Installation Steps For The Myq Smart Garage Hub
- Download the myQ App and Create Account: If you haven’t already, download the myQ app from your device’s app store and create a myQ account.
- Add a New Device: Within the app, select the option to add a new device and choose “myQ Smart Garage Hub.”
- Install the Door Sensor:
- Placement: Identify a suitable location on your garage door to attach the sensor. It should be on the top panel, near the edge, and positioned so that the sensor and its magnetic component are aligned when the door is closed. The sensor detects when the door is closed by the proximity of the magnet.
- Attachment: Clean the surface of the garage door where you plan to mount the sensor. Use the provided adhesive strips or screws to securely attach the sensor. Ensure the magnetic component is also attached to the door in the correct position relative to the sensor, as indicated in the hub’s manual. The sensor needs to be within a few inches of the hub when the door is closed.
- Connect the Smart Garage Hub:
- Power Up: Plug the Smart Garage Hub into a power outlet located within range of your Wi-Fi router and your garage door opener’s motor unit.
- Wi-Fi Connection: Follow the app’s instructions to connect the Smart Garage Hub to your home Wi-Fi network. This usually involves putting the hub into pairing mode and selecting your Wi-Fi network and password within the app.
- Pairing: The app will then guide you to pair the hub with your myQ account.
- Program the Hub to Your Opener: This is a critical step that tells the Smart Garage Hub how to communicate with your existing garage door opener.
- Learn Button: Locate the Learn button on your garage door opener’s motor unit (this is the button you use to program remotes).
- Remote Emulation: The myQ app will instruct you to press and hold a button on the Smart Garage Hub for a few seconds. This action makes the hub emit a signal that mimics your existing garage door remote.
- Confirmation: Your garage door opener should then activate (e.g., the light might blink, or the motor might engage briefly). The app will confirm when the opener has successfully learned the signal from the hub.
- Note: If your opener uses a rolling code security system (common in openers manufactured after 1995), you might need to press the Learn button on the motor unit for a few seconds and then press the button on the hub that corresponds to your garage door. Consult your opener’s manual and the myQ hub’s instructions carefully for this step.
- Configure Settings and Test: Once paired, name your device in the app and set up your preferred notifications. Test the system by opening and closing the garage door using the app and verifying that the sensor accurately reports the door’s status.
The Smart Garage Hub offers a cost-effective way to modernize older garage door systems, bringing them into the connected home era without the expense of a full replacement.

Credit: www.youtube.com
Setting Up And Using The Myq App
The myQ app is the central command center for your connected garage. Whether you have a myQ-enabled opener or are using the Smart Garage Hub, the app is where you’ll manage settings, monitor activity, and control your garage door. A well-configured app enhances both the usability and security of your smart garage.
Navigating The Myq App Interface
Upon logging into the myQ app, you’ll typically see a dashboard displaying all connected myQ devices. For a garage door setup, this would show your garage door opener.
- Device Status: The main screen will clearly indicate whether your garage door is Open or Closed. A visual icon, often a garage door graphic, will reflect its current state.
- Control: Tapping on your garage door device will usually bring up options to Open or Close it remotely.
- Activity Log: Within the device’s detail screen, you can access the Activity Log. This section provides a chronological record of all operations, including the time, date, and method of operation (e.g., “App,” “Remote,” “Keypad”).
- Settings: The app allows for extensive customization. You can:
- Name Devices: Assign custom names to your garage door openers or hubs.
- Configure Notifications: Set up alerts for specific events like the door being left open for too long, opened or closed by a specific user (if multiple users are set up), or unexpected activity.
- Manage Users: Invite family members or trusted individuals to control the garage door via their own myQ accounts. You can often set specific access times or permissions.
- Integration Settings: Link your myQ account with other smart home platforms like Amazon Alexa, Google Assistant, or IFTTT (if supported).
Configuring Notifications And Alerts
Effective notification settings are crucial for leveraging the security benefits of myQ.
- Open/Close Notifications: These alerts inform you every time the garage door is operated. This is useful for tracking who is coming and going.
- “Left Open” Alerts: This feature is a significant security enhancement. You can set a timer (e.g., 15 minutes, 30 minutes, 1 hour) after which you’ll receive an alert if the garage door remains open. This helps prevent accidental breaches or forgotten doors.
- Custom Schedules: Some versions of the app allow you to set specific times when you expect the door to be operated, and you can receive alerts if it’s operated outside those hours.
- Delivery Method: Choose how you want to receive alerts, push notifications directly to your smartphone or email notifications. Push notifications are generally faster and more immediate.
Granting Access To Others
The ability to grant access to family members or service providers is a key convenience feature.
- Invite Users: Navigate to the “Users” or “Family Members” section in the app. You’ll typically enter the email address of the person you want to invite.
- Permissions: The invited user will need to create their own myQ account and accept the invitation. Depending on the app version, you may be able to assign different levels of access, such as full control or limited access.
- Temporary Access: For service providers like dog walkers or cleaners, you can often grant temporary access that automatically expires after a set period or number of uses. This eliminates the need to share your main account credentials or a physical remote.
Regularly reviewing your notification settings and user access is a good practice to maintain optimal security and convenience.
Integrating With Smart Home Ecosystems
One of the most powerful aspects of the myQ system is its ability to integrate with broader smart home ecosystems. This allows for seamless control and automation, making your garage door a more integral part of your connected home. MyQ supports integration with several popular platforms, enhancing its functionality beyond simple remote control.
Voice Control With Amazon Alexa And Google Assistant
Many myQ-enabled garage door openers and Smart Garage Hubs are compatible with voice assistants like Amazon Alexa and Google Assistant. This integration allows you to control your garage door using simple voice commands.
- Setup: To enable voice control, you’ll typically need to link your myQ account to your Amazon Alexa or Google Home account through their respective apps. This is usually done by enabling the “myQ” skill or action and logging in with your myQ credentials.
- Commands: Once linked, you can use commands such as:
- “Alexa, open the garage door.”
- “Hey Google, is the garage door closed?”
- “Alexa, close the garage door.”
- Security Measures: For security reasons, most voice assistants require a voice PIN or passcode to open the garage door. This prevents unauthorized opening via voice command. Closing the door, however, typically does not require a PIN. You can set up this PIN within the Alexa or Google Home app when configuring the myQ skill.
Ifttt And Custom Automations
IFTTT (If This Then That) is a platform that allows you to create custom applets (automations) by connecting different apps and devices. myQ has an IFTTT service, opening up a wide range of possibilities for automating your garage door.
- Example Applets:
- “If I arrive home (based on phone location), then open the garage door.” This can provide hands-free entry.
- “If my garage door has been open for 30 minutes, then send me a notification.” (This often duplicates myQ’s native alerts but can be customized).
- “If I leave home, then close the garage door.” This ensures your garage is secured when you’re away.
- “If my smart lights turn off at night, then close the garage door.” This can be part of a “Goodnight” routine.
- Setup: To use IFTTT, you’ll need to create an IFTTT account, connect your myQ account and other desired services (like location services or smart lights), and then activate or create applets that link them.
Smart Home Hub Integration
MyQ can also integrate with other smart home hubs and platforms, depending on the specific model of your opener or hub. This allows your garage door to participate in more complex automation routines involving various smart devices in your home.
For instance, you might have a routine where your smart thermostat adjusts to an energy-saving mode when the garage door closes, or your security cameras begin recording when the garage door is opened.
When exploring smart home integration, always check the compatibility list for your specific myQ device and the smart home platform you intend to use. Manufacturers regularly update their integrations, so referring to the latest documentation from both myQ and your smart home provider is recommended.
Troubleshooting Common Connection Issues
Despite the generally straightforward setup process, users may occasionally encounter issues when connecting their garage door opener to myQ. Most problems stem from Wi-Fi connectivity, account setup, or sensor malfunctions. Addressing these common issues can save time and frustration.
Wi-fi Connectivity Problems
- Issue: The myQ app cannot connect to the garage door opener or Smart Garage Hub, or the connection is intermittent.
- Solutions:
- Check Wi-Fi Signal Strength: Ensure your garage is within the range of your Wi-Fi router. Consider a Wi-Fi extender or mesh network if the signal is weak.
- 2.4 GHz vs. 5 GHz: Verify that your smartphone is connected to the 2.4 GHz band of your Wi-Fi network during setup. MyQ devices typically do not support 5 GHz bands.
- Router Settings: Some router settings, like firewalls or MAC address filtering, can block new devices. Temporarily disable these settings or add the myQ device’s MAC address to your router’s allowed list.
- Reboot Devices: Power cycle your Wi-Fi router, the myQ opener/hub, and your smartphone.
- Network Name/Password: Double-check that you entered the correct Wi-Fi network name (SSID) and password. Passwords are case-sensitive.
- Router Compatibility: Ensure your router firmware is up to date. Older routers might have compatibility issues.
Device Not Responding In The App
- Issue: The garage door status doesn’t update, or commands sent from the app fail to execute.
- Solutions:
- Check Internet Connection: Ensure your home internet service is active.
- MyQ Server Status: Occasionally, myQ servers might be down for maintenance. Check the myQ app or their support website for any service advisories.
- App Updates: Make sure you have the latest version of the myQ app installed on your smartphone.
- Re-sync Device: In the app’s settings for your garage door opener or hub, look for an option to “Sync Device” or “Update Device.”
- Battery in Sensor (Smart Garage Hub): If you’re using the Smart Garage