
Ensuring your garage door operates smoothly and safely is paramount for home security and convenience. A critical, yet often overlooked, aspect of this is the force adjustment on your Genie garage door opener. This setting dictates how much force the opener applies to lift and lower the door. If it’s set too high, it can pose a safety risk, potentially causing injury or damage. Conversely, if it’s too low, the opener might struggle to move the door, leading to strain on the motor and the door mechanism itself. Understanding how to properly adjust the force settings on your Genie opener is a vital DIY skill that can prevent accidents and prolong the life of your equipment.
This guide will walk you through the process of adjusting the force settings on your Genie garage door opener. We’ll cover why these adjustments are necessary, how to identify the right settings, the step-by-step procedure for making those adjustments, and important safety precautions to keep in mind.
By the end, you’ll be equipped to fine-tune your Genie opener for optimal performance and safety.
Key Takeaways
- Force adjustment is crucial for safety: It determines how much power the opener uses, preventing crushing injuries or damage.
- Two main adjustments: Open force and close force, each requiring separate settings.
- Safety Reverse System: Modern Genie openers have a built-in safety mechanism that reverses the door if it encounters an obstruction. Force adjustments work in conjunction with this.
- Tools needed: Usually a flathead screwdriver and potentially a Phillips head screwdriver.
- Locate the controls: Force adjustment screws are typically found on the powerhead of the opener.
- Test thoroughly: After adjustment, test the safety reverse feature and the door’s movement multiple times.
- Consult the manual: Always refer to your specific Genie model’s owner’s manual for precise instructions.
- When in doubt, call a professional: If you’re uncomfortable or unsure, professional help is recommended.

Credit: garagedoorflorida.com
Understanding Garage Door Opener Force Settings
Garage door openers are designed with force adjustments to accommodate the varying weight and balance of different garage doors. The open force setting determines the maximum effort the opener will exert to lift the door. The close force setting dictates the maximum effort applied when lowering the door. These settings are not arbitrary; they are directly linked to the door’s safety reverse system.
The Role Of Force In Safety
Modern garage door openers are equipped with an essential safety feature known as the safety reverse system. This system is designed to prevent serious injury or damage by detecting when the door encounters an obstruction. For upward travel, this is typically a travel-limiting device that stops the door at a predetermined point. For downward travel, it’s a force-sensing mechanism that detects resistance.
When the door is closing, the opener applies a certain amount of force. If this force exceeds a preset limit upon encountering an obstruction (like a person, pet, or object), the opener is designed to immediately reverse the door’s direction, sending it back to the fully open position.
This is a critical safety net.
The force adjustment directly influences how sensitive this safety feature is. If the closing force is set too high, the opener might exert enough power to cause injury or damage before the safety mechanism has a chance to engage. Conversely, if the closing force is set too low, the opener might interpret normal resistance (like a slightly sticky track) as an obstruction, causing the door to reverse prematurely and preventing it from closing properly.
Why Adjusting Force Is Necessary
Over time, the balance and weight of a garage door can change. Factors such as:
- Weathering: Wood doors can absorb moisture and become heavier.
- Component wear: Rollers can wear down, hinges can loosen, and springs can lose tension, all affecting the door’s balance and requiring more effort to move.
- Lubrication: Lack of proper lubrication, as detailed in our guide on how to lube garage door rollers, can increase friction and the force required.
- Installation changes: Minor shifts in the mounting of the opener or the door track can alter the resistance.
When these changes occur, the original force settings may no longer be appropriate. An opener that was once set perfectly might now be struggling to lift a heavier door or might be too sensitive, reversing unexpectedly. This is why periodic checks and adjustments are essential for maintaining safe and efficient operation.
Understanding Your Genie Opener Model
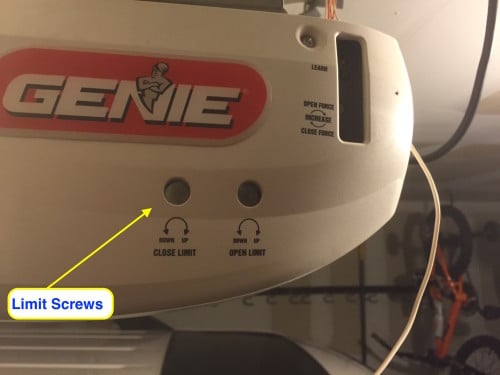
Genie offers a wide range of garage door opener models, and the exact location and type of force adjustment controls can vary. However, most Genie openers from the last few decades utilize a similar principle, typically involving rotating screws on the powerhead unit.
Key things to identify for your specific model:
- Powerhead location: This is the main unit mounted on the ceiling.
- Adjustment controls: Look for screws, knobs, or buttons typically labeled “Force,” “Up Force,” “Down Force,” or marked with arrows indicating direction.
- Owner’s manual: This is your most valuable resource. If you don’t have a physical copy, you can usually find a PDF version on the Genie website by searching for your opener’s model number.
Credit: veterangaragedoor.com
Safety Precautions Before You Start
Before you touch any adjustment screws, it’s crucial to prioritize safety. Working with garage door openers involves moving parts and electrical components, which can be hazardous if not handled correctly.
Essential Safety Steps
- Disconnect Power: Always unplug the garage door opener from the electrical outlet before making any adjustments. This prevents accidental activation of the opener while you are working on it.
- Disengage the Opener: Manually disconnect the opener from the garage door. This is typically done by pulling a red emergency release cord hanging from the opener’s trolley. This allows you to move the door freely by hand.
- Check Door Balance: With the opener disengaged, manually lift and lower the garage door.
- It should move smoothly without excessive binding or sticking. If it’s difficult to move, the issue might be with the door itself (springs, rollers, tracks) rather than the opener’s force settings. Address these mechanical issues first. You can find guidance on this in articles like How Do You Lubricate Garage Door Rollers for Smooth Operation?.
- The door should stay open on its own when you let go halfway. If it slams shut or flies upward, the torsion springs are likely out of balance, which is a dangerous condition requiring professional attention. Do not attempt to adjust spring tension yourself.
- Clear the Area: Ensure no people or pets are in the path of the garage door during testing. Remove any objects from the floor that could obstruct the door’s movement.
- Wear Protective Gear: Consider wearing safety glasses to protect your eyes from dust or debris.
When To Call A Professional
If you encounter any of the following, it’s best to stop and call a qualified garage door technician:
- The door is extremely heavy or unbalanced.
- The torsion springs appear damaged or are making unusual noises.
- You are unsure about any step in the process.
- You have made adjustments, and the opener still doesn’t function correctly or safely.
- Your opener model is significantly older or has complex electronic controls.

Credit: www.youtube.com
Locating And Identifying Adjustment Controls
The force adjustment mechanisms on Genie garage door openers are typically located on the powerhead, which is the main unit mounted on the ceiling. The exact appearance and labeling can vary between models, but the principle remains the same.
Common Control Types
Most Genie openers use one of two primary methods for force adjustment:
- Adjustment Screws: This is the most common method. You’ll usually find two screws on the powerhead, often labeled “UP FORCE” and “DOWN FORCE” or simply with “+” and “-“ symbols, or arrows indicating direction. These screws are typically slotted for a flathead screwdriver.
- Turning the screw clockwise (often in the direction of the “+” or arrow) usually increases the force.
- Turning the screw counter-clockwise (often in the direction of the “-” or opposite arrow) usually decreases the force.
- Electronic Controls: Some newer Genie models might use buttons or a digital interface on the powerhead or a separate control panel to adjust force settings. These often involve navigating menus or pressing specific combinations of buttons.
Finding Your Specific Model’s Controls
To accurately locate the controls for your specific Genie opener:
- Consult Your Owner’s Manual: This is the definitive source. It will show diagrams and provide exact instructions for your model.
- Inspect the Powerhead: Look for labels near adjustment screws or buttons. They are often located on the sides or bottom of the unit.
- Check the Genie Website: If you’ve lost your manual, you can often download a replacement from the Genie website by entering your opener’s model number.
Example: On many Genie ProMax or StealthDrive models, you’ll find two slotted screws on the side of the powerhead, clearly marked with up and down arrows or labels indicating their function.
Step-by-step Guide To Adjusting Genie Opener Force
Once you have identified the controls and taken all necessary safety precautions, you can proceed with adjusting the force settings. This process involves making small adjustments, testing, and repeating until the door operates correctly and safely.
Adjusting The Down Force (closing Force)
The down force adjustment is the most critical for safety due to the risk of crushing injuries.
- Reconnect Power: Plug the garage door opener back into the electrical outlet.
- Engage the Opener: Reconnect the opener to the door by operating the opener with the remote or wall button until the trolley re-engages.
- Set Initial Down Force: If the door isn’t closing properly, start by slightly increasing the down force. Turn the down force adjustment screw clockwise a quarter turn at a time.
- Test the Closing Force:
- Press the remote control to close the garage door.
- As the door nears the floor, gently place your hands on the bottom edge of the door.
- The door should reverse automatically upon encountering even slight resistance from your hands.
- If it doesn’t reverse, unplug the opener, turn the screw another quarter turn clockwise, plug it back in, re-engage the opener, and test again.
- If the door reverses too easily (e.g., from a slight breeze or uneven floor), you need to decrease the force. Unplug the opener, turn the screw counter-clockwise a quarter turn, plug it back in, re-engage, and test again.
- Repeat Testing: Continue making small, incremental adjustments (quarter turns) and testing until the door reverses reliably upon encountering light pressure. The goal is to set the force just high enough for the door to close consistently without excessive effort, but low enough to trigger the safety reverse immediately upon resistance.
Adjusting The Up Force (opening Force)
The up force adjustment ensures the opener has enough power to lift the door smoothly without straining the motor.
- Test the Opening Force:
- Press the remote control to open the garage door.
- Observe the door’s movement. It should open smoothly and completely to the fully open position.
- If the door struggles to lift, stops halfway, or reverses unexpectedly during opening, the up force may be set too low.
- Increase Up Force: If the door is not opening properly, turn the up force adjustment screw clockwise a quarter turn at a time.
- Test Again: Operate the opener and observe the door.
- Decrease Up Force (If Necessary): If the door opens with excessive force, or if you suspect the up force is set higher than needed (though less critical for safety than down force), turn the screw counter-clockwise a quarter turn.
- Find the Sweet Spot: Adjust until the door opens smoothly and reliably to its full height without hesitation. Unlike the down force, the up force doesn’t have a specific safety reversal trigger based on resistance. The primary concern is ensuring the door opens fully without straining the opener’s motor or the door’s mechanism.
Final Safety Reverse System Test
After adjusting both up and down forces, perform a thorough test of the safety reverse system:
- The 2×4 Test: Place a 2×4 piece of lumber flat on the floor in the path of the garage door.
- Initiate Closing: Press the remote to close the door.
- Observe Reversal: The door should strike the 2×4 and immediately reverse direction, returning to the fully open position.
- Troubleshooting: If the door closes completely over the 2×4, the down force is still set too high. Unplug the opener, turn the down force screw counter-clockwise a quarter turn, plug it back in, re-engage the opener, and re-test with the 2×4. If the door reverses before even reaching the 2×4, the down force might be too low, or there could be another issue causing perceived resistance.
This test is a critical step mandated by safety regulations for garage door openers.
Common Issues And Troubleshooting
Even with careful adjustments, you might encounter problems. Here are some common issues and how to address them:
Door Reverses Immediately Upon Closing
- Cause: Down force is set too low, or the safety reverse sensor (photo-eye) is obstructed or misaligned.
- Solution:
- Slightly increase the down force by turning the screw clockwise a quarter turn. Test again.
- Check the safety reverse sensors (small boxes near the bottom of the tracks). Ensure they are clean, aligned (a beam of light should connect them), and not obstructed by debris. Refer to your manual for specific alignment procedures. If one is blinking or red, it indicates a problem.
- Ensure the opener is properly connected to the door and the door is balanced.
Door Fails To Close Completely Or Stops Mid-way
- Cause: Down force is too low, or there’s a mechanical issue with the door or opener.
- Solution:
- Slightly increase the down force by turning the screw clockwise a quarter turn. Test again.
- Check for obstructions in the tracks or on the floor.
- Inspect the door’s rollers and tracks for damage or binding. Lubrication might be needed.
- Check the travel limit settings (separate from force settings) on your opener. These tell the opener when to stop opening or closing. If they are set incorrectly, the door might stop prematurely. Refer to your manual for adjusting travel limits.
Opener Motor Runs, But Door Doesn’t Move
- Cause: The opener has become disengaged from the door.
- Solution: Pull the red emergency release cord to disconnect the opener from the door. Then, operate the opener using the remote or wall button. The trolley should move, and the opener should re-engage with the door automatically on its next cycle. If it doesn’t re-engage, consult your manual or a professional. This is also covered in guides like How Can I Open My Garage Door Manually: Step-by-Step Guide, which explains the manual release.
Opener Makes Loud Noises
- Cause: Lack of lubrication, worn parts, or loose components.
- Solution:
- Lubricate the rollers, hinges, and tracks according to manufacturer recommendations. For Genie openers, using a silicone-based spray is often recommended.
- Check for loose bolts or nuts on the opener and the door hardware.
- Inspect the chain or belt for proper tension. For chain-driven openers, you might need to adjust the chain tension, similar to steps found in How to Adjust Chain on Garage Door Opener for Smooth Operation.
Opener Struggles To Open The Door
- Cause: Up force is set too low, door is heavy, or mechanical issues.
- Solution:
- Slightly increase the up force by turning the screw clockwise a quarter turn. Test again.
- Perform the door balance test mentioned earlier. If the door is heavy or unbalanced, address those mechanical issues first.
- Ensure rollers and tracks are clean and lubricated.
Comparison: Force Adjustment Vs. Travel Limits
It’s important to distinguish between force adjustments and travel limit settings, as they serve different purposes but are both crucial for proper opener operation.
| Feature | Purpose | Adjustment Method | Safety Relevance |
|---|---|---|---|
| **Force Adjustment** | Controls the **amount of power** the opener exerts to move the door. | Typically slotted screws on the powerhead (clockwise to increase, counter-clockwise to decrease). | **Critical for down force.** Dictates when the safety reverse mechanism triggers upon encountering resistance. Up force ensures smooth lifting. |
| **Travel Limits** | Determines the **exact points** where the door stops in the fully open and fully closed positions. | Usually dials or buttons on the powerhead, often requiring a screwdriver or specific button presses. | Prevents the door from over-traveling (damaging itself or the opener) or bottoming out too forcefully. Works in conjunction with force settings. |
Example: If your door stops about a foot from being fully closed, that’s a travel limit issue. If your door closes but then reverses upon hitting a small pebble on the ground, that’s likely a down force issue (too sensitive).
Maintaining Your Genie Opener’s Force Settings
Once you’ve achieved the correct force adjustments, proper maintenance will help ensure they remain accurate and the opener functions reliably for years to come.
Regular Maintenance Checklist
- Monthly:
- Test Safety Reverse: Perform the 2×4 test (or similar obstruction test) on the closing cycle.
- Visual Inspection: Check for any obvious damage to the opener, tracks, rollers, or springs.
- Quarterly:
- Lubrication: Lubricate rollers, hinges, and tracks with a silicone-based spray or garage door lubricant. Avoid using grease, which can attract dirt. Refer to How Do You Lubricate Garage Door Rollers for Smooth Operation? for detailed steps.
- Tighten Hardware: Check and tighten any loose bolts or nuts on the opener mounting brackets and door hardware.
- Annually:
- Check Door Balance: Perform the manual lift test to ensure the door is still balanced and stays in place when released. If it drifts significantly, the spring tension may need adjustment by a professional.
- Inspect Opener Chain/Belt: Check for wear and ensure proper tension.
- Clean Sensors: Wipe down the safety reverse sensors to ensure a clear beam.
When To Re-adjust Force Settings
You may need to re-adjust the force settings if you notice any of the following:
- The door consistently fails to close completely.
- The door reverses unexpectedly during the closing cycle.
- The opener seems to be straining or making unusual noises during operation.
- You have performed maintenance (like lubrication or replacing rollers) that might affect door balance or movement.
- After a power outage or a reset of the opener (refer to How Do I Reset My Garage Door Opener: Step-by-Step Guide for general procedures).
Frequently Asked Questions
How Often Should I Check My Genie Garage Door Opener’s Force Settings?
It’s recommended to perform a safety check of the force settings, particularly the safety reverse system, at least once a month. Make minor adjustments as needed based on observation. A full re-adjustment might only be necessary if you notice operational changes or after significant maintenance.
Can I Adjust The Force Settings On Any Genie Garage Door Opener?
Most Genie garage door openers manufactured in the last 20-30 years have adjustable force settings. Older models or very basic units might not have this feature. Always consult your owner’s manual to confirm if your specific model is