Now Reading: How to Change the Battery in Chamberlain Garage Door Openers Easily
- 01
How to Change the Battery in Chamberlain Garage Door Openers Easily
How to Change the Battery in Chamberlain Garage Door Openers Easily
Changing the battery in your Chamberlain garage door opener might seem like a small task, but it’s one that can save you from a lot of inconvenience. Many people don’t realize how quickly a dead battery can leave them locked out of their garage, especially during extreme weather or late at night.
If you’ve noticed your remote working less reliably, or the range has decreased, it’s probably time for a new battery. This guide will walk you through everything you need to know about replacing the battery in Chamberlain garage door openers, with clear explanations, practical tips, and expert insights that most beginners miss.
Understanding Chamberlain Garage Door Openers
Chamberlain is one of the top names in the garage door opener industry. Their products are known for reliability, smart technology, and user-friendly features. Before changing the battery, it helps to know a bit about how these systems work.
Most Chamberlain openers use a remote control or a wireless keypad for operation. Inside these devices is a small battery, usually a coin cell (like CR2032) or a 9-volt battery. The type depends on your remote model. Replacing the battery is simple, but a few steps are easy to overlook. Not all Chamberlain openers are the same, so small differences matter.
Key Parts Involved
- Remote control: The device you use to open and close your garage door from a distance.
- Wall-mounted keypad: A keypad outside your garage for PIN entry.
- Backup battery: Some openers have a built-in backup battery to keep the door working during a power outage.
Knowing which component you’re changing is important. This article focuses on remote controls and keypads, but will also cover backup batteries in the main opener unit.
Signs Your Battery Needs Changing
Many people wait until their remote stops working completely. However, there are common signs that your Chamberlain opener battery is fading:
- Reduced range: You have to get much closer for the remote to work.
- Intermittent response: Sometimes the door opens, sometimes not.
- LED indicator blinking: Some remotes have a small light that blinks or doesn’t light up at all.
- Keypad not lighting up: For wireless keypads, the numbers may not glow or respond.
- Beeping sound from opener: For models with backup batteries, a beeping noise often means the battery is low.
It’s smart to change the battery as soon as you notice these issues to avoid getting locked out.
Tools And Materials You’ll Need
Changing the battery is simple and doesn’t require many tools. However, being prepared makes the process faster.
- Small flathead screwdriver or coin: For opening the remote or keypad battery compartment.
- Replacement battery: Check your device’s manual or open it first to see the exact battery type.
- Clean cloth: For wiping any dust inside the compartment.
- Step ladder: If your opener’s main unit has a backup battery.
Common Battery Types
Here’s a quick comparison of the most common batteries you’ll find in Chamberlain remotes and keypads.
| Device | Battery Type | Typical Lifespan |
|---|---|---|
| Remote Control | CR2032 or CR2025 (coin cell) | 1-2 years |
| Wireless Keypad | 9V | 1-2 years |
| Backup Battery | 12V, 5Ah sealed lead-acid | 1-3 years |
Always use the battery recommended by Chamberlain for your model.
How To Change The Battery In A Chamberlain Remote Control
Most Chamberlain remotes are small and lightweight. The process is quick, but each step matters for safety and success.
Step 1: Identify Your Remote Model
Chamberlain has several remote designs. Look for the model number (often on the back or inside the battery cover). Common models include:
- 953EV (3-button remote)
- 953ESTD
- 956EV
- Keychain remotes
Why does this matter? Some remotes have slightly different ways to open the battery compartment, and knowing your model helps you find the right instructions and battery type.
Step 2: Open The Battery Compartment
Most Chamberlain remotes can be opened using a small flathead screwdriver or even a coin.
- Hold the remote firmly.
- Look for a small notch or groove on one edge.
- Insert the screwdriver or coin and gently twist.
- The back cover should pop off. If it doesn’t, double-check for screws or clips.
Non-obvious tip: Don’t use excessive force. If the cover is stuck, check for hidden latches or consult your manual.
Step 3: Remove The Old Battery
- Carefully lift the old battery out. Note the orientation (which side is up). Most coin cell batteries have a “+” symbol facing up.
- Avoid touching battery contacts with your fingers—oils can reduce conductivity.
Step 4: Insert The New Battery
- Place the new battery in, matching the orientation of the old one.
- Press gently so it snaps into place.
- If you use the wrong side up, the remote won’t work.
Step 5: Close The Remote
- Align the cover with the main body.
- Press until it clicks.
- Some remotes may require sliding the cover into place.
Step 6: Test The Remote
- Stand near your garage door and press any button.
- The door should respond. If not, repeat the steps, ensuring the battery is correctly installed.
Expert insight: If the remote still doesn’t work, try another new battery. Sometimes, shelf batteries lose power even when unused.
How To Change The Battery In A Chamberlain Wireless Keypad
Wireless keypads are mounted outside your garage and let you enter a PIN to open the door. Changing the battery is almost as simple as the remote, but there are a few extra points to watch for.
Step 1: Open The Keypad Cover
- Pull down the keypad cover as you normally do to enter your PIN.
- Look for a small screw at the bottom or back. Some models have a latch you can press with your finger or a screwdriver.
Step 2: Access The Battery Compartment
- Once the keypad is open, look for the battery compartment, often behind the keypad panel.
- Slide or lift the compartment cover.
Step 3: Remove And Replace The Battery
- Most keypads use a 9-volt battery.
- Gently pull the battery out, noting how the connectors are attached.
- Attach the new battery, making sure the connections are firm.
Step 4: Close And Test
- Replace the battery cover and reattach any screws.
- Enter your PIN to check if the keypad lights up and the door operates.
Practical tip: If the keypad doesn’t light up, recheck the battery orientation and connections.
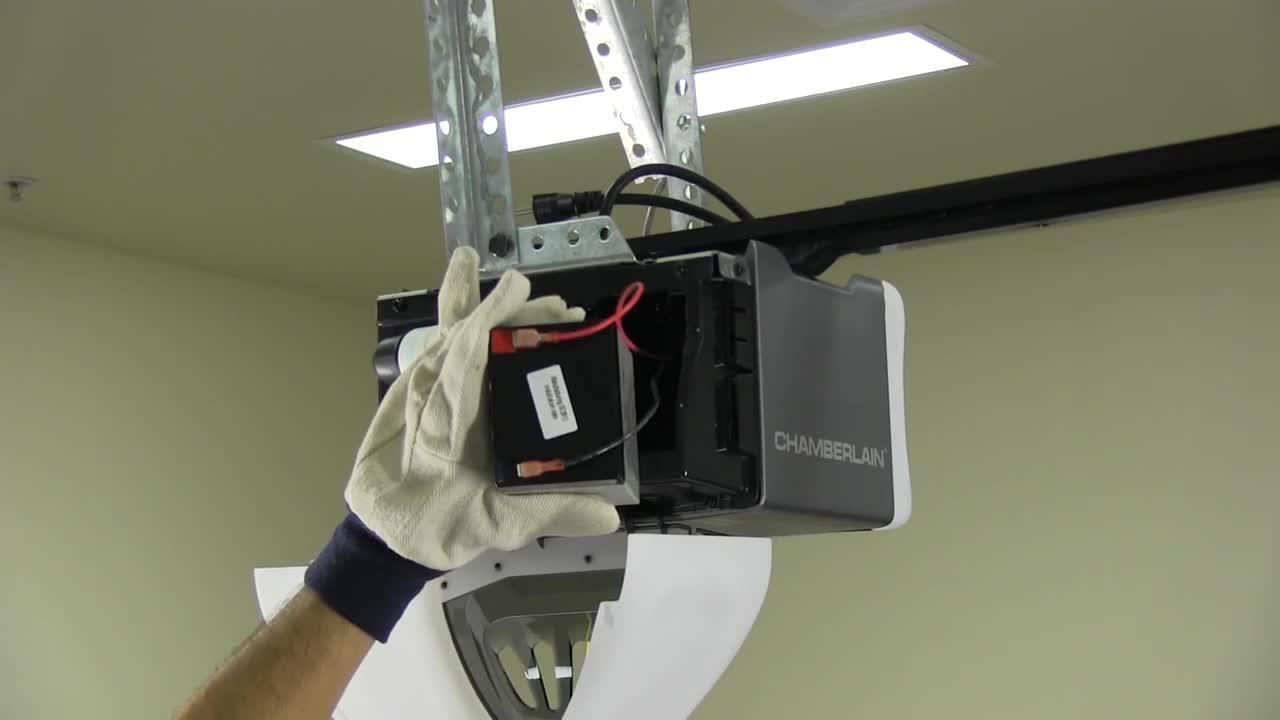
How To Change The Backup Battery In Chamberlain Garage Door Opener Units
Many newer Chamberlain openers have a built-in backup battery in the main unit. This battery keeps the opener working during a power outage.
Step 1: Turn Off The Power
- Unplug the garage door opener from the wall to avoid any electric shock.
Step 2: Locate The Battery Compartment
- Usually on the side or back of the main opener unit (mounted to the ceiling).
- Some models have a small door with a tab or screw.
Step 3: Remove The Old Battery
- Open the compartment.
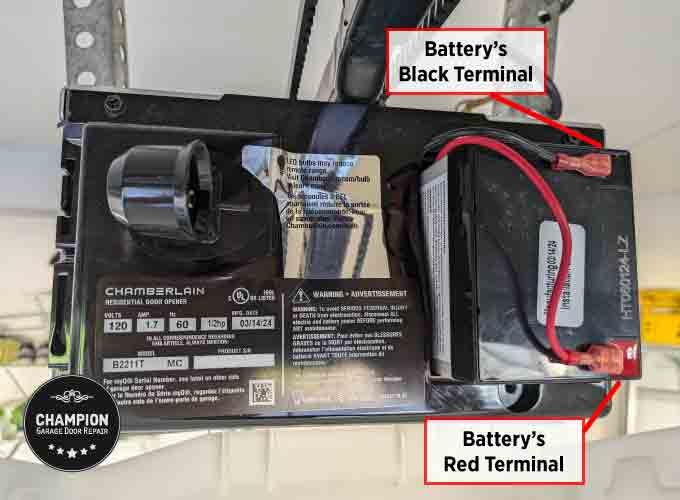
- Carefully disconnect the battery terminals (usually red and black wires).
- Remove the old battery.
Step 4: Install The New Battery
- Connect the red wire to the red terminal, and black to black.
- Slide the new battery into place.
Step 5: Close The Compartment And Restore Power
- Replace the compartment cover and tighten any screws.
- Plug the opener back in.
Common mistake: Plugging the opener in before closing the compartment can be dangerous.

Programming After Battery Replacement
Most Chamberlain remotes and keypads keep their programming after a battery change. But sometimes, especially after a long dead battery or with older models, you may need to reprogram.
How To Reprogram Your Remote
- Press the “Learn” button on the opener (usually on the back or side of the main unit).
- An LED will light up.
- Within 30 seconds, press and hold the button on your remote.
- The opener lights will blink or click to confirm.
How To Reprogram Your Keypad
- Press the “Learn” button on the main unit.
- Enter your chosen PIN on the keypad.
- Press the “Enter” button.
- The opener should respond by moving or flashing lights.
Expert insight: If your remote or keypad still doesn’t work, clear all codes from the opener and reprogram from scratch.
Common Problems And Troubleshooting
Sometimes, even after changing the battery, things don’t work as expected. Here are solutions to common issues.
Remote Still Not Working
- Check the battery orientation.
- Try a different new battery.
- Clean the battery contacts with a dry cloth.
- Check if the remote is programmed to the opener.
Keypad Not Responding
- Make sure the battery connectors are clean and tight.
- Try pressing the keys firmly—sometimes pads inside can get worn.
- Reprogram the keypad if needed.
Backup Battery Beeping
- New batteries sometimes need a few hours to reach full charge.
- If beeping continues, check if the battery is the correct type and installed properly.
Lost Programming After Battery Change
- Reprogram the device as described above.
- If the problem repeats, consult your opener’s manual for a reset procedure.
Safety Tips You Should Not Ignore
Replacing a battery is simple, but safety still matters.
- Always unplug the opener before touching the main unit’s backup battery.
- Dispose of old batteries properly—coin cells and lead-acid batteries can harm the environment.
- Keep small batteries away from children and pets.
- If you see corrosion or leaking battery fluid, clean with gloves and a dry cloth.
Non-obvious tip: Don’t mix old and new batteries. This can cause poor performance and even damage your remote or keypad.
How Often Should You Change The Battery?
Most Chamberlain remotes and keypads need a new battery every 1–2 years. If you live in a cold climate, replace them before winter, as batteries drain faster in the cold.
Backup batteries in opener units usually last 1–3 years, but it’s wise to check them during your annual garage maintenance.
Cost Of Replacement And Where To Buy
Changing the battery is affordable. Here’s a quick breakdown:
| Battery Type | Average Price (USD) | Where to Buy |
|---|---|---|
| CR2032 (coin cell) | $2–$5 | Hardware stores, supermarkets, online |
| 9V | $3–$7 | Hardware stores, supermarkets, online |
| 12V, 5Ah backup | $20–$40 | Specialty electronics, online |
Tip: Always buy name-brand batteries for longer life and reliability.
Differences Between Chamberlain And Other Garage Door Opener Brands
Chamberlain remotes and keypads are similar to those from other brands, but there are small differences:
| Feature | Chamberlain | Other Brands |
|---|---|---|
| Battery Type | Mostly coin cell, 9V, or 12V | Often coin cell, sometimes AAA/AA |
| Programming | “Learn” button system | Switches or “Learn” button |
| Backup Battery | Common in newer models | Less common |
| Smart Features | MyQ app compatibility | Varies |
If you use a universal remote, check compatibility before changing the battery—sometimes a reprogram is needed.
Environmental And Disposal Considerations
Batteries, especially coin cells and lead-acid types, should never be thrown in household trash. They can leak chemicals that harm the environment.
- Take old batteries to a recycling center or hardware store with a battery drop-off bin.
- Never burn or crush batteries.
- For more on safe disposal, check the EPA’s advice at EPA Battery Recycling.
Maximizing Battery Life
You can get the most from your Chamberlain remote, keypad, or backup battery with a few simple habits:
- Store remotes and keypads inside when not in use, especially in extreme heat or cold.
- Use high-quality batteries—cheaper brands often die faster.
- Keep contacts clean and dry.
- Test backup batteries every few months by unplugging the opener briefly.
Expert tip: If you have multiple remotes, replace all batteries at the same time to avoid surprises.
Why Your Garage Door Opener Needs A Reliable Battery
A working battery is more than convenience—it’s about security and peace of mind. If your opener fails, you can be locked out (or in), and your garage is less secure.
- A weak remote battery can cause the door to stop halfway, risking damage or injury.
- Backup batteries are essential during storms or blackouts, so you’re not stranded.
Avoiding Common Mistakes
- Using the wrong battery type: Check your model’s manual or look at the old battery.
- Forcing the compartment open: Always check for hidden clips or screws.
- Touching battery contacts with wet hands: This can cause corrosion.
- Mixing old and new batteries: Always replace all at once.
- Ignoring the beeping sound: This is a warning, not just an annoyance.
- Waiting for the battery to die completely: Replace at the first sign of trouble.
- Not reprogramming after change: Some devices need it.
Real-world Example
Samantha, a homeowner in Chicago, noticed her Chamberlain remote only worked when she was right next to the garage. Instead of waiting for it to fail, she opened the remote, found a CR2032 battery, and replaced it. The range immediately returned to normal. A month later, her neighbor waited too long and was locked out during a snowstorm. The lesson: change batteries early!
Non-obvious insight: Even if you only use the garage door a few times a week, batteries can slowly drain from temperature changes and age. Mark your calendar for a yearly check.
When To Call A Professional
Replacing the battery is safe for most people, but if you:
- See corrosion or leaking fluid
- Find the remote or keypad is damaged
- Have trouble with the main opener unit
…then it’s smart to call a garage door professional. They can safely replace the battery and check for other issues.
Frequently Asked Questions
How Do I Know What Battery My Chamberlain Remote Uses?
Check the back of your remote for the model number, then look it up in the manual or Chamberlain’s website. Most use a CR2032 or CR2025 coin cell battery.
Can I Use A Rechargeable Battery In My Chamberlain Remote?
No, most Chamberlain remotes and keypads are designed for standard non-rechargeable batteries. Rechargeables may not fit or provide the correct voltage.
My Remote Stopped Working After Changing The Battery—what Should I Do?
Check the battery orientation, clean the contacts, and try another new battery. If it still fails, reprogram the remote or consult the manual.
How Long Does A Chamberlain Backup Battery Last?
A backup battery in the opener unit typically lasts 1–3 years. The opener may beep when it’s time to replace it.
Is It Safe To Change The Battery Myself?
Yes, changing the battery in the remote or keypad is safe and easy. For the opener’s backup battery, always unplug the unit first to avoid electric shock.
Changing the battery in your Chamberlain garage door opener is a small task with big benefits. With the right tools and this guide, you can keep your garage secure, convenient, and reliable—saving time and avoiding hassles down the road. For more on battery safety and recycling, visit the EPA Battery Recycling page.


