Now Reading: How to Connect Garage Door Opener to Remote in Easy Steps
- 01
How to Connect Garage Door Opener to Remote in Easy Steps
Connecting your garage door opener to a remote can make life a lot easier. No more stepping out in the rain or leaving your car running while you rush inside. With just a press of a button, your garage door opens or closes smoothly. This small upgrade saves time and adds a layer of comfort to your daily routine. But for many homeowners, the process seems confusing—different brands, old and new systems, and remotes that don’t always “just work.” If this sounds familiar, you’re not alone.
This guide will show you, step by step, how to connect your garage door opener to a remote. Whether you have a new opener, a replacement remote, or an older system, you’ll find clear instructions here. You’ll also learn how to troubleshoot common problems, understand the types of remotes, and keep your connection secure.
Along the way, you’ll discover tips and insights that most guides miss. Let’s make your garage entry as smooth as possible.
Understanding Garage Door Opener Systems
Before you start, it’s important to know what kind of garage door opener you have. Not all openers and remotes work the same way. Understanding the basics saves you time and avoids mistakes.
Main Types Of Garage Door Openers
- Chain Drive: Uses a metal chain to lift and lower the door. These are strong and affordable but can be noisy.
- Belt Drive: Uses a rubber belt. These are much quieter and good for garages attached to living spaces.
- Screw Drive: Uses a threaded steel rod. These require less maintenance but can be sensitive to temperature changes.
- Direct Drive: The motor itself moves along a rail, making these systems very quiet and reliable.
Your remote needs to be compatible with your opener type and brand. Check your opener’s manual or look at the label on the motor unit. You’ll often find the manufacturer, model number, and sometimes the year it was made.
Why Compatibility Matters
Modern openers use rolling code technology for security. This means the code changes every time you use the remote, so thieves can’t copy it easily. Older systems might use fixed codes and DIP switches—small switches inside the remote that set the code. Always match the remote to your opener’s technology. Using the wrong type can cause frustration and wasted money.
Main Garage Door Remote Styles
- Single-Button Remotes: Operate one door only.
- Multi-Button Remotes: Can control two or three doors or even turn on garage lights.
- Universal Remotes: Designed to work with many brands, but not always with every system.
If you’re not sure, look for a brand name or FCC ID on your remote. You can search this online to find the right replacement or instructions.
Gathering Tools And Information
Preparation makes the connection process smoother. Here’s what you’ll need before you start:
- The garage door remote you want to program. Make sure it has fresh batteries.
- Your garage door opener’s manual (if you have it). If not, search online with your opener’s brand and model number.
- A sturdy ladder to reach the opener unit on the ceiling.
- A pen and paper to note any codes, DIP switch settings, or steps if needed.
- A flashlight if your garage is dim.
Having these items ready helps you avoid delays and keeps you safe while working.
How To Connect Most Modern Garage Door Openers To A Remote
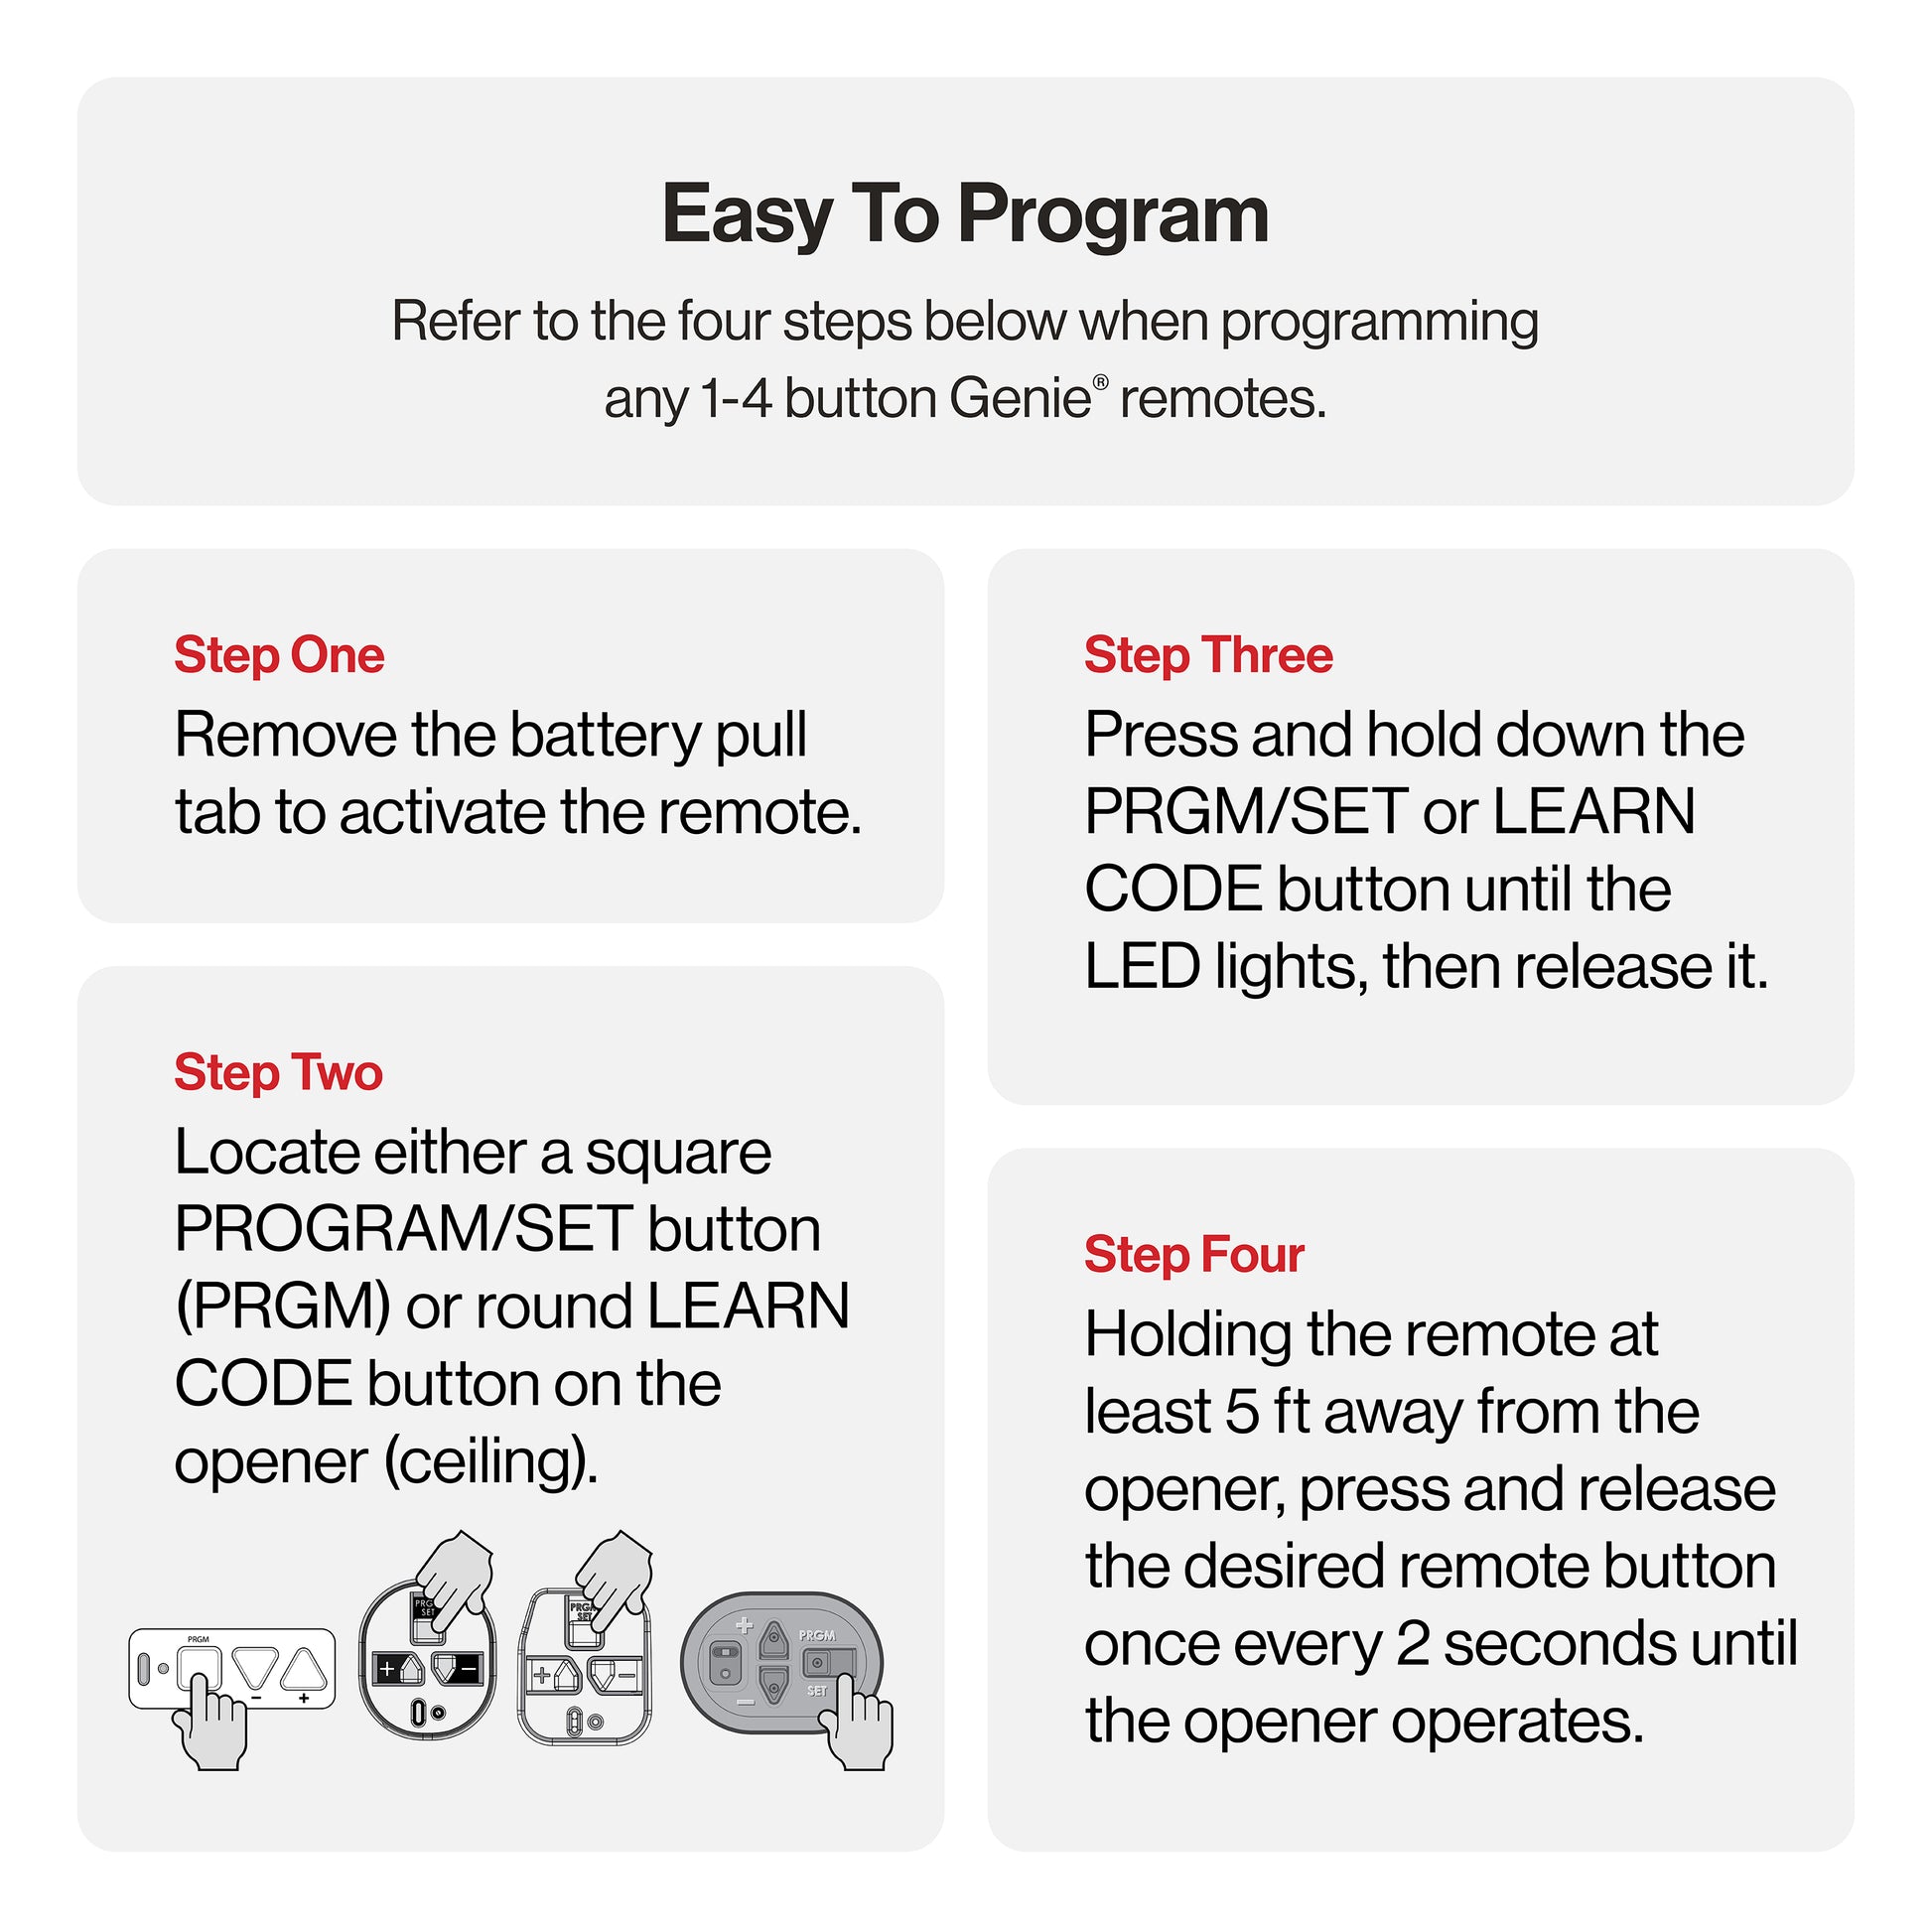
This section covers the most common process for openers made in the last 20 years. These usually have a “Learn” button on the motor unit.
Step 1: Locate The Learn Button
The Learn button is usually found on the back or side of the opener’s main unit (the box on the ceiling). You might need to remove a light cover to see it. The button is often yellow, red, orange, purple, or green.
- LiftMaster, Chamberlain, and Craftsman: Common brands with a visible Learn button.
- Genie: Often has a similar button, sometimes labeled “Program” or “Set.”
Step 2: Clear The Area
Make sure the garage door is closed or in a safe position. Keep children and pets away from the door during the process.
Step 3: Press The Learn Button
- Press and release the Learn button. A small LED light will turn on (some models beep).
- You usually have 30 seconds to complete the next step.
Step 4: Press The Remote Button
- With the Learn light still on, press and hold the button on your remote you want to program.
- Hold for about 3 seconds. You might see the light on the opener blink or hear a click.
- Release the remote button. Some models need you to press the remote button once or twice more to confirm.
Step 5: Test The Connection
- Wait a few seconds, then press the remote button again. The garage door should move.
- If it doesn’t, repeat the steps—sometimes timing is important.
Common Mistakes With Modern Openers
- Not pressing the Learn button firmly or pressing too long (hold for 1-2 seconds, not longer).
- Waiting too long between pressing the Learn button and the remote.
- Using a weak remote battery, which can prevent programming.
If you run into trouble, unplug the opener for 60 seconds and try again. Patience pays off with some brands.
Connecting Remotes To Older Garage Door Openers
Older openers (typically before 1995) may use DIP switches instead of a Learn button. Here’s how to handle these systems.
Step 1: Locate Dip Switches
- Open the remote’s battery cover.
- Look for a row of small switches (usually 8-12).
- Find the matching row of switches on the opener’s motor unit.
Step 2: Match The Settings
- Use a small tool or pencil tip to set each switch in the remote to match the opener.
- ON/OFF or UP/DOWN positions must match exactly.
Step 3: Test The Remote
- Stand a short distance from the opener and press the remote button.
- The door should respond if the codes match.
Things To Know About Dip Switch Systems
- Security: Fixed codes are less secure than rolling codes.
- Interference: If a neighbor’s opener uses the same code, their remote could open your door.
- Upgrading: Consider updating to a newer opener for better safety and features.

Connecting Universal Garage Door Remotes
Universal remotes are popular because they can work with many openers. But they sometimes require extra steps.
Step 1: Read The Universal Remote Manual
Each universal remote has a programming guide. It may use a series of button presses, dipswitches, or even a combination.
Step 2: Choose The Correct Brand Code
- Universal remotes often have a list of codes for different brands.
- You may need to enter this code using the remote’s buttons before starting the Learn button process.
Step 3: Program As Usual
- Follow the Learn button or DIP switch steps above, as required by your opener.
- Some remotes have a “smart” mode and will cycle through codes automatically.
Step 4: Test All Functions
- If your remote has multiple buttons, test each one to ensure it works as expected.
When Universal Remotes Don’t Work
- Not all openers are compatible. Very old or very new smart openers may need a specific remote.
- Some universal remotes only support certain frequencies (like 315 MHz or 390 MHz).
A quick online search with your opener’s brand, model, and “universal remote” can help check compatibility.
Table: Comparison Of Garage Door Opener Technologies
To help you match your remote and opener, here’s a quick overview of the main types:
| Technology | Typical Years Used | Programming Method | Security Level |
|---|---|---|---|
| DIP Switches | 1970s–Mid 1990s | Match Switches | Low |
| Rolling Code | Mid 1990s–Present | Learn Button | High |
| Smart/Connected | 2015–Present | App/Remote/Learn | Very High |
How To Connect Smart Garage Door Openers
Many new garage door openers have smart features. These allow you to control the door with a smartphone app, Wi-Fi remote, or even voice assistants like Alexa or Google Home.
Step 1: Download The Manufacturer App
- Common apps include myQ (Chamberlain/LiftMaster), Aladdin Connect (Genie), and others.
Step 2: Create An Account And Log In
- Most apps require registration and email verification.
Step 3: Connect The Opener To Wi-fi
- Follow app instructions to connect your opener to your home Wi-Fi.
- You may need to press a “Wi-Fi” or “Learn” button on the opener.
Step 4: Add A Remote Or Mobile Device
- In the app, look for “Add Remote” or “Add Device.”
- Follow prompts to pair a physical remote or your smartphone.
Step 5: Test Smart Controls
- Use the app to open and close the door.
- Program alerts for open/close status, or set schedules.
A Note On Security
Smart openers often send alerts if your door is left open. You can also set up guest access for friends or deliveries. Always use strong, unique passwords for your app account.
Table: Remote Compatibility Guide By Brand
Here’s a quick reference for the most popular garage door opener brands and their remote compatibility.
| Brand | Programming Method | Universal Remote Support | App/Smart Features |
|---|---|---|---|
| LiftMaster/Chamberlain | Learn Button | Yes (most models) | myQ App |
| Genie | Learn Button/DIP Switch | Yes (select models) | Aladdin Connect |
| Craftsman | Learn Button | Yes | myQ App |
| Overhead Door | Learn Button/DIP Switch | Limited | OHD Anywhere |
| Linear | DIP Switch | Limited | No |
Connecting Multiple Remotes
Many households need more than one remote. You might have a remote for each car, or a wall-mounted wireless keypad.
How Many Remotes Can You Add?
Most openers allow 5 to 7 remotes. Smart openers sometimes allow even more through their apps.
How To Program Extra Remotes
- Repeat the Learn Button process for each new remote.
- Don’t erase old remotes unless you want to remove them.
- If you reach the remote limit, adding a new remote may delete the oldest one.
Wireless Keypads
Wireless keypads mount outside your garage and let you enter a PIN to open the door.
- Programming is usually similar to remotes: Press Learn, then enter a code on the keypad.
- Tips: Change your PIN regularly and avoid simple codes for better security.
Troubleshooting Remote Connection Problems
Sometimes the process doesn’t work the first time. Here’s how to fix common issues.
Remote Won’t Program
- Check the batteries in the remote. Weak batteries cause most failures.
- Make sure the opener’s light comes on when you press the Learn button.
- Stay within range. Some remotes need to be within a few feet during programming.
- Clear all remotes and start over. Hold the Learn button for 10 seconds to erase all remotes, then reprogram.
Remote Works Intermittently
- Interference from LED bulbs, Wi-Fi routers, or other electronics can block signals. Try moving these devices.
- Antenna placement: Make sure the opener’s antenna wire hangs down freely.
- Weather: Very cold weather can affect older remotes.
Door Opens But Won’t Close
- Safety sensors at the base of the door might be misaligned or blocked. Check for debris or obstructions.
Remote Works, But Wall Button Doesn’t
- Power issue: Check wiring or the circuit breaker.
- Lock feature: Some wall panels have a “lock” button that disables remotes.

Table: Common Garage Door Remote Issues And Solutions
Here’s a quick reference for common problems and how to fix them.
| Problem | Possible Cause | Solution |
|---|---|---|
| Remote won’t program | Dead battery, wrong timing, out of range | Replace battery, repeat steps, move closer |
| Remote works sometimes | Interference, weak signal, bad antenna | Move devices, replace antenna, check opener light bulbs |
| Remote doesn’t open/close door | Safety sensors blocked | Clean/realign sensors |
| Wall button works but remote doesn’t | Remote not programmed, lock feature active | Reprogram remote, unlock wall panel |
Security Tips For Garage Door Remotes
Garage doors are a common entry point for thieves. Keep your home safe by following these tips:
- Never leave remotes in unlocked cars. A thief can use it to access your home.
- Choose rolling code remotes if possible. These are much harder to hack.
- Upgrade old openers. If your system uses DIP switches, consider replacing it with a newer model.
- Hide spare remotes in a secure spot, not under a mat or in the car glove box.
- Erase old remotes if you lose one or move to a new home.
Non-obvious Insights Most People Miss
1. Led Light Bulbs Can Block Remote Signals
Many modern garage openers use LED bulbs for energy savings. However, some cheap LED bulbs emit radio noise that interferes with the remote signal. If your remote works only when you’re close, try swapping the bulb for a different brand—this simple fix solves many “mystery” problems.
2. Not All Universal Remotes Are Equal
Some universal remotes support only a few brands, even if they claim “universal” on the package. Always check the fine print for supported frequencies (315 MHz, 390 MHz, etc. ) And rolling code compatibility. Reading recent online reviews can help you avoid wasted time and money.
3. Garage Doors Can “forget” Remotes After Power Surges
A strong power surge or blackout can sometimes erase your opener’s memory. If all remotes stop working after a storm, unplug the opener for a minute, then reprogram the remotes.
4. Security Upgrades Are Affordable
Newer rolling code openers are much safer than fixed code models. If your opener is over 20 years old, consider an upgrade—it increases both safety and property value. Many units are DIY-friendly and cost less than $200.
5. You Can Add Smart Features To Old Openers
If you want app control but your opener is older, add a “smart garage door controller. ” These devices (like myQ Smart Garage Hub) attach to almost any opener and connect it to your Wi-Fi. Installation is usually easy and can be done in under an hour.
For more technical details on garage door opener standards, see the Wikipedia article on garage door openers.
Frequently Asked Questions
Why Won’t My Garage Door Remote Program?
There are several reasons. The most common are weak batteries in the remote, pressing the Learn button too long or too short, or trying to program an incompatible remote. Always check your opener’s manual for the correct steps. Also, ensure you’re within a few feet of the opener during programming.
How Do I Erase All Remotes From My Garage Door Opener?
Most openers have a way to erase all programmed remotes at once. Press and hold the Learn button on the opener for 6-10 seconds until the indicator light goes out. This clears the memory. You’ll need to reprogram any remotes you want to keep.
Can I Use My Smartphone As A Garage Door Remote?
Yes, if your opener supports smart features or you add a smart garage door controller. Download the correct app for your system (like myQ or Aladdin Connect), set up an account, and follow the app’s instructions to connect. This lets you open, close, and monitor your garage door from anywhere.
What Should I Do If My Remote Works For Opening But Not Closing The Garage Door?
This usually means the safety sensors at the bottom of the door are misaligned or blocked. Check for anything in the way, clean the sensors, and make sure both sensor lights are on. If the problem continues, the sensors might need adjustment or replacement.
How Many Remotes Can I Connect To One Garage Door Opener?
Most openers allow 5 to 7 remotes at one time. If you need more, check your opener’s manual—some smart openers support extra devices through an app. If you add more than the limit, the oldest remote may be deleted automatically.
Connecting a garage door opener to a remote is a simple task when you know the steps. With a little care and the right information, you’ll enjoy smooth, secure access to your garage—and peace of mind knowing your system is set up correctly.


