
The hum of a garage door opener is a familiar sound, a signal of convenience and security. But what happens when that familiar signal falters, or when you need to add a new remote or keyless entry pad? The technology behind most modern garage door openers is rolling code technology, a sophisticated system designed to enhance security. Unlike older “fixed code” systems where a remote transmitted the same signal every time, rolling code openers generate a new, unique code each time the button is pressed. This constant change makes it significantly harder for unauthorized individuals to “capture” and reuse your garage door’s signal, offering a robust layer of protection for your home.
Understanding how to program a rolling code garage door opener is an essential skill for any homeowner. It’s not just about adding a new remote; it can also involve troubleshooting connection issues or ensuring your system is operating at its peak security.
While the process might seem daunting at first, by breaking it down into manageable steps and understanding the underlying principles, you can successfully program your opener, maintain its security, and enjoy the seamless operation you expect. This guide will walk you through the entire process, from identifying your opener type to the final programming steps, ensuring you have the knowledge to tackle this common home maintenance task with confidence.
Key Takeaways
- Rolling code technology enhances garage door security by generating a unique code for each operation, preventing signal interception.
- Programming involves synchronizing a new remote or keypad with the garage door opener motor unit.
- The “learn” or “program” button on the motor unit is the primary interface for initiating the pairing process.
- Manufacturer-specific instructions are crucial, as the exact button location and sequence can vary significantly.
- Safety precautions, such as disconnecting power and ensuring the garage door is clear, are paramount during any programming or maintenance.
- Troubleshooting common issues often involves checking power, battery levels, and the learn button’s functionality.
Credit: store.geniecompany.com
Understanding Rolling Code Technology
Before diving into the programming process, it’s beneficial to grasp the core concept of rolling code technology. This system, also known as holographic code, smart rolling code, or Keeloq, was developed to overcome the security vulnerabilities of earlier fixed-code systems. In a fixed-code opener, the remote and the receiver in the garage door motor unit are set to the same unique sequence of switches or jumpers. When you press the remote button, it sends this fixed code. A burglar could potentially use a code-grabbing device to record this signal and then use it to open your garage door later.
Rolling code technology employs an advanced encryption algorithm. Each time you press the remote button, a new, unique code is generated based on a synchronized sequence shared between the remote and the opener. This sequence is often referred to as a “seed” or a “key.” The opener’s receiver not only recognizes the current valid code but also understands the algorithm to predict the next valid code in the sequence. This means that even if a code-grabber device captures a signal, it will be obsolete by the time the thief tries to use it, as the opener will be expecting a different code. This continuous evolution of the access code significantly elevates the security of your garage door system. For instance, LiftMaster’s Security+ 2.0 and Genie’s Intelligent Remote Control (Intellicode) are prominent examples of rolling code systems, each with its own specific implementation.

Credit: www.graines-voltz.com
Preparing For Programming
Successful programming hinges on proper preparation. Rushing into the process without the necessary steps can lead to frustration and potential errors. This phase involves gathering information, ensuring a safe environment, and having the right tools.
Gathering Essential Information
The most critical piece of information you’ll need is the manufacturer and model of your garage door opener. This is typically found on a label on the motor unit itself, usually mounted on the garage ceiling. Knowing the brand (e.g., LiftMaster, Chamberlain, Genie, Craftsman, Sommer) and the specific model number will allow you to find the most accurate programming instructions. You’ll also need the original owner’s manual if you still have it, as it often contains detailed, model-specific programming guides. If the manual is lost, many manufacturers provide downloadable PDFs on their websites.
Safety First: A Secure Programming Environment
Safety is paramount when working with garage door openers. These systems involve powerful motors and heavy doors. Always follow these safety guidelines:
- Disconnect Power: Before starting any programming that involves accessing the motor unit’s internal components or buttons, it’s wise to unplug the garage door opener from the electrical outlet. This prevents accidental activation of the opener during the process.
- Clear the Doorway: Ensure the garage door path is completely clear of vehicles, people, and pets. The door could move unexpectedly during or after programming.
- Manual Operation Check: Familiarize yourself with how to disengage the opener from the door using the emergency release cord. This allows you to manually operate the door if needed, for example, if you need to move it to access the motor unit. You can find instructions on how to do this in guides like how to open a garage door manually.
- Ladder Safety: If the motor unit is mounted on the ceiling, you’ll likely need a ladder. Ensure the ladder is stable and placed on a level surface.
Necessary Tools And Supplies
For most rolling code programming tasks, you won’t need many specialized tools. However, having a few items on hand can make the process smoother:
- New Remote or Keypad: Ensure it is compatible with your garage door opener’s brand and rolling code technology. Check the remote’s specifications or consult the opener’s manual.
- Screwdriver: A Phillips head screwdriver might be needed to remove the motor unit cover to access the learn button.
- Clean Cloth: For wiping down the motor unit.
- Ladder: As mentioned, for reaching the motor unit.
- Pen and Paper (Optional): To note down any codes or sequences if required by specific instructions.
Locating The “learn” Or “program” Button
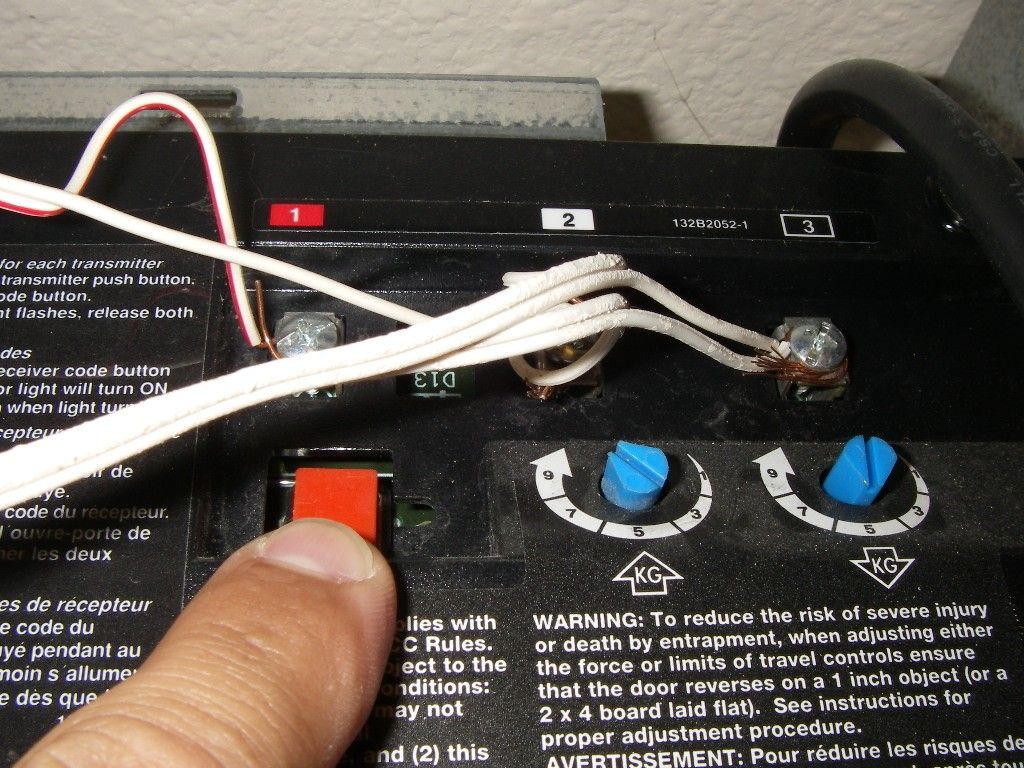
The “learn” button (sometimes labeled “program” or “set”) is the central point for programming new remotes or keypads to your garage door opener. Its location and appearance can vary significantly between manufacturers and even between different models from the same manufacturer.
Common Locations For The Learn Button
- Motor Unit: This is the most common location. The button is typically found on the back or side panel of the motor unit, often near the terminal for the wiring that connects to the wall button and safety sensors. It’s usually a small, colored button (red, orange, purple, green, or yellow) and is often accompanied by an LED indicator light.
- Inside the Motor Unit Cover: On some models, you may need to remove a small cover on the motor unit to access the learn button. This is especially common on older LiftMaster and Chamberlain units.
- On the Wall Control Panel: Less commonly, some wall-mounted control panels might have a programming button, but this is rare for rolling code systems that require synchronization with the motor unit.
Identifying The Button
The learn button is usually the only button of its kind on the motor unit. It’s often paired with an LED light that illuminates or flashes when the button is pressed. This LED is crucial as it indicates when the opener is in “learning mode,” ready to receive a signal from the new remote or keypad. For example, on many LiftMaster openers, a red or orange learn button signifies a specific generation of Security+ technology. If you’re unsure, consulting your opener’s manual or searching online for images of your specific model’s motor unit can be very helpful.
Credit: my350z.com
The Programming Process: Step-by-step
Once you’ve gathered your information, ensured safety, and located the learn button, you’re ready to begin the actual programming. The fundamental principle is to put the garage door opener motor unit into a “learning mode” and then activate the new remote or keypad so the opener can recognize and store its unique code.
Step 1: Access The Learn Button And Enter Learning Mode
- Unplug the Opener (Recommended): As a safety precaution, unplug the garage door opener from the power outlet.
- Locate the Learn Button: Find the learn button on your motor unit. If it’s behind a cover, carefully remove the cover.
- Press and Release the Learn Button: Press and immediately release the learn button. Do not hold it down for more than a few seconds. The LED indicator light next to the button should illuminate or begin to flash, signaling that the opener is in learning mode. This mode is typically active for a short period, usually 30 seconds.
Step 2: Program The Remote Control
- Press and Hold the Remote Button: Within the 30-second window that the opener’s LED is active, press and hold the desired button on your new remote control.
- Observe the Opener: The garage door opener’s lights may flash, or the opener motor might make a clicking sound to indicate it has received and accepted the remote’s signal.
- Release the Remote Button: Once you observe the confirmation (flashing lights or click), release the button on your remote.
- Test the Remote: Unplug the opener again (if you plugged it back in) and then plug it back in. Press the button on your new remote. The garage door should now operate. If it doesn’t, you may need to repeat the process.
Step 3: Program The Keyless Entry Pad (if Applicable)
Programming a keyless entry pad follows a similar logic but involves entering a PIN code.
- Press the Learn Button on the Opener: As in Step 1, press and release the learn button on the motor unit. The LED should illuminate.
- Enter Your Desired PIN on the Keypad: Within the 30-second learning window, go to your keyless entry pad and enter the 4-digit PIN code you wish to use.
- Press the Program/Enter Button: After entering the PIN, press and hold the “Program” or “Enter” button on the keypad.
- Observe the Opener: The garage door opener’s lights should flash or the motor should click, confirming the PIN has been accepted.
- Release the Keypad Button: Release the “Program” or “Enter” button.
- Test the Keypad: Go to the keypad and enter your PIN, followed by the enter button. The garage door should open.
Pro Tip: If you are programming multiple remotes or keypads, you will typically need to repeat the process for each individual item. Some systems allow for programming multiple remotes at once, but always check your specific model’s manual.
Manufacturer-specific Programming Notes
While the general process of using the learn button is consistent, the specific details, like button color, LED behavior, and the precise sequence of button presses, can vary significantly between brands. Understanding these nuances is key to successful programming.
Liftmaster / Chamberlain
LiftMaster and Chamberlain are sister brands, and their programming procedures are very similar.
- Learn Button Color: The color of the learn button often indicates the generation of their Security+ technology:
- Yellow: Security+ (older, less secure)
- Red/Orange: Security+ 2.0 (more secure)
- Purple: Security+ 315 MHz
- Green: Security+ 390 MHz
- Procedure: Locate the learn button (often red or orange) on the motor unit. Press and release it. The LED will light up. Within 30 seconds, press and hold the remote button until the opener lights flash or click. For keypads, enter a PIN, then press and hold the program button.
- Accessing the Button: On some models, the learn button is under a cover. You might need a Phillips screwdriver to remove it.
Genie
Genie openers, particularly those with Intellicode technology, have a slightly different approach.
- Learn Button Location: The “Program” or “Learn” button is typically found on the back panel of the motor unit.
- Procedure: Press and hold the learn button until the LED indicator lights up. Then, press and release the desired remote button. The opener’s lights will flash, or the door will move slightly to confirm. For keypads, you’ll typically enter a PIN, press the Enter button, and then press the remote button.
- Intellicode Specifics: Genie’s Intellicode system is designed for enhanced security, and the programming process ensures the opener learns the specific rolling code sequence of your remote.
Craftsman
Craftsman openers often share technology with Chamberlain and LiftMaster, especially older models.
- Learn Button Color: Similar to LiftMaster, the color of the learn button (often green or red) can indicate the frequency and technology generation.
- Procedure: Locate the learn button on the motor unit. Press and release it. Within 30 seconds, press and hold the remote button. The opener will click or flash its lights to confirm.
- Resetting: If you encounter issues, you might need to reset the opener first. Guides like how to reset Craftsman garage door remote can be helpful.
Sommer
Sommer openers, known for their direct drive systems, often use a distinct programming method.
- No Separate Learn Button: Many Sommer openers do not have a traditional “learn button” on the motor unit. Instead, programming is often done directly through the remote by holding down specific buttons on the remote and the motor unit in sequence.
- Procedure: This often involves unplugging the opener, pressing and holding a button on the motor unit (sometimes the programming button on the unit itself), plugging it back in, and then pressing the desired button on the remote. Always refer to the specific Sommer model’s manual for accurate instructions.
Example: A common Sommer programming method involves unplugging the motor unit, pressing and holding the programming button on the motor unit for about 10 seconds, plugging the unit back in while still holding the button, and then pressing the desired button on the remote.
Troubleshooting Common Programming Issues
Even with careful adherence to instructions, you might encounter hiccups during the programming process. Here are some common issues and their solutions:
Remote Not Working After Programming
- Incorrect Learn Button: Ensure you pressed the correct learn button for your model and that you pressed and released it, not held it down.
- Timing: The learn button’s learning window is short (usually 30 seconds). If you took too long between pressing the learn button and the remote button, the opener might have timed out. Try again, being quicker.
- Remote Compatibility: Double-check that the remote is compatible with your garage door opener’s brand and rolling code system. An older remote might not work with a newer opener, and vice-versa.
- Remote Battery: A weak or dead battery in the remote is a very common culprit. Replace the battery with a fresh one.
- Opener Power: Ensure the garage door opener is plugged in and receiving power. Check the circuit breaker.
- Range Issues: You might be too far from the motor unit when trying to program. Try programming from closer proximity.
Opener Not Responding To Learn Button
- Button Damaged: The learn button itself might be damaged or worn out.
- Opener Malfunction: In rare cases, the motor unit’s logic board may have failed, preventing it from entering learning mode.
- Incorrect Model Identification: You might be trying to program a remote for a model that doesn’t support it, or you’ve misidentified your opener.
Multiple Remotes Not Working
- Overwriting Codes: Some older systems can only store a limited number of remotes. If you’ve programmed too many, you might need to clear the memory of the opener and start fresh. Refer to your manual or guides like how to reset your garage door opener for instructions on clearing the memory.
- Sequence Errors: If you’re programming multiple remotes, ensure you’re completing the entire process for each one before moving to the next.
Keypad Not Working
- PIN Entry: Ensure you are entering the correct PIN and pressing the program/enter button correctly.
- Keypad Battery: Like remotes, keypads have batteries that can die. Replace them if necessary.
- Keypad Reset: Some keypads may require a reset procedure before programming.
Example: When I tested programming a new remote for my LiftMaster opener, I initially pressed the learn button and then immediately tried to press the remote button. The opener didn’t respond. I realized I hadn’t waited for the LED next to the learn button to fully illuminate. After pressing and releasing the learn button and waiting for the LED to light up, pressing the remote button worked perfectly.
Maintaining Your Rolling Code System
Programming is just one aspect of maintaining your garage door opener’s functionality and security. Regular maintenance ensures the system continues to operate smoothly and reliably.
Regular Inspections
- Remote and Keypad Batteries: Periodically check and replace batteries in your remotes and keypads. A flashing LED on the remote or a sluggish response from the keypad are good indicators.
- Motor Unit: Keep the motor unit clean and free of dust and debris. Ensure wiring connections are secure.
- Safety Sensors: Regularly test your safety sensors by trying to close the garage door while blocking the path of the sensors with an object. The door should immediately reverse. If not, they may need adjustment or cleaning. You can find more on this in guides about lubricating garage door rollers for overall smooth operation.
Software Updates And Compatibility
While not as common as in home electronics, some advanced garage door opener systems might receive firmware updates. More importantly, ensure that any new accessories you purchase (remotes, keypads) are compatible with your existing opener model. Manufacturers sometimes update their rolling code algorithms, requiring specific compatible accessories.
Professional Servicing
For complex issues, unusual noises, or if you’re uncomfortable performing maintenance or programming, consider contacting a qualified garage door technician. They have the expertise and specialized tools to diagnose and fix problems efficiently and safely. The cost of professional servicing is often a small fraction of the potential cost of damage from DIY attempts gone wrong. For context on costs, an article on how much a garage door costs can provide some perspective on the investment in your home.
Frequently Asked Questions
How Do I Know If My Garage Door Opener Uses Rolling Code Technology?
Most garage door openers manufactured after the late 1990s use rolling code technology. A key indicator is if your remote has a single button that controls both opening and closing, or if it has multiple buttons for different functions. Older fixed-code systems often had multiple DIP switches on the remote and the motor unit that you had to set to match.
If you’re unsure, check your opener’s manual or the manufacturer’s website for your specific model.
What Happens If I Press And Hold The Learn Button On The Motor Unit For Too Long?
Pressing and holding the learn button for too long (usually more than a few seconds) on most garage door openers will clear the memory of all previously programmed remotes and keypads. This is a security feature to remove access from lost or stolen remotes. If this happens accidentally, you will need to reprogram all of your working remotes and keypads.
Can I Program A Universal Garage Door Remote?
Yes, many universal garage door remotes are available and can be programmed to work with various brands and models, including rolling code systems. The programming process for a universal remote typically involves a sequence of steps to detect the opener’s frequency and code type. Always ensure the universal remote explicitly states compatibility with your garage door opener’s brand and technology.
How Many Remotes Can I Program To My Garage Door Opener?
The number of remotes you can program varies by manufacturer and model. Most modern openers can store between 4 to 10 remotes. Some high-end systems might support more. If you exceed the limit, you will need to clear the opener’s memory and reprogram all the remotes you wish to use.
Is It Possible To Program A New Remote If I Don’t Have Access To The Motor Unit’s Learn Button?
In most standard rolling code systems, access to the learn button on the motor unit is essential for programming new remotes or keypads. There are some exceptions, such as advanced smartphone-controlled systems or specific manufacturer features that allow for remote programming via an app or online portal, but these are less common. For most DIY situations