Now Reading: How to Reset a Liftmaster Garage Door Code Easily and Safely
- 01
How to Reset a Liftmaster Garage Door Code Easily and Safely

Resetting the code on a Liftmaster garage door opener can feel confusing, especially if you’re not used to working with garage door systems. Many homeowners and renters need to change their code for safety, after moving in, or when a remote gets lost. The process is not difficult, but you must follow the right steps to make sure your garage stays secure. This guide will walk you through everything you need to know—whether your opener uses a keypad, wall control panel, or remote transmitter. You’ll also learn how to handle common problems, understand security features, and avoid mistakes that could leave your home at risk. By the end, you’ll have the confidence to reset your code quickly and safely, even if you have no technical experience.
Understanding Liftmaster Garage Door Opener Codes
Every Liftmaster garage door opener uses a system of codes to control who can open and close the door. These codes are transmitted by remotes, wireless keypads, or wall units. When you press a button, a unique code is sent to the opener’s receiver. If it matches the stored code, the door moves. If not, nothing happens.
Liftmaster uses rolling code technology in most models made after 1993. This means the code changes every time you use the remote, making it harder for criminals to steal your signal. However, you can still reset the main code stored in the opener, which is important if you lose a remote or want to block old devices.
Why should you reset your code?
- You bought a new house and don’t know who else has access.
- You lost a remote or someone stole it.
- You want to limit who can enter (for example, after a roommate moves out).
- You’re upgrading your security.
Knowing how to reset a Liftmaster garage door code is a basic skill for protecting your property and loved ones.
Types Of Liftmaster Garage Door Openers And Their Keypads
Not all Liftmaster openers and keypads work the same way. Understanding your model is the first step to a successful reset.
| Opener Type | Year Range | Keypad/Remote Type | Main Features |
|---|---|---|---|
| Standard Garage Opener | 1993–present | Wireless Keypad, Remote, Wall Panel | Rolling code, Security+, LED controls |
| Smart Garage Opener | 2016–present | myQ App, Keypad, Remote | Wi-Fi, Smartphone control, Security+ 2.0 |
| Older Chain/Belt Opener | Pre-1993 | DIP Switch Remote | Manual switches, no rolling code |
Most users today have openers with rolling code or Security+ technology. The steps below focus on these models, but you’ll also find tips for older systems.
Safety Precautions Before Resetting
Before you start, take a few moments to think about safety. While resetting the code is not dangerous, small mistakes can cause inconvenience or security risks.
- Do not use a ladder on a slippery floor. Make sure the ground is dry and stable.
- Unplug the opener only if instructed. Some steps require the unit to be powered.
- Keep remotes and new codes private. Only share them with trusted people.
- Check the door’s balance. If your door is very heavy or moves strangely, get it checked by a professional before resetting codes.
- Write down new codes in a secure place. Do not put them on your garage wall.
These simple steps help you avoid injury and keep your garage secure during the process.
How To Reset A Liftmaster Garage Door Code: Step-by-step
Resetting the code can mean different things depending on your system. You might be resetting the main opener code, the wireless keypad code, or erasing all devices. This section covers the most common scenarios.
Resetting The Opener’s Main Code (all Remotes And Keypads)
This is the most common reset. It erases all remote controls, wireless keypads, and myQ app access from the opener memory. Use this if you lost a remote or want to start fresh.
- Locate the “Learn” Button
- The Learn button is usually on the back or side of the opener motor, under a light cover.
- It may be yellow, purple, orange, or red, depending on the model.
- Look for the word “Learn” or an LED next to it.
- Press and Hold the Learn Button
- Press and hold for about 6 seconds.
- The LED next to the button will turn off (or the light will blink).
- All remotes, keypads, and app connections are now erased.
- Test Existing Remotes
- Try any remotes or keypads. They should not open the door.
- If any still work, repeat step 2.
- Reprogram Devices
- Each remote, keypad, or app must now be reconnected. See the sections below.
Pro tip: If your opener has a myQ Wi-Fi connection, you may need to remove the device from your myQ app and reconnect after resetting.
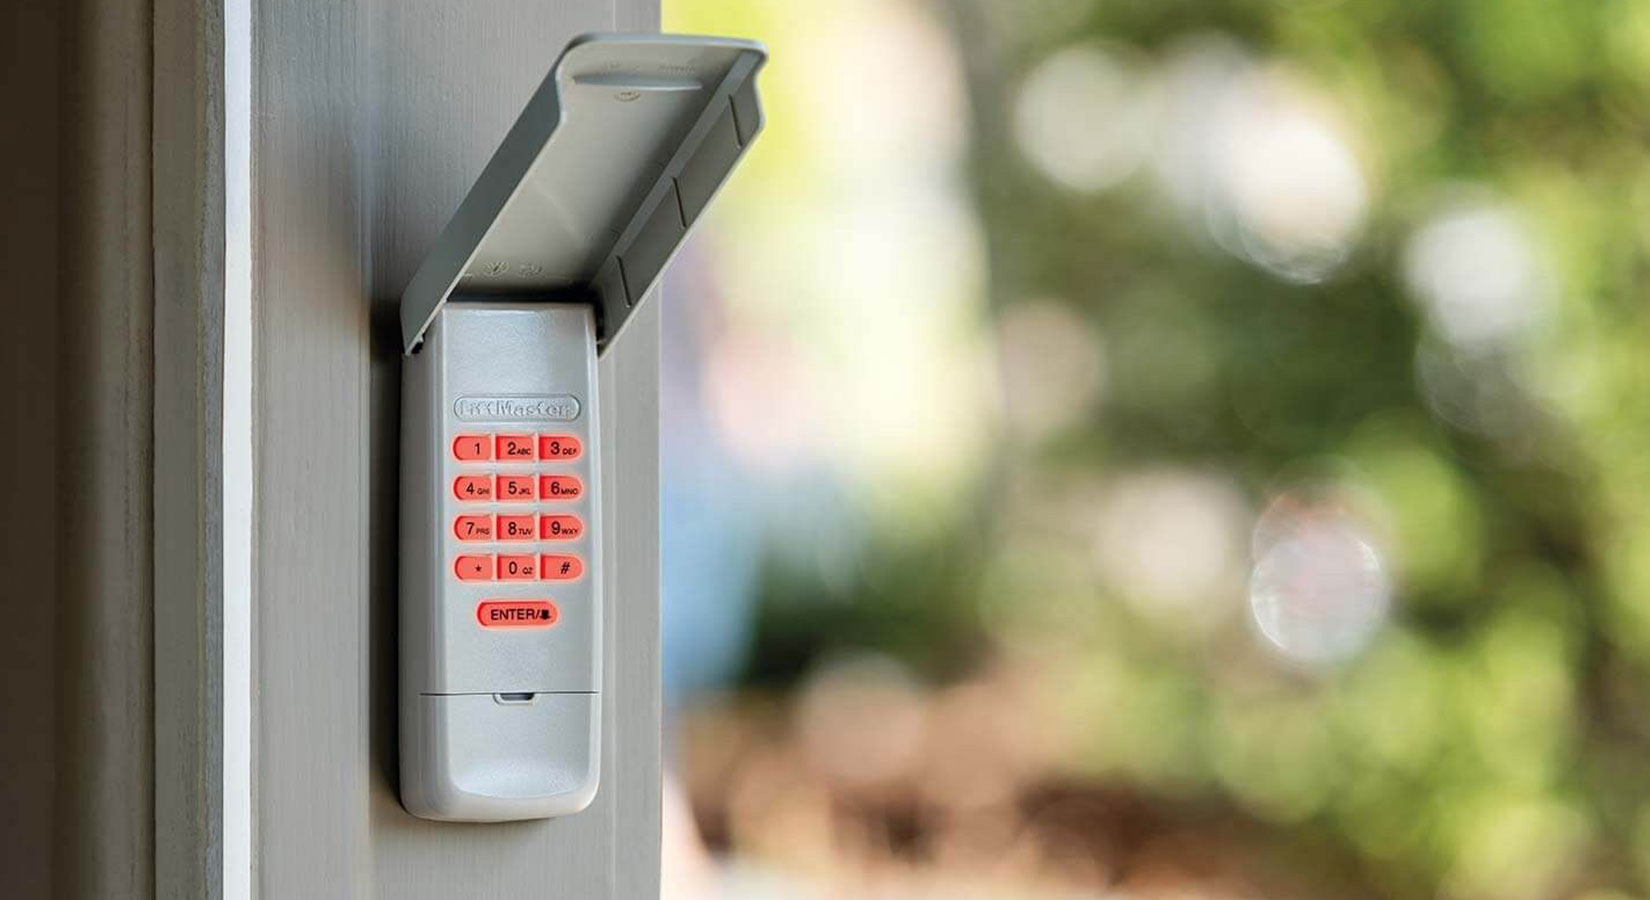
Resetting A Wireless Keypad Code
Most homes with a Liftmaster have a wireless keypad outside the garage. This lets you enter a 4-digit PIN to open the door. Resetting the keypad code is important if you forget your PIN or want to change access.
- Find the Learn Button on the Opener
- Open your garage and locate the Learn button, as above.
- Press the Learn Button Once
- Do not hold it down—just a quick press (about 1 second).
- An LED will turn on for 30 seconds.
- Enter New PIN on the Keypad
- Within 30 seconds, go to the keypad.
- Enter your desired 4-digit code, then press the Enter button.
- The opener light may blink or you’ll hear a click.
- Test the New Code
- Wait 10 seconds. Enter the code again and press Enter.
- The door should move.
- If not, repeat steps 2–4.
Insider tip: If you wait too long after pressing Learn, you’ll need to start over. The 30-second window is strict.
Resetting A Remote Control
If you want to erase a single remote or add a new one, follow these steps:
- Quick Press the Learn Button
- Tap the Learn button once (do not hold).
- The LED will light for 30 seconds.
- Press Remote Button
- While the LED is on, press and hold the button on your remote you want to program.
- The opener light blinks or clicks.
- Test the Remote
- After 10 seconds, press the remote button again. The garage should open or close.
Repeat for each remote you wish to add.
Resetting A Myq Smart Garage Door Opener Code
For newer models with Wi-Fi (myQ), you may need to reset codes through the app:
- Open the myQ App
- Go to Device Settings > Remove Device.
- This will unpair the opener from your phone.
- Reset with the Learn Button
- On the opener, hold the Learn button for 6 seconds to erase all codes.
- Reconnect in the myQ App
- Add the opener as a new device and set up codes as prompted.
Not-so-obvious insight: myQ does not store your wireless keypad codes. If you erase opener codes, you must reprogram the keypad manually.
Resetting Older Dip Switch Remotes
If you have a very old Liftmaster (pre-1993), the remotes have DIP switches inside.
- Open the Remote and the Opener Cover
- You’ll see a row of tiny switches (usually 8–12).
- Set a New Pattern
- Use a pen tip to set a random pattern (up or down).
- Match the same pattern inside the opener unit.
- Test the Remote
- The door should respond to the new code.
Security warning: DIP switch systems are less secure. Consider upgrading to a modern opener.
Reprogramming Devices After A Code Reset
After you reset the opener’s memory, none of your remotes or keypads will work. You need to reprogram each one. This is a critical step—if you skip it, you could be locked out of your garage.
Adding A Remote Control
- Press the Learn button (once, not hold).
- Within 30 seconds, press your remote button.
- Wait for a click or light blink.
- Test the remote.
Adding A Wireless Keypad
- Press the Learn button once.
- On the keypad, enter your 4-digit PIN, then Enter.
- Wait for a blink or click.
- Test the code.
Adding Homelink (car’s Built-in Remote)
Many newer cars have HomeLink buttons. You can program these just like a regular remote.
- Press and hold the desired HomeLink button in your car.
- Press the Learn button on the opener.
- Release the HomeLink button when the garage light blinks.
Tip: Some cars need you to hold both the remote and HomeLink button together for the first programming.
Adding Myq App Control
- Open the myQ app.
- Go to “Add Device.”
- Follow in-app instructions to pair with your opener.
- Complete the Wi-Fi setup and test.
Real-world example: After resetting, one user forgot to re-add their HomeLink button and was locked out for a day. Always test every device after a reset.
Troubleshooting: When The Code Reset Doesn’t Work
Sometimes, the reset process doesn’t go as planned. Here’s how to fix common problems:
The “learn” Button Does Nothing
- Check the power: Make sure the opener is plugged in and the outlet works.
- Inspect for damage: Old wiring or water damage can stop the button from working.
- Try a different remote: If none work, the control board may be faulty.
Keypad Won’t Program A New Code
- Replace the battery: Weak batteries can block signals.
- Clear all codes and try again: Hold Learn for 6 seconds, then reprogram.
- Reset the keypad: Some models have a tiny “reset” button under the cover.
Remotes Still Work After Reset
- You may not have held the Learn button long enough.
- Try holding for 10 seconds.
- If remotes still work, call Liftmaster support—your opener may have a memory error.
Myq App Can’t Connect
- Make sure your Wi-Fi works (try a phone in the garage).
- Reset the opener’s Wi-Fi (press and hold the Wi-Fi button until the LED blinks).
- Re-add the device in the myQ app.
Door Opens Or Closes On Its Own
- Check for stuck remotes (under a car seat).
- Make sure no neighbor uses the same frequency (rare in modern openers).
- Reset all codes and reprogram only your devices.
Security Features And Best Practices
Resetting your code is just one part of garage door security. Here’s how to keep your home even safer.
Use A Strong, Unique Pin
- Avoid simple codes like 1234 or your house number.
- Change the PIN every 6–12 months.
- Don’t write the code where others can see.
Limit Who Gets Access
- Only give remotes or PINs to trusted people.
- If a roommate moves out, reset all codes.
- Delete old devices from the opener’s memory.
Keep Your Opener Updated
- Newer models get security updates (especially myQ).
- Check the Liftmaster website for firmware updates.
- If your opener is over 20 years old, consider replacing it.
Watch For Signs Of Hacking
- If your door opens without reason, reset all codes.
- Use rolling code openers (Security+ 2.0 or newer).
- Cover windows in your garage to block prying eyes.
Non-obvious insight: Most burglaries through garages happen with lost or stolen remotes, not hacking. Regular code resets prevent most problems.
Table: Common Learn Button Colors And Their Meaning
Different Learn button colors mean different programming steps and code formats. Here’s a quick reference:
| Learn Button Color | Opener Year | Security Type | PIN/Remote Programming Steps |
|---|---|---|---|
| Yellow | 2011–present | Security+ 2.0 | Press Learn, enter PIN, press Enter |
| Purple | 2005–2011 | Security+ | Press Learn, enter PIN, press Enter |
| Red/Orange | 1997–2005 | Security+ | Press Learn, enter PIN, press Enter |
| Green | 1993–1996 | Basic Rolling Code | Press Learn, enter PIN, press Enter |
Pro tip: Always check your opener’s Learn button color before following online instructions, as steps can differ.

Comparing Liftmaster Code Reset Methods
You might wonder if there’s an easier way to reset your code, especially if you have multiple openers or keypads.
| Reset Method | Speed | Devices Erased | Best For | Risk of Mistake |
|---|---|---|---|---|
| Hold Learn Button | Fast (under 1 min) | All remotes, keypads, apps | Lost remote, new home | Low if followed carefully |
| Quick Press Learn Button | Very fast (10–30 sec) | Single device | Adding new remote/keypad | Low |
| myQ App Reset | Medium (1–2 min) | myQ and Wi-Fi only | Smart openers | Medium (if Wi-Fi weak) |
| DIP Switch Change | Slow (3–5 min) | All DIP switch devices | Old openers | High (switch pattern error) |
Choose the reset method that fits your situation and always double-check that all old remotes are erased.
Common Mistakes When Resetting Liftmaster Codes
Most problems come from small errors. Avoid these to save time and avoid lockouts.
- Holding the Learn button too long (when trying to add a single device). This erases all devices instead.
- Not testing each device after reset. Always test remotes, keypads, and cars before you finish.
- Forgetting to reprogram HomeLink in your car. Do this after any full reset.
- Using an easy-to-guess PIN like 0000 or birth years.
- Ignoring the 30-second window—you must enter codes quickly after pressing Learn.
- Resetting only the keypad, not the opener—this doesn’t block old remotes.
- Trying to reset with the power off—the opener needs electricity to erase codes.
Advanced tip: If you have multiple garage doors, label remotes with tape so you know which belongs to which door after a reset.
When To Call A Professional
Most code resets are easy for homeowners, but sometimes it’s best to ask for help:
- You hear a loud popping or burning smell when pressing buttons.
- The Learn button is broken or missing.
- Your opener is over 25 years old.
- The door is off track or very heavy.
- No devices will program even after a reset.
A professional can diagnose electrical problems, replace broken parts, and make sure your system is secure.
Maintenance And Preventive Tips
Resetting your code is only part of keeping your garage secure. Regular maintenance also matters.
- Change keypad batteries every 1–2 years.
- Clean the opener’s sensors with a dry cloth to prevent false signals.
- Check for firmware updates if you use a smart opener.
- Inspect the garage door hardware (springs, tracks, rollers) twice a year.
- Keep your garage door closed when not in use.
Simple habits make your garage safer and reduce the need for emergency resets.
Where To Find Official Help
If you get stuck, Liftmaster’s official website has manuals and troubleshooting guides for every model. They also offer live chat and phone support. For extra information, check:
- The sticker on the opener (for model and serial number).
- Your home’s user manual (for builder-installed systems).
- Online forums for common issues.
For reliable guides and security advice, you can also check Family Handyman.
Frequently Asked Questions
How Often Should I Reset My Liftmaster Garage Door Code?
You don’t need to reset your code regularly, but you should do it:
- After moving into a new home.
- If you lose a remote or suspect someone has your code.
- If you give out a temporary code for guests or workers.
- At least once a year as a good security habit.
What Do I Do If I Forget My Keypad Pin?
If you forget your PIN, you cannot recover it. You must reset the keypad by pressing the Learn button on the opener and entering a new code within 30 seconds. For older models, check the user manual for specific steps.
Will Resetting The Code Erase My Car’s Built-in Remote (homelink)?
Yes. If you erase all codes from the opener, you must reprogram your car’s HomeLink system. Follow your car’s manual or the steps above to add it again after the reset.
Is It Safe To Let A Neighbor Have My Garage Code?
Only give your code to someone you fully trust. If you give it out temporarily, reset your code as soon as you no longer need them to have access. Never write the code in a visible or public place.
Can Someone Hack My Liftmaster Opener Remotely?
Modern Liftmaster openers use rolling code technology, which is very hard to hack. Most break-ins happen from lost remotes or weak PINs. Always use a strong code and reset codes after losing a device. For extra safety, use a newer opener with Security+ 2.
0 or myQ features.
Resetting your Liftmaster garage door code is a simple but powerful way to control who enters your garage. With clear steps, a little planning, and regular maintenance, you can keep your home safe and avoid future problems. Whether you use a keypad, remote, or smart app, being in control of your garage’s security gives you peace of mind every day.


