Now Reading: How to Wind the Spring on a Garage Door Safely and Easily
- 01
How to Wind the Spring on a Garage Door Safely and Easily
Winding the spring on a garage door is one of those tasks that many homeowners worry about. It’s not just about turning a metal bar—there’s real tension and risk. The spring helps lift the heavy door, and if you get it wrong, it can be dangerous.
But with the right knowledge, tools, and safety steps, you can do this job safely and correctly. This guide will walk you through every part of the process, from understanding your garage door system to winding the spring step by step, and troubleshooting common issues.
You’ll also discover tips for safe maintenance and how to avoid costly mistakes that could lead to injury or further damage.
Understanding Garage Door Springs
Before you get your hands dirty, you need to know what you’re dealing with. Garage doors mainly use two types of springs: torsion springs and extension springs. The method for winding a spring depends on the type, but this article focuses on torsion springs, which are the most common in modern garage doors.
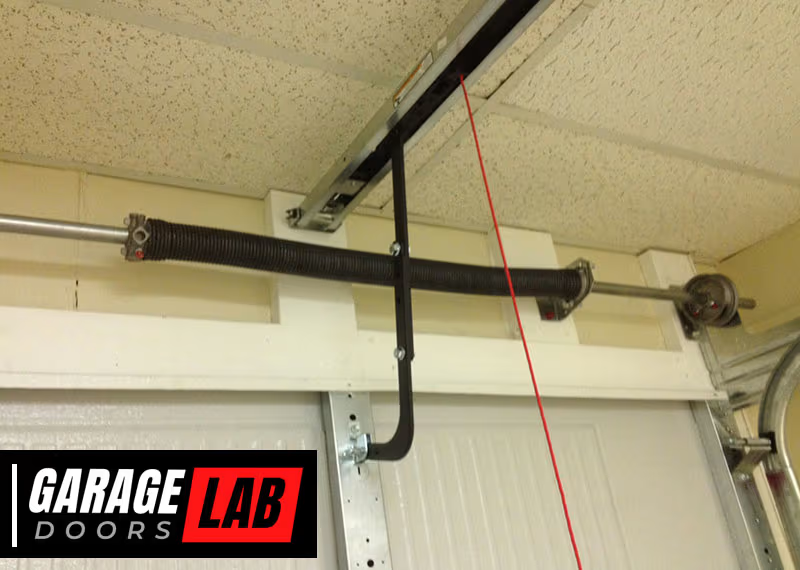
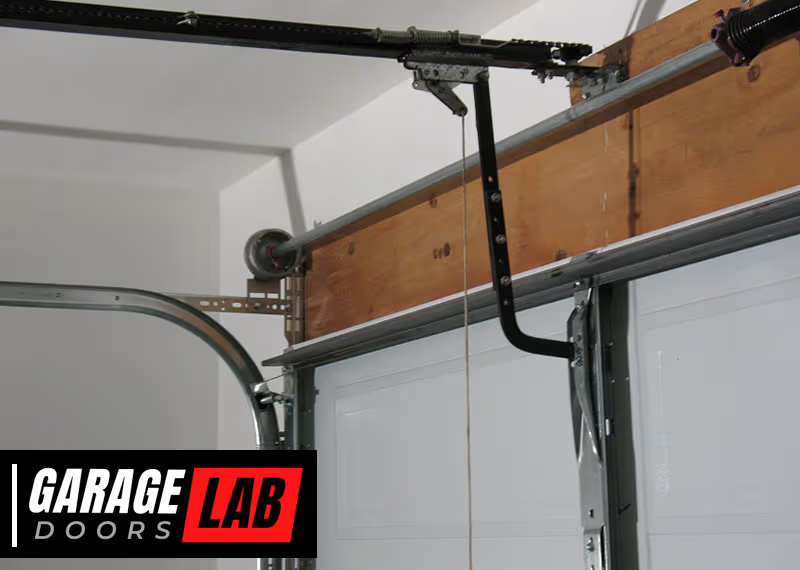
Torsion springs are mounted above the garage door opening, on a metal shaft. When you close the door, the spring winds up and stores energy. When you open the door, the spring unwinds, helping to lift the heavy panels. This system spreads the lifting force evenly, so the door moves smoothly. One key detail: the shaft with the torsion spring also carries drums on either end, where the lifting cables wrap and unwrap as the door moves. This means the spring’s tension directly controls the door’s balance.
Extension springs, found along the sides of the door, work differently. They stretch and contract as the door moves. Winding extension springs is less common for homeowners, because the tensioning process is not as precise or safe. Extension springs are more common on older or smaller doors, and they tend to wear out faster because the stretching motion puts more stress on the metal.
Why Winding The Spring Is Critical
The spring’s tension controls how easily your door opens and closes. Too loose, and the door feels heavy. Too tight, and the door may not close fully or could be dangerous. Proper winding is not just about function—it’s also about safety. If the spring is not wound correctly, the door can slam shut, hurt someone, or damage the opener.
A well-tensioned spring also protects the opener’s motor from working too hard, which extends its life and reduces the risk of breakdowns. Many people don’t realize that a garage door opener is only designed to guide the door, not do the heavy lifting.
That’s the spring’s job.
Safety First: Precautions And Personal Protective Equipment
Winding a garage door spring is risky. The spring is under high tension, and if it snaps or is released suddenly, it can cause severe injury. Before starting, follow these safety steps:
- Disconnect the opener: Unplug or switch off the automatic garage door opener so the door won’t move unexpectedly. If your opener has a battery backup, disconnect that too.
- Lock the door: Use locking pliers or a C-clamp to keep the door from moving while you work. This is especially important if you have children or pets who might accidentally bump the door.
- Wear safety goggles and gloves: Protect your eyes and hands from sharp edges or flying debris. Heavy-duty gloves reduce the chance of cuts from the spring or shaft.
- Use the right tools: Never improvise with random bars or screwdrivers—they can slip or break. Only winding bars made for this job are safe.
- Work with a partner: If possible, have someone nearby in case you need help. They can hand you tools or call for help if something goes wrong.
An extra tip: Make sure your workspace is well-lit and clear of clutter. This reduces the chance of tripping or dropping tools while handling the spring.

Tools And Materials Needed
Having the correct tools will make the job safer and smoother. Here’s a checklist:
- Winding bars (18 to 24 inches, solid steel)
- Socket wrench set
- Adjustable wrench
- Locking pliers or C-clamps
- Tape measure
- Step ladder
- Chalk or marker
- Safety goggles
- Heavy-duty gloves
- Lubricant spray (for maintenance after winding)
Never use makeshift winding bars. The wrong tools are a leading cause of accidents.
A detail many people miss: Check that your ladder is stable and tall enough so you don’t have to stretch or overreach. Overreaching while handling a spring increases your risk of slipping and getting hurt.
Identifying Your Garage Door Spring Type
Knowing your spring type isn’t just academic—it affects the winding direction and process.
Torsion Springs
- Located above the closed garage door, mounted on a shaft
- Usually one or two springs, depending on door width and weight
- Ends are attached to anchor brackets and winding cones
Extension Springs
- Run parallel to the door tracks
- Stretch as the door closes
- Usually have safety cables running through the spring
If you see a spring above the door center, you have a torsion spring system. Most modern double garage doors use this type.
Not sure? Look for a metal shaft with drums and a spring wound tightly around it. That’s torsion. If you see long, thin springs running along the sides, those are extension springs.
Step-by-step Guide: How To Wind A Garage Door Spring
Let’s get practical. These steps are designed for torsion spring garage doors. If you have extension springs, do not use this guide—call a professional.
1. Measure And Mark The Spring
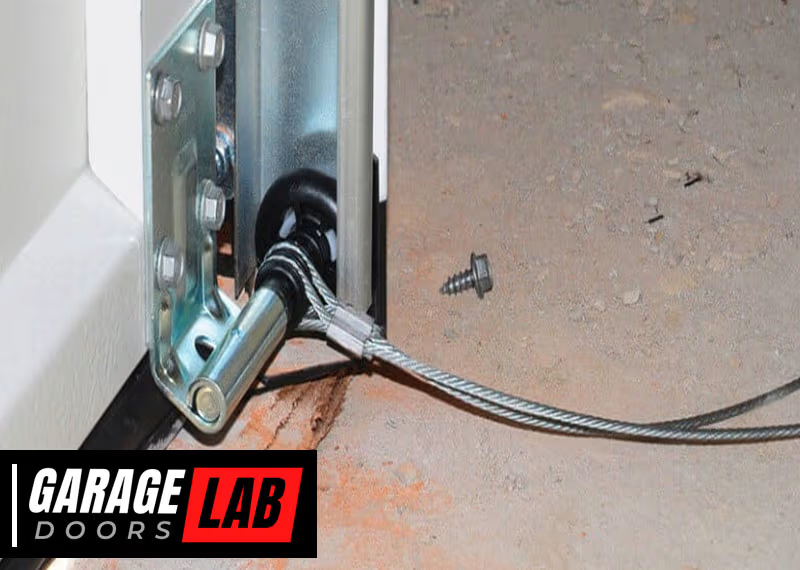
- Fully close the door. Secure it with locking pliers or a C-clamp below the bottom roller. This makes sure the door won’t move unexpectedly.
- Use a chalk or marker to draw a straight line across the spring’s coils. This will help you count how many turns you make. If you lose track, the line will spiral around the spring, showing you the exact amount of winding done.
2. Loosen The Old Spring (if Replacing)
If you are replacing the spring, you must release the tension first. Do this step only if you are replacing, not just adjusting.
- Insert the winding bars into the winding cone holes.
- Hold the bar firmly and loosen the set screws with your wrench.
- Carefully unwind the spring one quarter turn at a time, always keeping a winding bar in the cone.
- Never remove both winding bars at the same time. Keep one bar inserted as you move the other to the next hole.
This step requires patience. If the spring is old or rusty, it may be stuck. Spray a small amount of lubricant if needed, but don’t force it.
3. Secure The Shaft And Drum
Use a pair of locking pliers to clamp the shaft firmly against the wall or ceiling. This prevents the shaft from spinning while you work. You can add a second clamp on the other end for extra safety.
4. Attach The New Spring (if Replacing)
Slide the new spring onto the shaft, ensuring the stationary cone is anchored against the center bracket. Install the drum and cable, making sure the cable is properly seated. If your system has two springs, make sure both are installed before proceeding.
A practical tip: Double-check that the cables are lying flat in the drums and not twisted or kinked. Misaligned cables can cause uneven lifting and further problems.
5. Prepare For Winding
- Make sure the winding cone is on the correct side (left wound on the right side of the door, right wound on the left).
- Insert the first winding bar into the winding cone hole, facing upward at 9 or 3 o’clock.
- Stand on a steady ladder and check your footing before starting.
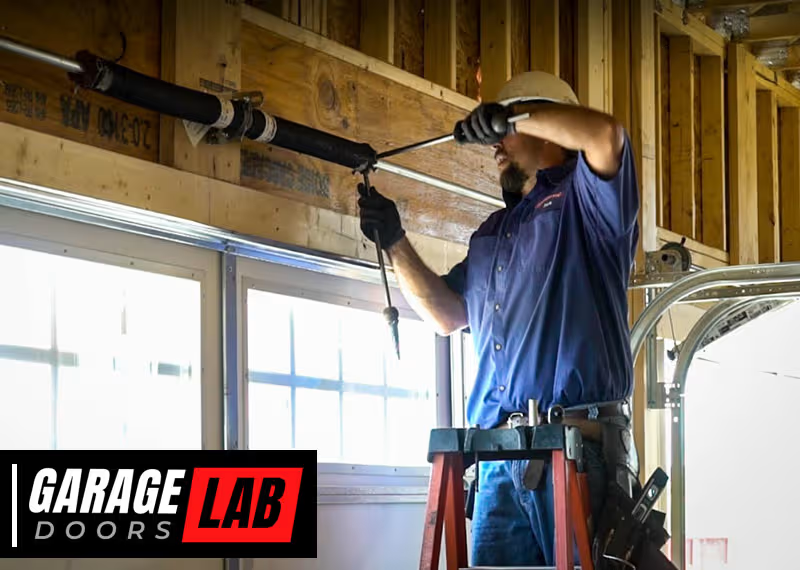
6. Wind The Spring
- Stand to the side of the spring, never directly in front.
- Firmly grip the winding bar. Lift upward to wind the spring, inserting the second winding bar before removing the first.
- Turn the spring one quarter turn at a time.
- Count the number of turns. Most residential doors require 7.5 to 8.5 full turns for a standard 7-foot door. For an 8-foot door, about 8.5 to 9.5 turns.
- Use the chalk line to check your progress. The line should spiral smoothly around the coil.
If you feel resistance or hear unusual noises, stop and check for jams or misalignment. For double spring systems, alternate winding both springs evenly to keep the tension balanced.
Example Calculation
For a 7-foot tall door:
- 7.5 full turns = 30 quarter turns
For an 8-foot door:
- 8.5 full turns = 34 quarter turns
A tip: Write down the number of turns as you go, so you don’t lose count. It’s easy to get distracted if someone interrupts you.
7. Tighten Set Screws
After winding, hold the winding bar in place and use a socket wrench to tighten the set screws on the winding cone. Make sure they’re snug but don’t overtighten, which can strip the threads. If the screws are loose, the spring can unwind suddenly.
A common beginner mistake is forgetting to check both screws. Tighten each one firmly and double-check their grip on the shaft.
8. Remove Tools And Test
- Carefully remove the winding bars.
- Release the locking pliers or C-clamps from the track.
- Reconnect the garage door opener, if used.
Move slowly when removing the bars—keep your hands clear of the spring’s path.
9. Test Door Balance
- Lift the door manually halfway and let go (with a helper).
- A properly wound spring keeps the door in place.
- If the door moves up or down, adjust by adding or removing quarter turns.
If your door is very heavy to lift or slams shut, the spring needs more tension. If it shoots upward, you have over-wound it.
How Many Turns Should You Wind?
This depends on your door’s height. Here’s a quick reference:
| Door Height | Full Turns | Quarter Turns |
|---|---|---|
| 7 feet | 7.5 – 8.5 | 30 – 34 |
| 8 feet | 8.5 – 9.5 | 34 – 38 |
Note: Always check your door manufacturer’s instructions for the exact number of turns.
For doors with unusual weights (extra insulation, custom materials), you may need to adjust slightly, but always start with the manufacturer’s recommendation.
Common Mistakes And How To Avoid Them
Many DIYers make the same errors when winding garage door springs. Here’s how to prevent them:
- Using the wrong tools: Never use screwdrivers or thin metal rods. Always use real winding bars.
- Winding in the wrong direction: Torsion springs are wound by lifting the winding bar up toward the ceiling. Remember: right side = left-wound spring; left side = right-wound spring.
- Incorrect number of turns: Over-winding can break the spring or damage the door. Under-winding makes the door heavy.
- Not securing the door: The door can suddenly lift or slam down if not locked in place.
- Standing in front of the spring: Always stand to the side to avoid injury if a tool slips.
- Ignoring unusual sounds: If you hear scraping, popping, or see jerky movement, stop and check everything. Forcing the spring can break it.
How To Know If Your Spring Needs Winding Or Replacement
A common question is whether to adjust or replace the spring. Here’s how to tell:
Signs You Need To Wind (adjust) The Spring
- Door feels heavy to lift
- Door doesn’t stay open halfway
- Opener struggles or fails to lift door
- Door closes unevenly or moves slowly
Signs You Need To Replace The Spring
- Visible gaps in the spring coils
- Rust or corrosion
- Loud snapping sound when opening or closing
- Door does not open at all
- The spring looks stretched out or deformed
If the spring is broken, do not attempt to wind it—replacement is the only solution.

Professional Vs. Diy: When To Call An Expert
While many homeowners are comfortable with basic repairs, winding a garage door spring carries real risks. Consider professional help if:
- You’re unsure about any step
- The spring is unusually large or double-spring system is complex
- You have physical limitations or poor access to the garage ceiling
- The door is unusually heavy or commercial-grade
Professional technicians have specialized tools and training. According to the International Door Association, more than 20,000 injuries related to garage doors occur each year in the U.S., many due to DIY spring work.
Another benefit: Professionals often inspect the whole system for hidden problems, like worn cables or bent tracks, that you might miss.
Maintenance Tips For Garage Door Springs
Regular maintenance extends the life of your springs and reduces the chance of sudden failure. Here’s what you can do:
- Lubricate the springs every six months with a silicone-based lubricant to prevent rust and reduce noise. Avoid WD-40 for springs; it’s not a long-term lubricant.
- Inspect for wear: Look for gaps, fraying, or corrosion. Pay attention to any reddish-brown dust—it’s a sign of rust.
- Check door balance: Test every few months by disconnecting the opener and lifting the door manually. It should stay in place at about halfway up.
- Clean the tracks: Dirt and debris can affect the door’s operation and put stress on the springs.
- Listen for changes: New noises or jerky motion often mean the spring or another part needs attention.
A simple maintenance routine can add years to your spring’s life and prevent emergency repairs.

Troubleshooting Common Problems After Winding
Sometimes, even after winding the spring, things might not feel right. Here’s how to solve typical issues:
Door Is Hard To Lift
- Check if you have wound enough turns. If not, add quarter turns as needed.
- Ensure the cables are seated correctly on the drum.
- Inspect the tracks and rollers for obstructions.
Door Flies Open Quickly
- The spring is over-wound. Remove quarter turns gradually.
- Double-check that the correct spring type is installed.
Door Won’t Stay Open
- Spring tension may still be too low. Add another quarter turn and test.
- Inspect the door for binding or damage in the tracks.
Loud Noises During Operation
- Lubricate the spring.
- Check for misaligned tracks or loose hardware.
- Look for worn rollers or hinges.
If you’ve tried these steps and the problem continues, the issue may be with the door’s weight or another hardware part, not the spring.
The Importance Of Proper Balance
A well-balanced door is safer and reduces wear on the opener. An unbalanced door puts extra stress on all moving parts, shortening their lifespan. If you notice uneven movement or jerky operation, inspect the spring tension and door alignment.
Proper balance also reduces energy use for automatic openers, saving money over time.
Cost Comparison: Diy Vs. Professional Spring Winding
Many homeowners wonder if DIY is worth the risk. Here’s a comparison:
| Option | Cost | Time | Safety |
|---|---|---|---|
| DIY Winding | $30 – $80 (spring & tools) | 1-2 hours | High risk |
| Professional Service | $150 – $300 | 30-60 minutes | Low risk |
While DIY saves money, the safety risk is significant. Professionals also offer warranties and peace of mind. If a mistake happens, they’re insured; you are not.
How To Choose The Right Replacement Spring
If you need to replace your spring, choosing the right size and type is vital. Here’s what to check:
- Measure the old spring: Length, inside diameter, and wire size. You can use a tape measure and calipers for accuracy.
- Check the color code: Manufacturers often use colored paint on the end of the spring to indicate strength. Match the new spring to the color of your old one.
- Know your door weight: Heavier doors need stronger springs. If you’re unsure, you can weigh your door with a bathroom scale placed under one side while you lift the other.
Example Spring Sizing Chart
| Wire Size (inches) | Inside Diameter (inches) | Door Weight (lbs) |
|---|---|---|
| 0.207 | 2.00 | 80-120 |
| 0.218 | 2.00 | 120-180 |
| 0.243 | 2.00 | 180-250 |
Always consult your door’s manual or a professional for the correct spring.
Two Non-obvious Insights For Beginners
- Spring winding direction matters: Left-wound and right-wound springs are not interchangeable. Installing them on the wrong side will cause the door to malfunction or the spring to unwind dangerously. Double-check the winding direction before you start.
- Temperature affects spring tension: In cold climates, metal contracts, making springs tighter. If you adjust your door in winter, check again in summer to ensure proper balance. This is especially important in garages that are not heated.
Another tip: Springs wear out slowly. If your door’s balance changes over time, it’s a sign the springs are reaching the end of their life.
Real-world Example: Learning From A Homeowner’s Experience
Mark, a first-time homeowner, tried winding his garage door spring using a screwdriver and a metal rod he found in the garage. The rod slipped, and the spring unwound violently, damaging the door and injuring his hand. After this, he called a professional, who completed the job in 40 minutes and explained the importance of using the correct tools.
Lesson: The right tools and safety steps are not optional—they’re essential.
Another common story: Many people think replacing just one spring is enough, but if your door has two springs and one breaks, the other is likely worn and will fail soon. Professionals usually recommend replacing both at the same time to avoid another repair soon after.
Helpful Resources
If you’re unsure or want more detailed diagrams, the Wikipedia page on garage doors has a helpful overview of different mechanisms and safety standards.
Frequently Asked Questions
How Do I Know If My Garage Door Spring Is Broken?
Look for a visible gap in the coil, a loud snap when the door is operated, or the door failing to open. A broken spring cannot be wound and must be replaced.
Can I Use Any Metal Rod As A Winding Bar?
No. Only use solid steel winding bars that fit the winding cone holes exactly. Improvised tools can slip and cause injury.
How Often Should Garage Door Springs Be Adjusted Or Replaced?
Springs typically last 7–9 years with regular use (about 10,000 cycles). Adjust only when the door feels heavy or doesn’t stay open. Replace if you see damage or the door won’t open at all.
Is It Safe To Wind A Garage Door Spring Alone?
It’s possible but not recommended. Having a helper makes the process safer in case something goes wrong.
What Should I Do If The Door Still Doesn’t Work After Winding The Spring?
Check the cables, drums, and tracks for alignment or damage. If the problem continues, call a professional, as additional force can worsen the issue or cause injury.
Winding a garage door spring is not a casual DIY job, but with careful attention to detail, the right tools, and respect for safety, you can restore your garage door’s smooth operation. Remember, when in doubt, don’t risk it—professional help is always the safest option.
Your safety and the proper functioning of your garage door are worth the extra effort.