Now Reading: How to Adjust Garage Door Opener for Smooth Operation
- 01
How to Adjust Garage Door Opener for Smooth Operation
Adjusting your garage door opener can make your daily life safer and more convenient. A well-tuned opener keeps your garage door moving smoothly and quietly. But when things go wrong—like doors not closing all the way, making loud noises, or reversing for no reason—it can be frustrating. Many homeowners don’t realize that with a few tools, some patience, and the right steps, you can solve most garage door opener issues yourself. You do not always need a professional for basic adjustments.
This guide will walk you through every part of adjusting your garage door opener, from understanding how it works to handling advanced settings. If you want to make your garage door opener safer, quieter, and more reliable, you’re in the right place.
How A Garage Door Opener Works
Before you start adjusting anything, it’s important to know the basics of your garage door opener. Most openers use an electric motor connected to the door by a rail and trolley. When you press a button on your remote or wall switch, the motor moves the door up or down. Sensors and limit switches tell the motor when to stop.
There are three main types of openers:
- Chain drive: Uses a metal chain to move the door. They are strong but can be noisy.
- Belt drive: Uses a reinforced rubber belt. These are much quieter but often cost more.
- Screw drive: Uses a threaded steel rod. These need less maintenance but can be loud in cold climates.
Most openers have force and travel limits. These control how hard the motor pulls and how far the door moves. Understanding these features helps you adjust your opener correctly, keeping your door safe and reliable.
Safety First: Preparing To Adjust
Working with garage doors can be dangerous. Before you touch anything, make sure you:
- Unplug the opener from the wall to avoid electric shock.
- Keep the area clear of children and pets.
- Use safety glasses and gloves to protect your eyes and hands.
- Read the manual for your opener. Each brand (like Chamberlain, LiftMaster, or Genie) has unique parts and instructions.
If your door is very heavy, makes grinding noises, or has a broken spring, do not try to fix it yourself. These are signs of serious problems that need a professional.
Identifying What Needs Adjustment
Many people adjust their garage door opener because something feels off. Here are common problems that call for adjustment:
- Door does not open or close all the way
- Door reverses when closing
- Opener motor runs but the door doesn’t move
- Door opens or closes too fast or slow
- Opener makes loud or unusual noises
It’s important to know the difference between an opener problem and a door problem. If the door is off its tracks, or the springs or cables are damaged, the opener is not at fault. Fix these problems first before adjusting the opener.
Tools And Materials Needed
Having the right tools makes adjustments easier and safer. You don’t need expensive gear—most tools are common in many homes.
- Flathead and Phillips screwdrivers
- Adjustable wrench
- Step ladder (tall enough to safely reach the opener)
- Tape measure
- Lubricant (garage door lubricant, not WD-40)
- Work gloves
Optional but useful:
- Socket set for stubborn bolts
- Flashlight for dark garages
- Safety glasses for eye protection
Adjusting The Travel Limits
Travel limits control how far the door moves up or down. If your door stops before fully opening or closing, or keeps running after touching the floor or ceiling, these need adjustment.
Finding The Adjustment Screws
Most openers have two screws or dials marked “up” and “down” or “open” and “close. ” These are often located on the side or back of the opener motor housing. Some models use digital buttons.
- Locate the screws or buttons: Check your manual if you’re not sure.
- Mark the current position: Use a marker so you can return to the original setting if needed.
Adjusting The Down Limit
- Close the garage door using the wall button.
- If the door stops before reaching the floor, turn the “down” screw clockwise to increase travel distance. For most brands, one full turn equals about 2 inches of travel.
- Test the door after each adjustment. Do not turn the screw more than one full turn at a time.
- If the door closes too far and hits the floor hard, turn the screw counterclockwise.
Adjusting The Up Limit
- Open the garage door using the wall button.
- If the door does not open fully, turn the “up” screw clockwise.
- Test the door. Stop when the door opens fully but does not hit the opener’s stop bolt or rail.
- If the door opens too far and hits the stops, turn the screw counterclockwise.
Practical Tips
- Make small changes and test each time.
- If the door only moves a few inches and stops, the travel limits may be set too short.
- If the door reverses before closing, it could be a travel limit issue or a sensor problem.
Adjusting The Force Settings
Force settings control how hard the opener pushes or pulls. If the force is too high, the door can injure someone or damage objects. If it’s too low, the door may stop or reverse for no reason.
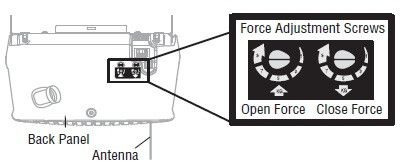
Locating Force Adjustment Controls
Most openers have two dials marked “up force” and “down force. ” These are usually near the travel limits or on the back of the opener.
Adjusting Down Force
- Press the wall button to close the door.
- If the door reverses before hitting the floor, increase the down force by turning the dial clockwise.
- If the door slams shut or doesn’t reverse when hitting an object, decrease the down force by turning counterclockwise.
Adjusting Up Force
- Open the door using the wall button.
- If the door stops before fully opening, increase the up force.
- If the door opens too quickly or harshly, decrease the up force.
Safety Test
- Place a small block of wood under the door.
- Close the door. It should reverse when it touches the wood. If not, reduce the force and test again.
Non-obvious insight: Many people increase force to fix a sticky door, but this can hide bigger problems like bad rollers or springs. Always check for mechanical issues before raising the force.
Aligning And Adjusting The Safety Sensors
Modern garage door openers use safety sensors (photo eyes) to stop the door from closing if something is in the way. If the sensors are misaligned, dirty, or faulty, the door may not close or may reverse for no reason.
Checking Sensor Alignment
- Find the two sensors, one on each side of the garage door, near the floor.
- Both sensors should have a steady, usually green or red light.
- If a light is blinking or off, the sensors are not aligned.
Aligning The Sensors
- Loosen the mounting bracket wing nut.
- Move the sensor until the light is steady.
- Tighten the nut.
Cleaning The Sensors
- Gently wipe the lens with a soft cloth.
- Remove any spider webs, dirt, or obstructions.
Wiring Checks
- Make sure wires are not damaged or disconnected.
- If wires are loose, carefully reattach them.
Non-obvious insight: Sunlight can sometimes cause sensor problems by shining directly into the lens. Try shading the sensor if you notice problems only during certain times of day.
Lubricating And Maintaining The Door
A noisy or slow garage door is often a sign of poor lubrication or worn-out parts—not an opener problem. Proper maintenance can solve many issues.
What To Lubricate
- Rollers: Use a silicone-based lubricant.
- Hinges: A small drop on each hinge.
- Springs: Light coating, but avoid excess.
- Tracks: Wipe clean and use a dry spray.
Do not lubricate the opener rail with standard grease. Use only what the manufacturer recommends.
How Often To Lubricate
- Every six months for most homes
- More often in dusty or humid climates
Practical tip: Avoid using WD-40, as it can remove grease instead of lubricating.
Adjusting The Chain Or Belt Tension
If your door opener uses a chain or belt drive, the tension can become loose over time. A loose chain or belt makes noise and can cause jerky movement.
Checking Tension
- The chain or belt should sag slightly (about ½ inch in the center).
- If it hangs down more, it needs tightening.
Adjusting Chain Or Belt Tension
- Unplug the opener.
- Find the adjustment bolt on the trolley.
- Turn the nut to tighten or loosen the chain/belt.
- Do not overtighten—this can damage the opener.
| Drive Type | Typical Sag | Adjustment Tool |
|---|---|---|
| Chain Drive | ½ inch | Wrench |
| Belt Drive | ¼ to ½ inch | Wrench |
| Screw Drive | None (should be tight) | None |
Note: If you overtighten, the chain or belt may break.
Calibrating The Opener After Power Outages
If your garage loses power or you use the emergency release, the opener may lose track of the door’s position. Recalibrating is simple but important.
- Reconnect the opener to the door by running the opener until the trolley catches.
- Open and close the door fully using the wall button.
- If the door does not travel correctly, adjust the travel limits as described above.
Some modern openers have a self-learn mode. Check your manual for details.
Programming Remote Controls And Keypads
Sometimes, the problem is not with the door itself, but with the remote or keypad. If your remote only works up close, or not at all, try these steps.
Programming A Remote
- Press the “learn” button on the opener (usually on the back or side).
- When the indicator light blinks, press a button on the remote.
- The light should blink or go steady, showing the remote is programmed.
Programming A Keypad
- Press the “learn” button.
- Enter your chosen code on the keypad.
- Press “Enter” or “Send.”
Troubleshooting Remote Problems
- Replace the battery in the remote.
- Make sure you are within range.
- Check for interference from LED bulbs or other electronics.
Troubleshooting Common Garage Door Opener Problems
Even with regular adjustments, problems can happen. Here are the most common issues and how to solve them:
Door Won’t Open Or Close
- Check the manual lock is not engaged.
- Inspect the safety sensors for alignment.
- Make sure the remote batteries are fresh.
Door Reverses Before Or After Closing
- Adjust the down travel limit.
- Clean and align the safety sensors.
- Lubricate the rollers and tracks.
Opener Motor Runs, But Door Doesn’t Move
- Check if the trolley is engaged.
- Inspect for broken springs or cables.
Opener Makes Loud Noises
- Lubricate moving parts.
- Check for loose bolts.
- Tighten the chain or belt.
Remote Only Works Up Close
- Change the remote battery.
- Move or replace LED bulbs in the opener.
Comparing Garage Door Opener Brands And Adjustment Methods
Different brands have their own features and quirks. Here’s a comparison of three popular brands.
| Brand | Travel Adjustment | Force Adjustment | Sensor Alignment |
|---|---|---|---|
| Chamberlain | Screw/knob or digital | Dial | Manual |
| LiftMaster | Screw/knob or digital | Dial | Manual |
| Genie | Digital buttons | Dial | Manual |
Tip: Always check your brand’s manual. Digital adjustment models may need you to press and hold buttons, rather than turning screws.
When To Call A Professional
Not all garage door opener problems are safe to fix yourself. Call a professional if you notice:
- Broken springs or cables
- Door is off its tracks
- Motor is smoking or smells burned
- Repeated adjustments don’t fix the problem
Attempting to fix these issues can cause serious injury or more damage.

Upgrading Your Garage Door Opener For Better Adjustments
If your opener is over 15 years old, or lacks features like soft start/stop, battery backup, or smartphone control, consider upgrading. Newer models are quieter, safer, and easier to adjust.
Benefits Of Modern Openers
- Quieter operation (especially belt drive)
- Built-in Wi-Fi and smart control
- Improved safety features
- Easier digital adjustments
What To Look For
- Soft start/stop: Reduces wear and tear.
- Battery backup: Works during power outages.
- Safety sensors: Required by law in most places.
| Feature | Old Openers | Modern Openers |
|---|---|---|
| Noise Level | Loud | Quiet |
| Safety Sensors | Sometimes missing | Required |
| Smartphone Control | No | Yes |
| Battery Backup | No | Yes |
Practical tip: If you upgrade, have a professional install and set up the opener. This ensures all safety features work correctly.
Seasonal Adjustments And Maintenance
Garage doors can behave differently in winter and summer due to changes in temperature and humidity. You may need to adjust the opener as the seasons change.
Winter Tips
- Cold weather can make metal parts contract, causing the door to move slower.
- Lubricate moving parts more often.
- You may need to increase the up force slightly in cold months.
Summer Tips
- Humidity can cause wooden doors to swell, increasing friction.
- Check for sticking and adjust the down force if needed.
Non-obvious insight: Sometimes, a door that works fine in summer will reverse in winter, or vice versa. Seasonal adjustment is normal for many homes.

Preventive Maintenance Checklist
Regular maintenance can prevent the need for big adjustments.
- Test the door balance by disconnecting the opener and lifting the door halfway. It should stay in place. If not, springs may need service.
- Check for loose bolts and nuts on hinges, rollers, and opener mount.
- Lubricate all moving parts every six months.
- Test the safety reverse every three months.
- Inspect the sensors for dirt or misalignment.
- Listen for unusual noises—these are often the first sign something is wrong.
Frequently Asked Questions
How Often Should I Adjust My Garage Door Opener?
You should check the adjustments every six months or whenever you notice problems. Seasonal changes can affect the door’s movement, so you may need to adjust more often in climates with big temperature swings.
Why Does My Garage Door Reverse When Closing?
The most common reasons are misaligned safety sensors, dirty sensor lenses, or travel limits set too short. Check the sensors first, then adjust the limits if needed.
Is It Safe To Adjust The Garage Door Springs Myself?
No. Garage door springs are under high tension and can cause serious injury. Only trained professionals should repair or adjust springs.
What Lubricant Should I Use On My Garage Door?
Use a silicone-based garage door lubricant or a product recommended by the door manufacturer. Avoid regular WD-40, which can wash away needed grease.
Where Can I Find More Detailed Information About My Specific Opener Model?
The best source is your owner’s manual or the official website of your opener’s brand. For general info, visit the Wikipedia: Garage Door Opener article.
Adjusting your garage door opener isn’t just about convenience—it’s about safety and protecting your investment. With the right steps, most homeowners can keep their garage door moving smoothly for years. If you ever feel unsure, call a professional. Your safety is always worth it.


