
Removing a garage door sounds simple, but it’s a job that requires attention to safety, detail, and the right approach. Maybe your garage door is old, damaged, or you want to upgrade to an automatic model. No matter your reason, taking down a garage door is a step-by-step process that anyone can do with the right guidance.
If you’ve never worked with large mechanical parts before, don’t worry. This guide will help you avoid common mistakes, explain the tools you need, and walk you through every part of the project. By the end, you’ll know not only how to remove a garage door, but also how to do it safely and efficiently.
Why Remove A Garage Door?
There are several reasons you might need to take out your garage door. Some of the most common include:
- Upgrading to a new model with better insulation or an automatic opener.
- Fixing structural issues if the frame or door is damaged.
- Renovating your garage for another use, such as a workshop or living space.
- Improving security with a more modern, tamper-resistant door.
No matter your motivation, removing the old door is the first step.
Safety First: Preparing For Garage Door Removal
Before you touch any tools, safety must come first. Garage doors are large, heavy, and often under a lot of spring tension. Making a mistake here can cause serious injury. Many people forget that even an old garage door can be dangerous during removal.
Safety Equipment You’ll Need
- Work gloves to protect your hands from sharp edges.
- Safety glasses to keep dust and debris out of your eyes.
- Sturdy shoes (preferably steel-toed) for foot protection.
- Hard hat if the door is especially large or if you’re working alone.
Key Precautions
- Never remove a garage door alone. Having a helper makes the process safer and much easier.
- If your door uses torsion springs, extreme caution is needed. These springs store a lot of energy. If you are not sure what type of spring you have, check the bar above the door or consult the manual.
- Always disconnect the power to the automatic opener before starting.
- Clear the garage of any cars, tools, or objects near the door.
Tools And Materials You’ll Need
Gathering the right tools before you start will save time and frustration. Here’s what you’ll need for most garage doors:
- Wrench set (metric and standard)
- Socket set
- Screwdriver set (especially flat-head and Phillips)
- Pliers
- Hammer
- Cordless drill (optional, for faster screw removal)
- C-clamps or locking pliers (to secure the door if needed)
- Step ladder
- Tape measure
- Pry bar
- Duct tape (for securing loose parts)
Materials For Disposal
Think ahead to what you’ll do with the old door. You may need:
- Heavy-duty garbage bags for small parts.
- A tarp for catching falling debris.
- A truck or trailer for hauling away the panels.
Identifying Your Garage Door Type
Understanding your door’s construction is key to safe removal. There are three main types:
- Sectional garage doors: Made of several horizontal panels connected by hinges.
- One-piece (tilt-up) doors: A single, solid piece that lifts up and out.
- Roll-up doors: Common in commercial settings, made of thin slats that roll into a coil.
Most homes use sectional or one-piece doors. The removal steps are similar but not identical. Identify your type before you start.
Table: Common Garage Door Types And Features
| Type | Common Material | Mechanism | Difficulty to Remove |
|---|---|---|---|
| Sectional | Steel, Wood, Aluminum | Panels on tracks, spring-assisted | Medium |
| One-Piece | Wood, Fiberglass | Single slab, pivots up | Medium |
| Roll-Up | Steel | Slats roll into coil | High |
If your door is especially heavy or old, removal may be harder. Don’t be afraid to call a professional if you feel unsure.
Step-by-step: How To Remove A Sectional Garage Door
Sectional doors are the most common. Here’s how to remove one safely.
1. Disconnect The Garage Door Opener
Unplug the opener from its power source. If hardwired, turn off the breaker. Pull the emergency release cord (usually a red handle) to detach the door from the opener’s rail. This step is often missed, leading to unwanted movement during removal.
2. Secure The Door
Use C-clamps or locking pliers to clamp the tracks just above the bottom roller on each side. This keeps the door from falling while you work.
3. Remove The Springs
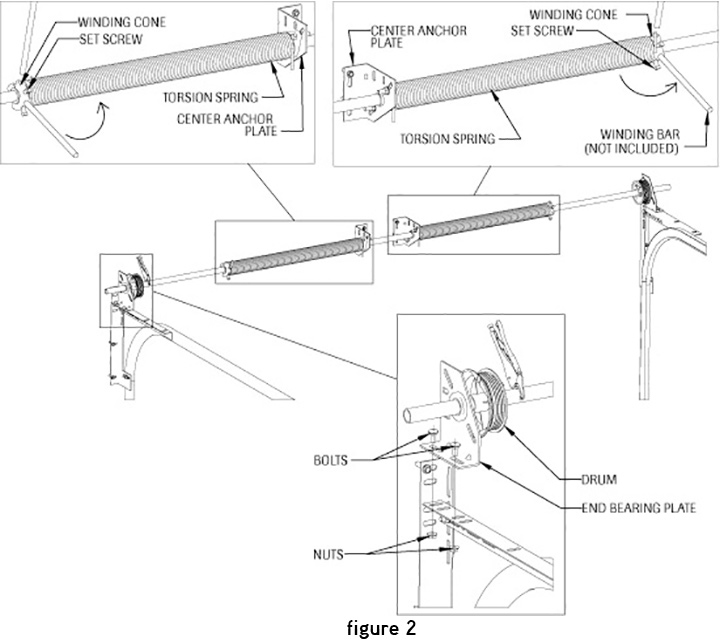
Sectional doors use either torsion (above the door) or extension springs (along the sides).
If You Have Torsion Springs:
- Identify the winding bar holes on the spring.
- Insert a winding bar into one hole, keeping a firm grip.
- Loosen the set screws with a wrench. The bar will want to turn—hold it tightly.
- Slowly unwind the spring, moving the bar from hole to hole until all tension is gone.
- Repeat for the other spring.
If You Have Extension Springs:
- Open the door fully to release most tension.
- Secure the door open with C-clamps.
- Disconnect the springs from their anchor point with pliers.
Non-obvious insight: Many beginners forget that springs can still hold residual tension even when the door is up. Always check for movement before unhooking.
4. Remove Lift Cables And Hardware
- With springs de-tensioned, disconnect the lift cables from the bottom bracket using a wrench.
- Remove any pulleys, brackets, or additional hardware.
5. Take Off The Door Panels
- Start from the top panel. Remove the hinges that connect the top panel to the next.
- With a helper, carefully lift the top panel off the tracks and set it aside.
- Continue down, removing each panel one at a time.
Tip: Panels can be heavy and awkward. Don’t try to move them alone.
6. Remove Tracks And Remaining Hardware
- Unscrew the tracks from the wall and ceiling.
- Take down any brackets, struts, or weatherstripping as needed.
7. Clean Up
- Remove all loose hardware and sweep the area.
- Check for nails or screws left in the wall or ceiling.
How To Remove A One-piece (tilt-up) Garage Door
Though less common now, many older homes have a single-piece door. The process is different.
1. Disconnect The Opener And Springs
- Unplug the opener and pull the emergency release.
- Most one-piece doors use extension springs on the sides. Open the door fully and clamp it in place.
- Detach springs from their anchor points.
2. Remove Pivot Arms And Hardware
- Unscrew the pivot arms (hinges) from the door with your wrench.
- Have a helper support the door as you remove the last screws. The door can fall forward quickly.
3. Lower And Remove The Door
- With help, carefully tilt the door out and down.
- Move the door away from the garage opening.
4. Remove Tracks (if Present)
- Some one-piece doors have side tracks or guides. Remove these with your screwdriver.
Table: Key Differences Between Sectional And One-piece Door Removal
| Step | Sectional Door | One-Piece Door |
|---|---|---|
| Spring Type | Torsion or Extension | Extension (usually) |
| Panel Removal | One at a time | Whole slab |
| Opener Disconnect | Emergency release, unplug | Emergency release, unplug |
| Helper Required | Yes | Yes, even more critical |
Removing A Roll-up Garage Door
Roll-up doors are most common in commercial garages or storage units, but you may find one at home. These are more complex.
1. Disconnect The Motor
Turn off power and release any tension in the motor chain or belt.
2. Release Spring Tension
Roll-up doors use a spring inside the barrel. Consult your manual. Usually, there’s a tension adjustment bolt. Loosen it carefully.
3. Remove The Slats
- Open the door halfway.
- Remove the stops at the end of the tracks.
- Slide out the slats, one at a time.
4. Detach Barrel And Tracks
- Unbolt the barrel from the wall brackets.
- Remove the tracks from the wall.
Insight: Roll-up doors are heavy and require at least two strong people to handle. If you see rust or damage, parts may be fused or stuck—spray with lubricant and give yourself extra time.
How Long Does It Take To Remove A Garage Door?
Most standard removals take 2 to 4 hours for two people with basic tools. Roll-up doors may take longer. If you run into rusted bolts or stripped screws, allow extra time.
Common Problems And How To Solve Them
1. Rusted Or Stripped Screws
Spray penetrating oil (like WD-40) on rusted parts and wait 10–15 minutes before trying again. For stripped screws, use a screw extractor or try gripping with locking pliers.
2. Door Won’t Move After Springs Are Released
Check for missed bolts or hardware. Sometimes, hidden screws hold panels together.
3. Springs Won’t Release
If the spring won’t unwind, do not force it. This is a sign of a stuck or broken spring. Call a professional if you cannot safely remove it.
4. Damaged Tracks
If tracks are bent or stuck to the wall, use a pry bar gently, taking care not to damage the wall.
What To Do With The Old Garage Door
Don’t just leave your old door on the curb. Here are options:
- Recycle: Most metal or wood garage doors can be recycled. Check your city’s recycling guidelines.
- Repurpose: Old panels make good workbenches or shed walls.
- Sell: If the door is in good shape, sell it online.
- Disposal: Contact your local waste service for bulk pickup.
Non-obvious insight: Some metal doors have foam insulation inside. Separate the foam from the metal before recycling, as most recycling centers require this.
When To Call A Professional
While removing a garage door is possible for most DIYers, there are times when you should call a pro:
- If you have torsion springs and no experience.
- If the door is extremely heavy (solid wood or steel).
- If the door is jammed, warped, or has electrical connections you’re unsure about.
- If you’re working alone.
A professional will have the right tools and experience to avoid injury.
Preparing For A New Door Installation
If you plan to install a new door, use this removal as a chance to inspect the frame, header, and garage opening. Look for:
- Rotting wood around the opening.
- Cracks in concrete where tracks attach.
- Level and square opening.
Any problems here should be fixed before putting in a new door.
Table: Checklist For Replacing A Garage Door
| Task | Why It Matters | How to Check |
|---|---|---|
| Inspect frame for rot | Ensures new door stability | Poke with screwdriver, look for softness |
| Check opening is square | Prevents gaps and jams | Measure diagonals, compare |
| Verify anchor points | Secure mounting for tracks | Check for loose or missing hardware |

Costs And Budgeting For Removal
Removing a garage door yourself is usually free, except for tool rental or disposal fees. If you hire a professional, expect to pay $150–$400 depending on the door type and size. Heavier or custom doors can be more expensive.
Tip: If you are replacing your door, some installers include removal in their price. Always ask before hiring.
Environmental Considerations
Many garage doors contain materials that require special handling:
- Lead paint: Found on doors built before 1978.
- Asbestos: Rare, but possible in very old doors.
- Oil or grease: Clean up spills to avoid contaminating soil.
Always dispose of hazardous materials according to local guidelines. For more information, visit the EPA’s lead safety page.
Mistakes Beginners Often Make
- Ignoring spring tension: Trying to remove a spring-loaded door without unwinding the springs.
- Working alone: Doors are heavy and can shift suddenly.
- Forgetting to disconnect the opener: This can cause the motor to engage unexpectedly.
- Not labeling parts: Put screws and brackets in labeled bags to avoid confusion during reinstallation.
- Skipping safety gear: Even a small slip can cause injury.
Tips For A Smooth Removal
- Take photos as you go. This makes reinstallation easier.
- Use a magnetic tray for small screws and nuts.
- Mark the wall where brackets were attached; it helps for the new door.
- Don’t rush. Take breaks if you feel tired or frustrated.

Frequently Asked Questions
How Dangerous Are Garage Door Springs?
Garage door springs, especially torsion springs, are under high tension. If released suddenly, they can cause serious injury or damage. Always unwind or release tension before removing. If you’re not sure how, call a professional.
Can I Remove A Garage Door By Myself?
It’s possible but not recommended. Most doors are heavy and awkward. At minimum, have a helper to support panels and move heavy parts. For roll-up or large wooden doors, professional help is best.
Do I Need A Permit To Remove A Garage Door?
Usually, you do not need a permit to remove a garage door in most areas. However, if you are making structural changes or installing a new door, local building codes may require one. Check with your city before starting.
What Do I Do With The Old Garage Door Hardware?
If the hardware is in good shape, you can reuse it for the new door or keep it as spare parts. Otherwise, most metal hardware can be recycled. Some installers will take old hardware away for you.
How Long Does It Take To Remove A Garage Door?
For two people with basic tools, removing a typical residential garage door takes 2–4 hours. Roll-up or custom doors can take longer. Having the right tools and preparation speeds up the process.
Removing a garage door is a big project, but with the right approach, it’s manageable for most homeowners. Take your time, stay safe, and don’t hesitate to ask for help. Whether you’re making room for a new door or turning your garage into something new, careful removal means fewer problems down the road.