Now Reading: How to Reprogram a Genie Garage Door Opener Remote Easily
- 01
How to Reprogram a Genie Garage Door Opener Remote Easily
If you own a garage, your Genie garage door opener remote is a small device that brings big convenience. With one press, you can open or close your garage without leaving your car. But like any electronic gadget, remotes sometimes stop working, get lost, or need to be synced with a new opener. If you ever find yourself in this situation, knowing how to reprogram your Genie remote will save you time, money, and frustration.
Many people feel nervous about reprogramming a remote, worrying it’s complicated or requires a professional. The good news is, most Genie remotes are designed for homeowners to program themselves—no special skills needed. With a bit of guidance, you can do it in less than 10 minutes.
This guide will show you all the steps, cover different Genie models, and share practical tips that even experienced users sometimes overlook.
Let’s explore how to reprogram a Genie garage door opener remote, from understanding your system to detailed programming steps, troubleshooting, and safety advice. By the end, you’ll be ready to handle this essential garage task with confidence.
Understanding Your Genie Garage Door Opener System
Before you start, it’s important to know a bit about the system you’re working with. Genie has made garage door openers for decades, and their remotes have changed over time. Knowing your model and its features makes the process smoother and helps you avoid mistakes.
Common Genie Remote Types
Genie remotes come in several shapes and sizes. Here are the main types:
- Genie Intellicode remotes – These use rolling code technology for security. The code changes each time you press the button.
- Genie fixed code remotes – Older models use DIP switches to set a fixed code. Less secure, but still in use.
- Genie 3-button remotes – Can control up to three openers or doors.
- Genie 1-button remotes – Designed for single garage doors.
- Genie wireless keypads – Mounted outside the garage, allow access via a PIN.
Most newer Genie remotes use Intellicode technology. If your remote or opener was made after 1995, it’s likely Intellicode.
Finding Your Opener Model And Remote Type
You can usually find your opener’s model number on a sticker on the motor unit (hanging from the garage ceiling). The remote’s model is often on the back or inside the battery compartment.
Knowing your model helps you find the right instructions. Genie’s official website also lists manuals for most models if you need more details.
Why Reprogram Your Genie Remote?
There are several reasons you might need to reprogram:
- Lost or stolen remote – Prevent someone from accessing your garage.
- Replacing batteries – Some remotes lose their programming when the battery is removed.
- New remote – Adding a second or third remote to your system.
- Malfunctioning remote – Resetting can fix many problems.
Understanding these basics gives you a solid start before you begin.
Preparing To Reprogram Your Genie Remote
Good preparation makes the process easier and safer. Before you start, follow these steps:
Gather The Right Tools
You don’t need many tools, but having these ready will help:
- A small ladder (if your opener is mounted high)
- A flashlight (garages can be dark)
- New batteries for your remote (low power can cause programming to fail)
- Your remote control
- Access to your garage door opener motor unit
Ensure Safety
Safety is often overlooked. Always:
- Make sure no people, pets, or objects are in the garage door’s path.
- Disconnect power only if your model requires it (most programming is done with power on).
- Stand on a sturdy ladder, not furniture or boxes.
Clear Old Remotes (if Needed)
If you lost a remote or want to erase all remotes, you can clear the opener’s memory. This step isn’t always needed, but it’s smart if you want full control.
To clear all remotes: Press and hold the Learn button on your opener until the indicator light turns off (usually about 10 seconds). This erases all remotes and keypads.
How Genie Garage Door Openers Store Remote Codes
Genie openers have a small memory chip inside. Each remote is programmed with a unique code. When you press the button, the opener checks if the code matches.
- Intellicode openers store many remote codes (typically up to 7-10).
- Fixed code openers use DIP switches to set the code. You match the switches in the remote and the opener.
If the memory is full, you’ll need to erase a remote before adding a new one.
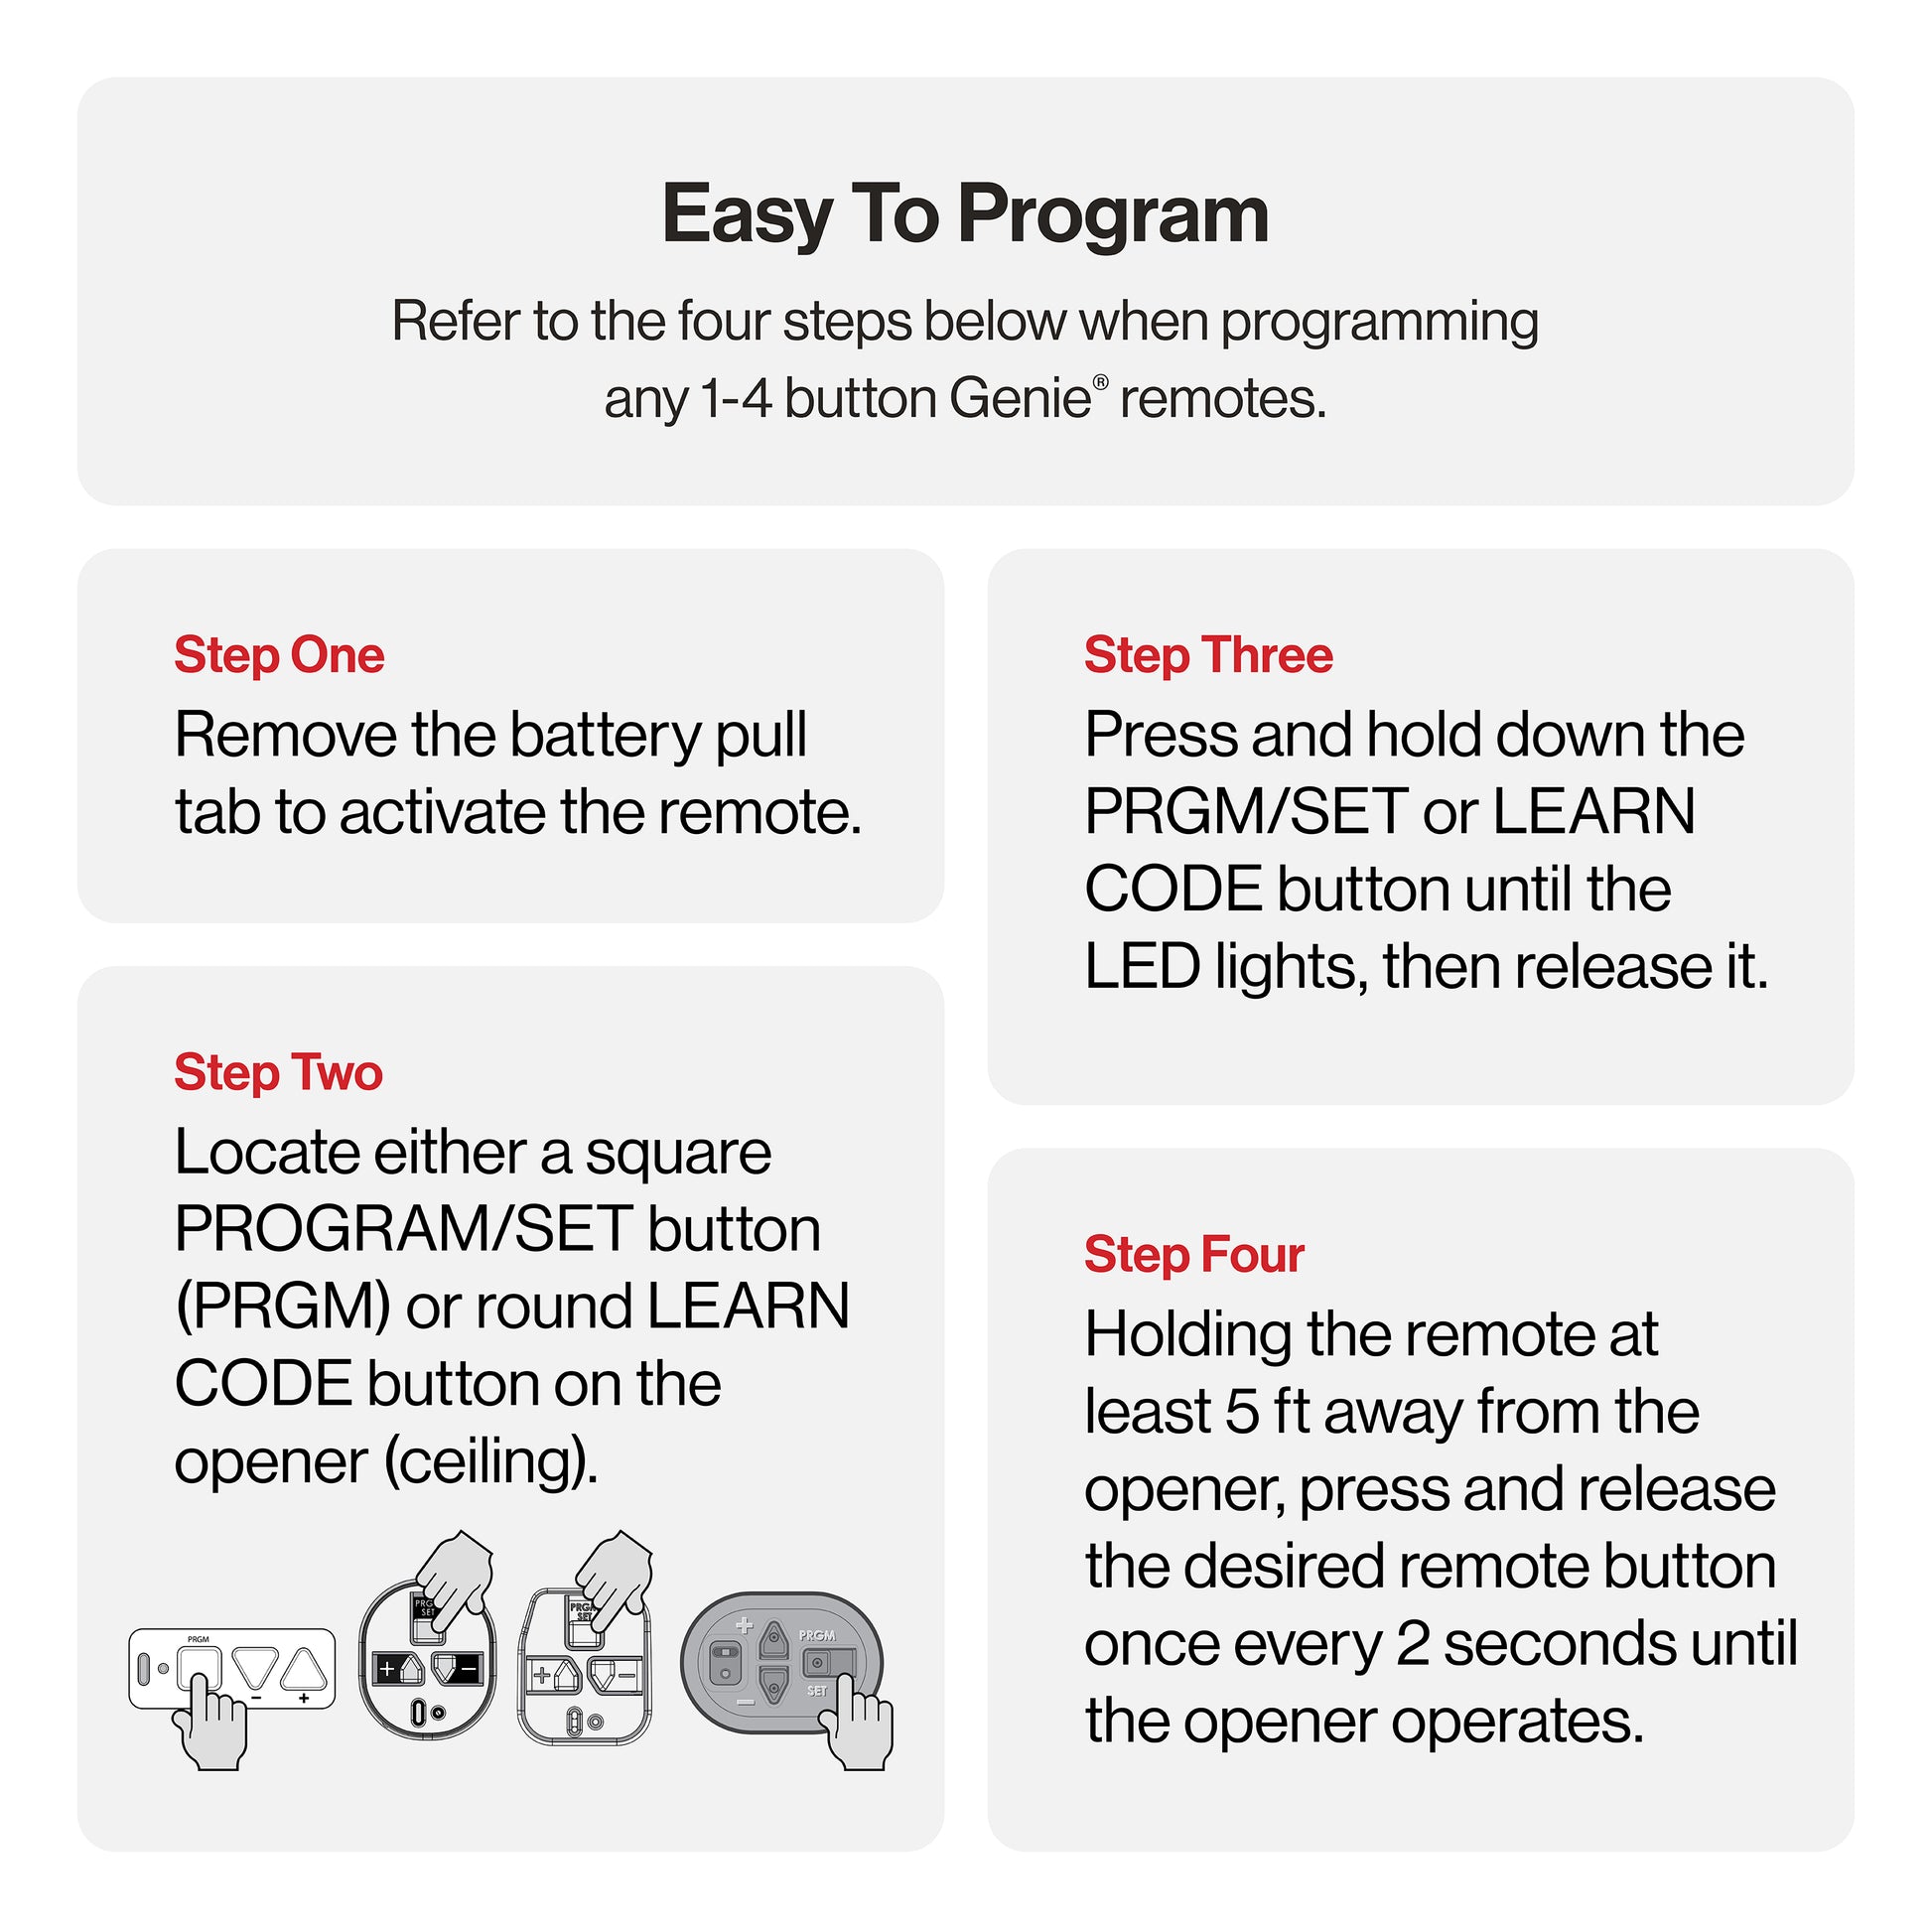
Step-by-step: How To Reprogram A Genie Garage Door Opener Remote
Now, let’s get into the main process. These steps cover the most common Genie Intellicode remotes. If your remote uses DIP switches, see the special section further down.
1. Locate The Learn Button
The Learn button (sometimes called “Program” or “Set”) is usually on the back or side of the opener’s motor unit.
- It may be under a light cover.
- Often colored (red, purple, black, green).
- Near a small LED light.
If you can’t find it, check your opener’s manual or look for a label.
2. Prepare Your Remote
- Make sure the batteries are fresh.
- If possible, clear your remote’s old programming by holding the button for 10 seconds (not all models require this).
3. Press The Learn Button
- Press and release the Learn button on the opener. The LED will light up (some models blink).
- You now have 30 seconds to program the remote.
4. Press The Remote Button
- Within 30 seconds, press the button on your remote you want to program (usually the large button).
- Hold for 2-3 seconds, then release.
- The opener’s light may blink or you’ll hear a click—this means programming was successful.
5. Test The Remote
- Wait a few seconds.
- Press the remote’s button again to see if the door moves.
- If it doesn’t work, repeat the steps. Sometimes it takes two tries.
6. Program Additional Remotes
Repeat steps 3-5 for each additional remote. You don’t need to erase the others; Genie openers can remember several remotes at once.
7. Reprogram Keypads (optional)
If you use a Genie keypad, you’ll need to reprogram it as well. Keypads usually have their own “Learn” button sequence. Follow your keypad’s manual or Genie’s instructions.
Non-obvious tip: After programming, wait 1-2 minutes before testing all remotes. Some openers need a short reset time.
Special Instructions For Genie Fixed Code Remotes (dip Switches)
Older Genie remotes use DIP switches to set a fixed code. If your remote has little switches inside, follow these steps:
- Open your remote’s battery cover.
- Find the row of DIP switches (often 9 or 12).
- Set each switch to match the switches in your opener’s motor unit (or external receiver).
- Close the cover, press the button, and test.
This method is simple, but less secure than Intellicode. If you have a choice, upgrade to a newer remote for better security.
Troubleshooting Programming Problems
Even with clear steps, things can go wrong. Here’s how to solve the most common issues.
Remote Won’t Program
- Check batteries – Even new batteries can be weak; try another set.
- Distance – Stand within 3-5 feet of the opener during programming.
- Memory full – Too many remotes? Clear the opener’s memory and start fresh.
- Wrong model – Not all remotes work with all openers. Check compatibility.
Door Opens But Won’t Close (or Vice Versa)
- Safety sensors – Genie openers use beam sensors at the bottom of the door. If misaligned or blocked, the door may only open or close.
- Wiring issues – Check for loose wires at the opener or wall button.
Remote Works Only Sometimes
- Interference – LED lights, Wi-Fi routers, or other electronics can block signals. Try moving these devices.
- Weak batteries – Even a slightly low battery can cause random failures.
Programming More Than One Door
If you have multiple Genie openers, you can program one remote to operate all of them. Here’s how:
- Program the first button to opener #1.
- Repeat the steps above, but use a different button for opener #2 (and so on).
Non-obvious tip: Label your remotes or buttons for clarity—especially if you share with family members.
Data Comparison: Genie Remote Models And Compatibility
Choosing the right remote is crucial. Here’s a quick comparison of popular Genie remote models and which openers they work with.
| Remote Model | Compatible Openers | Number of Buttons | Programming Method |
|---|---|---|---|
| G3T-R (Intellicode) | All Intellicode (1995+) | 3 | Learn Button |
| G1T-BX | Intellicode | 1 | Learn Button |
| GITR-3 | Intellicode | 3 | Learn Button |
| GT90-1 | Fixed Code (DIP switches) | 1 | DIP Switches |
| GWK (Wireless Keypad) | Intellicode | Keypad | Learn Button + PIN |
This table makes it easier to match your remote to your opener and avoid compatibility headaches.
Step-by-step: Programming A Genie Wireless Keypad
Many homes use a Genie wireless keypad for easy access without a remote. Here’s how to program or reprogram it:
- Locate the Learn Button on your opener (same as for a remote).
- Press and release the Learn Button. The LED will light.
- Within 30 seconds, enter your chosen PIN on the keypad, then press the “Up/Down” or “#” key.
- The opener light will blink or you’ll hear a click—this means success.
- Test your PIN by entering it again and pressing “Up/Down” or “#”.
Tip: Some Genie keypads allow you to set temporary PINs. This is great for visitors or deliveries.
Data Table: Genie Opener Memory And Remote Limits
Different Genie openers have different limits on how many remotes (or keypads) they remember. Here’s a quick reference.
| Opener Model | Memory Limit (Remotes/Keypads) | Programming Button Name |
|---|---|---|
| Genie SilentMax 1000 | 7 | Learn |
| Genie Chain Drive 500 | 7 | Learn |
| Genie Excelerator | 8 | Learn |
| Genie ProMax | 7 | Learn |
| Genie Blue Max (DIP) | N/A (DIP Switch) | DIP Switches |
If you reach your opener’s memory limit, you’ll need to erase all remotes and reprogram only the ones you want.
Advanced Tips For Reliable Programming
Even experienced users miss some advanced techniques that make remote programming easier and more secure.
1. Update Firmware (if Possible)
Some newer Genie openers allow for firmware updates. Check your opener’s manual or Genie’s website. Updated firmware can fix bugs and improve remote compatibility.
2. Avoid Interference During Programming
Programming remotes near strong radio signals (like Wi-Fi routers, LED bulbs, or even your car’s keyless entry) can sometimes interfere. Turn off these devices if you have trouble.
3. Test At Multiple Distances
After programming, test your remote from both inside and outside your garage. Signal range can be affected by metal doors, walls, or even the car itself.
4. Record Your Codes
Write down your remote model numbers and programming steps in a notebook or your phone. If you need to reprogram in the future, you’ll save time.
5. Use Genie’s Official Support
If you run into a problem you can’t solve, Genie’s support website offers manuals and troubleshooting guides for every model. You can find official Genie support at Genie Company Support.
Common Mistakes To Avoid
Programming a Genie remote is simple, but these mistakes are common:
- Skipping the Learn Button – Some users try to program the remote without pressing the opener’s Learn button. This step is required for Intellicode models.
- Wrong Remote Model – Not all remotes work with all openers. Check compatibility before buying a new remote.
- Low Batteries – Programming with weak batteries can cause the remote to fail, even if it seems to work at first.
- Not Clearing Old Remotes – If you lose a remote, always erase all remotes from the opener’s memory for security.
- Rushing Steps – You usually have 30 seconds to program, but don’t rush. Follow each step carefully for best results.
Security Tips For Genie Remotes
Garage security is important—your garage often leads right into your home. Here’s how to keep your Genie system safe:
- Erase lost or stolen remotes immediately.
- Don’t share your PIN for keypads with anyone you don’t trust.
- Upgrade to Intellicode remotes if you use older DIP switch models.
- Keep remotes out of sight in your car.
- Regularly test and update your remotes and keypads.
Non-obvious insight: Garage door openers are a common target for burglars. Rolling code remotes like Intellicode are much safer than fixed code types.
When To Call A Professional
While most people can reprogram a Genie remote themselves, some situations may require professional help:
- Physical damage to the opener or remote.
- Electrical wiring issues (sparks, burning smells, etc. ).
- Programming doesn’t work after several careful tries.
- Upgrading to a smart opener (Wi-Fi/app control).
Professionals can solve complex issues and ensure your system stays safe.
Genie Remotes And Smart Home Integration
Modern Genie openers can connect to smart home systems. Some models work with apps like Aladdin Connect, Amazon Alexa, or Google Home. If you want to control your garage from your phone, look for Genie openers with Wi-Fi or buy a Genie smart controller.
Programming a remote for a smart opener usually uses the same steps, but you may also need to set up the smart app and link your account.

Data Table: Genie Remotes Vs. Other Brands
Here’s how Genie remotes compare with other popular brands.
| Brand | Security Technology | Max Remotes | Programming Method | Smart Features |
|---|---|---|---|---|
| Genie | Intellicode | 7-10 | Learn Button | Optional (Aladdin Connect) |
| Chamberlain/LiftMaster | Security+ 2.0 | 8-12 | Learn Button | MyQ App |
| Craftsman | Security+ | 7-10 | Learn Button | Some models |
| Overhead Door | CodeDodger | 7-10 | Learn Button | Optional |
Genie’s Intellicode system is respected for reliability and security, but if you want more advanced smart features, compare brands before buying a new opener.
Frequently Asked Questions
How Do I Reset My Genie Garage Door Opener Remote If I Lost It?
If you lose a Genie remote, press and hold the Learn button on your opener for about 10 seconds until the LED turns off. This erases all remotes from the memory. Then, reprogram only the remotes you still have. This prevents anyone with the lost remote from accessing your garage.
Can I Program A Universal Remote To My Genie Garage Door Opener?
Many universal remotes work with Genie openers, but you must check compatibility. Look for Intellicode support if your opener is newer. Programming steps are similar: use the Learn button and follow the universal remote’s instructions.
Why Won’t My Genie Remote Work After Replacing The Battery?
Some Genie remotes lose their programming when the battery is removed. If this happens, repeat the programming steps using the Learn button. Also, double-check the battery is installed correctly and is fresh.
How Many Remotes Can I Program To My Genie Opener?
Most Genie openers allow 7-10 remotes and keypads. If you reach the limit, you must erase all remotes and reprogram only the ones you want. Check your opener’s manual for the exact number.
What Should I Do If My Genie Remote Works Only From Very Close To The Garage?
A weak signal is often caused by low batteries, interference from other electronics, or metal objects blocking the signal. Change the batteries, move any nearby electronics, and test from different angles. If the problem continues, consider replacing the remote.
Reprogramming your Genie garage door opener remote is a simple but important task for every homeowner. With the right steps, clear safety habits, and a bit of patience, you can keep your garage secure and convenient. If you ever feel unsure, Genie’s official guides and support team are just a click away.


