Now Reading: How to Change Battery in Liftmaster Garage Door Remote Easily
- 01
How to Change Battery in Liftmaster Garage Door Remote Easily
Changing the battery in your LiftMaster garage door remote might seem like a small task, but it’s often the key to keeping your garage accessible and your daily routine smooth. Many people put off replacing the battery until the remote stops working completely.
By then, it might be late at night or during bad weather—never a good time. Knowing how to change the battery yourself can save you time, frustration, and even money. This guide will walk you through everything you need to know, from identifying your remote model to troubleshooting after battery replacement.
You’ll also learn practical tips, common mistakes to avoid, and answers to questions most owners have.
Why Changing Your Liftmaster Remote Battery Matters
A working garage door remote is more than a convenience; it’s part of your home’s security. When the battery is weak, you might notice your remote works only when you’re close to the door or stops working at random times. Ignoring these signs can leave you locked out or, in rare cases, unable to secure your garage. Regular battery changes keep your remote reliable and extend its life.
Some newer LiftMaster remotes use rolling code technology for better security. A dead battery doesn’t just mean inconvenience—it can sometimes cause your remote to lose its programming. Changing the battery the right way helps prevent this.
Understanding Your Liftmaster Remote
Before you start, it’s important to know what kind of LiftMaster remote you have. There are several models, and the battery type and replacement method can vary.
Common Liftmaster Remote Models
Here are a few popular models you might have:
- 371LM/373LM/375LM: Small, oval, one or three buttons.
- 890MAX/893MAX/895MAX: Features ‘MAX’ in the model, usually with three buttons.
- 974LM/972LM: Older, larger models with a sliding cover.
- Keychain remotes (e.g., 370LM): Small, portable design.
You can find your remote’s model number on the back of the device or inside the battery compartment.
Types Of Batteries Used
Most LiftMaster remotes use either a coin cell (like CR2032 or CR2016) or a 9V alkaline battery. Newer models almost always use coin cells, while some older remotes use 9V batteries. Using the wrong battery can damage your remote or cause poor performance.
Here’s a quick comparison of common LiftMaster batteries:
| Battery Type | Common Models | Average Lifespan |
|---|---|---|
| CR2032 | 371LM, 893MAX, 890MAX | 2-3 years |
| CR2016 | 375LM, 370LM | 2 years |
| 9V | 974LM, 972LM | 3-5 years |
Non-obvious insight: Many owners don’t realize using a higher quality battery (like Energizer or Duracell) can make your remote last longer and work more reliably, especially in extreme temperatures.
How To Identify When Your Remote Battery Needs Replacing
You don’t have to wait until your remote stops working completely. Here are common signs that your garage door remote battery is weak:
- Short Range: You need to be much closer to the garage door for the remote to work.
- Intermittent Response: Sometimes it opens the door, sometimes it doesn’t.
- Button Light Fades: The LED on your remote is dim or doesn’t light up at all.
- Multiple Clicks Needed: You have to press the button several times before anything happens.
Pro tip: If your remote is slow to respond or only works in certain weather, try replacing the battery before assuming the remote is broken.
Tools And Supplies You’ll Need
Changing a battery in a LiftMaster remote doesn’t require special tools, but having the right supplies helps avoid damage.
- Small flat-head screwdriver or coin (for prying open the case)
- Replacement battery (check the exact type needed)
- Clean cloth (for handling the battery)
- Pen or tweezers (to gently remove the old battery)
Avoid using sharp knives or metal objects that could scratch or break the plastic case.
Step-by-step Guide: Changing The Battery In Liftmaster Remotes
Different remotes have slightly different designs, but the general process is similar. Let’s break it down so you can follow along easily.
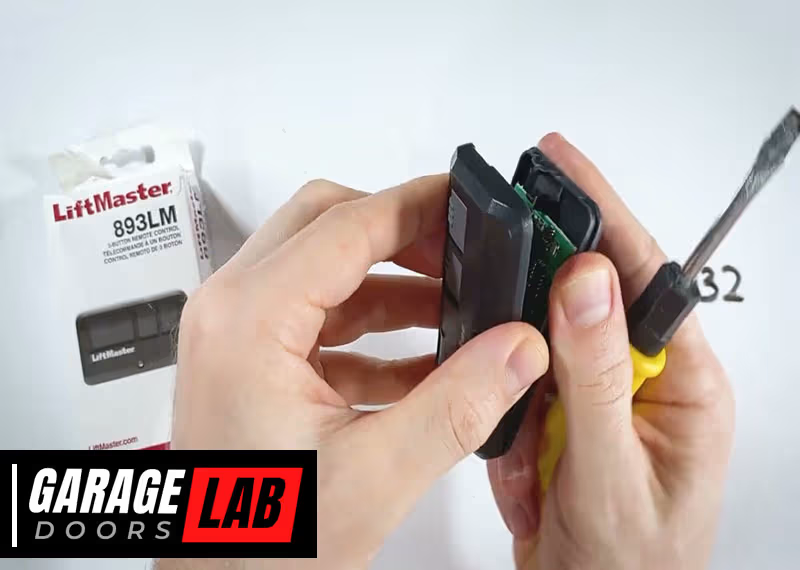
Step 1: Open The Remote Case
Most LiftMaster remotes have a small notch or seam on the side or back.
- For coin cell remotes (e.g., 371LM, 893MAX): Insert a small flat-head screwdriver or coin into the notch. Twist gently until the case pops open. Be careful not to crack the plastic.
- For 9V battery remotes (e.g., 974LM): Slide the battery cover off. Sometimes you’ll need to remove a small screw first.
Non-obvious insight: If your remote has a sliding cover, slide it all the way before trying to open the battery compartment. Forcing it can break the latch.
Step 2: Remove The Old Battery
Gently lift the battery out. If it’s a coin cell, use a pen or tweezers to avoid touching the battery contacts with your fingers (skin oils can cause corrosion).
Caution: Note the battery orientation (which side is up). Most coin cells have the + side facing up, but double-check.
Step 3: Insert The New Battery
Place the new battery in the same position as the old one. For coin cells, the + symbol should match the markings inside the compartment. For 9V batteries, align the terminals correctly.
- Push the battery in gently until it clicks or sits flat.
- Avoid bending the contacts.
Step 4: Close The Remote Case
Snap the case back together or slide the cover on. If there was a screw, replace it. Make sure the case is fully closed to keep dust and moisture out.
Step 5: Test The Remote
Stand a short distance from your garage door and press the button. The LED should light up brightly, and the door should respond immediately.
If the remote does not work, double-check:
- The battery is installed correctly (right way up).
- The battery is new and not expired.
- The contacts inside are clean (wipe with a dry cloth if needed).
Special Instructions For Popular Liftmaster Remotes
Let’s look at specific instructions for the most common models.
371lm / 373lm / 375lm
- Uses a CR2032 battery.
- Open the case by prying at the notch on the side.
- Insert the battery with the + side up.
- Snap the case closed firmly.
890max / 893max / 895max
- Uses a CR2032 battery.
- Slide the battery cover down to reveal the battery.
- Remove the old battery and insert the new one with the + side up.
- Slide the cover back into place.
370lm (keychain Remote)
- Uses a CR2016 battery.
- Remove the key ring if needed.
- Pry open the case at the seam with a small screwdriver.
- Replace the battery and snap the case closed.
974lm / 972lm
- Uses a 9V battery.
- Slide off the back cover or remove the screw if present.
- Pull out the old battery and insert the new one, matching the terminals.
- Replace the cover or screw.
Note: Some rare LiftMaster remotes use AA or AAA batteries. Check the inside of the remote for instructions.
Tips For Choosing The Right Replacement Battery
Not all batteries are created equal. Here’s what to look for:
- Correct type: Double-check your remote’s instructions or the old battery.
- Freshness: Batteries have an expiration date—use one that’s at least a year from now.
- Brand: Stick with reliable brands like Duracell, Energizer, or Panasonic for best results.
- Avoid rechargeable coin cells: These can sometimes provide the wrong voltage.
| Brand | Average Price (US) | Typical Lifespan | Leak Risk |
|---|---|---|---|
| Duracell | $3.50 | 3 years | Low |
| Energizer | $3.30 | 3 years | Low |
| Generic | $1.50 | 1-2 years | Medium |
How To Dispose Of Old Batteries Safely
Don’t throw old batteries in the trash. Coin cells and 9V batteries can be recycled at most electronics or hardware stores. Improper disposal can harm the environment and, in some cases, cause fires (especially with 9V batteries).
- Place tape over the terminals of 9V batteries before recycling.
- Store old batteries in a dry, cool place until you can recycle them.
For more information on battery recycling, check local regulations or visit the EPA’s website.
What To Do If Your Remote Still Doesn’t Work
If your LiftMaster remote does not work after replacing the battery, try these steps:
- Check the battery orientation: Make sure the + and – sides are correct.
- Clean the contacts: Corrosion or dirt can block the connection. Wipe gently with a dry cloth.
- Reprogram the remote: Sometimes, especially with older remotes, you’ll need to reprogram after a battery change.
- Press the “Learn” button on your garage door opener (usually on the main unit in your garage).
- Press the remote button within 30 seconds.
- The opener light should blink, confirming programming.
- Test with another battery: Occasionally, a new battery is defective.
- Try a different remote: If a second remote works, your first remote might be faulty.
Expert tip: If your remote gets wet or is dropped, it may need to dry out fully before working again. Remove the battery and let it air-dry for a day.
Common Mistakes To Avoid
Many people damage their remotes or waste money by making the following mistakes:
- Forcing the case open: This can crack the plastic or break the internal contacts.
- Using the wrong battery type: Even one digit off (like CR2025 instead of CR2032) can lead to problems.
- Touching contacts with fingers: Oil from your skin can cause corrosion over time.
- Not checking orientation: Installing the battery upside down means the remote won’t work.
- Forgetting to test before closing: You can test the remote with the case open (carefully) before snapping it shut.
How Often Should You Change The Battery?
Most LiftMaster remote batteries last 2–3 years, but it’s smart to replace them every 18–24 months, especially if you live in a cold or hot climate. Extreme temperatures can shorten battery life. If you have more than one remote, change all the batteries at the same time for convenience.
Keeping Your Remote In Good Condition
A little care goes a long way. Here’s how to make your LiftMaster remote last:
- Store in a dry place: Avoid leaving it in a car dashboard or outside.
- Clean regularly: Wipe the buttons and case with a soft cloth.
- Avoid dropping: The internal circuit board can crack if dropped.
- Replace battery promptly: Don’t wait until the remote stops working.

Credit: diy.stackexchange.com
When To Replace The Remote Instead Of The Battery
If you’ve changed the battery and the remote still doesn’t work, it may be time for a new one. Signs you need a new remote:
- Buttons are stuck or missing.
- Case is cracked or water has gotten inside.
- The remote is more than 10 years old.
- The LED does not light up with a fresh battery.
New remotes can be purchased online or at hardware stores. Make sure to get one compatible with your garage door opener.
Comparing Liftmaster Remotes: Features That Affect Battery Life
Not all remotes are the same. Here’s a look at how features can affect battery life and replacement frequency:
| Model | Number of Buttons | Battery Used | Battery Life Expectancy | Special Features |
|---|---|---|---|---|
| 371LM | 1 | CR2032 | 2-3 years | Basic |
| 893MAX | 3 | CR2032 | 2 years | Multi-door control |
| 974LM | 4 | 9V | 3-5 years | Sliding cover, older technology |
Tip: Remotes with more buttons or extra features may use more battery power.

Credit: www.youtube.com
Troubleshooting: Special Situations
Sometimes you face unique challenges. Here’s guidance for a few:
My Remote Was In Water
- Remove the battery immediately.
- Dry the case and battery compartment with a soft cloth.
- Let the remote air-dry for at least 24 hours before inserting a new battery.
My Remote Is Lost Or Stolen
- Reset your garage door opener by pressing and holding the “Learn” button for 6 seconds. This erases all remote codes.
- Program new remotes as needed.
My Remote Works But Only Sometimes
- Change the battery first.
- Check for interference from LED lights or other electronics.
- Move closer to the garage door opener.
Should You Use A Professional?
Most battery changes are easy to do yourself. However, consider professional help if:
- Your remote is stuck or won’t open easily.
- You’re unsure about the battery type.
- The remote does not work after several attempts.
Many garage door professionals offer quick remote battery replacement for a small fee. In rare cases, the opener itself may need service.
Credit: heritagedoor.com
Safety Precautions
- Always keep coin cell batteries out of reach of children and pets—swallowing them is dangerous.
- Don’t mix old and new batteries in the same remote.
- Dispose of batteries properly.
For more information on battery safety, see the US Consumer Product Safety Commission.
Frequently Asked Questions
How Do I Know Which Battery My Liftmaster Remote Uses?
Check the back of your remote or inside the battery compartment for a label. Most LiftMaster remotes use CR2032 or CR2016 coin cell batteries. Older or larger remotes may use a 9V battery. If you’re unsure, look up your remote’s model number online or consult your user manual.
Will I Need To Reprogram My Remote After Changing The Battery?
Usually, you do not need to reprogram your remote after a battery change, especially with modern LiftMaster remotes. However, if your remote loses its programming, follow your garage opener’s instructions to re-sync it. This usually involves pressing the Learn button on the opener unit and then the remote button.
How Long Does A New Battery Typically Last In A Liftmaster Remote?
A fresh, high-quality battery lasts 2 to 3 years in most LiftMaster remotes. If you use your remote often, live in a very cold or hot climate, or use a generic brand, it might last a bit less. Replace all remote batteries every 18–24 months for best reliability.
Can I Use Rechargeable Batteries In My Liftmaster Remote?
It’s best not to use rechargeable coin cell batteries in your LiftMaster remote. They often provide lower voltage and may not fit correctly. Always use non-rechargeable, high-quality batteries of the exact type recommended by LiftMaster.
What Should I Do If My Remote Still Doesn’t Work After Changing The Battery?
First, check the battery orientation and ensure the contacts are clean. Try another new battery if possible. If the remote still fails, try reprogramming it to your opener. If it still doesn’t work, the remote may be faulty and need replacement.
Changing the battery in your LiftMaster garage door remote is a simple job that keeps your home secure and your daily routine running smoothly. With the right tools, a little care, and the information above, you’ll be able to handle this task confidently.
Save time, avoid frustration, and keep your garage working—all with a fresh battery in your remote.


