Now Reading: How to Wire Garage Door Sensors: Step-by-Step Guide
- 01
How to Wire Garage Door Sensors: Step-by-Step Guide
Wiring garage door sensors may sound technical, but it is a project most homeowners can handle with the right guidance. These small safety devices stop your garage door from closing if something—or someone—is in the way. This not only prevents property damage but, more importantly, protects children and pets from injury.
Whether you’re replacing faulty sensors or installing new ones, understanding every step is essential for safety and smooth operation.
Many people struggle with wiring garage door sensors because the wiring seems confusing. Wires look similar, instructions are not always clear, and mistakes can make your garage door stop working. But with some patience and careful planning, you can complete this task—even if you’re not an expert in electrical work.
This detailed guide will walk you through how to wire garage door sensors from start to finish. You’ll learn what tools you need, how the sensors work, how to troubleshoot issues, and key safety tips. Along the way, you’ll also find tables comparing sensor types and common wiring mistakes, plus practical advice most beginners miss.
Let’s get started on making your garage safer and more reliable.
Understanding Garage Door Sensors
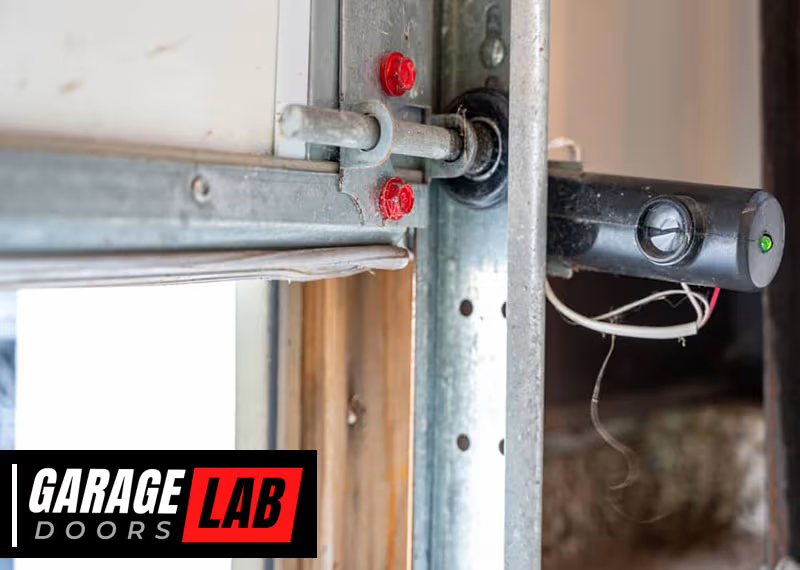
Garage door sensors, often called photo-eye sensors, are a critical safety feature. They use an invisible beam of light between two units—one on each side of the door, near the ground. When something blocks this beam, the sensor tells the garage door opener to stop closing or reverse direction.
How Sensors Work
One unit emits an infrared beam, while the other receives it. If the beam is interrupted, the circuit is broken, and the door won’t close. This system protects against accidents that could cause injury or damage.
Types Of Garage Door Sensors
Most modern garage door openers use similar sensors, but there are some differences. Here’s a comparison:
| Type | How it Works | Compatibility | Common Brands |
|---|---|---|---|
| Photo-Eye Sensors | Infrared beam between two units | Most modern openers | Chamberlain, LiftMaster, Genie |
| Pressure Sensors | Senses pressure under the door | Older/Commercial systems | Some older models |
| Wireless Sensors | Infrared, but no wires to opener | Specific models only | Newer Chamberlain, Craftsman |
Most homes use photo-eye sensors, which are wired. Wireless types are rare in residential settings.
Why Correct Wiring Matters
Wiring the sensors correctly ensures the safety system works. Wrong wiring can:
- Stop your garage door from closing
- Trigger constant error beeps or lights
- Disable the auto-reverse function
That’s why following the right process is so important.
Tools And Materials You’ll Need
Before starting, collect all the tools and materials. Missing tools often cause frustration and mistakes.
Essential tools:
- Screwdrivers (Phillips and flat-head)
- Wire stripper/cutter
- Electrical tape
- Drill and drill bits (if mounting new brackets)
- Level (to align sensors)
- Ladder
Materials:
- Replacement sensors (if needed)
- Sensor brackets and mounting hardware
- Garage door opener wiring (usually 22-24 gauge, two-conductor)
- Wire connectors (wire nuts or quick connectors)
- Zip ties or clips (to secure wires)
Pro Tip: Always check your garage door opener’s manual for any tool or wire size recommendations. Using incorrect wire gauge can cause issues.
Safety Precautions Before You Begin
Electrical work is safe if you follow basic rules. Here’s what to do before wiring garage door sensors:
- Unplug the garage door opener. Never work on wiring while the power is on.
- Clear the garage door area. Move cars, bikes, and objects away for space and safety.
- Wear safety glasses if you’re drilling or cutting.
- Double-check wiring diagrams for your specific opener. Some models have unique wiring colors or terminals.
Insight: Many beginners forget to unplug the opener, which can lead to short circuits or electric shock. Always disconnect power first.
Step-by-step: How To Wire Garage Door Sensors
Let’s get into the process. These steps cover most standard wired photo-eye sensors, but always refer to your opener’s manual for specific instructions.
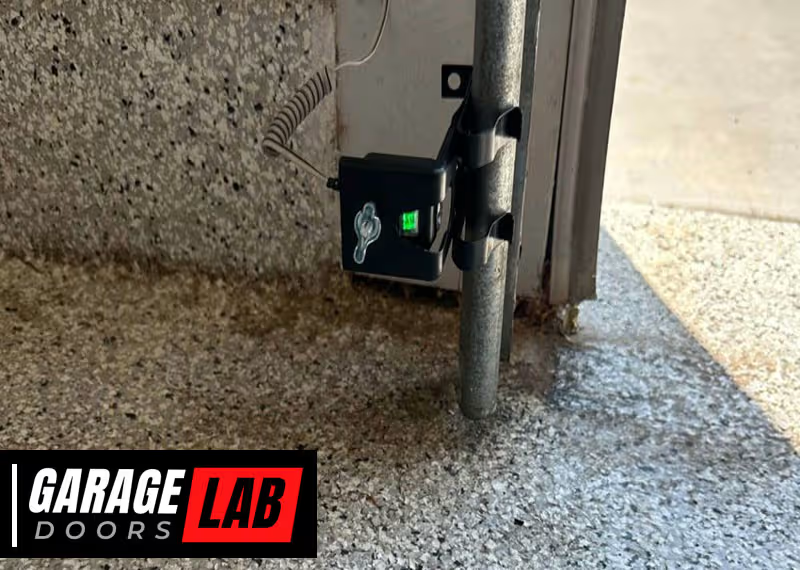
1. Identify Sensor Locations
Sensors should be installed on both sides of the garage door, about 6 inches above the floor. This height is ideal for detecting small children or pets.
- If you have existing brackets, check if they are still sturdy.
- If new brackets are needed, use a level to ensure sensors are straight across from each other.
Common Mistake: Mounting sensors too high can let objects pass under the beam undetected.
2. Mount The Sensors
- Attach the sensors to the brackets using the provided screws.
- Do not fully tighten yet—leave them a little loose for easy alignment later.
3. Plan The Wiring Path
Route the wires from each sensor to the garage door opener motor unit (usually on the ceiling). Avoid sharp corners, moving parts, or places where wires could get pinched.
- Use zip ties or clips to keep wires neat and out of the way.
- If you need to drill holes for wire routing, double-check for pipes or cables behind the wall.
4. Prepare The Wires
Most sensors use two wires, often color-coded:
- White/white-striped (common)
- White/black-striped (signal)
- Use a wire stripper to remove about 1/2 inch of insulation from each wire end.
- Twist the bare wire strands gently for a better connection.
5. Connect Wires At The Sensor Side
- Match wire colors to the sensor’s terminals or wire leads.
- Use wire nuts or connectors to secure the connection.
- Wrap with electrical tape for extra safety.
Insight: Some older sensors have screw terminals; newer models use push-in connectors. If unsure, check your sensor’s label or manual.
6. Run Wires To The Opener
Carefully run both wires from each sensor up the wall, along the ceiling, and to the opener unit. Keep the wires away from any moving garage door parts.
- Combine the two white wires from each sensor together. Do the same for both white/black wires.
- You should have two bundles: One with all white, one with all white/black.
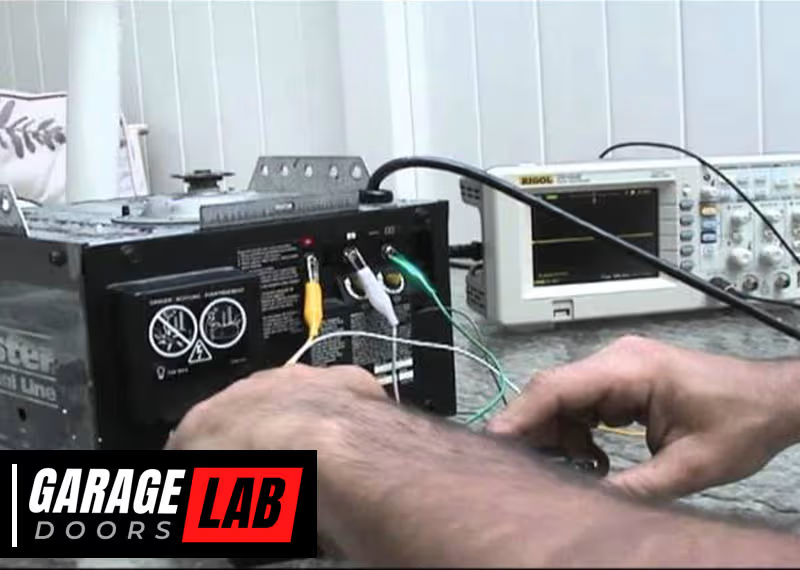
7. Connect Wires At The Opener
On the opener’s back or side panel, you’ll find terminals labeled “Sensor”, “Safety”, or sometimes “24V” and “COM”.
- Loosen the terminal screws.
- Insert the white wire bundle into the “Sensor” or “White” terminal.
- Insert the white/black wire bundle into the “Common” or “Black” terminal.
- Tighten the screws firmly.
Pro Tip: Some openers have a diagram inside the cover. Take a picture with your phone before connecting, in case you need to check later.
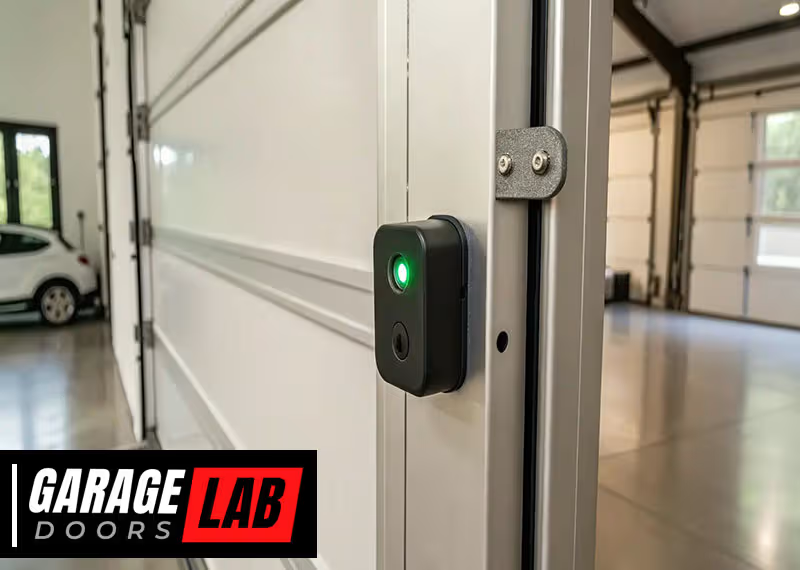
8. Align The Sensors
- Plug the opener back in.
- Check both sensors—each should have a solid green or amber indicator light.
- Adjust the sensor position until both lights are steady (not flickering).
- Tighten the mounting screws when aligned.
If one light is off or blinking, the beam is not aligned. Adjust until both lights stay on.
9. Test The System
- Close the garage door using the remote or wall button.
- Wave an object (like a broomstick) between the sensors as the door closes.
- The door should reverse direction immediately.
If the door does not reverse, unplug the opener, recheck all wiring and alignment, and try again.

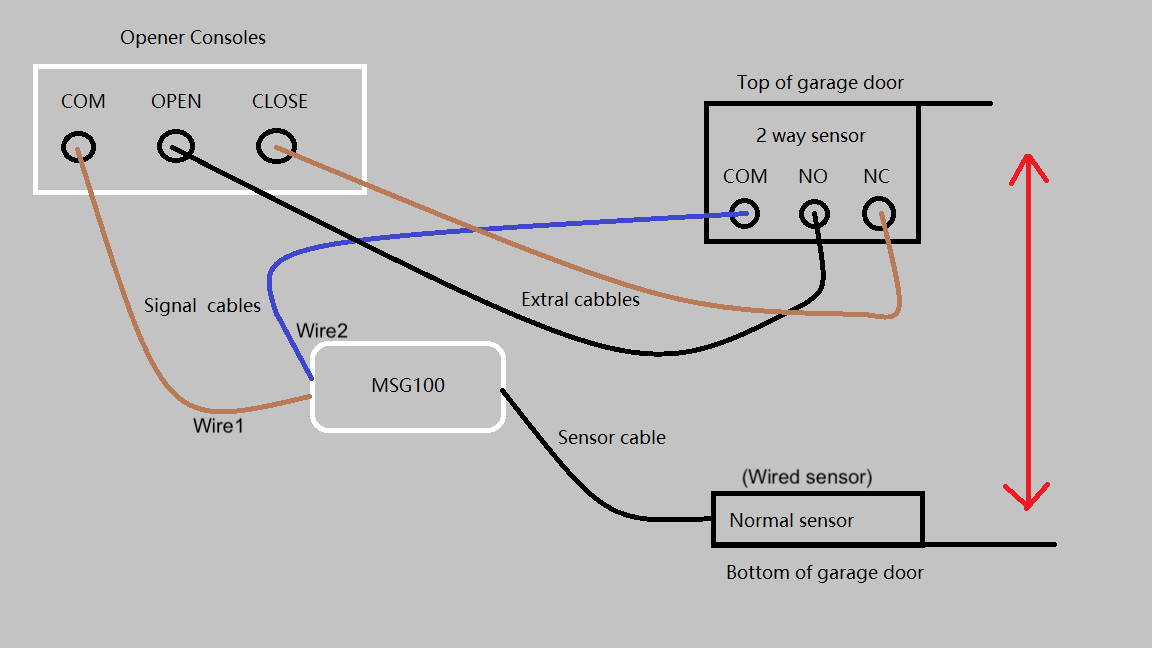
Wiring Diagram Example
Sometimes, a simple wiring diagram helps visualize the process. Here’s a typical setup for photo-eye sensors:
| Component | Wire Color | Connection Point |
|---|---|---|
| Left Sensor | White, White/Black | To opener terminals |
| Right Sensor | White, White/Black | To opener terminals |
| Opener Terminal | White | Sensor Terminal (or “White”) |
| Opener Terminal | White/Black | Common Terminal (or “Black”) |
Note: Your sensor wire colors might differ. Always check your manual.
Troubleshooting Common Sensor Wiring Problems
Even with careful wiring, issues can happen. Here are the most frequent problems and how to solve them.
1. Sensor Lights Not Turning On
- Check that the opener is plugged in.
- Make sure wires are securely connected to both sensors and the opener.
- Inspect wires for breaks, cuts, or pinching.
- Confirm the wiring matches the correct terminals.
2. Door Won’t Close (but Opens Fine)
- Sensors may be misaligned—indicator lights will blink or be off.
- Something could be blocking the sensor beam (dust, cobwebs, sunlight glare).
- Loose wire connections can cause signal loss.
Pro Tip: Sunlight directly hitting one sensor can interrupt the beam. Shield sensors from direct sun with a small cover if needed.
3. One Sensor Light Is Dim Or Off
- Swap the sensors left to right. If the problem follows the sensor, it’s faulty.
- If the problem stays on the same side, check the wire for damage or loose connection.
4. Sensors Are Working, But Door Still Reverses
- Check for obstructions on the garage floor.
- Adjust the downward travel limit on the opener—if the door hits the floor too hard, it may trigger reversal.
5. Door Only Closes When Holding The Wall Button
- This is a safety feature when the sensor circuit is open (broken beam or wiring).
- Double-check all connections and alignment.
Advanced Tips For A Reliable Installation
Wiring garage door sensors is more than just connecting wires. Here are advanced tips for a professional result.
Use The Right Wire Gauge
Most manufacturers recommend 22-24 gauge solid copper wire for sensors. Thicker wires are harder to work with and may not fit terminals.
Avoid Splicing Wires If Possible
Every extra splice is a place where a connection can fail. Run a single length of wire from each sensor to the opener if you can.
Mark Wires Before Disconnecting
If you’re replacing old sensors, label the wires before removing them. This avoids confusion during reassembly.
Secure Wires Neatly
Loose wires are easy to snag or damage. Use zip ties every few feet and avoid sharp bends.
Check Local Codes
Some regions require low-voltage wiring to be enclosed in conduit. Check with your local building office if you’re unsure.
When To Replace Vs. Rewire Sensors
Not all sensor problems are caused by wiring. Sometimes, the sensors themselves are faulty due to age, water damage, or impact.
Replace sensors if:
- The indicator lights never come on, even after new wiring
- The plastic lens is cracked or missing
- You see water or rust inside the unit
Rewire sensors if:
- The wires are brittle, chewed (rodents), or have many splices
- You’re upgrading to a new opener with different terminals
Expert note: Most garage door sensors are inexpensive ($15–$40 per pair), so replacing old ones is often worth it for peace of mind.
Comparing Wired Vs. Wireless Garage Door Sensors
A few newer garage door openers use wireless sensors. Here’s how they compare:
| Feature | Wired Sensors | Wireless Sensors |
|---|---|---|
| Reliability | Very high | Can be affected by interference |
| Installation | Requires running wires | Easier, no wires |
| Maintenance | Low | Battery replacement needed |
| Cost | Lower | Higher |
| Compatibility | Works with most openers | Only with certain models |
For most homes, wired sensors are the best choice due to reliability.
Mistakes To Avoid When Wiring Garage Door Sensors
Many first-time installers make avoidable errors. Avoid these common mistakes:
- Mixing up wire colors. Connecting wires to the wrong terminals will prevent operation.
- Not aligning sensors. Even a small misalignment can cause the door to malfunction.
- Forgetting to check for power. If the opener is unplugged, sensors won’t light up.
- Leaving wires loose. Unsecured wires can get caught or pulled.
- Skipping the test. Always test the sensors before finishing the job.
Hidden Insight: Sometimes, pets like cats can trigger sensor beams if they walk under the door at the wrong moment. Make sure the sensors are low enough to catch even small pets.

How Long Does It Take To Wire Garage Door Sensors?
For most people, wiring new sensors takes about 1–2 hours. If you’re replacing old sensors and using existing wiring, it can be as fast as 30 minutes.
Factors that affect time:
- Need to install new brackets or drill holes
- Condition of existing wiring
- Height of the garage ceiling (tall ceilings require a ladder)
- Opener brand and sensor compatibility
Tip: Take your time aligning the sensors. This small step prevents 90% of future problems.
Extra Safety Checks After Installation
Once you’ve wired and tested your sensors, perform these extra checks:
- Make sure both sensor lenses are clean (wipe with a soft cloth).
- Check that wires are not near springs, chains, or belts.
- Confirm the door reverses every time the beam is broken.
- Test with different objects (cardboard box, broomstick, etc. ).
Legal Note: In the US, garage door openers made after 1993 must have working safety sensors. Disabling them is against safety codes.
Upgrading Old Garage Door Openers
If your garage door opener is more than 20 years old, consider upgrading. New models have better safety features, quieter motors, and improved reliability.
Modern features include:
- Battery backup (so the door works during a power outage)
- Smartphone control via Wi-Fi
- LED lights for longer life
If you replace the opener, always install the sensors that come with the new unit. Mixing brands or models can cause compatibility issues.
Resource: For more about garage door opener safety standards, visit the Wikipedia article on garage door openers.
Frequently Asked Questions
What If My Garage Door Only Closes When I Hold The Wall Button?
This means the sensor circuit is open—either from miswiring, misalignment, or a blocked beam. Double-check all wiring connections and ensure the sensors’ lights are steady and not blinking. Clear any obstructions and realign as needed.
Can I Bypass Garage Door Sensors?
While it’s technically possible to bypass sensors, it is not safe and may be against local building codes. Sensors are required for safety to prevent injury or property damage. Always keep them installed and working.
How Do I Know Which Wire Goes Where?
Most sensors use a white wire and a white/black wire. Match these with the terminal markings on your opener (often “White” and “Black” or “Sensor” and “Common”). Consult your opener’s manual for specifics if colors differ.
Do All Garage Door Openers Use The Same Sensors?
No, sensors are often brand-specific and sometimes model-specific. Always buy sensors compatible with your opener brand and model. Mixing brands can result in the sensors not working at all.
My Sensor Lights Are On, But The Door Won’t Close. What’s Wrong?
If both lights are steady and the door still won’t close, check for other opener issues—like travel limits or force settings. Also, ensure the opener is not in “vacation lock” mode, which disables remote controls.
Wiring garage door sensors is a practical project that improves your home’s safety and reliability. By understanding how the sensors work, using the right tools, and following each step carefully, you can wire your sensors like a pro. Remember to always check the alignment, test the system, and avoid common mistakes.
With this guide, you’re well prepared to make your garage a safer place for everyone.