Now Reading: How to Fix Garage Door Sensors: Quick and Easy Solutions
- 01
How to Fix Garage Door Sensors: Quick and Easy Solutions
A garage door that won’t close or open can turn an ordinary day into a frustrating experience. Often, the culprit is a problem with the garage door sensors. These small devices are essential for safety, making sure the garage door does not close on a person, pet, or object. But when something goes wrong, you need a clear, step-by-step guide to find the problem and fix it fast. This guide will show you how to diagnose and repair common garage door sensor issues, even if you have no special tools or electrical experience.
Garage door sensors have saved countless accidents since they became a required safety feature in the 1990s. But even the best technology can fail—dirt, misalignment, wiring issues, or age can all cause sensors to stop working. This article will walk you through each possible problem, explain how to fix it, and help you understand when it’s time to call a professional.
You’ll also find tables that compare repair costs and the most common tools, plus practical troubleshooting tips that even seasoned DIYers sometimes overlook.
Understanding Garage Door Sensors
Before you start fixing, it’s helpful to know how garage door sensors work. Most residential garage door sensors use an infrared beam. There are two units: a sender and a receiver. They are placed on both sides of the door, near the ground. The sender shines an invisible beam to the receiver. If anything breaks the beam, the sensor tells the garage door opener to stop or reverse.
If the sensors don’t work, the door won’t close, or it may reverse suddenly. Often, the opener will blink its lights or show an error code. Knowing these basics will help you follow the steps and spot what’s wrong.
Common Signs Of Sensor Problems
When garage door sensors aren’t working right, you’ll usually notice one or more of these issues:
- Garage door won’t close: The door starts to close but reverses immediately, or it won’t move at all.
- Blinking or steady sensor light: Most sensors have a small LED. If it’s off, blinking, or the color is wrong, there’s likely a problem.
- Garage door opener flashes: The main unit may flash a warning light or show an error code.
- Manual closing works: If you press and hold the wall button, the door closes. This bypasses the sensor, confirming a sensor issue.
- No response from remote: If the remote won’t close the door but the wall button works, the sensors may be at fault.
Safety First: Preparing For Repairs
Working with a garage door is generally safe, but the door is heavy and the opener uses electricity. Always follow these steps before starting:
- Unplug the garage door opener from the outlet.
- Make sure the door is fully open (if possible) to avoid being trapped.
- Keep tools and parts out of reach of children.
- If you’re unsure about electrical work, call a professional.
Step-by-step: Diagnosing Sensor Problems
Let’s look at how to quickly find the source of most sensor issues.
1. Check For Obstructions
Dirt, spider webs, or small objects can block the sensors’ path.
- Inspect both sensors for anything blocking the lens.
- Clean the lenses gently with a soft cloth.
- Remove cobwebs, leaves, or snow around the area.
Non-obvious insight: Sometimes, sensors are blocked by sunlight. If the door works at night but not during the day, try shading the sensors.
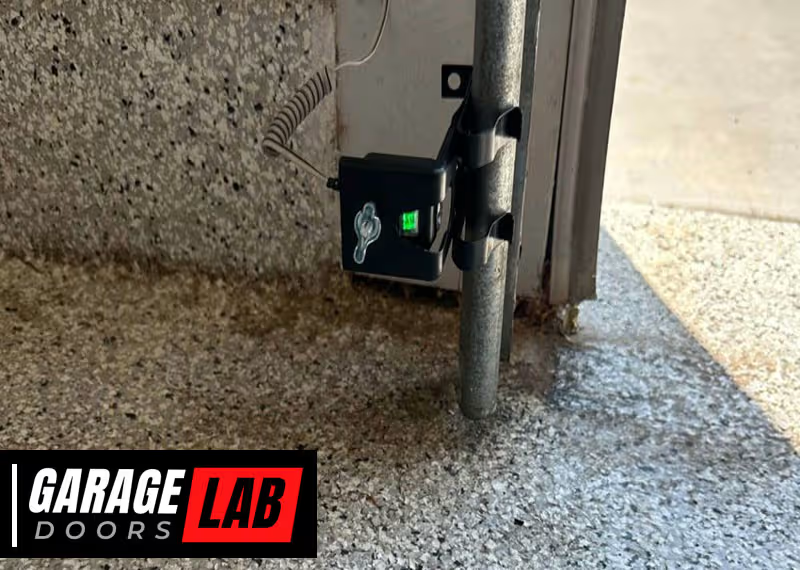
2. Examine Sensor Alignment
Sensors must face each other directly. Even a small bump can misalign them.
- Check if both sensors are at the same height and pointing straight.
- Loosen the mounting bracket screws slightly, adjust until the LED turns solid (not blinking), then tighten.
- Use a level for accuracy.
Pro tip: Garage floors can shift or settle, causing sensors to move out of alignment over time.
3. Inspect The Sensor Lights
Every brand uses a slightly different LED signal.
- Solid light: Usually means the sensor is working.
- Blinking or off: Often means a wiring or alignment problem.
Check your opener’s manual for specific light codes.
4. Test The Wiring
Loose or damaged wires are a common cause, especially if you have pets or recent repairs.
- Inspect the wires running from each sensor to the opener.
- Look for cuts, chew marks, or loose connections.
- Gently wiggle the wires at the sensor and opener terminals.
If you see a broken wire, you may need to strip and reconnect it (see below).
5. Clean The Sensor Lenses
Even a thin layer of dust can block the infrared beam.
- Use a clean, dry microfiber cloth. Avoid water or chemicals, which could damage the lens.
- Wipe gently until the lens is clear.
6. Check Sunlight Interference
Bright sunlight can overwhelm the sensor’s receiver.
- Try shading the sensor with a piece of cardboard as a quick test.
- If the door works, consider installing a sun shield or moving the sensors slightly inward.
7. Test With The Wall Button
Most openers allow you to hold down the wall button to override the sensors.
- If the door closes when you hold the button but not with the remote, the sensors are definitely the problem.
8. Look For Moisture Damage
Sensors near the ground can get wet from rain, snow, or sprinklers.
- Look for condensation inside the sensor lens or corrosion on the wires.
- Let the sensors dry completely and try again.
9. Replace Faulty Sensors
If all else fails, sensors can wear out or fail with age.
- Purchase replacement sensors that match your opener’s brand and model.
- Follow the installation steps below.

Essential Tools And Materials
You don’t need special equipment for most sensor repairs. Here’s a comparison of common tools:
| Tool | Purpose | Cost (approx.) | DIY Difficulty |
|---|---|---|---|
| Screwdriver | Adjust or remove sensors | $5–$15 | Easy |
| Wire stripper | Repair sensor wires | $8–$20 | Moderate |
| Multimeter | Test for voltage/continuity | $15–$30 | Moderate |
| Microfiber cloth | Clean sensor lens | $2–$8 | Easy |
How To Fix Garage Door Sensors: Step-by-step
Now that you’ve found the problem, here’s how to fix the most common sensor issues.
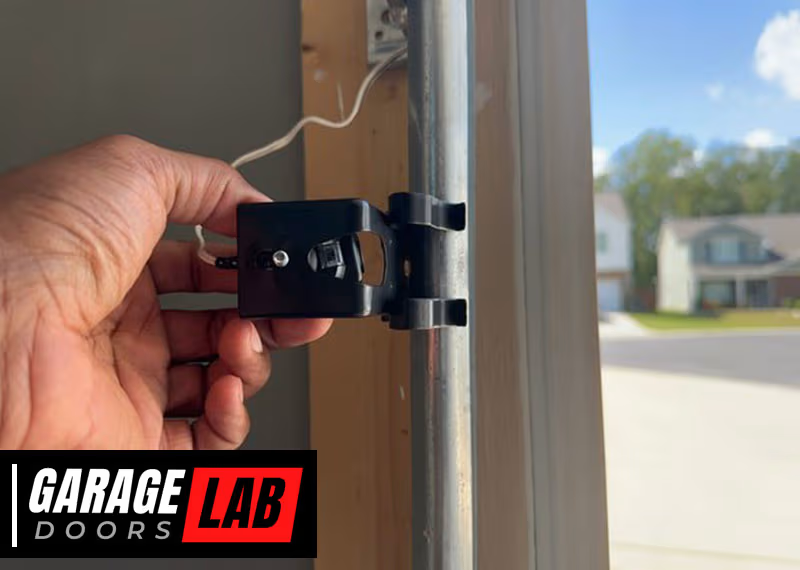
Cleaning And Realigning Sensors
- Unplug the opener to stay safe.
- Use a soft cloth to wipe both lenses clean.
- Check the sensor brackets. If they’re bent or loose, straighten and tighten them.
- Adjust the sensors to face each other directly. When aligned, most sensor LEDs turn solid.
- Plug in the opener and test the door.
Repairing Or Replacing Sensor Wires
Damaged wires are often visible near the sensor or where they enter the wall.
- Disconnect power to the opener.
- Cut the damaged section with wire cutters.
- Strip about 1/2 inch of insulation from each end.
- Twist matching wires together (usually black to black, white to white).
- Secure with wire nuts or electrical tape.
- Reconnect and test the system.
Non-obvious tip: If you see green corrosion on copper wires, clean with vinegar and a brush before reconnecting.
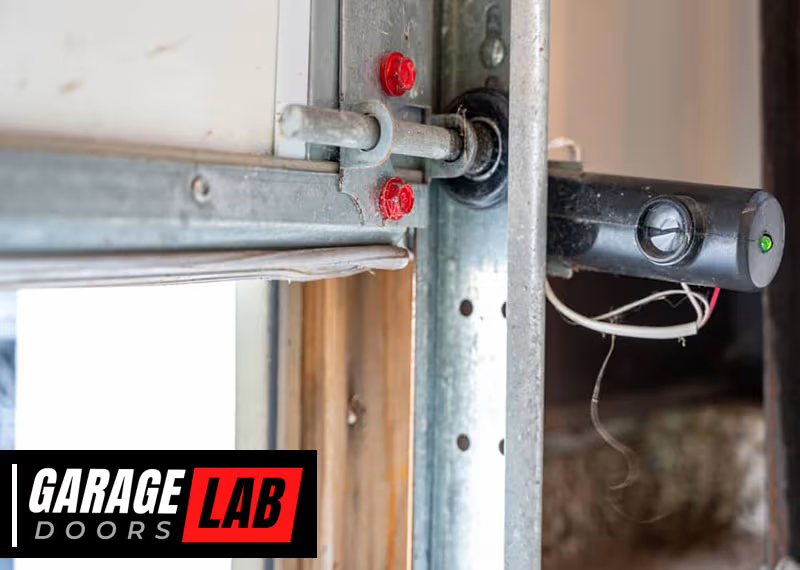
Replacing Garage Door Sensors
If cleaning and wiring don’t help, it’s time for new sensors.
- Buy replacement sensors for your opener’s brand and model.
- Unplug the opener.
- Remove the old sensors by unscrewing the mounting brackets.
- Disconnect the wires (note which color goes where).
- Attach the new sensors to the brackets.
- Connect the wires. Use wire nuts or the connectors provided.
- Align the sensors until the LED shows solid.
- Plug in and test the door.
Pro insight: If the sensors are over 10 years old, replace both—even if only one has failed.

Troubleshooting Unusual Sensor Issues
Some problems are less obvious, but still easy to fix if you know what to look for.
Sensor Works Intermittently
- Possible causes: Loose wiring, sunlight interference, or a failing sensor.
- Solution: Check wire connections, shade the sensor, or swap with a new unit to test.
Sensors Work Only In Certain Weather
- Possible causes: Moisture, condensation, or expansion/contraction of sensor brackets.
- Solution: Dry the sensors, adjust alignment, or move sensors slightly higher if water pools nearby.
One Sensor Light Is Always Off
- Possible causes: Broken wire, dead sensor, or no power from opener.
- Solution: Test the wire for continuity. Replace the sensor if needed.
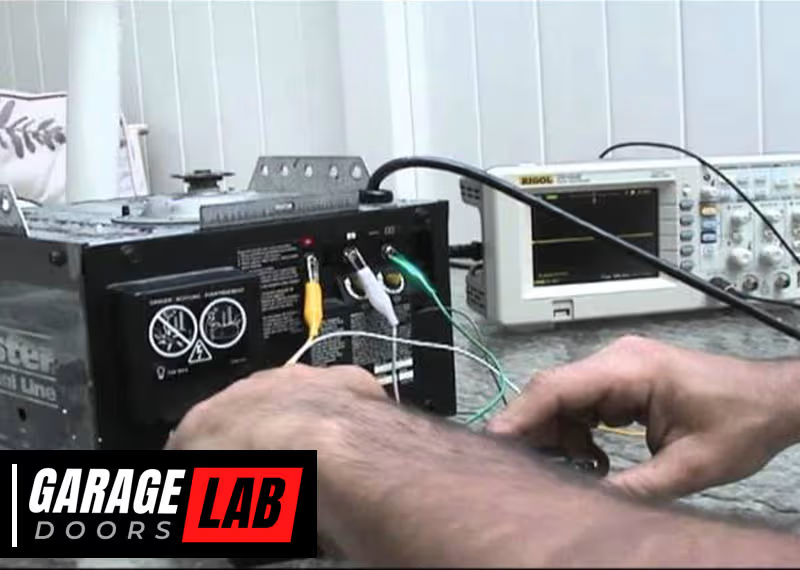
Advanced Testing: Using A Multimeter
A multimeter can help check if sensors are getting power.
- Set the meter to DC voltage.
- Test the wires at the sensor (usually 5–24V DC).
- If there’s no voltage, check wiring back to the opener.
- If voltage is present but the sensor LED is off, the sensor is likely bad.
When To Call A Professional
While most sensor problems are easy to fix, call a pro if:
- The wiring inside the wall is damaged.
- The opener still won’t work after sensor replacement.
- You’re not comfortable with electrical repairs.
A professional can also check for issues with the opener’s circuit board, which sometimes mimics sensor failure.
Comparing Diy Vs. Professional Repair
Wondering if you should fix it yourself or hire someone? Here’s a quick cost comparison:
| Repair Type | DIY Cost | Pro Cost | Time Needed |
|---|---|---|---|
| Clean/Align Sensors | $0–$10 | $60–$100 | 10–20 mins |
| Wire Repair | $5–$20 | $100–$150 | 20–40 mins |
| Sensor Replacement | $20–$50 | $150–$250 | 30–60 mins |
DIY fixes save money and time, but only if you feel confident.
Preventing Future Sensor Problems
Once your garage door sensors are working, keep them in good shape:
- Clean the lenses every month.
- Check alignment after any impact near the door.
- Keep the sensor area clear of snow, dirt, or yard debris.
- Inspect wires for wear each season.
- If you use sprinklers, make sure they do not spray the sensors.
Special Cases: Smart Garage Door Sensors
Newer garage doors may use smart sensors that connect to Wi-Fi or a smart home system. These work much the same way, but:
- Check for firmware updates if your system has an app.
- Make sure your Wi-Fi signal is strong near the opener.
- Reset the smart hub if troubleshooting regular fixes doesn’t work.
For more on smart systems, visit the Garage Door Opener Wikipedia page.

Environmental Factors That Affect Sensors
Sensors are sensitive to their surroundings. Some less-known factors include:
- Vibration: If your garage floor shakes (for example, from slamming the door), sensors can fall out of alignment.
- Insects: Small bugs sometimes crawl inside the sensor housing. Carefully open and clean if you suspect this.
- Paint or debris: If you recently painted the garage, even a thin overspray can block the lens.
Brands And Compatibility
Most major brands use similar sensors, but not all are interchangeable. For example, Chamberlain, LiftMaster, and Craftsman sensors are often compatible, but Genie and Overhead Door use different designs.
If you buy new sensors, check:
- Sensor voltage (usually printed on the sensor or in the manual)
- Connector type (screw, clip, or push-in)
- Mounting bracket style
Table: Major Garage Door Sensor Brands
| Brand | Sensor Type | Typical Price | Compatibility Notes |
|---|---|---|---|
| Chamberlain | Infrared | $20–$35 | Works with LiftMaster, Craftsman |
| Genie | Infrared | $25–$40 | Genie only |
| Overhead Door | Infrared | $25–$45 | Overhead Door only |
| Marantec | Infrared | $35–$50 | Marantec only |
Mistakes To Avoid
Many homeowners make small errors that lead to bigger problems. Avoid these mistakes:
- Ignoring sensor alignment after a small bump or vibration.
- Using harsh cleaners on the sensor lens.
- Wrapping wires with tape only (wire nuts are safer and last longer).
- Mixing up sensor wiring colors—always double-check before connecting.
- Buying generic sensors that don’t match your opener model.
Non-obvious insight: Sometimes, “universal” sensors won’t work with all openers, even if the connectors look the same.
Practical Troubleshooting Examples
Example 1: You clean and align the sensors, but one LED is still off. You test with a multimeter and find no voltage. The wire inside the wall is broken—call a pro.
Example 2: The door works on cloudy days but not sunny afternoons. A quick cardboard shield fixes the problem. Later, you install a small sunshade over the sensor.
Example 3: Both lights are solid, but the door still reverses. The floor is uneven, causing the door to bounce and trigger the opener’s safety feature. Adjust the close force setting or level the floor area.
How Long Do Sensors Last?
Most sensors last 8–15 years. If yours are older, or you’ve had to fix them often, it’s smart to replace both sensors at the same time. This prevents future breakdowns and ensures safety.
Frequently Asked Questions
Why Does My Garage Door Only Close When I Hold Down The Wall Button?
This is a safety override feature. Holding the button tells the opener to ignore the sensors. If the door closes this way, your sensors are blocked, misaligned, or faulty.
Can I Bypass Garage Door Sensors Permanently?
It’s not recommended. Bypassing sensors removes an important safety feature. If you must close the door with faulty sensors, do it only until you can repair or replace them.
What If Both Sensor Lights Are Off?
Check for power at the opener and at the sensor wires. Both lights off usually means a wiring or power issue, not just a dirty lens or misalignment.
Are All Garage Door Sensors The Same?
No. Most use infrared, but voltage and connectors differ between brands. Always buy sensors that match your opener’s brand and model.
How Much Does Professional Sensor Repair Cost?
Professional repair costs between $100 and $250 depending on the problem and your location. Simple alignment is cheaper; full sensor replacement costs more.
Fixing your garage door sensors can be straightforward with the right approach. By understanding the basics, following careful troubleshooting steps, and avoiding common mistakes, you can restore your garage door’s safety and convenience in less than an hour. Regular cleaning and quick checks will keep problems from coming back, so your garage door works smoothly year after year.