Now Reading: How Do You Reset Your Garage Door Opener: Simple Steps Guide
- 01
How Do You Reset Your Garage Door Opener: Simple Steps Guide
Resetting a garage door opener might sound technical, but you don’t need to be an expert to handle it. Many people find themselves stuck when the garage remote stops working, the keypad won’t respond, or they move into a new home and want to clear old codes.
A proper reset can solve many common problems. This guide walks you step by step through the process, explains what to expect, and offers tips to keep your garage safe and reliable.
Why do people need to reset their garage door opener? The main reasons include improving security after moving, fixing malfunctions, or syncing new remotes and keypads. Sometimes, a simple battery replacement isn’t enough. A reset often helps when other troubleshooting fails. If you understand the basics of your system, you’ll save time and avoid unnecessary service calls.
This article gives you everything: how garage openers work, when and why to reset, a full reset process for different brands, troubleshooting advice, and key safety tips. By the end, you’ll feel confident to reset your opener, improve your home’s security, and handle common problems easily.
How Garage Door Openers Work
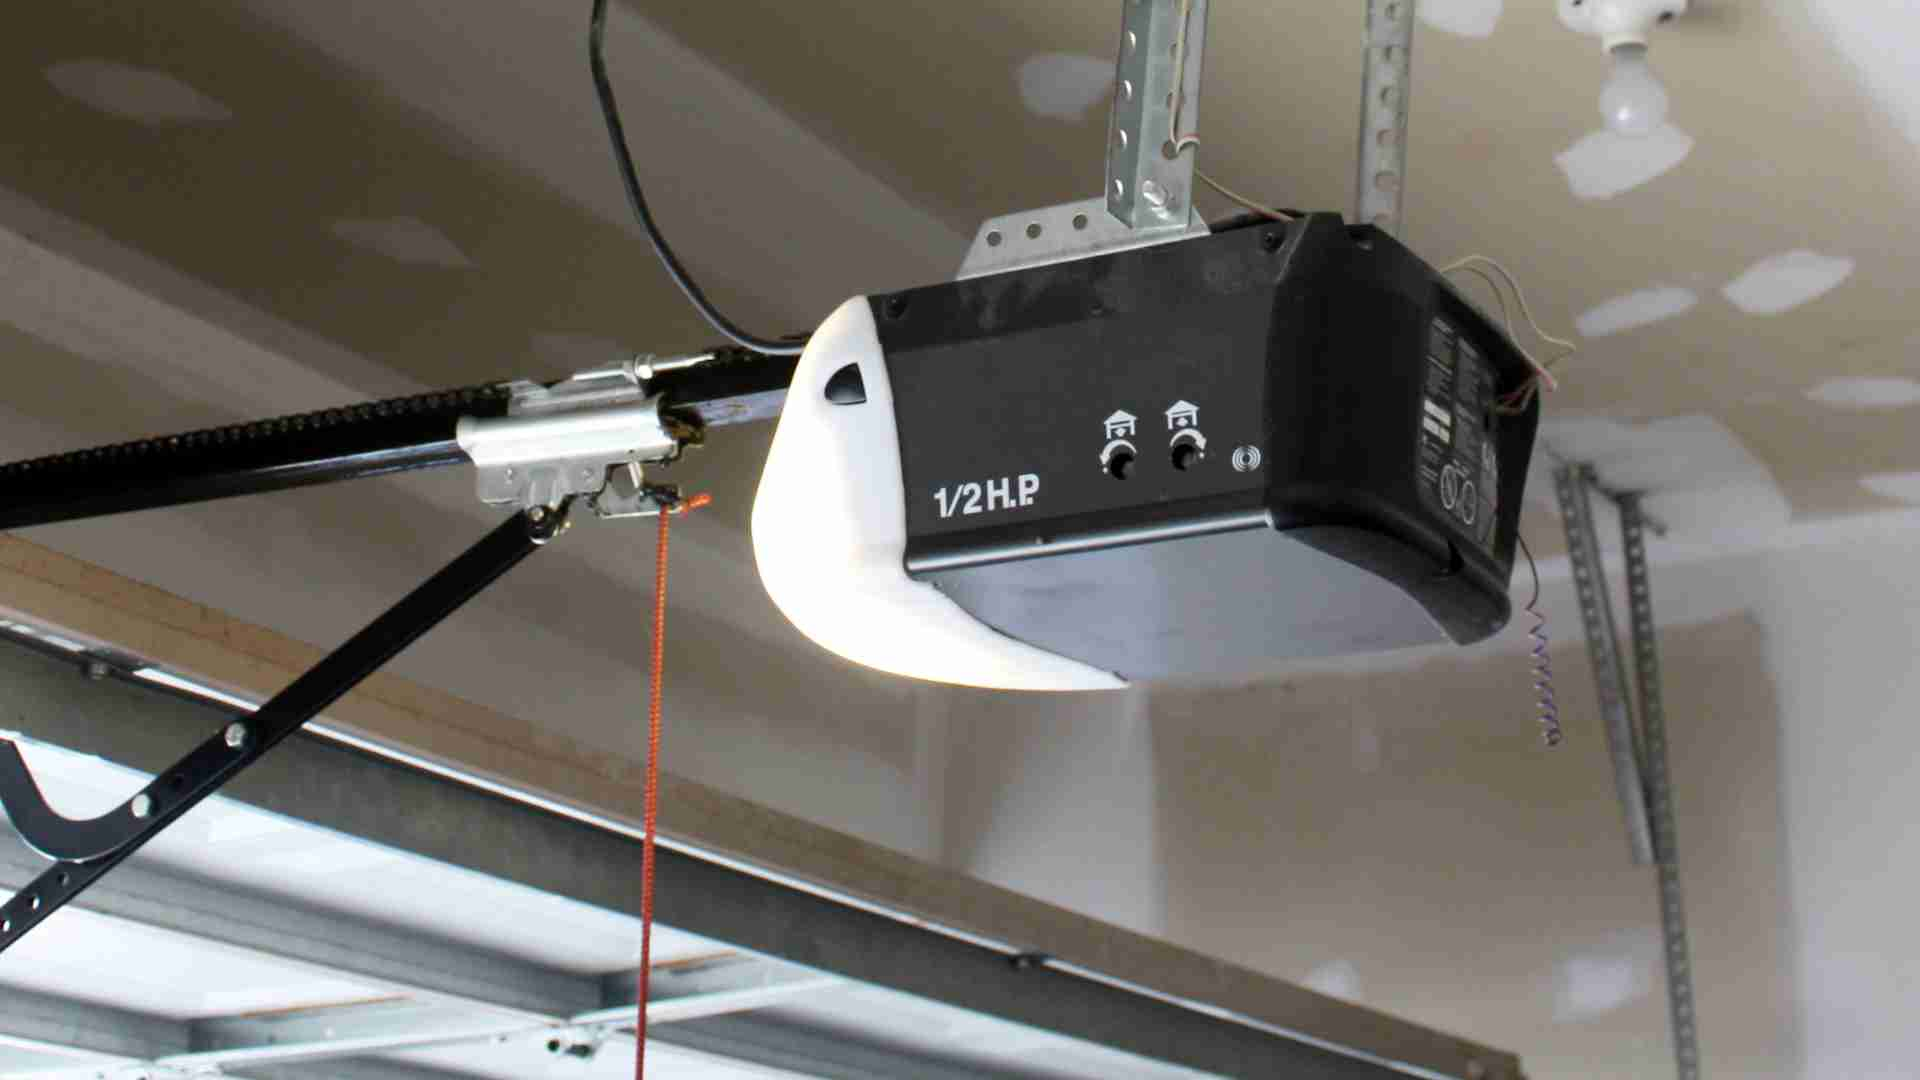
Before jumping into the reset process, it’s helpful to know how these devices function. A garage door opener is a motorized unit that opens and closes your garage door, usually controlled by a remote, wall switch, or keypad. The opener receives a wireless signal and operates the motor, which moves the door with a chain, belt, or screw drive.
Most modern garage door openers use rolling code technology. This means every time you use the remote, a new code is generated, making it harder for hackers to access your garage. The opener stores these codes in its memory, which is why resetting clears all programmed remotes and keypads.
Key components of a garage door opener:
- Motor unit: Powers the door’s movement.
- Remote controls: Handheld devices for opening/closing.
- Wall switch: Fixed inside the garage.
- Keypad: Mounted outside for PIN access.
- Safety sensors: Prevent the door from closing if something is in the way.
- Circuit board: The “brain” that stores codes and settings.
If you’ve never looked at your opener, take a moment to find the learn button (sometimes called “smart” or “program” button). You’ll use it during the reset.
When Should You Reset Your Garage Door Opener?
People often think about resetting when something goes wrong, but there are several smart reasons to do it even if things seem fine.
1. After Moving To A New Home
You never know who has old remotes or PINs. Resetting wipes all previous codes, so only your remotes work.
2. Lost Or Stolen Remote
If a remote goes missing, anyone could access your garage. Resetting ensures only authorized remotes work.
3. Malfunctioning Remotes Or Keypads
Sometimes, remotes stop working because the opener’s memory is full or has glitches. A reset often fixes these problems.
4. Adding Or Removing Devices
If you want to add a new remote or keypad, or remove one, a reset is the cleanest way to start fresh.
5. Upgrading Security
Regular resets are a good habit, especially if you use older openers. It’s a simple way to boost your home’s protection.
6. Troubleshooting Errors
Error lights, strange behavior, or unresponsive controls may be solved by a reset before calling a technician.
Non-obvious insight: Many people don’t realize a full reset also erases any programmed car remotes (like those in modern vehicles). You’ll need to reprogram those after the process.

Understanding Your Opener’s Brand And Model
Not all garage door openers are the same. The reset process can vary depending on the brand and model you have. The three most common brands in the US are Chamberlain, LiftMaster, and Genie. Others include Craftsman, Overhead Door, and Linear.
Where to find your model information:
- Look on the main unit (often on the ceiling of your garage).
- Check near the light cover or the back of the motor.
- The model number and brand are usually on a sticker or plate.
Knowing your model helps you follow the right reset steps and avoid mistakes. If you don’t have the manual, most companies offer free downloads on their websites.
The Complete Reset Process (step-by-step)
Let’s cover the general process first, then look at specifics for popular brands. Always make sure the area is safe, the garage door is closed, and you have a stable ladder if needed.
General Reset Steps
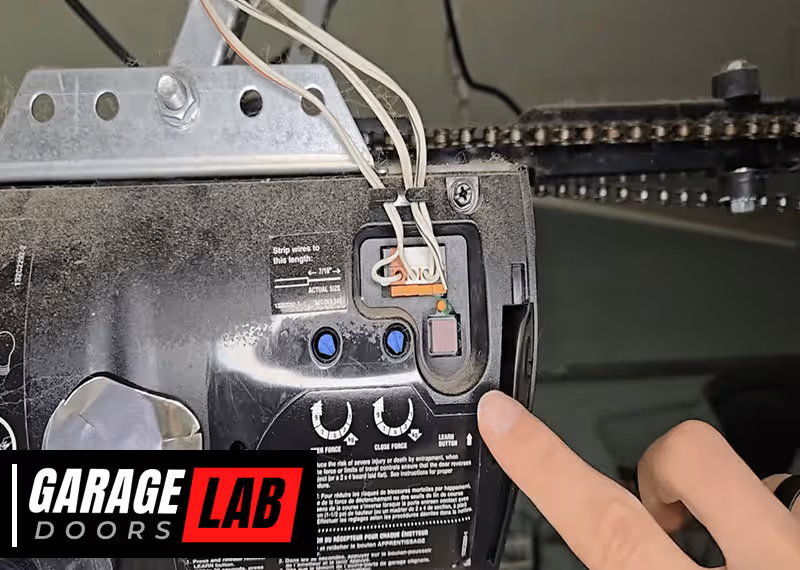
1. Locate The Learn Or Program Button
This button is usually found on the back or side of the main unit. It may be behind a light cover. Colors include red, yellow, purple, or orange.
2. Press And Hold The Button
Use a finger or small tool. Hold for 6-10 seconds. A light will usually blink or turn off when the memory is cleared.
3. Release The Button
The unit should now forget all remotes and keypads.
4. Reprogram Your Remotes And Keypads
Press the learn button once (don’t hold this time), then press your remote’s button within 30 seconds. For keypads, enter your PIN and follow the manufacturer’s steps.
5. Test Each Device
Make sure all remotes and keypads work. If not, repeat the programming step.
Practical tip: If you have multiple remotes, program them one after another without long delays, or the opener may exit program mode.
Brand-specific Reset Instructions
Chamberlain & Liftmaster
These brands are closely related and share many designs.
- Find the learn button (often yellow, red/orange, or purple).
- Hold the button for about 6 seconds until the LED turns off.
- All remote controls and keypads are erased.
- Program new remotes: Press learn, press remote button, wait for the click or light blink.
Genie
- Locate the learn button (sometimes called “program” or “smart”).
- Hold for 10 seconds until the LED blinks or turns off.
- For older Genie models, you may need to unplug the unit for 30 seconds after holding the button.
- Reprogram remotes and keypads as needed.
Craftsman
Craftsman openers are often rebranded Chamberlain/LiftMaster units. Follow the same process.
Overhead Door & Linear
These brands may have a slightly different process. Always check your manual.
- Locate the “learn” or “code” button.
- Hold for 10 seconds.
- For some models, unplugging and plugging back in helps clear old codes.
Table: Common Learn Button Locations
Here is a quick reference comparing major brands and button locations.
| Brand | Learn Button Label | Common Location | Typical Color |
|---|---|---|---|
| Chamberlain | Learn | Back/Side of Motor | Yellow, Red/Orange, Purple |
| LiftMaster | Learn | Back/Side of Motor | Yellow, Red/Orange, Purple |
| Genie | Learn/Program | Under Light Cover | Black, Red |
| Craftsman | Learn | Back/Side of Motor | Yellow, Red/Orange, Purple |
| Overhead Door | Learn/Code | Back/Side of Motor | Usually Red |
| Linear | Learn/Program | Back of Motor | Varies |
Non-obvious insight: Some older openers may not have a learn button. For these, unplugging the unit for a minute and removing all power sometimes helps, but you may need a technician for a full reset.
Safety Precautions Before You Begin
Working with garage door openers is usually safe if you take basic precautions.
- Always close the garage door first.
- Unplug the opener before opening the light cover or handling wiring.
- Use a stable ladder—never stand on boxes or unstable items.
- Keep children and pets away while working.
- Do not touch the circuit board unless necessary.
If you see damaged wires, water near the unit, or suspect electrical problems, do not proceed. Call a professional to avoid injury or damage.
What To Do If The Reset Doesn’t Work
Sometimes, the standard reset process fails. Here are steps to troubleshoot:
1. Check Power Supply
Make sure the opener is plugged in and the outlet works.
2. Inspect The Learn Button
Dirt or damage can prevent proper contact. Gently clean if needed.
3. Wait After Reset
Some openers need a minute to fully clear memory.
4. Try A Full Power Cycle
Unplug the unit for 60 seconds after holding the learn button.
5. Replace Remote Batteries
Weak batteries can make remotes fail to reprogram.
6. Consult Your Manual
Brand-specific quirks may require extra steps.
7. Look For Lock Mode
Some wall panels have a “lock” button, which disables remotes. Make sure this isn’t active.
8. Call A Technician
If all else fails, the circuit board could be faulty.
Practical tip: If you have a keypad or built-in car remote, reprogram those only after you confirm the handheld remote works.
Reprogramming Remotes And Keypads After Reset
Resetting clears all device memory, so you’ll need to set up remotes and keypads again. Here’s how:
Remotes
- Press the learn button (once, don’t hold).
- Within 30 seconds, press the button on your remote.
- The opener light will blink, or you’ll hear a click.
- Repeat for each remote.
Keypads
- Press the learn button once.
- Within 30 seconds, enter your PIN on the keypad and press “Enter” (or your brand’s confirmation button).
- The light will blink or you’ll hear a click.
Note: Each brand may have a slightly different process. Always check your manual if unsure.
Table: Typical Reset And Reprogramming Times
Here’s a quick comparison of how long each step usually takes.
| Step | Time Needed | Difficulty |
|---|---|---|
| Reset Opener | 1-2 minutes | Easy |
| Program Each Remote | 30 seconds | Easy |
| Program Keypad | 1 minute | Moderate |
| Power Cycle (if needed) | 2-3 minutes | Easy |
Non-obvious insight: Some older keypads require a “factory reset” using a pinhole button on the back. Don’t forget to check for this if your keypad won’t reset with the main unit.
Common Problems And Solutions After Reset
It’s normal to run into small issues after resetting your garage door opener. Here’s how to handle the most common ones.
Remotes Still Not Working
- Make sure the batteries are fresh.
- Try reprogramming again. Some remotes need to be closer to the opener during programming.
- If one remote works but others don’t, the memory may be failing—consider replacing the opener.
Keypad Won’t Program
- Double-check your PIN is entered correctly.
- Some keypads need a new battery after resetting.
- For wireless keypads, make sure you press “Enter” firmly.
- If the keypad blinks but won’t operate the door, try a different PIN.
Door Opens And Closes Unexpectedly
- Someone nearby could have a remote still programmed (rare but possible).
- Interference from nearby electronics can cause issues—move new wireless devices away from the opener if possible.
Wall Switch Not Working
- Some wall panels have a lock or vacation mode that disables all remotes. Unlock this first.
- Check for loose wires at the wall switch and opener.
Table: Troubleshooting Quick Guide
| Problem | Possible Cause | Quick Solution |
|---|---|---|
| Remote not working | Weak battery, not programmed | Replace battery, reprogram |
| Keypad fails | Wrong PIN, needs reset | Reset, reprogram PIN |
| Wall switch dead | Loose wire, lock mode | Check wiring, unlock panel |
| Door moves on its own | Interference, old code active | Reset again, check for interference |
Resetting Built-in Car Remotes (homelink)
Many newer cars have Homelink or similar systems built into the dashboard or visor. After resetting your garage door opener, you’ll need to sync these again.
Steps:
- Hold two Homelink buttons until the indicator light flashes.
- Press the learn button on your garage opener.
- Within 30 seconds, press the Homelink button you want to program.
- The indicator should change from slow to fast blink.
Some cars need the ignition on during programming. Check your car’s manual for details.
Tip: If programming fails, wait a few minutes and try again. Older cars may need an extra step with a remote acting as a “bridge.”
How To Keep Your Garage Secure After A Reset
Resetting your garage door opener improves security, but there are extra steps you can take for better protection.
- Change your keypad PIN to something unique. Avoid birthdays or simple codes.
- Do not leave remotes in your car, especially if you park outside.
- Consider upgrading to a smart garage opener with app control.
- Regularly check your opener’s memory for unknown remotes.
- If you rent out your home, reset the opener between tenants.
Security insight: Rolling code openers are much safer than fixed code models. If your opener is more than 20 years old, think about replacing it with a modern version.
For more on garage security, see the Consumer Reports guide.
Resetting Vs. Replacing Your Garage Door Opener
Sometimes, a reset isn’t enough. If your opener is unreliable after several resets, it may be time for a new unit.
Signs you need a replacement:
- The opener is more than 15 years old.
- Frequent power failures or strange noises.
- Memory won’t hold new remotes.
- Parts are no longer available.
Modern openers are quieter, more secure, and often have smartphone features. Compare models and choose one that fits your needs and budget.
Frequently Asked Questions
How Often Should I Reset My Garage Door Opener?
You don’t need to reset often. Do it after moving into a new house, losing a remote, or if you notice problems. For maximum security, resetting once a year is a good habit.
Will Resetting Erase My Car’s Built-in Remote?
Yes, a full reset clears all devices, including car remotes. You’ll need to reprogram them after the reset.
Is It Safe To Reset My Garage Door Opener Myself?
Yes, it’s safe if you follow basic precautions like unplugging the unit, using a sturdy ladder, and keeping the area clear. If you’re unsure, ask a professional for help.
What Should I Do If My Opener Doesn’t Have A Learn Button?
Some very old openers lack a learn button. Try unplugging the unit for a minute. If that doesn’t work, check the manual or contact the manufacturer for help.
Can I Reset The Opener If I Lost All Remotes?
Yes. You can reset using the learn button on the main unit. Then buy new compatible remotes and program them after the reset.
Resetting your garage door opener is a simple but powerful way to improve security and solve common problems. With a few tools and careful steps, you can clear out old codes, add new remotes, and keep your home safe. When in doubt, always check your manual or contact support for your specific model.
Remember, a well-maintained garage door system not only protects your home but also gives you peace of mind every day.


