
As your garage door opener ages, its performance might start to decline. This can manifest in various ways, from slow operation and unusual noises to a complete refusal to budge. While a new opener is an option, many common issues with older Chamberlain garage door openers can be resolved through proper adjustment and maintenance.
Understanding how to fine-tune these systems can save you money and extend the life of your existing unit, ensuring your garage door continues to function reliably and safely.
Key Takeaways
- Safety First: Always disconnect power to the opener before performing any adjustments.
- Limit Settings: Adjusting the up and down travel limits controls how far the door opens and closes.
- Force Settings: The force adjustment determines the amount of force the opener uses to move the door.
- Sensor Alignment: Photo-eye sensors must be properly aligned to prevent the door from reversing unexpectedly.
- Lubrication: Regular lubrication of moving parts is crucial for smooth operation and longevity.
- Chain/Belt Tension: The drive mechanism (chain or belt) may require tension adjustments.
- Remote/Keypad Issues: Reprogramming or replacing remotes and keypads can resolve communication problems.
- Professional Help: For complex issues or if you’re uncomfortable, consult a qualified garage door technician.

Credit: www.youtube.com
Understanding Your Chamberlain Garage Door Opener Components
Before diving into adjustments, it’s essential to familiarize yourself with the key components of your Chamberlain garage door opener system. Knowing what each part does will make the adjustment process much clearer and safer. Older models, while perhaps less sophisticated than their modern counterparts, share fundamental operating principles.
The Motor Unit
This is the main housing, typically mounted on the ceiling. It contains the motor, gears, and the logic board that controls the opener’s functions. The motor unit is the “brain” of the operation, translating your remote signal into the mechanical action of opening and closing the door.
Older units might have more robust, albeit sometimes noisier, mechanical components compared to newer, more streamlined models.
The Drive Mechanism
This is what physically moves the garage door. Chamberlain openers commonly use one of three types:
- Chain Drive: A metal chain runs along a rail, connected to a trolley that moves the door arm. This is often found in older, more robust models.
- Belt Drive: Similar to a chain drive, but uses a rubber belt, which is generally quieter.
- Screw Drive: A threaded rod is used to move the trolley.
The specific type of drive mechanism will influence how you approach certain adjustments, particularly those related to tension. For chain drives, understanding how to adjust the chain on a garage door opener is vital for smooth operation.
The Trolley And Door Arm
The trolley is the component that travels along the rail, pulled by the chain or belt. It connects to the door arm, which in turn is attached to the garage door itself. The trolley’s movement along the rail is what opens and closes the door.
The Rail
The rail is the track that the trolley moves along. It’s typically mounted to the ceiling or wall above the garage door.
The Photo-eye Sensors
Located near the bottom of the garage door tracks, these sensors are a critical safety feature. They emit an invisible beam of light; if this beam is broken while the door is closing, the opener will reverse the door’s motion to prevent accidents.
Misalignment or obstruction of these sensors is a common reason for a closing door to suddenly reverse.
The Control Panel And Remotes
The control panel is usually mounted on the wall inside the garage and includes buttons for opening, closing, and stopping the door. Remote controls (transmitters) and wireless keypads communicate with the motor unit to operate the door remotely. Issues with these can often be resolved by reprogramming. For example, if you’re having trouble with a Chamberlain keypad, learning how to reprogram a Chamberlain garage door keypad can be a straightforward fix.
Travel Limit Nuts/screws
These are adjustable mechanical stops or electronic settings that tell the opener when to stop moving the door at its fully open and fully closed positions. Improperly set limits are a frequent cause of a door not opening or closing completely, or of the opener continuing to strain after the door has reached its endpoint.
Force Adjustment Settings
These settings control the amount of force the opener motor applies to move the door. If the force is set too low, the door might stop prematurely. If set too high, it can be a safety hazard, as the door might exert too much force on an obstruction.

Credit: www.youtube.com
Safety Precautions Before Making Adjustments
Working with garage door openers involves mechanical and electrical components, making safety paramount. Older systems may have wear and tear that requires extra caution. Always adhere to these safety guidelines before you begin any adjustment or maintenance.
Disconnect Power
The absolute first step before touching any internal components or making significant adjustments is to disconnect the power to the garage door opener. This is typically done by unplugging the opener from the electrical outlet. If the outlet is not easily accessible, you can turn off the corresponding circuit breaker in your home’s electrical panel. This prevents accidental activation of the opener while you’re working on it, which could cause serious injury.
Engage The Emergency Release
Most garage door openers have an emergency release cord, usually a red handle hanging from the trolley mechanism on the rail. Pulling this cord disengages the trolley from the drive mechanism, allowing you to operate the garage door manually. You will need to do this to test your adjustments and to ensure the door moves freely by hand. Remember to re-engage the trolley after you’ve finished your work.
Inspect For Wear And Tear
Older openers can develop worn parts. Before making adjustments, take a moment to visually inspect the opener, the rail, the chain or belt, the springs, and the door itself. Look for any frayed cables, cracked rollers, loose bolts, or damaged sections of the door or track. Addressing these underlying issues might be necessary before, or in conjunction with, making adjustments. For instance, if your rollers are worn, learning how to lubricate garage door rollers for smooth operation or replacing them might be a prerequisite.
Use Proper Tools
Gather the necessary tools before you start. This might include screwdrivers (Phillips and flathead), pliers, a stepladder, and possibly a wrench set. Ensure your tools are in good condition and fit the fasteners you’ll be working with to avoid stripping screws or bolts.
Have A Helper
For certain adjustments, especially those involving moving the door or holding components in place, having a second person can be invaluable for safety and ease of work. They can assist in lifting, steadying the door, or simply observing and providing feedback.
Adjusting Travel Limits On Older Chamberlain Openers
The travel limits tell your garage door opener when to stop opening and closing. If your door doesn’t open all the way, closes too far and bumps the floor, or stops short, adjusting these limits is likely the solution. Older Chamberlain models often use mechanical limit nuts on the rail, while some later older models might have electronic adjustments accessible via buttons on the motor unit.
Locating The Limit Adjustments
- Mechanical Limit Nuts: On chain drive models, you’ll typically find two large nuts (one for up, one for down) that thread onto a screw or shaft attached to the trolley. These nuts physically stop the trolley’s travel. You’ll need to slide them along the shaft to adjust the stopping points.
- Electronic Limit Settings: For models with electronic limits, you’ll usually find adjustment screws or buttons on the motor unit itself, often labeled “UP LIMIT” and “DOWN LIMIT” or similar. You’ll typically need a screwdriver to turn these.
Adjusting The Down Travel Limit
This adjustment controls how far the door closes.
- Disconnect Power: Ensure the opener is unplugged.
- Disengage Opener: Pull the emergency release cord to disengage the trolley.
- Manually Position Door: Move the garage door to the fully closed position. Check that it sits flush and doesn’t bind against the floor or any obstructions.
- Adjust Limit Nut/Setting:
- Mechanical: If the door is closed too high, move the down limit nut upwards on the shaft. If it’s closing too far and crushing something, move the down limit nut downwards. The goal is to have the trolley stop just as the door reaches its fully closed position.
- Electronic: With the power reconnected (and safety precautions in place), you’ll typically press a button sequence on the motor unit to enter limit setting mode. Then, you’ll manually close the door (using the wall button) to the desired position and press another button to set the down limit. Consult your specific model’s manual for the exact electronic adjustment procedure.
- Re-engage Opener: Re-engage the trolley by lifting the emergency release lever or by operating the opener as per your manual’s instructions.
- Reconnect Power & Test: Plug the opener back in. Using the remote, initiate a down cycle. The door should close fully and stop precisely. If not, repeat the process, making small adjustments.
Adjusting The Up Travel Limit
This adjustment controls how far the door opens.
- Disconnect Power: Ensure the opener is unplugged.
- Disengage Opener: Pull the emergency release cord.
- Manually Position Door: Move the garage door to the fully open position. Ensure it doesn’t hit any obstructions above and that it’s not opening so far that it disengages from the opener arm or strains the springs.
- Adjust Limit Nut/Setting:
- Mechanical: If the door isn’t opening high enough, move the up limit nut downwards on the shaft. If it’s opening too high, move the up limit nut upwards. The goal is to have the trolley stop just as the door reaches its fully open position.
- Electronic: Similar to the down limit, you’ll use a specific button sequence on the motor unit. Manually open the door to the desired height, then set the up limit. Again, refer to your model’s manual.
- Re-engage Opener: Re-engage the trolley.
- Reconnect Power & Test: Plug the opener back in. Initiate an up cycle using the remote. The door should open fully and stop precisely.
Pro Tip: Make small, incremental adjustments to the limit nuts or settings. Moving them too much at once can lead to overshooting the desired position, requiring further adjustments. Test after each small change.
Credit: support.chamberlaingroup.com
Setting The Force Limits On Older Chamberlain Openers
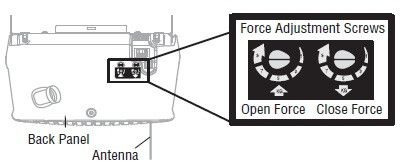
Force adjustments prevent the opener from exerting excessive force on the door, which is a crucial safety feature. If the door reverses unexpectedly during closing or if the opener struggles to move the door, the force settings might need adjustment. Older Chamberlain models typically have rotary adjustment screws on the motor unit for both up and down force.
Understanding Force Settings
- Closing Force: This dictates how much force the opener applies to close the door. If set too low, the door might stop and reverse upon encountering minor resistance (like a slightly misaligned track or a rug).
- Opening Force: This dictates how much force the opener applies to open the door. If set too low, the door might stop mid-travel.
Adjusting The Closing Force
- Power On: Ensure the opener is plugged in and the power is on.
- Test Closing: Place a piece of 2×4 lumber flat on the ground where the garage door will make contact when closing. Press the remote to close the door.
- Observe: The door should close, make contact with the 2×4, and then reverse direction and open fully. If it stops and reverses before hitting the 2×4, the closing force is set too low. If it hits the 2×4 and doesn’t reverse, or if it crushes the wood, the force is set too high.
- Locate Adjustment Screw: On the motor unit, find the screw labeled “DOWN FORCE” or similar. It’s often a rotary dial or screw.
- Adjust: Turn the screw slightly in the direction indicated for increasing force (usually clockwise, but check your manual).
- Retest: Repeat steps 2 and 3 until the door reverses reliably upon contact with the 2×4.
Adjusting The Opening Force
- Test Opening: Have a helper stand clear. Press the remote to open the door.
- Observe: The door should open smoothly to its full limit. If it stops midway without apparent obstruction, the opening force may be too low. If it slams against the overhead stop or makes straining noises, the force might be too high.
- Locate Adjustment Screw: Find the screw labeled “UP FORCE” or similar on the motor unit.
- Adjust: Turn the screw slightly in the direction indicated for increasing force.
- Retest: Repeat steps 1 and 2 until the door opens smoothly and reliably to its full limit.
Warning: Setting the force too high increases the risk of injury or damage if the door encounters an obstruction. The goal is to set it just high enough for the door to operate reliably without excessive force. Many safety standards recommend the door reverse within 2 seconds of encountering a 1.5-inch obstruction.
Troubleshooting Photo-eye Sensor Issues
The photo-eye sensors are vital safety devices. If they are dirty, misaligned, or obstructed, the opener will refuse to close the door, or it will reverse immediately after starting to close. This is one of the most common issues with any garage door opener, including older Chamberlain models.
Signs Of Photo-eye Problems
- The garage door will not close using the remote or wall button.
- The door starts to close but reverses and opens fully as soon as it begins moving.
- An indicator light on the motor unit might be flashing, often indicating a sensor error.
Steps To Troubleshoot And Adjust Sensors
- Inspect for Obstructions: Check the area around the sensors. Ensure nothing is blocking the beam, such as a parked car, a broom, a trash can, or even tall grass or weeds if the opener is on an external unit.
- Clean the Lenses: The lenses on the sensors can get dirty or dusty, interfering with the beam. Use a soft, damp cloth to gently clean both the sending and receiving lenses. Avoid abrasive cleaners.
- Check Indicator Lights: Most Chamberlain openers have indicator lights on the sensors themselves. One sensor (the transmitter) usually has a solid light indicating it’s powered. The other (the receiver) should have a solid light when the beam is unbroken and unobstructed. If the receiver light is flashing or off, it indicates a problem with the beam.
- Align the Sensors: This is the most common fix.
- Locate Sensors: They are usually mounted a few inches off the ground on either side of the garage door track.
- Identify Transmitter/Receiver: One sensor has a solid light (transmitter), and the other has a light that flashes or is off when the beam is broken (receiver).
- Adjust: Gently adjust the receiving sensor (the one with the intermittent light). Loosen its mounting bracket slightly if needed. Slowly pivot the sensor until its indicator light turns solid, indicating it has successfully “seen” the beam from the transmitter.
- Secure: Once the light is solid, gently tighten the mounting bracket.
- Test: Once aligned and clean, try closing the door using the remote. It should now close without reversing.
Example: In my experience, a common scenario is a child’s toy left too close to the sensor, or a new landscaping feature partially obstructing the path. A quick visual check and cleaning often resolve the issue. If the sensors are significantly damaged or corroded, they may need replacement.
Lubrication And Maintenance For Longevity
Regular maintenance, including lubrication, is key to ensuring your older Chamberlain opener continues to function smoothly and reliably. Neglecting this can lead to increased wear, noise, and eventual failure.
What To Lubricate
- Rollers: The wheels that guide the door along the tracks. Worn or unlubricated rollers can cause a lot of noise and strain. For detailed instructions, refer to how to lube garage door rollers.
- Hinges: The joints connecting the panels of the garage door.
- Tracks: The vertical and horizontal channels the rollers travel in. Wipe them clean and apply a light lubricant to the inside edges where the rollers make contact. Avoid excessive grease, which can attract dirt.
- Springs: Torsion springs (mounted above the door) and extension springs (running along the horizontal tracks) benefit from a light coating of lubricant. Use a garage door lubricant spray or a silicone-based spray.
- Opener Chain/Belt: For chain drives, apply a garage door lubricant or white lithium grease to the chain. For belt drives, inspect the belt for wear and ensure it’s clean; belt drives typically don’t require lubrication but may need tension adjustments.
- Opener Drive Gears: Some older openers may have accessible gears within the motor unit that can be lubricated, but this is often a more involved process and may require consulting your manual or a professional.
Lubrication Frequency
- High-Frequency Use: If your garage door is used multiple times a day, lubricate every 3-6 months.
- Average Use: For typical residential use, every 6-12 months is usually sufficient.
- Listen for Cues: Pay attention to the sound your garage door makes. If it starts to squeak, groan, or chatter, it’s a sign that lubrication is needed.
Other Maintenance Tasks
- Tighten Hardware: Periodically check and tighten any loose bolts or screws on the opener, rail, brackets, and the garage door itself.
- Inspect Cables: Ensure the lift cables attached to the bottom brackets are not frayed or worn.
- Check Balance: With the opener disengaged, the garage door should lift and lower smoothly by hand and stay partially open on its own. If it’s too heavy or too light, the springs may need adjustment or replacement, this is a job best left to professionals due to the high tension involved.
Addressing Drive Mechanism Issues (chain/belt Tension)
The drive mechanism, whether a chain or belt, needs to be properly tensioned to operate efficiently and safely.
Chain Tension Adjustment (chain Drive Models)
A chain that is too loose can skip teeth on the sprocket, leading to jerky movement or failure to operate. A chain that is too tight can put excessive strain on the motor and sprocket.
- Disconnect Power: Unplug the opener.
- Locate Tension Adjustment: On the rail, near the motor unit, you’ll typically find a take-up tensioner. This might be a bolt or screw mechanism.
- Adjust:
- Loose Chain: Turn the adjustment screw/bolt to tighten the chain. The chain should be taut but not overly stretched. It should have a small amount of slack (consult your manual, often around 1/4 inch).
- Tight Chain: Turn the adjustment screw/bolt in the opposite direction to loosen the chain.
- Test: Re-engage the trolley (if disengaged), reconnect power, and test the opener’s operation. The chain should move smoothly without skipping.
Belt Tension Adjustment (belt Drive Models)
Belt drives also have tensioners, often similar to chain tensioners, located on the rail. The principle is the same: ensure the belt is taut enough to engage the sprockets properly but not so tight that it strains the motor or the belt itself. Refer to your specific Chamberlain model’s manual for belt tension adjustment details, as improper adjustment can damage the belt or motor.
Example: An older Chamberlain opener might start making a loud “clunking” noise during operation. Often, this is because the chain has become loose and is skipping teeth on the sprocket. Adjusting the chain tension as described above can resolve this issue.
Reprogramming Remotes And Keypads
If your remote or keypad isn’t working, it’s often a communication issue rather than a mechanical one. Reprogramming can resolve this. Older Chamberlain openers use a “Learn” or “Program” button on the motor unit.
Reprogramming A Remote
- Locate the Learn Button: This is usually a colored button (often red, orange, purple, or green, depending on the model year) on the motor unit casing, sometimes under a light cover. You’ll also see a small LED indicator next to it.
- Press and Release Learn Button: Press and immediately release the Learn button. The LED indicator will light up.
- Press Remote Button: Within about 30 seconds, press and hold the button