Now Reading: How to Change Batteries in Garage Door Opener Easily and Safely
- 01
How to Change Batteries in Garage Door Opener Easily and Safely
How to Change Batteries in Garage Door Opener Easily and Safely
Changing the battery in your garage door opener might seem like a small task, but it’s a detail that can make a big difference. When the remote stops working, or the wall unit blinks strangely, life gets interrupted. Suddenly, you’re stuck outside in the rain, juggling groceries, wondering what went wrong.
Knowing how to change the batteries yourself saves time, money, and stress. You don’t need to call a technician or wait for help—just a few simple steps and you’re back in control.
This guide covers everything you need to know about changing batteries in your garage door opener. You’ll learn how to spot signs of a dying battery, understand different opener types, pick the right replacement, follow safe steps, and troubleshoot common issues.
Along the way, you’ll discover tips that most first-timers miss—like why some remotes use watch batteries and how battery contacts can affect performance. By the end, you’ll be able to handle any battery change with confidence.
Why Battery Replacement Matters
Garage door openers rely on batteries for smooth operation. If the battery is weak or dead, the opener won’t respond, or it might work only sometimes. In worst cases, a failing battery can cause the opener to send weak signals, making you think the device is broken.
Changing the battery is a simple fix that prevents bigger headaches.
A surprising number of service calls to garage door companies are for issues related to batteries—up to 40% by some estimates. Most people don’t realize how much a low battery can affect opener performance until they’re locked out. Regular checks and timely battery changes keep everything working well and extend the life of your opener.
Identifying Your Garage Door Opener Type
Not all garage door openers use the same battery or have the same replacement method. Knowing your opener type is the first step.
Remote Controls
Most homes have a remote control that attaches to a car visor or sits by the door. These remotes almost always use coin-shaped batteries, like CR2032 or CR2016.
Wall Consoles
Some systems have a wall console with a backup battery. These are less common but becoming popular in newer models.
Keypad Entry Units
A keypad outside the garage allows keyless entry. These units typically use AA or AAA batteries, but some use 9V.
Main Opener Unit (motor Head)
The main opener inside the garage usually runs on electricity. However, many modern units include a backup battery (often 12V or rechargeable) to operate during power outages.
Common Garage Opener Brands And Their Battery Types
Here’s a quick comparison of popular brands and the batteries they use:
| Brand | Remote Battery | Keypad Battery | Backup Battery |
|---|---|---|---|
| Chamberlain | CR2032 | 9V | 12V, 5Ah |
| LiftMaster | CR2032 | 9V or AAA | 12V, 4.5Ah |
| Genie | CR2032 or A23 | AAA | Battery backup optional |
| Craftsman | A23 | AAA | 12V, 5Ah |
| Linear | CR2032 | 9V | No backup |
Tip: Always check your opener’s manual or the battery compartment for the correct type.
Signs That Your Garage Door Opener Needs A New Battery
It’s easy to miss the early signs of a weak battery. Here are the most common clues:
- Remote works only up close. If you need to stand right next to the door for the remote to work, the battery is probably low.
- Flashing LED lights. Some remotes or wall units blink to show low battery.
- Slower response. The door takes longer to open or close after pressing the button.
- Complete failure. The remote or keypad stops working entirely.
- Random operation. The opener works sometimes, but not always.
Many users think their opener or wiring is faulty, but it’s often just the battery. Replacing it early avoids bigger problems.
Choosing The Right Replacement Battery
Picking the correct battery is essential for both safety and performance. If you use the wrong type, the device may not work or could be damaged.
How To Find Your Battery Type
- Check the old battery. Most have a number printed, like CR2032 or A23.
- Look at the manual. The opener’s manual lists compatible batteries.
- Search online. Use the opener’s model number to find the battery type.
Battery Quality Matters
Not all batteries are equal. Cheap batteries might work for a few weeks, then fail. High-quality brands last longer and perform better in extreme weather.
Pro tip: Avoid mixing old and new batteries. Changing all at once ensures the best performance.
Quick Battery Type Reference
Here’s a table to help you match opener types with battery sizes:
| Device | Common Battery Type | Average Lifespan |
|---|---|---|
| Remote Control | CR2032, A23 | 1-2 years |
| Keypad Entry | 9V, AAA | 1 year |
| Wall Console | AAA, AA | 2 years |
| Backup Battery | 12V, 4.5Ah or 5Ah | 3-5 years |
If you’re unsure, take the old battery to a hardware store. Staff can help you find the right match.

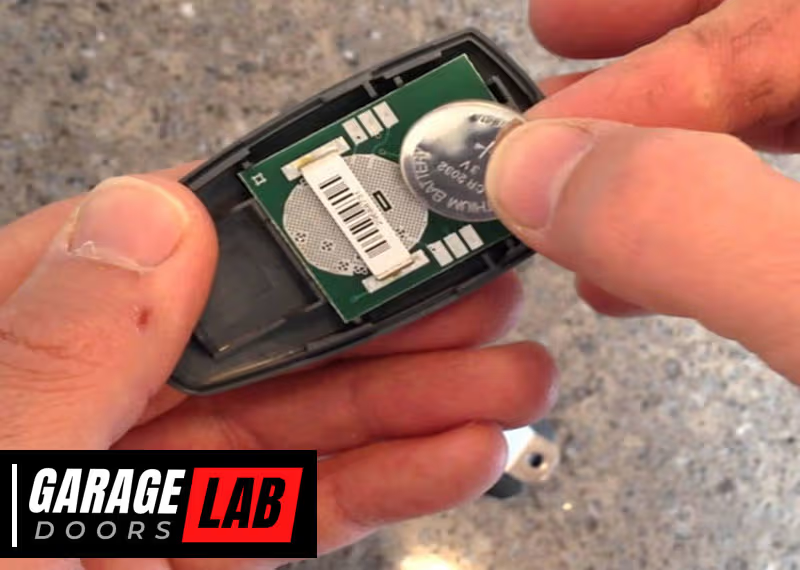
Step-by-step Guide: Changing Batteries In Garage Door Opener Remotes
Changing the battery in your garage door remote is a task anyone can do. Here’s how to get it right.
1. Gather Your Tools
You’ll need:
- The correct replacement battery
- A small Phillips screwdriver or flathead screwdriver
- A clean cloth
2. Locate The Battery Compartment
Most remotes have a small slot or screw on the back. The battery compartment is often hidden to prevent accidental opening.
3. Open The Remote
- If there’s a screw, remove it with the screwdriver.
- If not, gently pry open the case with a coin or your fingernail.
- Take care not to damage the plastic clips.
4. Remove The Old Battery
- Note the battery’s position (positive and negative sides).
- Use the cloth to handle the battery if it’s corroded or dirty.
- Gently lift out the battery.
5. Clean The Contacts (optional, But Smart)
- Check for corrosion or dirt inside the compartment.
- Wipe the contacts with a dry cloth.
- If there’s green or white buildup, use a cotton swab and a bit of rubbing alcohol.
Beginner insight: Dirty or corroded contacts can prevent the remote from working, even with a new battery.
6. Insert The New Battery
- Place the new battery in the same position as the old one.
- Check the + and – symbols to avoid reversing polarity.
7. Close The Remote
- Snap the case shut or replace the screw.
- Make sure the remote clicks together tightly.
8. Test The Remote
- Stand a few steps from the garage.
- Press the button to make sure the opener responds.
If it doesn’t work, double-check the battery orientation and contacts.
How To Change Batteries In Keypad Entry Systems
Most garage keypads use standard household batteries. Here’s how to replace them safely.
1. Open The Keypad
- Look for a battery compartment on the bottom or back.
- Some keypads slide open; others need a screwdriver.
2. Remove The Old Batteries
- Note the direction of each battery.
- Take all batteries out at once (don’t just change one).
3. Check For Corrosion
- Look for white or green powder near the contacts.
- Clean gently with a dry cloth or alcohol.
4. Insert New Batteries
- Match the positive and negative ends.
- Use fresh, high-quality batteries.
5. Secure The Compartment
- Close the cover tightly.
- Some units beep or blink to confirm a new battery.
6. Test The Keypad
- Enter your code and check if the door responds.
Non-obvious tip: Some keypads need to be reprogrammed after a battery change. Check your manual if the code doesn’t work.
Changing The Backup Battery In The Main Opener Unit
If your opener has a battery backup, it will be inside the main unit, often in the ceiling of your garage.
1. Unplug The Opener
- For safety, always disconnect power before opening the unit.
2. Locate The Battery Compartment
- Most battery backup units have a small door on the side or back.
- You may need a screwdriver to open it.
3. Remove The Old Battery
- Disconnect the wires (note their position for reattachment).
- Carefully remove the battery.
4. Inspect For Damage
- Check for leaks or corrosion.
- Clean with a dry cloth if necessary.
5. Install The New Battery
- Match the voltage and amperage exactly (e.g., 12V, 5Ah).
- Connect the wires securely.
6. Close The Compartment
- Screw the door back on.
- Plug the opener back into power.
7. Test The System
- Open and close the door to confirm everything works.
- Some models have a test button for battery backup.
Important: Never throw away old lead-acid batteries in the trash. Take them to a recycling center.
Special Cases: Unusual Battery Types And Hard-to-open Remotes
Some garage remotes use less common batteries, like A23 or even button cells stacked together. Others are glued or sealed to keep out water.
- If your remote doesn’t open easily, check for hidden screws under stickers.
- For waterproof remotes, look for a rubber seal around the edge.
- If you force the remote and it cracks, tape can hold it together, but it’s best to replace the shell.
Beginner mistake: Using the wrong tool or too much force can break the remote. Take your time and inspect all sides.

Programming And Re-syncing After Battery Change
Usually, changing the battery doesn’t erase your remote’s programming. But sometimes, especially after a long dead period, the remote loses sync.
How To Re-sync
- Find the “Learn” button on your main opener unit (often under a light cover).
- Press the button until the indicator light turns on.
- Press the remote button within 30 seconds.
- The light blinks to show the remote is paired.
Check your opener’s manual for specific instructions, as some models have extra steps.
Safety Tips When Handling Batteries
Batteries are safe when handled correctly, but mistakes can cause leaks or short circuits.
- Never mix old and new batteries.
- Do not touch both ends of a battery with metal tools.
- Wash hands after handling old or corroded batteries.
- Store spare batteries away from metal objects and in a cool, dry place.
- Dispose of used batteries properly—never burn or crush them.
Non-obvious insight: Even small coin batteries can be dangerous if swallowed, especially for kids or pets. Keep them out of reach.
Troubleshooting: When The New Battery Doesn’t Work
Sometimes, the remote or keypad still won’t work after a battery change. Here’s what to check:
- Battery orientation. Double-check the + and – sides.
- Battery contacts. Clean any corrosion.
- Remote damage. Look for cracks or water inside.
- Programming lost. Try re-syncing.
- Wrong battery. Verify the replacement matches the required type.
- Dead replacement battery. Rare, but possible with old stock.
If you’ve checked all these and it still fails, the remote may need to be replaced.
How Often Should You Change Garage Door Opener Batteries?
Most garage remotes and keypads need new batteries every 1-2 years. Backup batteries in openers last 3-5 years. However, heavy use, extreme cold, or poor battery quality can shorten this time.
Tip: Set a reminder on your phone or calendar to check batteries each year—before winter, when batteries fail most often.
Environmental Impact And Proper Disposal
Throwing batteries in the trash harms the environment. Most hardware stores and recycling centers accept used batteries. Lead-acid backup batteries especially must be recycled, as they contain hazardous materials.
For more on safe battery disposal and recycling, see the EPA’s advice at EPA.gov.
Cost Breakdown: What To Expect
Most garage door opener batteries are affordable. Here’s a quick summary:
- Coin batteries (CR2032, A23): $2–$6 each
- 9V or AAA batteries: $2–$8 for a pack
- Backup batteries (12V, 5Ah): $20–$40
Buying in bulk saves money, but watch expiration dates. High-quality brands cost a bit more but last longer and work better in cold weather.
Real-world Example: Step-by-step Battery Change
Imagine you have a LiftMaster remote that stopped working.
- You check the back—no screw, just a seam.
- Pry open with a coin; inside is a CR2032 battery.
- Remove the old battery, noting the “+” side faces up.
- Clean the contacts with a cloth.
- Insert a new CR2032 battery, positive side up.
- Snap the case closed.
- Test—door opens from 20 feet away, just like new.
This process takes less than 5 minutes and saves a service call.
Common Mistakes To Avoid
- Forcing the case open and breaking plastic clips.
- Using the wrong battery type or size.
- Mixing old and new batteries.
- Ignoring corrosion, which can spread and ruin electronics.
- Forgetting to test the remote before leaving the garage.
Extra Tips For Long Battery Life
- Store remotes indoors during extreme heat or cold.
- Use brand-name batteries for best reliability.
- Don’t wait for total failure—change batteries when the range drops.
When To Call A Professional
Most battery changes are DIY-friendly. Call a technician if:
- The battery compartment is damaged or stuck.
- The opener fails after a battery change and reprogramming.
- There’s heavy corrosion or leaking inside the device.
- You’re unsure about handling lead-acid backup batteries.

Frequently Asked Questions
How Do I Know Which Battery My Remote Uses?
Check the old battery for a code (like CR2032 or A23). You can also find this information in your garage door opener’s manual or by searching the remote’s model number online.
Will I Need To Reprogram My Remote After Changing The Battery?
In most cases, no. But if the remote does not work after the battery change, try re-syncing it with the main opener unit using the “Learn” button. Some remotes lose memory if left without a battery for a long time.
What Should I Do With Old Garage Door Opener Batteries?
Do not throw them in the regular trash. Take coin, alkaline, or lead-acid batteries to a recycling center or hardware store for safe disposal. For more details, see the EPA’s website.
Why Does My Remote Still Not Work After Changing The Battery?
Check that the new battery is installed with the correct polarity, the contacts are clean, and the remote is not damaged. Try reprogramming the remote if needed. If all else fails, the remote may be faulty.
How Long Do Garage Door Opener Batteries Last?
Remote and keypad batteries usually last 1–2 years. Backup batteries in the main opener can last 3–5 years. Battery life depends on usage, temperature, and battery quality.
Changing the batteries in your garage door opener is simple, but it’s easy to overlook important steps. By understanding the different opener types, using the right battery, and following safe procedures, you’ll keep your system running reliably year after year.
A few minutes of care can save hours of frustration—so don’t wait until you’re locked out to replace your batteries.


