Now Reading: Garage Door Springs How Many Turns: A Complete Guide
- 01
Garage Door Springs How Many Turns: A Complete Guide

A garage door opens and closes smoothly because of a hidden hero—the garage door spring. If you’ve ever struggled with a heavy door or wondered why it won’t stay open, the spring is likely the cause. One small detail makes a big difference: how many turns the spring gets during installation. For many, this is a mystery, but it’s essential for safety and performance.
If you try to set up or adjust a garage door spring without knowing the right number of turns, you risk damaging your door, hurting yourself, or even making the garage unsafe. This article explains, in simple and clear words, how many turns garage door springs need, why it matters, and what happens if you get it wrong.
Along the way, you’ll learn about different spring types, tools, common mistakes, and how professionals handle this job.
Understanding Garage Door Springs
Most garage doors use torsion springs or extension springs. Each type works differently and needs a specific number of turns or stretches to balance the door correctly.
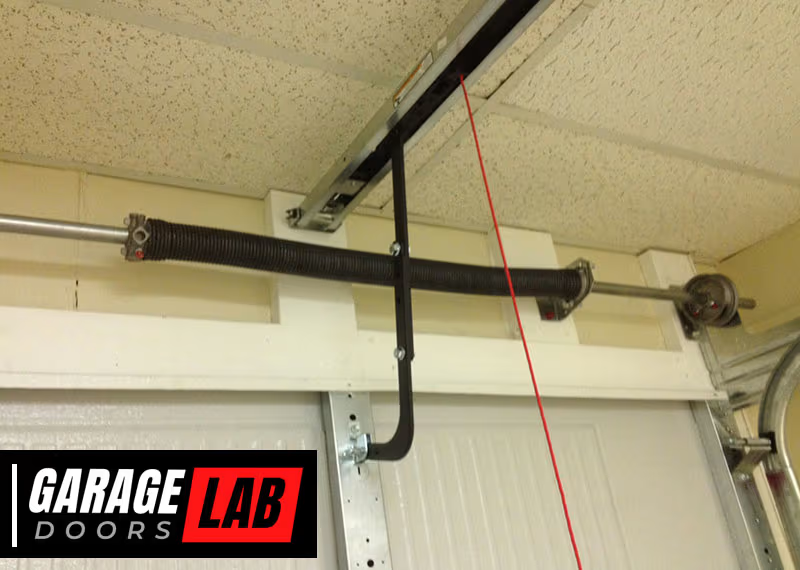
Torsion Springs
Torsion springs sit above the door, mounted on a metal shaft. When you open the door, the springs unwind and help lift the weight. When you close the door, they wind back up, storing energy for the next lift.
Extension Springs
Extension springs are mounted on both sides of the door, stretching as the door closes and contracting as it opens. These are usually found in older or smaller garage doors.
Why Proper Tension Matters
The right tension means your garage door feels light and easy to move. If tension is too low, the door will be heavy and may fall quickly. If tension is too high, the door might not close properly or could jump off its tracks.
How Many Turns For Garage Door Springs?
The number of turns you need depends mainly on the height of your garage door, not the width or weight. Here’s the basic rule used by professionals: One full turn per foot of door height, plus an extra half turn.
Let’s break that down:
- For a standard 7-foot door: 7 turns + ½ turn = 7.5 turns
- For an 8-foot door: 8 turns + ½ turn = 8.5 turns
This rule covers most residential garage doors. However, some doors are custom-sized or heavier, so adjustments may be needed.
Typical Turn Chart
Below is a quick reference table for common door heights.
| Door Height (ft) | Number of Turns | Extra Notes |
|---|---|---|
| 6 | 6.5 | For small or shed doors |
| 7 | 7.5 | Most common size |
| 8 | 8.5 | High-ceiling garages |
| 9 | 9.5 | Rare, heavy doors |
Why Add A Half Turn?
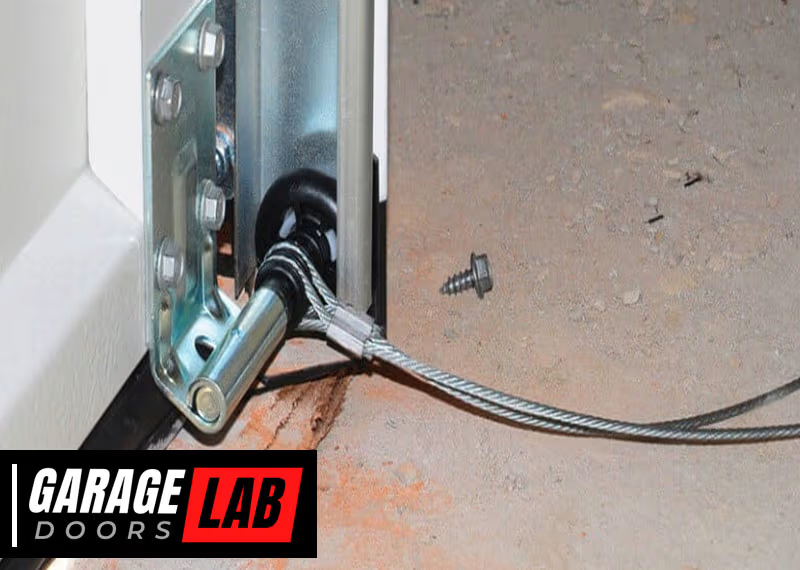
The extra half turn ensures the cables on the drum stay tight when the door is fully closed. Without this, the cables may come loose, and the door can jam or fall.
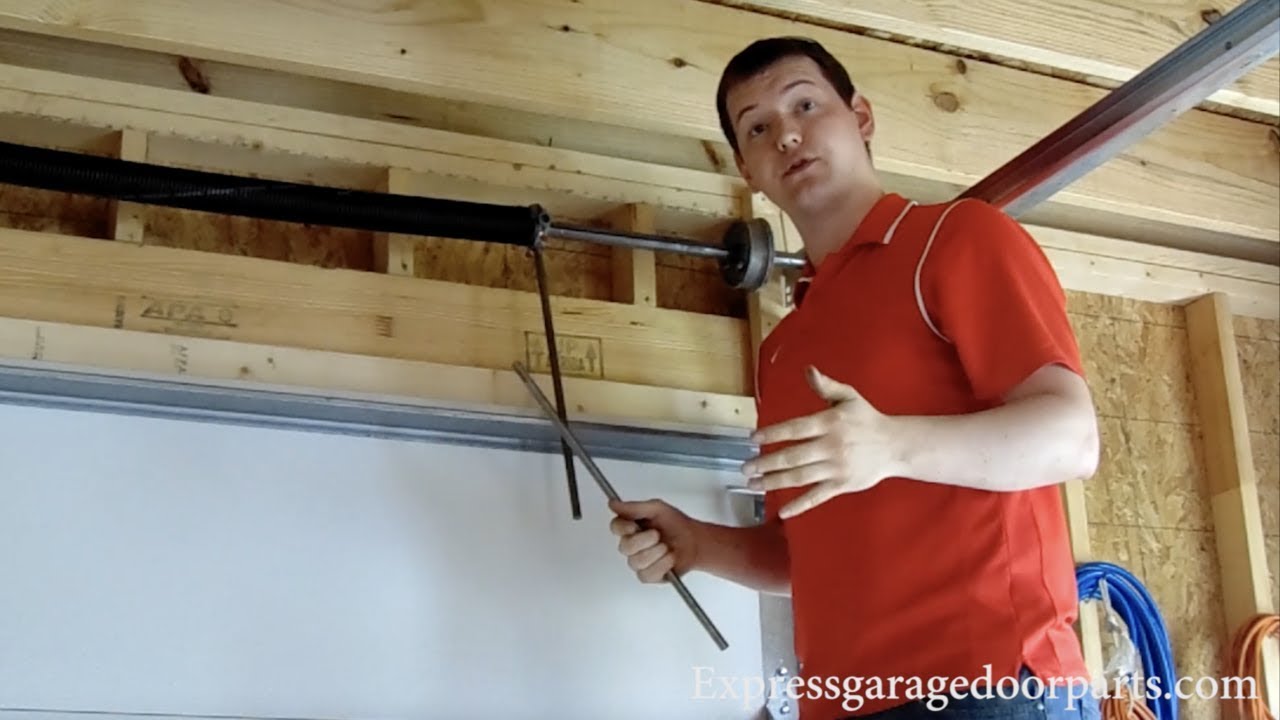
How To Count Turns On A Torsion Spring
When winding a torsion spring, each full rotation (360 degrees) is one turn. You usually make these turns with a winding bar. Mark the spring with chalk before starting so you can count easily.
Example:
- If you need 7.5 turns, you rotate the bar 7 full times, then another half turn.
One smart tip: As you turn, count the number of times your chalk mark passes the top or bottom position. If you lose count, start over rather than guess—an incorrect number can be dangerous.
Step-by-step: Adjusting Torsion Springs
Adjusting torsion springs is not for everyone. It can be dangerous due to the high tension. If you’re not confident, hire a professional. If you want to understand the process, here’s how it works:
- Unplug the opener and make sure the door is fully closed.
- Secure the door with locking pliers or a clamp on the track.
- Insert winding bars into the winding cone holes.
- Loosen the set screws on the winding cone.
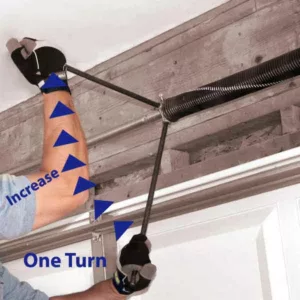
- Wind the spring: Add one full turn per foot of door height, plus a half turn.
- Tighten the set screws and remove the winding bars.
- Test the door balance. The door should stay halfway open on its own.
Important: Never use screwdrivers or makeshift bars—they can break and cause injury.
Adjusting Extension Springs
Unlike torsion springs, extension springs are not wound with turns but stretched to a certain length. Still, they must be balanced properly.
- If your door feels heavy, increase the stretch (move the hook to a higher hole).
- If the door flies up, decrease the stretch (move the hook lower).
Common Mistakes When Winding Springs
Many beginners make errors that can lead to broken doors or injuries. Here are some common mistakes:
- Winding the wrong direction: Torsion springs must be wound in the correct direction (usually toward the ceiling).
- Not adding the half turn: Skipping this can cause cables to slip.
- Using the wrong tools: Avoid screwdrivers or pipes not made for winding.
- Forgetting to secure the door: The door can move suddenly and cause harm.
- Miscalculating turns: Always use the correct formula for your door height.
Factors Affecting Number Of Turns
While the “one turn per foot plus half” rule works for most, a few factors can change the number of turns needed:
Door Weight
Heavier doors may need thicker springs, not more turns. If your door is solid wood or extra wide, check your spring’s rating.
Spring Length And Wire Size
Longer or thicker springs store more energy. If you replace a spring with a different size, the number of turns may change. Always use the manufacturer’s instructions.
Cable Drum Size
Some specialty cable drums (used on commercial or high-lift doors) may need more or fewer turns. The drum size affects how much cable is wound per turn.
Weather And Temperature
Colder weather can make springs stiffer. Sometimes, installers add a quarter turn more in colder climates to keep the door balanced.
Signs Of Incorrect Spring Tension
How do you know if your garage door springs have the right number of turns? Watch for these signs:
- Door is hard to lift or falls quickly: Not enough turns.
- Door flies up when opened: Too many turns.
- Door won’t close fully: Tension may be too high.
- Cables slip off the drum: Usually from missing the half turn.
Testing your door’s balance by hand is a practical way to check. With the opener disconnected, lift the door halfway. If it stays in place, your tension is likely correct.
Professional Vs. Diy: When To Call An Expert
Adjusting garage door springs is risky. The tension can cause serious injury if tools slip or parts break. Many homeowners try to save money but end up calling a pro after problems.
Here’s a comparison of DIY vs. professional spring adjustment:
| Aspect | DIY Adjustment | Professional Service |
|---|---|---|
| Cost | Low (just tools) | Higher (labor + parts) |
| Safety | Risk of injury | Safer (trained staff) |
| Accuracy | May require trial and error | Precise and quick |
| Time | Can take hours | Usually under 1 hour |
| Warranty | None | Often included |
If your springs are old, rusty, or you’re unsure, it’s best to call a professional. They have the right tools, experience, and insurance.
Tools Needed For Winding Garage Door Springs
Using the right tools makes the job safer and easier:
- Winding bars: These fit snugly in the spring’s winding cone. Never use tools not made for this job.
- Vice grips or locking pliers: To secure the shaft and keep the door from moving.
- Socket wrench: For loosening and tightening set screws.
- Chalk or marker: To mark the spring for counting turns.
- Safety glasses and gloves: To protect yourself from flying debris or sharp edges.
Some hardware stores sell winding bar kits made for garage doors. Avoid using anything homemade.
How Spring Life Is Measured
Garage door springs don’t last forever. Most standard springs are rated for 10,000 cycles (one cycle = one open and close). Some high-cycle springs last up to 20,000 or more.
If your springs are over 7-10 years old and your door is used daily, it may be time for a replacement.
Example: Spring Cycle Chart
| Spring Cycle Rating | Estimated Years (2 Cycles/Day) | Estimated Years (4 Cycles/Day) |
|---|---|---|
| 10,000 | 13.7 | 6.8 |
| 20,000 | 27.4 | 13.7 |
| 50,000 | 68.5 | 34.2 |
Real-world Examples
Let’s look at a few real-life situations:
Example 1: Standard Home Garage
Maria has a 7-foot tall aluminum garage door. She replaces the springs and winds them 7. 5 turns as recommended. The door now lifts easily, and the opener motor works less.
Example 2: Heavy Wooden Door
Jorge’s old wooden garage door is 8 feet tall and very heavy. He installs thicker, stronger springs, but still uses the 8. 5 turns rule. Even though the springs are stronger, the turn count stays the same—what changes is the spring’s wire size.
Example 3: Spring Replaced With Wrong Size
A homeowner replaces a broken spring with one that’s too short. Even after winding the right number of turns, the door is still heavy. This shows why spring size matters as much as turns.
What If The Door Is Not Standard Height?
Some garage doors are 6.5 feet or 7.6 feet. For these, use the same rule:
- Measure the exact height.
- Round to the nearest quarter foot.
- Add one turn per foot, plus the half turn.
Example: For a 6.5-foot door: 6.5 + 0.5 = 7 turns.
Myths And Misunderstandings
Many people believe that adding more turns will make the door lighter, or fewer turns will make it safer. Both are wrong. Too many turns make the spring too tight and can cause it to break. Too few turns put extra strain on your opener or cables.
Another common myth: “If the door is heavy, just add more turns.” The real solution is to use the right size spring.
How To Tell If Springs Are Worn Out
Signs your springs may need replacement, not just adjustment:
- Springs are stretched out or have gaps
- Door makes loud bang (spring has snapped)
- Rust or visible wear
- Door is crooked or jams
If you see these, call a professional. Don’t try to fix or wind a broken spring.
Safety Precautions
Working with garage door springs is dangerous. Here are safety rules you should never ignore:
- Always unplug the opener before working.
- Wear safety gear—gloves and glasses.
- Use only winding bars made for your spring size.
- Never wind a damaged or rusty spring.
- Keep children and pets away.
- If unsure, call a pro.
Non-obvious Insights Most Beginners Miss
- Spring winding direction matters: If you wind the wrong way, the spring will not help lift the door. Torsion springs come in left- and right-wound versions. Check markings or ask the supplier.
- Cable drums and shaft position: If the cable drums are not set correctly, even the right number of turns won’t balance the door. Make sure drums are secure and cables are tight before winding.
- The effect of opener force settings: Sometimes, people adjust the opener’s force instead of fixing spring tension. This can damage the opener and make the door unsafe.
Best Practices For Long-lasting Springs
- Lubricate springs every 6-12 months with garage door spray.
- Check balance twice a year.
- Replace both springs at the same time if one breaks—this keeps wear even.
- Don’t exceed the cycle rating—plan to replace springs before they fail.
Where To Find More Information
For in-depth guides and safety warnings, check the official Wikipedia page on garage doors. It covers all technical details and links to safety standards.
Frequently Asked Questions
How Many Turns For A Standard 7-foot Garage Door Spring?
A standard 7-foot door needs 7.5 turns on the torsion spring. This is one full turn per foot of door height plus a half turn to keep the cables tight.
What Happens If I Add Too Many Or Too Few Turns?
Too many turns make the door fly up, put stress on the system, and can break the spring. Too few turns make the door heavy, hard to lift, and can cause the cables to slip off the drum.
Can I Use The Same Number Of Turns For All Spring Sizes?
No. While the number of turns is based on door height, the spring size must also match your door’s weight. Always use the right spring size and wire thickness for your door.
Is It Safe To Adjust Garage Door Springs Myself?
It is risky. Springs are under high tension and can cause serious injury. If you are not experienced or don’t have the right tools, it’s best to call a professional.
What Tools Do I Need To Wind A Garage Door Spring Safely?
You need winding bars (made for garage doors), locking pliers, a socket wrench, chalk or a marker, and safety gear like gloves and glasses. Never use makeshift tools.
A well-balanced garage door is safer, lasts longer, and protects your investment. Understanding the right number of turns for your garage door springs is a small detail that makes a big difference. Take care, follow these guidelines, and your garage will work smoothly for years.