Now Reading: How to Change Garage Door Spring: A Step-by-Step Guide
- 01
How to Change Garage Door Spring: A Step-by-Step Guide
Changing a garage door spring is one of those tasks that seems simple, but carries hidden risks and requires careful steps. Many homeowners consider this project to save money, but it demands strong attention to detail, proper tools, and solid safety practices. If you’re thinking about replacing a garage door spring yourself, this guide will walk you through every step — from understanding the basics to completing the installation and testing your work.
You’ll also learn where most beginners go wrong, how to avoid common injuries, and the differences between spring types. By the end, you’ll have the knowledge to decide if you should tackle the job yourself or call a professional.
Understanding Garage Door Springs
Before you start, it’s important to know exactly what garage door springs do. These springs carry the heavy weight of your garage door, making it possible to lift the door by hand or with a motor. When a spring breaks, the door can become extremely heavy and dangerous to operate.
There are two main types of garage door springs:
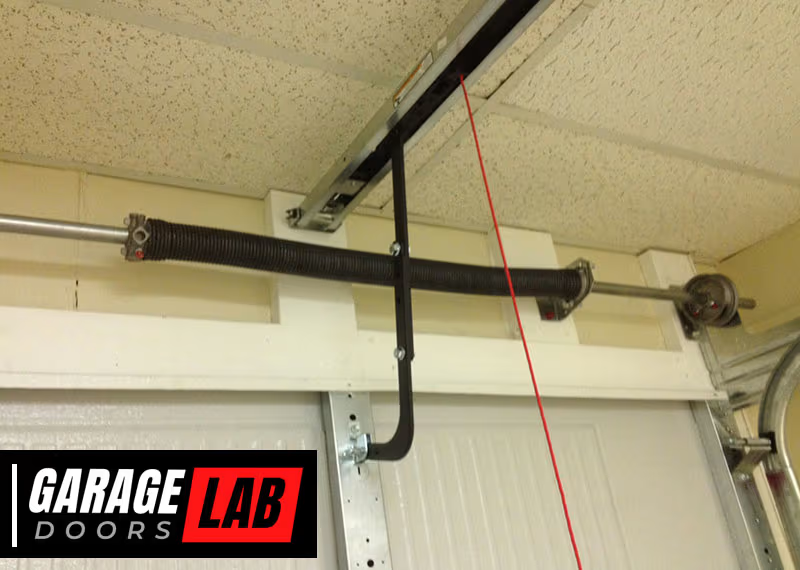
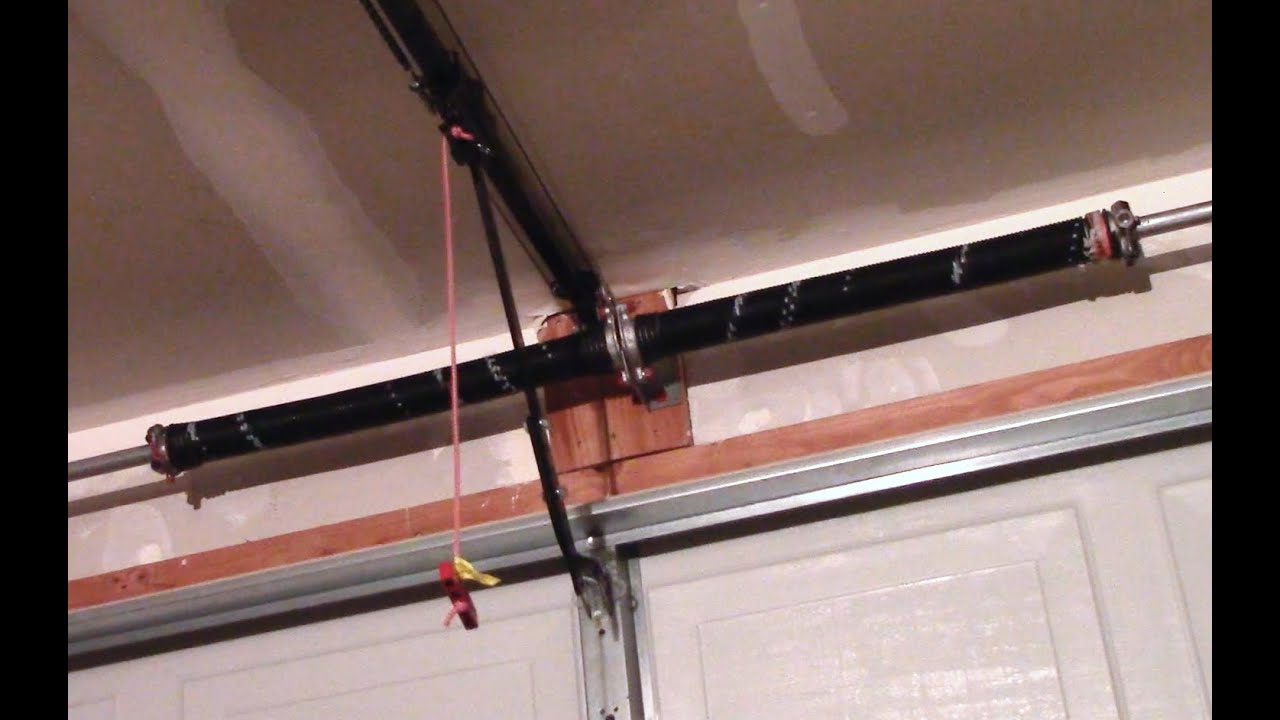
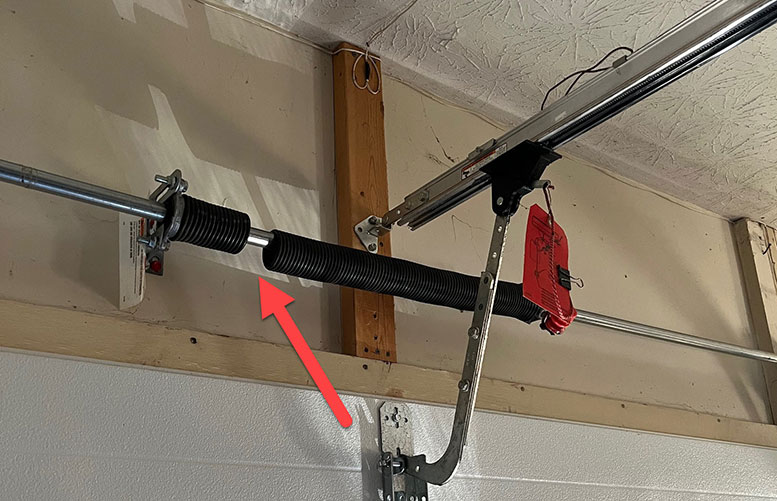
- Torsion springs – Mounted above the garage door opening on a metal shaft. They twist to create tension.
- Extension springs – Located above the upper tracks on both sides. They stretch and contract to assist lifting.
Most modern doors use torsion springs because they last longer and are safer if they break. Extension springs are still found on older doors or smaller garages.
How Garage Door Springs Work
When you open your garage door, the springs counterbalance the weight. A standard double garage door can weigh between 150 and 250 pounds, with heavier custom doors going even higher. The springs store mechanical energy and release it as the door moves up or down, making operation smooth and controlled.
If a spring breaks, you may hear a loud bang, and the door may suddenly drop or become impossible to lift. This is why timely replacement is critical.
Signs Your Garage Door Spring Needs Replacing
Most springs are rated for 10,000 cycles (one cycle is an open and close). For a typical household, this means 7–10 years of use. However, usage patterns and climate can shorten this lifespan.
Here are common signs your spring is failing or broken:
- The garage door won’t open, or only opens a few inches.
- You hear a loud snap or bang from the garage.
- The door closes much faster than normal.
- There are visible gaps in the spring coils.
- The door feels unusually heavy to lift manually.
If you notice any of these, do not continue using the door. A broken spring is dangerous, and forcing the opener can damage other components.

Safety Warning And Preparation
Replacing a garage door spring is dangerous. Every year, thousands of injuries occur due to improper handling, with some resulting in broken bones or worse. Torsion springs, in particular, are tightly wound and can release enough force to cause serious harm.
Non-obvious insight: Even with the door in the open position, springs can still hold dangerous tension. Always treat them with respect.
If you are not comfortable working with tools or handling heavy parts, call a professional. For those who are confident, careful, and follow safety instructions closely, this guide will help you proceed.
Tools And Materials You Need
Gather all tools and materials before starting. Missing items can force you to stop midway, which is unsafe with a disassembled door.
Essential tools:
- Two winding bars (never use screwdrivers)
- Adjustable wrench
- Socket set
- Vice grips
- Clamps
- Safety goggles
- Leather gloves
- Stepladder
- Marker or chalk
- Tape measure
Replacement parts:
- Correct size garage door spring(s) (consult the manufacturer or measure your old spring)
- New center and end bearings (if worn)
- Lubricant (garage door specific)
Pro tip: Always replace both springs, even if only one is broken. The other is likely to fail soon.
Measuring And Identifying The Correct Replacement Spring
Choosing the right spring is critical. Using the wrong size can cause the door to operate unsafely or damage the opener.
How To Measure A Torsion Spring
- Length: Measure the spring from coil to coil (do not include end cones).
- Wire size: Measure 10, 20, 30, and 40 coils and divide by the number of coils to get the wire thickness.
- Inside diameter: Usually stamped on the winding cone (common sizes are 1.75″ or 2″).
- Wind direction: Left-wound springs go on the right side, right-wound on the left (from inside the garage).
Take these measurements to your supplier or match with the original manufacturer’s specs. If you have any doubts, ask for help — the wrong spring is a common cause of problems.
Extension Spring Sizing
For extension springs, you’ll need:
- Door height
- Spring length (relaxed)
- Weight of the door
Check color codes on the spring loops, which often indicate the weight rating.
Step-by-step Guide: How To Change A Garage Door Spring
Changing a spring is a step-by-step process. For safety, never skip steps or take shortcuts. The following instructions are for torsion springs, as they are most common. Extension spring replacement follows a similar logic but uses different mounting points.
Step 1: Disconnect Power And Secure The Door
- Unplug the garage door opener to prevent accidental activation.
- Use the emergency release rope to disconnect the door from the opener.
- Raise the door fully and clamp it in place on the tracks with vice grips or locking pliers. This holds the door up and reduces spring tension.
Important: If the door won’t stay open, use additional clamps or supports. Never rely on the opener or your strength alone.
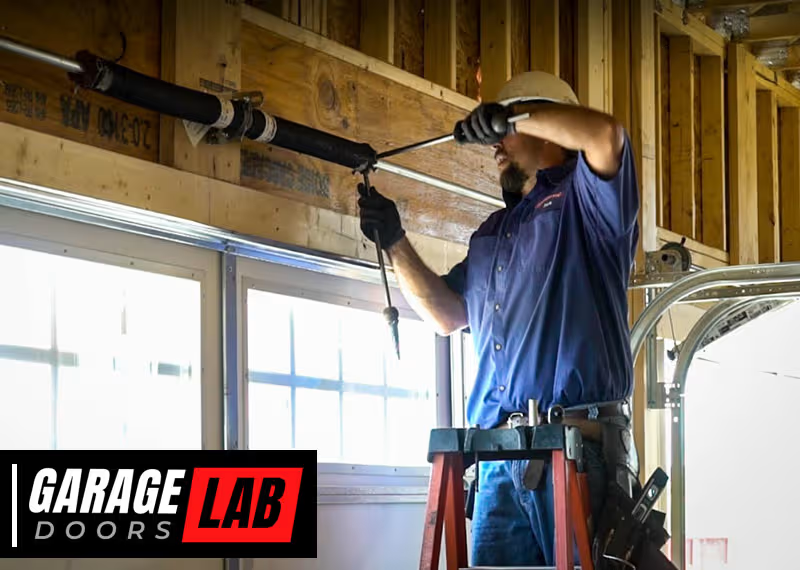
Step 2: Loosen The Broken Spring
- Put on safety goggles and gloves.
- Insert a winding bar into the winding cone hole of the spring.
- Hold the bar firmly and loosen the set screws with a wrench.
- Insert the second winding bar before removing the first to keep control.
- Carefully unwind the spring, one quarter-turn at a time, alternating bars. Count the turns for reference.
Non-obvious insight: Never stand directly in front of the winding cone. Always keep your body to the side.
Step 3: Remove Old Spring And Hardware
- Slide the spring toward the end bracket.
- Remove the end bearing plate and carefully slide off the spring.
- Inspect the shaft, center bearing, and end bearing for wear or damage. Replace if necessary.
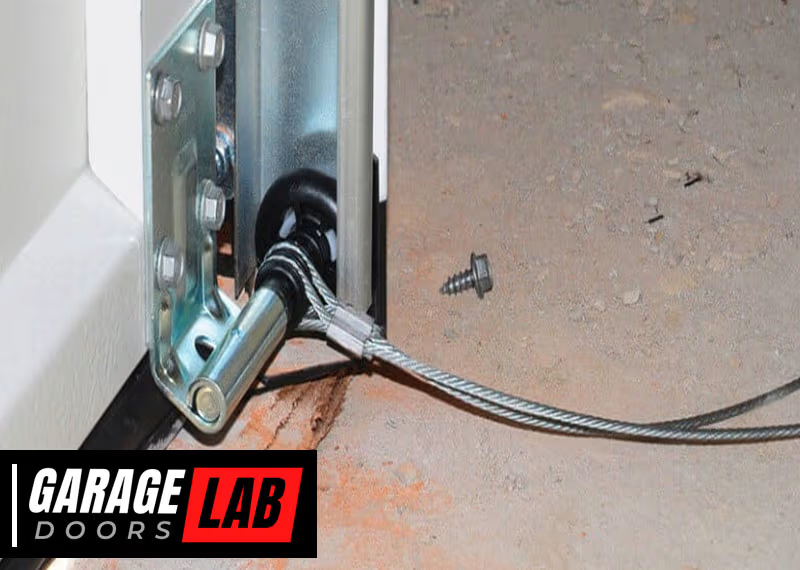
- Remove and inspect the cable drums and cables; replace any frayed parts.
Tip: Taking photos during disassembly helps you remember the order for reassembly.
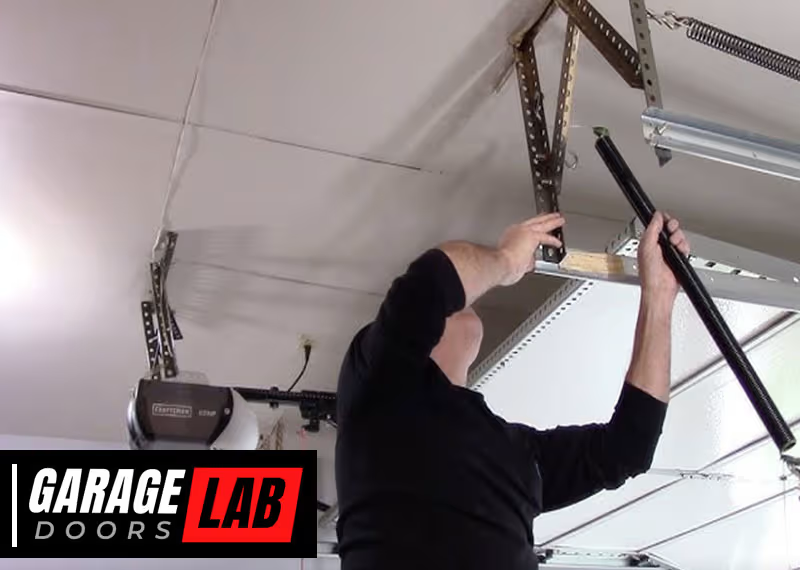
Step 4: Install The New Spring
- Slide the new spring onto the shaft in the correct direction (right or left wind).
- Replace the center bearing, end bearing, and cable drum.
- Thread the lift cables onto the drums, making sure they are seated properly.
- Tighten the set screws on the cable drum, but do not overtighten.
- Center the shaft so it turns freely.
Pro insight: If your door uses two springs, repeat the steps for the other side before winding either spring.
Step 5: Wind The New Spring
- Insert the winding bar into the winding cone.
- Wind the spring the correct number of turns (usually 7.5 for a 7-foot door, 8.5 for 8-foot door).
- Use the winding bars to turn the spring in the specified direction.
- Tighten the set screws on the winding cone.
- Remove the clamps and vice grips holding the door.
Never use power tools for winding. Only winding bars can safely handle the force.
Step 6: Test And Adjust The Door
- Reconnect the opener.
- Raise and lower the door manually. It should move smoothly and stay open at waist height.
- If the door drifts up or down, adjust the spring tension by adding or removing a quarter-turn.
- Lubricate the springs and bearings with garage door lubricant.
Once you’re satisfied, reconnect the opener and test the door several times. Listen for unusual noises or jerky movement.
Note: Extension springs are replaced by disconnecting one end, installing the new spring, and adjusting the safety cable. Always use safety cables to prevent injury if a spring snaps.
Common Mistakes To Avoid
Many DIYers make errors that can cause injury or more repairs later. Here’s what to watch for:
- Using the wrong tools: Screwdrivers and pliers can slip; only winding bars are safe.
- Skipping safety gear: Eye and hand protection are essential.
- Not clamping the door: The door can fall suddenly without clamps.
- Ignoring spring direction: Installing a spring backward can damage the door.
- Not replacing both springs: One old spring will fail soon after the other.
- Improper tension: Over- or under-winding makes the door unsafe or hard to open.
If you’re unsure at any point, don’t guess — consult a professional or trusted resource like the Family Handyman guide.
Cost Comparison: Diy Vs. Professional Replacement
Many people choose DIY replacement to save money, but it’s important to understand the true costs — including risk.
| Replacement Method | Average Cost | Includes Labor? | Risk Level |
|---|---|---|---|
| DIY | $40–$100 | No | High |
| Professional | $150–$350 | Yes | Low |
While DIY is cheaper, the risk of injury or damage can outweigh the savings for many homeowners.
Torsion Vs. Extension Springs: What’s The Difference?
Some homeowners aren’t sure which type their garage uses. Here’s a simple side-by-side comparison:
| Feature | Torsion Spring | Extension Spring |
|---|---|---|
| Location | Above door opening, on shaft | Above tracks, both sides |
| Safety | Safer if broken | Can fly off if not cabled |
| Lifespan | 10,000–20,000 cycles | 5,000–10,000 cycles |
| Cost | Higher | Lower |
| Ease of Replacement | More complex | Easier |
If you have a choice, torsion springs are worth the investment for safety and durability.
How To Maintain Garage Door Springs
After installing new springs, regular maintenance is the best way to extend their life and keep your door safe.
- Lubricate springs every 6–12 months with garage door lubricant to reduce friction.
- Check for rust or corrosion and clean as needed.
- Inspect cables and bearings for fraying or wear.
- Test door balance twice a year by disconnecting the opener and lifting the door halfway. It should stay in place.
- Listen for noises like grinding or squeaking, which may signal issues.
Most spring failures come from lack of lubrication, rust, or overuse. A simple maintenance routine can add years to their lifespan.
When To Call A Professional
Some jobs are best left to experts. If you experience any of the following, call a garage door technician:
- The shaft is bent or damaged
- The door is off its tracks
- You cannot identify the correct spring type or size
- You lack the proper tools or confidence
A professional will have the right parts, tools, and know-how to do the job safely and quickly.
Real-world Example: What Can Go Wrong
A homeowner in Texas tried to replace his own torsion spring using a screwdriver instead of winding bars. The screwdriver slipped, and the spring spun loose, breaking his wrist and damaging the door. He ended up paying more in hospital bills and repairs than a professional replacement would have cost.
Lesson: The right tools and techniques are non-negotiable. Saving a few dollars isn’t worth a serious injury.
Tips For A Safer And Easier Installation
- Label everything during disassembly to make reassembly easier.
- Take photos as you go, especially of cable routing and hardware positions.
- Work with a partner if possible, for extra hands and safety.
- Double-check measurements before purchasing new springs.
- Keep children and pets away from the garage during the repair.
- Dispose of old springs safely; they can still be dangerous if mishandled.
Garage Door Spring Replacement: Timeline
How long will the job take? Here’s a rough breakdown for a typical DIY replacement:
| Task | Time Estimate |
|---|---|
| Preparation & Setup | 20–30 minutes |
| Removing Old Spring | 30–45 minutes |
| Installing New Spring | 30–45 minutes |
| Testing & Adjustment | 15–20 minutes |
| Total Time | 1.5–2.5 hours |
Plan for extra time if you’re new to this type of work.
Garage Door Spring Replacement For Different Doors
Not all doors are the same. Here’s what to consider based on your garage type:
Single Vs. Double Garage Doors
- Single doors use one or two springs, depending on weight.
- Double doors almost always use two springs for balance.
Insulated Or Heavy Doors
- Heavier or insulated doors require thicker springs with more tension.
- Using undersized springs can damage the opener or cause unsafe operation.
Custom Or High-lift Systems
- Some doors have unique spring setups. Always check your model’s manual and order the correct replacement.
Environmental Factors That Affect Spring Life
Climate can have a big impact on how long your springs last.
- High humidity causes rust and weakens steel.
- Extreme cold makes springs more brittle and prone to snapping.
- Coastal air can speed up corrosion.
Using galvanized or powder-coated springs can help in harsh climates. Regular lubrication is extra important in these areas.
Recycling And Disposal Of Old Springs
Garage door springs are made of steel and can be recycled at most metal scrap yards. Wrap them in cloth or cardboard for transport, as sharp edges can cut. Do not throw them in household trash — they can harm sanitation workers.
Check with your local recycling center for guidelines.
Frequently Asked Questions
How Dangerous Is It To Change A Garage Door Spring Myself?
Changing a garage door spring is one of the most dangerous home repairs due to the high tension involved. Injuries range from cuts and bruises to broken bones and even death in rare cases. Always use the correct tools and safety gear, and don’t hesitate to call a professional if you’re unsure.
How Do I Know Which Spring Size To Buy?
Measure your old spring’s length, wire diameter, and inside diameter, and check the wind direction. Many suppliers have online calculators or guides to help. Providing your door’s model and weight to a specialist is also very helpful.
Can I Replace Just One Spring If Only One Is Broken?
It’s best to replace both springs at the same time. They wear out together, so the unbroken spring is likely near the end of its life. Replacing both ensures even operation and prevents future breakdowns.
How Long Do Garage Door Springs Usually Last?
Most torsion springs last around 10,000 cycles (7–10 years for a typical family). High-cycle springs can last 20,000 cycles or more. Factors like climate, lubrication, and door weight can shorten or lengthen this lifespan.
Is It Safe To Use The Garage Door Opener If The Spring Is Broken?
No. Using the opener with a broken spring can damage the motor and gears, and may cause the door to fall unexpectedly. Always repair or replace broken springs before operating the opener.
Replacing a garage door spring is a job where preparation, the right tools, and careful attention to safety make all the difference. With the right knowledge, many homeowners can handle the task — but it’s not for everyone. When in doubt, professional help is the safest path.
Your garage door is one of the heaviest moving objects in your home — treat it with respect, and it will serve you well for years to come.