Now Reading: How to Change Torsion Spring on Garage Door Safely and Easily
- 01
How to Change Torsion Spring on Garage Door Safely and Easily
Changing the torsion spring on a garage door is not a simple weekend project. Many homeowners try to save money by doing it themselves, but this job demands careful planning, the right tools, and a strong focus on safety. One mistake can lead to serious injury or expensive damage.
Still, if you are handy with tools and follow expert guidance, you can successfully replace a torsion spring on your garage door. This article will guide you step by step through the process, explain what tools you need, warn you about common mistakes, and help you decide if you should do it yourself or call a professional.
Understanding Torsion Springs And Their Role
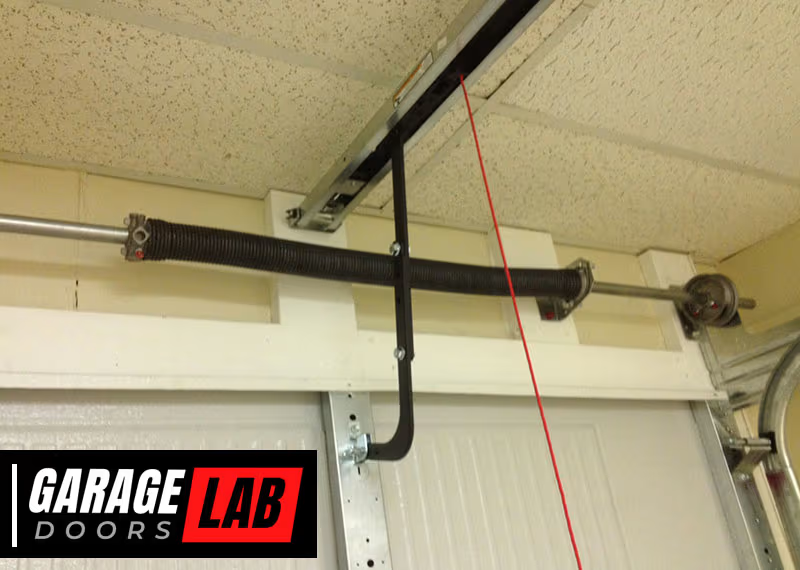
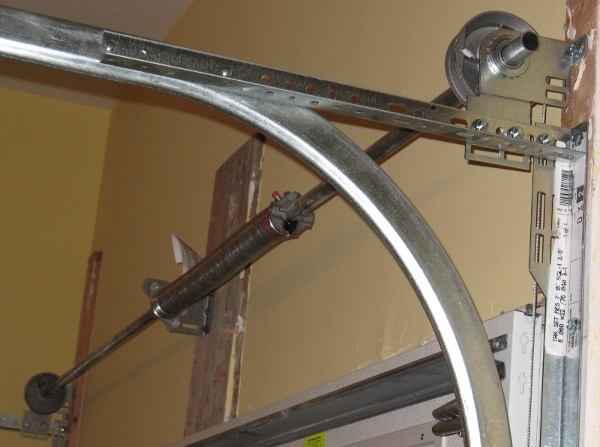
A garage door often weighs over 150 pounds, and lifting it by hand would be almost impossible without the help of a torsion spring. This spring sits above the door, wound tightly to store energy. When you open the door, the spring unwinds, making the door light enough to lift. When the spring breaks, your door becomes heavy, hard to move, or may not open at all.
There are two main types of springs used in garage doors: torsion springs and extension springs. Torsion springs are mounted above the door and twist to store energy, while extension springs run along the sides. Most modern doors use torsion springs because they are safer, last longer, and offer smoother operation.
A typical torsion spring lasts for about 10,000 cycles. One cycle means the door opens and closes one time. If you use your garage door four times a day, the spring might last about seven years. With heavy use, it may break sooner.
When And Why Should You Replace A Torsion Spring?
A broken torsion spring is a serious issue. Signs your spring has failed include:
- The door is extremely heavy or will not open.
- You hear a loud bang from the garage (the sound of the spring snapping).
- The door moves a few inches and stops.
- You see a visible gap in the spring.
Operating your garage door with a broken spring can damage the opener and may even cause the door to fall. Some people try to lift the door manually, which is dangerous due to the weight. Always stop using the door if you suspect a broken spring.
Replacing a spring is not just about convenience. It is essential for safety and door longevity. A working spring balances the door, reducing stress on other parts. If you replace the spring before it snaps, you protect your opener and prevent accidents.
Safety Warnings: Why Torsion Springs Are Dangerous
Torsion springs store a huge amount of energy. If they unwind suddenly or slip from your tool, they can cause broken fingers, face injuries, or worse. According to the U. S. Consumer Product Safety Commission, thousands of garage door injuries are reported each year, and many involve springs.
Never try to change a torsion spring without the right tools, knowledge, and safety steps. If you feel unsure at any point, call a professional. Saving money is not worth risking your health.
Two non-obvious dangers that beginners miss:
- Drift of the Door: With the spring removed, the door can slide down rapidly. Always clamp the door securely to prevent movement.
- Wrong Winding Bar: People sometimes use screwdrivers as winding bars. This is dangerous because screwdrivers can bend or break. Only use solid steel winding bars designed for garage doors.
Tools And Materials Needed
Before you start, gather all tools and materials. Having everything ready makes the job safer and faster.
Essential tools:
- Two solid steel winding bars (usually 18–24 inches long)
- Adjustable wrench (or socket wrench set)
- Sturdy ladder
- Vice grips or locking pliers
- Tape measure
- Safety glasses and gloves
- Marker or chalk
Materials:
- Replacement torsion spring (make sure the size, length, and wire diameter match your old spring)
- New center and end bearings (optional, but wise if the old ones are worn)
- Replacement cables (if frayed)
- Garage door lubricant
Pro tip: Many springs look similar but are not the same. Write down the numbers printed on the old spring or measure the wire and inside diameter. If you are unsure, bring the old spring to the store or consult the manufacturer.
Preparation: Ensuring A Safe Work Area
A clean, safe work area is critical. Follow these steps before starting:
- Disconnect the power to your garage door opener. You do not want the opener to activate while you work.
- Lift the door manually to the fully open position. Clamp vice grips below the bottom roller to keep the door from falling.
- Clear the area. Remove tools, boxes, or cars from near the door.
- Ask for help. Having another adult nearby can be useful for holding the ladder or passing tools.
Step-by-step Guide: How To Change A Torsion Spring On A Garage Door
Changing a torsion spring is a process that requires patience and attention to detail. Let’s break down the steps.
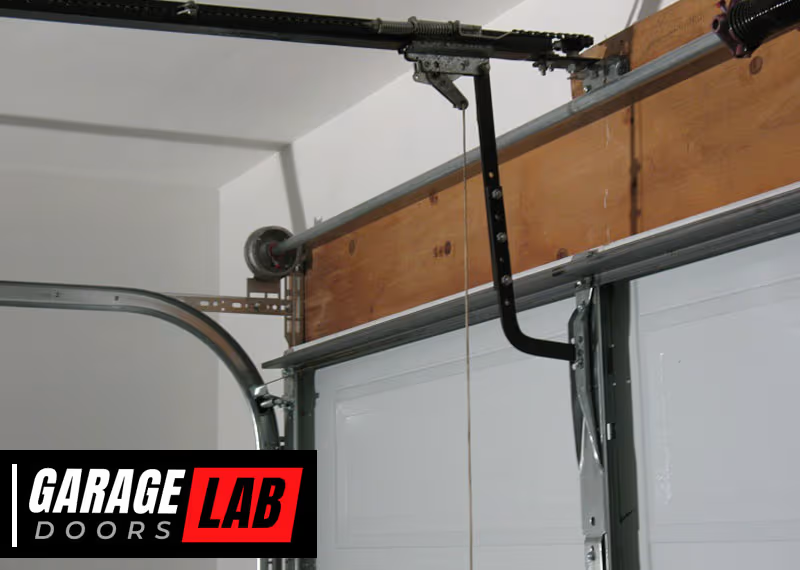
1. Identify The Spring Type And Door Setup
Most residential garage doors use a single torsion spring (for light doors) or two springs (for heavier, double doors). Look above your door to see how many springs your setup has.
Check if your springs are right-wound or left-wound. This matters when installing the new spring. Usually, the spring on the left side of the center bracket is right-wound, and the one on the right is left-wound.
2. Unwind The Old Torsion Spring
Warning: Wear gloves and safety glasses. Stand to the side of the spring, not directly in front.
- Insert a winding bar into one of the holes on the winding cone (the part with set screws).
- Hold the bar firmly and loosen the set screws with the wrench.
- The spring will push against the bar. Carefully lower the bar and insert the second winding bar into the next hole.
- Remove the lower bar, rotate the spring downward, and repeat until the spring is fully unwound.
- Count the number of turns as you unwind. This will help when winding the new spring.
3. Remove The Old Spring
- Once unwound, remove the set screws from the winding cone completely.
- Slide the spring off the torsion bar.
- Remove the center stationary cone, end bearing plates, and any worn bearings if you are replacing them.
- Inspect the torsion bar for wear or rust. Clean or replace if needed.
4. Install The New Torsion Spring
- Slide the new spring onto the bar. Make sure the stationary cone faces the center bracket, and the winding cone is on the outside.
- Reattach the center bearing and end bearing plates.
- Tighten all set screws, but do not over-tighten (this can strip the threads).
- If you are replacing both springs, repeat the process for the other side.
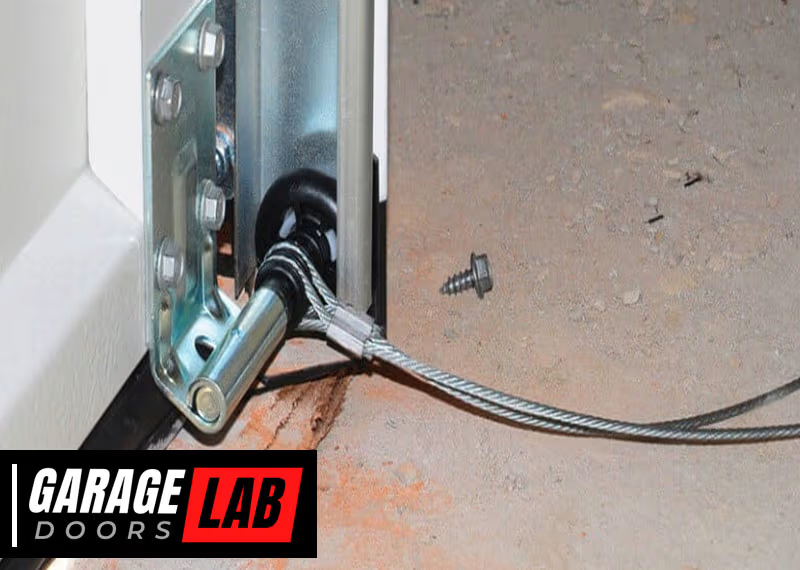
5. Reinstall Cables And Secure The System
- Check the lift cables on both sides. If they are frayed or worn, replace them.
- Loop the cables over the cable drums at each end of the bar.
- Make sure the cables are tight and properly seated in the grooves.
- Secure the drums by tightening their set screws.
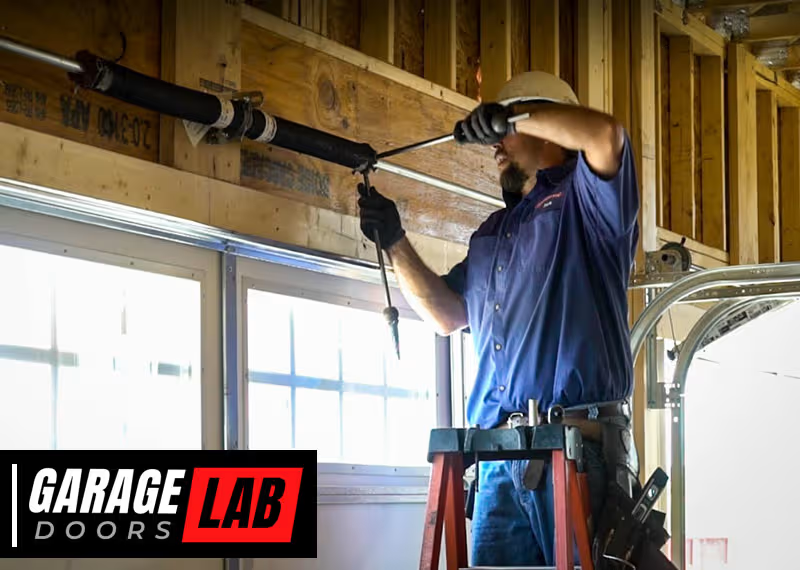
6. Wind The New Torsion Spring
This is the most dangerous step. Double-check your safety gear and make sure the door is clamped open.
- Insert the winding bar into the winding cone.
- Wind the spring in the correct direction (usually upward, toward the ceiling).
- Refer to the number of turns you counted when removing the old spring. Typically, a standard 7-foot door needs about 30–32 quarter turns (7.5 to 8 full turns), and an 8-foot door needs about 34–36 quarter turns.
- After winding, hold the bar in place and tighten the set screws securely.
- Remove the winding bars carefully.
7. Test Door Balance And Operation
- Remove the clamps and vice grips from the tracks.
- Slowly lower the door halfway. A properly balanced door should stay in place. If the door drifts up, the spring is too tight. If it falls, it is too loose.
- Adjust the spring tension by adding or removing a quarter turn as needed.
8. Lubricate And Final Check
- Apply garage door lubricant to the spring, bearings, and hinges.
- Open and close the door several times by hand to ensure smooth operation.
- Reconnect the power to the opener.
If the door works smoothly and stays balanced, you have successfully changed the torsion spring.
Common Mistakes And How To Avoid Them
Many DIYers make errors that can lead to injury or extra costs. Here’s how to avoid the most frequent mistakes:
- Using the wrong spring size: Even a small difference in wire thickness or length can make your door unsafe. Always match the new spring to the old one.
- Skipping the safety gear: Gloves and eye protection are essential.
- Not securing the door: If the door slides down, it can crush fingers or damage your floor.
- Improper winding bars: Never use makeshift tools like screwdrivers or rebar.
- Over-tightening set screws: This can strip the cone, leading to failure.
- Not checking cable condition: Old cables can snap soon after spring replacement.
When To Call A Professional
While many people can replace torsion springs with care and the right tools, you should call a professional if:
- You do not feel confident working with high-tension parts.
- Your door is unusually heavy, custom-made, or uses non-standard hardware.
- The setup is different from what is described here.
- You do not have the right tools.
Professionals have special training and can often finish the job in less than an hour. They can also spot other issues—like worn bearings or misaligned tracks—that you might miss.
How To Choose The Right Replacement Torsion Spring
Selecting the correct spring is critical. Here’s what to check:
- Wire diameter: Measure 10, 20, or 40 coils and divide by the number of coils to find the diameter.
- Inside diameter: Usually printed on the winding cone.
- Spring length: Measure the relaxed spring, not stretched or compressed.
- Wind direction: Left-wound or right-wound.
If you are unsure, bring the old spring to a supplier or consult a chart from a trusted source. Using the wrong spring can damage your door or opener.
Below is a comparison of typical torsion spring sizes for common door types.
| Door Width | Spring Wire Diameter | Spring Length | Inside Diameter | Cycles (Typical) |
|---|---|---|---|---|
| 8 ft (single) | 0.207 in | 25 in | 2 in | 10,000 |
| 16 ft (double) | 0.250 in | 39 in | 2 in | 10,000 |
| Oversized/Heavy | 0.283 in | 47 in | 2.25 in | 15,000 |
Cost Comparison: Diy Vs Professional Replacement
Many people wonder if doing it themselves is worth the risk. Let’s look at typical costs.
| Option | Parts Cost | Tools Cost | Labor Cost | Total |
|---|---|---|---|---|
| DIY | $40–$100 | $20–$50 (if needed) | $0 | $60–$150 |
| Professional | $60–$120 | $0 | $120–$250 | $180–$370 |
Hidden cost for DIY: If you buy the wrong spring or damage the door, total expenses can exceed professional rates. Safety should always be your first concern.
Maintenance Tips To Extend Torsion Spring Life
Replacing torsion springs is hard work, so it makes sense to extend their life as much as possible. Here’s how:
- Lubricate the springs every six months with a light spray lubricant. This prevents rust and smooths operation.
- Inspect cables and hardware for fraying, rust, or wear.
- Keep the door balanced. If the door is hard to lift, have a professional check the balance before the spring breaks.
- Use the door gently. Slamming the door or using it more than needed reduces spring life.
- Clean the tracks so the door moves smoothly.
Many people miss that temperature changes can affect spring tension. In cold weather, steel contracts, and springs can become more brittle. If you live in a cold climate, check your springs more often in winter.
Real-world Example: A Homeowner’s Experience
Paul, a homeowner in Ohio, heard a loud bang in his garage one morning. His 16-foot garage door would not open, and he soon saw a two-inch gap in the torsion spring. Paul tried to replace the spring himself. He watched several videos but used a regular steel rod instead of a proper winding bar.
The rod slipped, and the spring spun loose, hitting his wrist. Luckily, he was not seriously hurt, but the scare made him call a professional.
Paul’s story shows the importance of using the correct tools and respecting the risks. He spent $220 for professional replacement and now checks his springs twice a year.
Should You Convert To A Two-spring System?
Some older or smaller garage doors use only one torsion spring. Many experts recommend switching to a two-spring system when you replace the spring. Here’s why:
- If one spring breaks, the second supports the door, making it safer.
- Two springs share the load, so each lasts longer.
- The door operates more smoothly.
If your door has only one spring, ask your supplier or a technician about a conversion kit.
Environmental Impact And Recycling
Old torsion springs are made of steel and can be recycled. Do not throw them in the trash. Take the old spring to a local metal recycling center. This small step helps reduce landfill waste and allows the metal to be reused.
Advanced: Balancing The Door And Adjusting The Spring
After installing the new spring, you may need to fine-tune the door balance. Here’s how:
- With the opener disconnected, raise the door halfway and let go carefully.
- If the door rises, unwind the spring by a quarter turn.
- If the door falls, wind the spring tighter by a quarter turn.
- Repeat until the door stays in place.
If the door does not balance after several tries, you may have the wrong spring or an underlying issue. Do not keep winding—seek expert advice.
Signs Of A Failing Torsion Spring (before It Breaks)
Most springs break without warning, but there are a few early signs:
- The door makes creaking or grinding noises.
- The door opens unevenly or with jerks.
- Visible rust or gaps in the spring coils.
- The door feels heavier than usual.
If you notice these signs, inspect the spring and consider replacing it before it fails.

How To Dispose Of A Broken Torsion Spring
Since torsion springs are under tension, always unwind them fully before removal. Place the old spring in a sturdy bag or box. Take it to a scrap metal facility for recycling. Never leave it within reach of children or pets.
Comparing Torsion Springs And Extension Springs
You may wonder if you should switch to a different spring type. Here’s a quick comparison.
| Feature | Torsion Springs | Extension Springs |
|---|---|---|
| Location | Above the door | Alongside the tracks |
| Safety | Safer (less flying parts) | Can fly if broken |
| Durability | 10,000–15,000 cycles | 5,000–10,000 cycles |
| Operation | Smoother | Can be noisy |
| Maintenance | Lower | Higher |
Most modern garage doors use torsion springs for these reasons.
Further Reading And Resources
If you want to learn more about garage door mechanics or spring types, visit the Wikipedia page on garage doors for technical details and safety advice.

Frequently Asked Questions
How Do I Know Which Torsion Spring Size To Buy?
Measure the wire diameter, inside diameter, and spring length of your old spring. Most springs have a code printed on the winding cone. If unsure, bring the old spring to a supplier or consult a spring sizing chart.
Is It Safe To Replace A Torsion Spring Myself?
It is possible, but only if you use the right tools and follow safety steps carefully. Torsion springs are under high tension and can cause injury. If you are unsure, hire a professional.
How Long Does It Take To Change A Torsion Spring?
For an experienced DIYer, it usually takes 2–3 hours. A professional can often finish in under an hour. Having all tools ready speeds up the process.
Can I Use Any Steel Rod As A Winding Bar?
No. Only use solid steel winding bars made for garage doors. Other rods, like screwdrivers, can bend or break, causing the spring to spin out of control.
How Often Should I Check My Garage Door Springs?
Inspect your springs every six months. Look for rust, gaps, or fraying cables. Lubricate the springs and call a professional if you see any damage.
Replacing a torsion spring on a garage door is a tough but rewarding project if done with care and respect for safety. Understanding the risks, using the right tools, and following each step closely will help you get your door working smoothly again.
When in doubt, do not hesitate to call a professional—it’s better to spend a little more than risk a serious injury.