Now Reading: How to Change Garage Door Rollers: Step-by-Step Guide
- 01
How to Change Garage Door Rollers: Step-by-Step Guide
Changing garage door rollers is a skill many homeowners never expect to need. But if your garage door starts making noise, moving roughly, or jamming, the rollers are often to blame. Replacing them yourself can restore smooth operation, save money, and even increase the lifespan of your garage door.
With the right knowledge, tools, and safety steps, you can tackle this project with confidence—even if you have never done garage door maintenance before. This guide explains everything you need to know, from choosing the right rollers to safely installing them, with clear instructions and practical tips.
Understanding Garage Door Rollers
Garage door rollers are small wheels, usually attached to metal stems, that fit into the tracks on either side of your garage door. As the door opens and closes, the rollers glide along these tracks, allowing the heavy panels to move smoothly.
There are three main types of garage door rollers:
- Plastic rollers: Inexpensive, lightweight, but wear out quickly. Usually found on new garage doors.
- Steel rollers: Strong and durable, but can be noisy unless they have ball bearings.
- Nylon rollers: Quieter than steel, often with sealed ball bearings for longer life. Usually the best choice for residential doors.
Most modern garage doors use 10 to 12 rollers, depending on the size and style. Rollers with ball bearings last longer and operate more quietly than those without. Quality matters: cheap rollers can cause damage to tracks, increase noise, and require replacement sooner.
How Rollers Impact Your Garage Door
Worn or damaged rollers can lead to:
- Noise: Squeaking, grinding, or rattling sounds.
- Sticking: The door may jerk or get stuck when moving.
- Track damage: Bad rollers put extra strain on tracks, leading to costly repairs.
- Opener wear: The motor works harder, reducing its lifespan.
Replacing worn rollers is one of the simplest ways to keep your garage door healthy and your home secure.
Signs Your Garage Door Rollers Need Replacing
Many people ignore roller problems until a complete breakdown. Here are common signs your garage door rollers may need changing:
- Excessive noise: A smooth garage door is quiet. If you hear scraping, grinding, or squealing, the rollers are likely failing.
- Visible wear and tear: Cracks in plastic, rust on steel, or broken nylon parts signal it’s time for new rollers.
- Rough movement: The door moves in jerks, hesitates, or comes off the track.
- Loose rollers: Wiggle the rollers gently. If they shake in the track, the bearings may be worn out.
- Slow opening or closing: A door struggling to move may have bad rollers, especially if the opener is in good condition.
- Roller separation: If the wheel separates from its stem, replace immediately.
Ignoring these signs can lead to bigger issues, like track damage or a broken opener.
Tools And Materials Needed
Before you start, gather all the tools and materials you’ll need. Being prepared prevents frustration and keeps you safe.
Essential Tools
- Socket wrench set: For removing and reattaching roller brackets.
- Flathead screwdriver: To help pry rollers from the track.
- Pliers: Useful for removing stubborn rollers.
- Clamps or locking pliers: To secure the garage door and prevent movement.
- Step ladder: For reaching rollers near the top of the door.
- Gloves and safety glasses: Protect your hands and eyes from injury.
Materials
- Replacement rollers: Choose the right size (usually 2″ or 3″ diameter) and type (nylon is best for most homes).
- Garage door lubricant: For lubricating rollers and tracks after installation.
- Rag or cloth: To clean tracks and remove old grease.
Example: Comparing Roller Types
Here’s a quick comparison of the main garage door roller types:
| Roller Type | Average Lifespan | Noise Level | Cost (each) | Best For |
|---|---|---|---|---|
| Plastic | 1-2 years | Low | $2-$4 | Temporary/Low budget |
| Steel (no bearings) | 3-5 years | High | $5-$8 | Heavy doors/High use |
| Nylon (with bearings) | 10-20 years | Very low | $6-$12 | Homes/Quiet operation |
Always check your door’s manual or current roller size before buying replacements.
Safety Precautions Before You Begin
Garage doors are heavy and under tension. Working safely is critical. Here are key precautions:
- Disconnect the opener: Always unplug or disconnect the electric opener to prevent accidental movement.
- Secure the door: Use clamps or locking pliers below the bottom roller on both sides to keep the door from moving.
- Do not touch the bottom bracket: The bottom roller bracket is attached to the door’s spring system. Removing it can cause serious injury. Only experienced professionals should handle this part.
- Wear protection: Gloves and safety glasses protect you from sharp metal, debris, and pinched fingers.
- Work with a partner: If possible, have someone assist you, especially with double doors.
Step-by-step Guide: How To Change Garage Door Rollers
Changing your garage door rollers can usually be done in a few hours, but it requires careful attention to detail. Follow these steps for a safe and effective process.
Step 1: Open The Garage Door Partway
Open the garage door about halfway and unplug the opener. This position releases most of the tension from the springs and makes the rollers accessible. If your door is manual, simply lift it by hand.
Step 2: Secure The Door
Attach C-clamps or locking pliers to the tracks just below the bottom rollers on both sides. This ensures the door won’t move while you’re working.
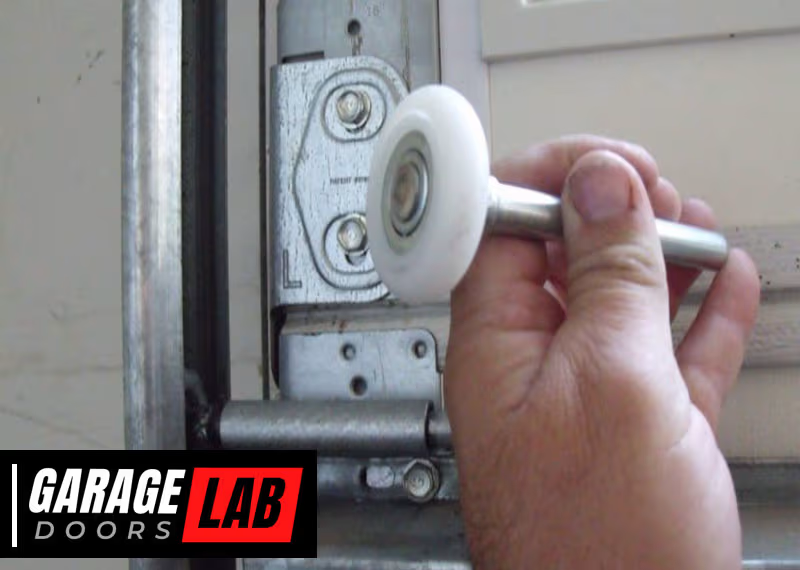
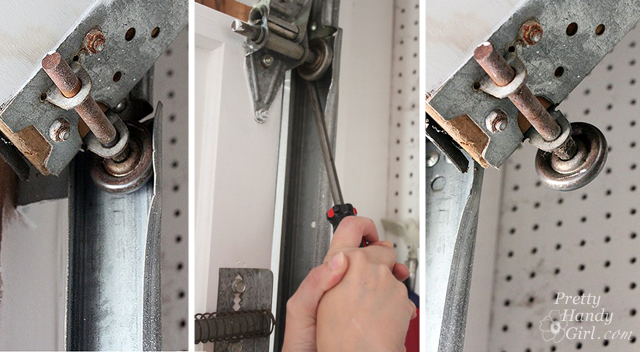
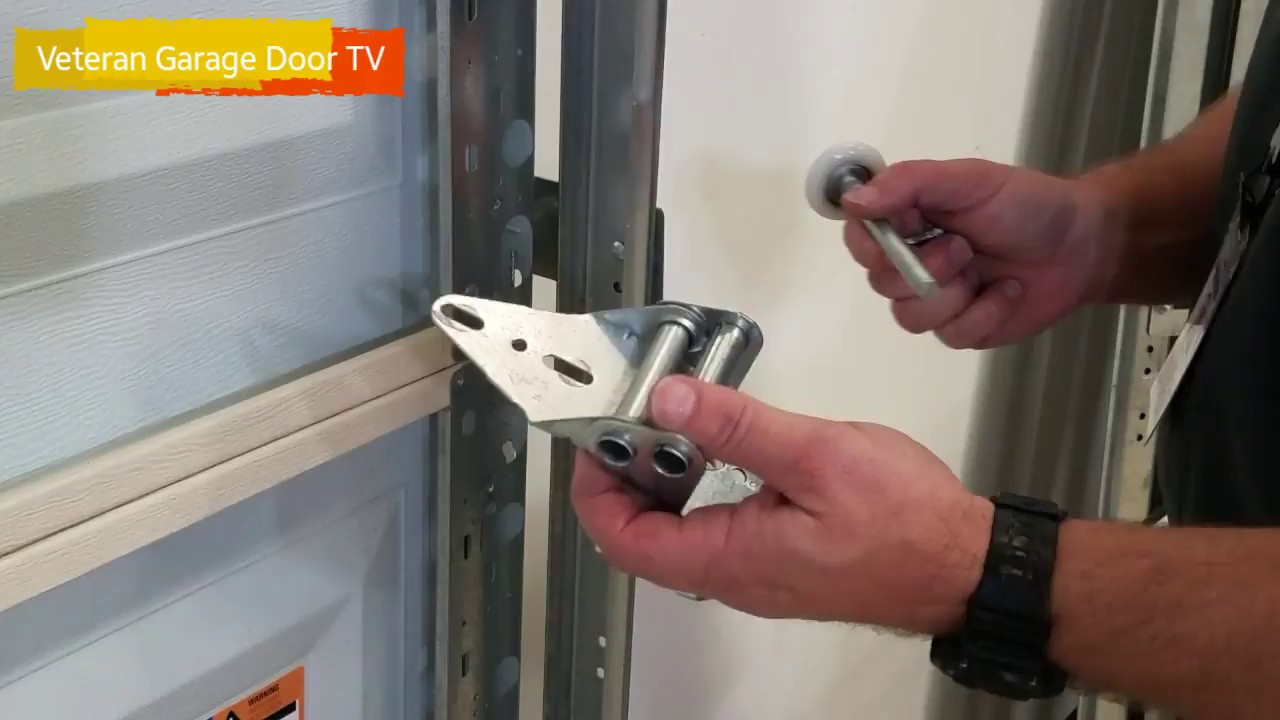
Step 3: Remove The Track Bracket
For each roller (except the bottom one), locate the metal bracket that holds the roller in place. Use your socket wrench to loosen and remove the bolts or screws, then slide the bracket out.
Step 4: Pry The Track Open Slightly
Using a flathead screwdriver, gently bend the track open near the roller you plan to remove. Only open it enough to slip the roller out—about a half-inch is usually enough. Be careful not to bend the track too much, or the door may not move smoothly.
Step 5: Remove The Old Roller
Slide the roller out of the bracket and pull it free from the door. If the roller is stuck, use pliers to grip and remove it.
Step 6: Install The New Roller
Insert the new roller into the bracket and align it with the track. Gently guide the roller back into the track, then bend the track back to its original position using your hands or a mallet.
Step 7: Reattach The Bracket
Secure the bracket back to the door with the bolts or screws you removed earlier. Make sure it’s tight, but don’t overtighten.
Step 8: Repeat For Remaining Rollers
Move to the next roller and repeat steps 3 through 7. Work your way up one side of the door, then the other. Remember: Do not remove the bottom roller bracket—this is dangerous due to the spring tension.
Step 9: Lubricate Rollers And Tracks
Once all new rollers are installed, apply garage door lubricant to each roller and along the tracks. This reduces noise and extends the life of your new rollers. Avoid using WD-40; it’s not designed for garage door hardware.
Step 10: Test The Door
Remove the clamps or locking pliers, reconnect the opener, and test the door several times. Listen for smooth, quiet operation and check that the door moves evenly. If it sticks or is noisy, check for bent tracks or loose hardware.
Example: Typical Roller Replacement Timeline
| Task | Time (minutes) | Difficulty (1-5) |
|---|---|---|
| Preparation | 15 | 2 |
| Removing old rollers (each) | 8 | 3 |
| Installing new rollers (each) | 5 | 2 |
| Lubrication & testing | 10 | 1 |
Most standard garage doors (with 10-12 rollers) can be completed in 1. 5 to 2 hours by a careful DIYer.
Special Considerations For Different Door Types
Not all garage doors are the same. Here’s how to handle common variations:
Sectional Garage Doors
Most residential doors are sectional. The process above applies directly, but always check your door’s manual for unique features.
One-piece Tilt-up Doors
These older doors have fewer rollers and a different mechanism. You may need to support the entire door as you change the rollers. Consider asking for help.
Insulated Or Heavy Doors
Heavy doors put more stress on rollers. Choose high-quality nylon rollers with sealed bearings. You may need a helper to support the extra weight while you work.
Automatic Vs. Manual Doors
With automatic doors, always disconnect power before beginning. Manual doors are easier to secure but may be heavier to lift.
Choosing The Right Replacement Rollers
Selecting the wrong rollers can lead to quick failure or even damage. Here’s what to consider:
Roller Size
Measure your current rollers’ diameter (usually 2″ or 3″) and stem length. The wrong size won’t fit your tracks or brackets.
Bearing Type
- No bearings: Cheap, wear out fast, noisy.
- Open bearings: Last longer, but need regular lubrication.
- Sealed bearings: Best for long life and low maintenance.
Roller Material
As shown earlier, nylon with sealed bearings is best for most homes due to its quiet operation and long life.
Quantity
Count your door’s rollers (usually 10-12). It’s wise to replace all at once for even wear and best results.
Example: Roller Selection Table
| Door Size | Typical Roller Size | Recommended Quantity | Best Roller Type |
|---|---|---|---|
| Single (8×7 ft) | 2″ | 10 | Nylon, sealed bearings |
| Double (16×7 ft) | 2″ or 3″ | 12 | Nylon, sealed bearings |
| Heavy/Insulated | 3″ | 12+ | Steel/Nylon, sealed bearings |
Common Mistakes And How To Avoid Them
Changing garage door rollers is simple, but there are a few mistakes beginners often make:
- Forgetting to disconnect the opener: This can cause the door to move unexpectedly, leading to injury.
- Removing the bottom bracket: Only professionals should touch this part, as it’s under high spring tension.
- Bending the track too much: Excessive bending can misalign the tracks and cause the door to jam.
- Choosing the wrong rollers: Always measure and match the size and type to your door’s requirements.
- Skipping lubrication: Unlubricated rollers wear out quickly and make noise.
- Not checking track alignment: If the door still sticks after roller replacement, check for bent or out-of-level tracks.
Avoid these errors for a safe, successful repair.
Maintenance Tips To Prolong Roller Life
New rollers should last many years, but regular maintenance can add even more life and keep your door moving smoothly.
Monthly Visual Inspection
Look for signs of wear, debris, or loose hardware. Catching problems early prevents big repairs.
Lubricate Every Six Months
Apply garage door lubricant to all rollers, hinges, and tracks twice a year. Avoid using grease or WD-40, which can attract dirt and grime.
Keep Tracks Clean
Wipe down the tracks with a dry cloth to remove dust and debris. Dirty tracks can cause rollers to stick or wear out early.
Check Track Alignment
If your door is noisy or jams, check that the tracks are straight and parallel. Bent tracks cause rapid roller failure.
Tighten Hardware
Vibration can loosen bolts and screws. Check and tighten all hardware at least once a year.
When To Call A Professional
While most homeowners can change standard rollers, some situations require a professional:
- Broken springs: Never attempt to repair or replace springs yourself. High tension can cause severe injury.
- Severely bent tracks: If the tracks are damaged or out of alignment, call a pro to avoid further damage.
- Heavy commercial doors: Larger or high-use doors may require special rollers and tools.
- Persistent problems: If your door still sticks or is noisy after roller replacement, professional inspection is wise.
A pro can also handle the bottom roller bracket safely.
Real-world Example: Diy Garage Door Roller Replacement
Tom, a homeowner in Texas, noticed his garage door was getting noisy and moving unevenly. He checked the rollers and saw they were worn and cracked. After researching, he chose nylon rollers with sealed bearings for quiet operation.
Tom gathered his tools, bought the right rollers, and set aside a Saturday morning. He followed the steps above, working carefully and lubricating the tracks when done. The result? His garage door now opens quietly and smoothly, and he saved over $150 compared to hiring a professional.
One thing Tom learned: He almost made the mistake of removing the bottom roller. After reading about the risks, he left it alone and had a pro replace it safely later.
Cost Breakdown: Diy Vs. Professional Roller Replacement
Changing rollers yourself saves money, but let’s compare costs:
| Item/Service | DIY Cost (Estimate) | Professional Cost (Estimate) |
|---|---|---|
| Set of 10-12 nylon rollers | $60-$120 | Included |
| Tools/Supplies | $0-$40 | Included |
| Labor | Free (your time) | $120-$250 |
| Total | $60-$160 | $180-$370 |
DIY can save $120–$200, but only if you follow safety steps and use the right parts.
Non-obvious Insights For Beginners
- Roller quality matters more than you think. Cheap plastic rollers often fail within a year, leading to repeat work and more expense. Investing in high-quality nylon rollers with sealed bearings saves time and money in the long run.
- Track condition affects roller life. Even the best rollers won’t last if tracks are bent, dirty, or misaligned. Always inspect and clean tracks before installing new rollers.
- Roller stem length is critical. Some doors require longer or shorter roller stems. Using the wrong length can cause the roller to pop out or put stress on the bracket.
Frequently Asked Questions
How Often Should I Replace Garage Door Rollers?
Most high-quality rollers last 10 to 20 years with proper maintenance. Inspect your rollers yearly and replace them when you notice noise, wear, or rough movement.
Can I Replace Garage Door Rollers Myself, Or Should I Hire A Professional?
Most homeowners can replace standard rollers with basic tools and careful attention to safety. However, never remove the bottom roller bracket yourself, and call a pro for heavy, commercial, or unusual doors.
What Size Garage Door Rollers Do I Need?
Most residential doors use 2-inch rollers, but some heavy or double doors use 3-inch rollers. Measure your existing rollers’ diameter and stem length before buying replacements.
What Are The Best Garage Door Rollers For Quiet Operation?
Nylon rollers with sealed ball bearings offer the quietest and longest-lasting performance for most homes. They reduce noise and require less maintenance than steel or plastic.
Where Can I Find More Detailed Garage Door Maintenance Tips?
For more in-depth tips and troubleshooting advice, visit the Garage Door Wikipedia page for a comprehensive overview.
Changing garage door rollers isn’t difficult, but doing it right makes a big difference. With quality parts, safe practices, and a little patience, you can enjoy a quieter, smoother garage door for years to come.


