Now Reading: How to Fix a Spring on Garage Door: Step-by-Step Guide
- 01
How to Fix a Spring on Garage Door: Step-by-Step Guide
Fixing a garage door spring is a task that many homeowners consider because it can save money and restore the smooth function of a heavy garage door. However, it’s also a repair that comes with real dangers if not done correctly.
A garage door spring holds a lot of tension, which means a mistake could lead to serious injury or property damage. With the right knowledge, tools, and safety steps, you can handle this job with greater confidence. This guide covers everything you need to know about how to fix a spring on a garage door, from understanding the parts involved to step-by-step instructions, safety advice, and troubleshooting common problems.
Understanding Garage Door Springs
Before starting any repair, it’s crucial to know what type of spring your garage door uses. There are two main kinds:
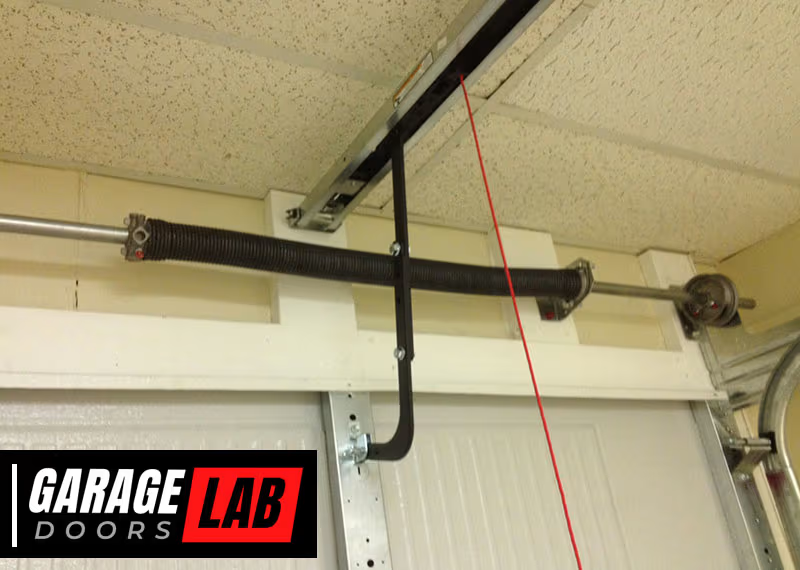
- Torsion springs – These are mounted above the closed garage door, running parallel to the top of the door. They use torque to raise and lower the door.
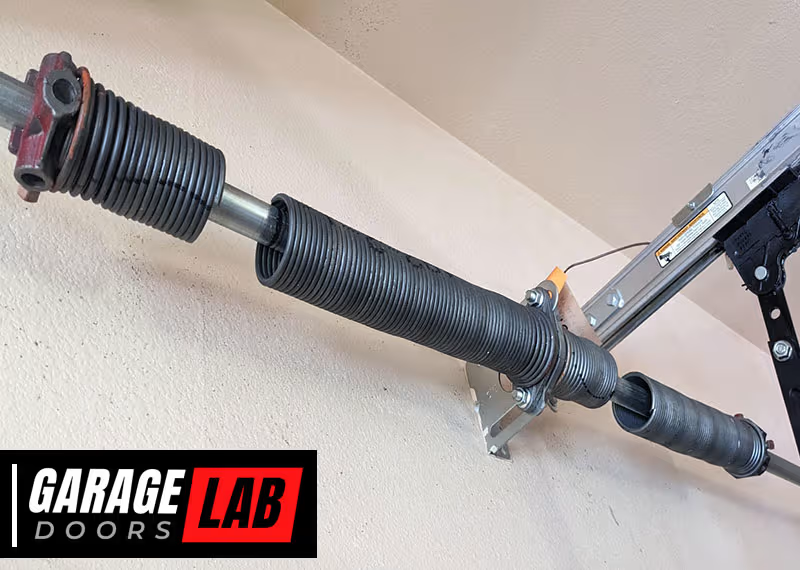
- Extension springs – Located above the upper tracks on both sides, these stretch and contract to balance the door.
Each type works differently and requires different repair techniques. Torsion springs are more common in modern garage doors due to their smooth operation and durability, but they’re also more dangerous to handle because of the high tension.
Why Do Springs Break?
Garage door springs have a limited life cycle, typically between 7,000 and 10,000 cycles (one cycle is the door going up and down once). Factors that cause springs to fail include:
- Wear and tear: Springs lose strength over time.
- Rust: Corrosion weakens metal, causing early failure.
- Poor maintenance: Lack of lubrication increases friction and wear.
- Incorrect spring size: Using the wrong spring for your door’s weight causes extra stress.
Signs Your Spring Is Broken
Some common symptoms of a broken or failing garage door spring include:
- The door feels heavier than usual.
- The door opens a few inches and then stops.
- You hear a loud bang from the garage (the sound of a spring snapping).
- The door is crooked or won’t move smoothly.
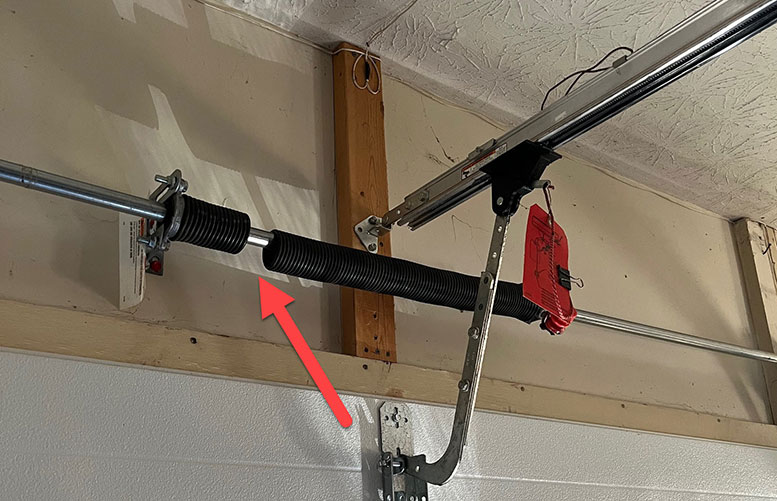
- The spring is visibly gapped or stretched.
Ignoring these signs can make your door unsafe or cause more expensive damage.
Safety Precautions You Must Take
Garage door spring repair is not the same as fixing a squeaky hinge. The stored energy in springs is enough to cause severe injury. Follow these safety steps before doing anything else:
- Disconnect power to the garage door opener.
- Wear safety goggles and work gloves.
- Use locking pliers to secure the door in place.
- Only use proper tools (winding bars, not screwdrivers).
- Never try to adjust or remove a spring that is under tension without the right knowledge.
- If in doubt, call a professional.
A garage door can weigh between 130 and 400 pounds. Replacing springs without the door secured can result in the door slamming down unexpectedly.

Tools And Materials You Need
Having the correct tools makes the job safer and easier. For torsion spring replacement, you’ll need:
- Winding bars (specifically for garage doors)
- Socket wrench set or adjustable wrench
- Clamps or locking pliers
- Ladder (6 or 8 foot, sturdy)
- Tape measure
- Marker or chalk
- Safety goggles and gloves
- New garage door spring (matched to your door’s size and weight)
- Lubricant (garage door spray)
Extension spring replacement requires:
- Stepladder
- C-clamps
- Socket set or adjustable wrench
- Safety equipment
- Replacement extension springs
- Safety cables (if not already installed)
- Tape measure
Pro Tip: Never reuse old or mismatched springs. Always buy new springs that match your door’s specifications.
How To Fix A Torsion Spring On A Garage Door
Torsion springs are the most common in modern homes. Here’s a step-by-step guide for safe replacement:
1. Measure And Order The Correct Spring
Before starting, identify your current spring’s size. You’ll need to measure:
- Wire diameter (thickness of the coil wire)
- Inside diameter (width across the inside of the coil)
- Length of the coil when relaxed
Remove the old spring before measuring if it is broken. Accurate measurements are essential for safe operation. Use your door’s make and model to confirm the right replacement.
2. Open The Garage Door Fully
Unlock the garage door and open it all the way. This relieves most of the tension from the spring and makes the door easier to handle. Use clamps or locking pliers on the tracks to keep the door from closing unexpectedly.
3. Disconnect The Garage Door Opener
Pull the release cord to disconnect the opener from the door. This allows you to move the door by hand and prevents accidental activation.
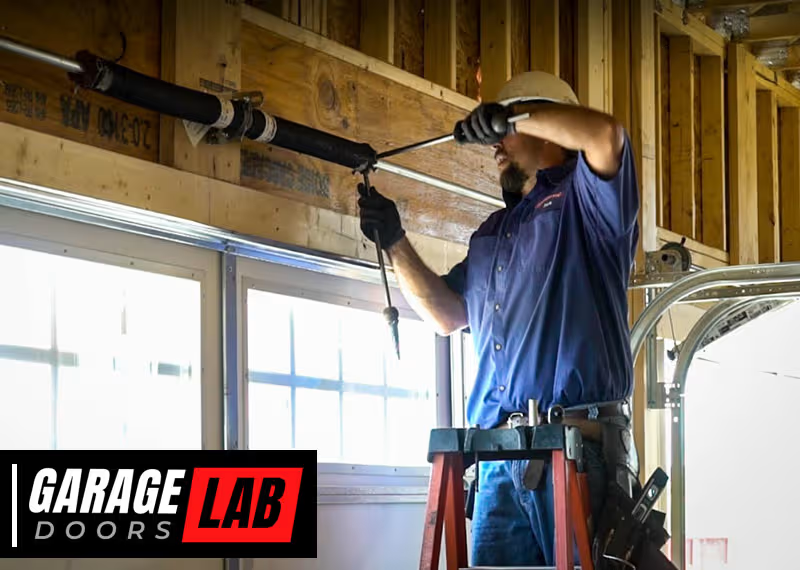
4. Unwind The Broken Spring
Insert winding bars into the winding cone holes at the end of the spring. Hold one bar firmly while loosening the setscrews on the cone with a wrench. Carefully unwind the spring in quarter-turn increments, moving bars one at a time until all tension is released.
Caution: Never use screwdrivers or other makeshift tools. Only winding bars designed for this purpose are safe.
5. Remove The Old Spring
Loosen the setscrews and slide the spring off the torsion bar. Remove any brackets or hardware holding the spring in place. At this point, inspect the center bearing and end plates for wear or damage.
6. Install The New Spring
Slide the new torsion spring onto the torsion bar, making sure the winding cone faces the correct direction (check your old spring as a reference). Reattach the center bracket and secure all hardware.
7. Wind The New Spring
Insert the winding bars into the winding cone. Turn the spring the correct number of times (refer to the manufacturer’s chart or instructions; most standard doors require 30–36 quarter turns). The spring must be wound in the proper direction—right-wound springs are installed on the left side, and left-wound springs on the right.
8. Tighten Setscrews And Remove Tools
Once wound, tighten the setscrews on the winding cone securely. Remove all winding bars and clamps.
9. Test The Balance
Reconnect the garage door opener. Open and close the door several times by hand. The door should stay open about three feet above the ground. If it closes or opens on its own, adjust the spring tension.
10. Lubricate And Inspect
Spray a garage door lubricant on the springs and all moving parts. This reduces wear and noise.
Key Insight: Many beginners forget to check the door’s balance after replacing springs. An unbalanced door puts extra stress on the opener and can cause early failure.
How To Fix An Extension Spring On A Garage Door
Extension springs are easier to replace but still require careful handling.
1. Open The Door And Secure It
Open the garage door fully and secure it with C-clamps or locking pliers on the tracks. This takes most tension off the springs.
2. Disconnect The Opener
Pull the release cord to disconnect the door from the opener, allowing manual movement.
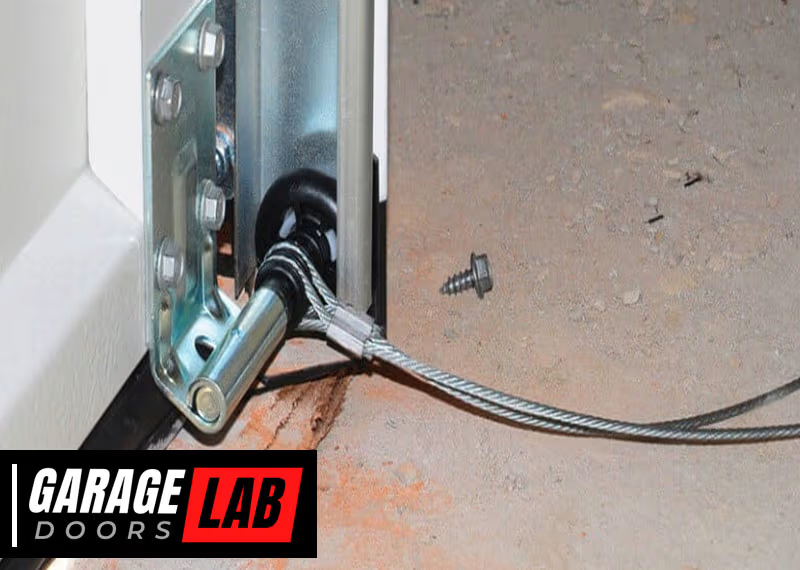
3. Remove Safety Cables
If your door has safety cables running through the extension springs, remove them carefully.
4. Disconnect The Old Spring
Use a wrench to unhook the spring from the rear hanger and then from the front bracket. Note the position of each piece for reassembly.
5. Install The New Spring
Hook the new spring onto the front bracket first, then stretch it to the rear hanger. If your door did not have safety cables, now is the time to install them. These cables prevent broken springs from flying across the garage.
6. Reattach And Test
Remove all clamps and reconnect the opener. Test the door’s movement. If it’s hard to lift or doesn’t close smoothly, adjust the spring tension by changing the hook position.
Important: Extension springs must be paired and replaced together, even if only one is broken. This ensures even tension and smooth operation.
Comparing Torsion And Extension Springs
Not sure which type your door has, or considering an upgrade? Here’s a quick comparison:
| Feature | Torsion Spring | Extension Spring |
|---|---|---|
| Location | Above door opening, parallel to door | Above upper tracks, one on each side |
| Safety | Safer (less likely to fly if broken) | Can fly across garage if no safety cable |
| Durability | 15,000–20,000 cycles | 7,000–10,000 cycles |
| Noise | Quieter | Noisier |
| Installation | More complex | Easier for DIY |
Common Mistakes When Fixing Garage Door Springs
DIY repairs can save money, but there are pitfalls to avoid:
- Using the wrong type or size spring. Always match the spring to your door’s weight and size.
- Skipping safety cables on extension springs. These cables are essential.
- Not releasing tension before removal. Removing hardware while the spring is still under load is extremely dangerous.
- Incorrect winding direction for torsion springs. This can cause the spring to unwind unexpectedly.
- Neglecting to lubricate new springs. Dry springs wear out faster and make more noise.
- Replacing only one extension spring. Both should be replaced together for even operation.
- Ignoring worn hardware. Check and replace worn bearings, brackets, and rollers.
- Forgetting to check door balance. An unbalanced door strains your opener and shortens its life.
- Using makeshift tools. Only use proper winding bars and safety equipment.
- Not securing the door. The door can fall suddenly if unsecured.
Insight: Many people think only the broken spring needs replacing, but springs wear out at the same rate. Replacing both prevents future problems.
When To Call A Professional
While many people can handle extension spring replacement with patience and care, torsion springs are much riskier. Call a professional if:
- Your door has multiple torsion springs.
- The spring is extra-large or custom-made.
- You’re uncomfortable working with heavy, tensioned parts.
- You have a high-lift or commercial door.
- The door is stuck open or closed and you can’t move it.
Professional installers have the training and tools to fix springs safely. According to the International Door Association, more than 20,000 garage door injuries are reported each year in the US, with spring-related accidents among the most serious. Don’t risk your safety to save a few dollars.
How To Choose The Right Replacement Spring
If you decide to buy and replace the spring yourself, here’s how to get the right part:
- Measure carefully: Measure the wire diameter, inside diameter, and length for torsion springs. For extension springs, note the color code (often painted on the end of the spring).
- Know your door weight: Use your door’s manual or look for a label on the door.
- Check spring ends: Some extension springs have open, double-loop, or clipped ends. Match your replacement to the original.
- Buy from reputable suppliers: Avoid used or mismatched springs from online marketplaces.
Example Data For Spring Selection
Here’s a quick reference for common door weights and spring sizes:
| Door Weight | Torsion Spring Size | Extension Spring Color Code |
|---|---|---|
| 90–130 lbs | 0.207″ x 2″ x 24″ | Yellow |
| 130–180 lbs | 0.218″ x 2″ x 24″ | White |
| 180–250 lbs | 0.234″ x 2″ x 24″ | Green |
Note: Always confirm with the supplier or manufacturer before ordering.
Maintenance Tips To Extend Spring Life
Proper maintenance can double the life of your garage door springs and help prevent sudden failure.
- Lubricate springs every 6 months with a silicone-based spray.
- Check door balance twice a year. Open halfway by hand; it should stay in place.
- Inspect for rust or wear during routine cleaning.
- Replace worn parts like rollers, cables, and bearings.
- Keep tracks clean and free of debris.
Pro Insight: Even a small amount of rust on springs can shorten their life by up to 50%. Keep the area dry and lubricated.
Troubleshooting Common Problems After Spring Replacement
Sometimes, the garage door may not work as expected after you install new springs. Here’s how to solve common issues:
Door Opens Unevenly
- Check that both springs are the same type and age.
- Inspect cables and pulleys for wear or misalignment.
Door Will Not Stay Open
- The springs may be under-wound. Add a quarter-turn at a time (for torsion springs).
- For extension springs, move the hook to a higher hole for more tension.
Door Closes Too Fast
- Springs may be over-wound or too strong for the door weight.
- Use a lighter spring or reduce tension.
Loud Noises
- Apply lubricant to springs and all moving parts.
- Check for loose hardware.
Opener Struggles Or Fails
- Door may be too heavy or unbalanced.
- Check spring type and installation.
If problems persist, check your work step-by-step or consult a professional.
Cost Comparison: Diy Vs. Professional Repair
Is it worth fixing garage door springs yourself? Here’s a cost breakdown:
| Repair Type | Estimated Cost | What’s Included |
|---|---|---|
| DIY Extension Spring | $20–$60 per spring | Parts only; no labor |
| DIY Torsion Spring | $30–$100 per spring | Parts only; must buy tools if needed |
| Professional Repair | $150–$350 | Parts, labor, warranty, safety check |
Note: Professional repairs often include a warranty and peace of mind, while DIY saves money but carries more risk.
Real-world Example
Mark, a homeowner in Ohio, noticed his garage door was hard to lift. He found a broken torsion spring. He measured carefully, ordered a new spring, and followed all safety steps. After two hours, the door worked smoothly again. Mark’s main tip: “Watch several video tutorials and don’t rush. Having the right tools makes all the difference.”
Additional Resources
For more detailed visual guides, diagrams, and safety information, the Garage Door Manufacturers Association and International Door Association are trusted sources. You can also check this Wikipedia page about garage doors for further reading.
Frequently Asked Questions
What Is The Most Dangerous Part Of Fixing A Garage Door Spring?
The most dangerous part is releasing or applying tension to the spring. If the spring slips or your tool fails, it can cause severe injury. Always use proper winding bars, and never rush this step.
Can I Use Any Spring For My Garage Door?
No. You must use a spring matched to your door’s weight and size. The wrong spring can cause the door to work poorly or fail quickly.
Should Both Springs Be Replaced At The Same Time?
Yes, especially for extension springs. Both springs wear at the same rate. Replacing both ensures even tension and smooth operation.
How Long Do Garage Door Springs Last?
Most springs last 7,000 to 10,000 cycles for extension springs and up to 20,000 cycles for high-quality torsion springs. Regular maintenance helps them last longer.
Is It Worth Hiring A Professional For Spring Replacement?
For most people, yes—especially for torsion springs. The risk of injury and cost of mistakes is high. Professionals have the right tools and experience for a safe, reliable repair.
Fixing a garage door spring is a project that rewards patience, preparation, and respect for safety. With the guidance above, you can make an informed decision about whether to tackle the job yourself or call an expert. Remember, a well-maintained garage door keeps your home secure and your family safe.