Now Reading: How to Frame a Garage Door Opening: Step-by-Step Guide
- 01
How to Frame a Garage Door Opening: Step-by-Step Guide
Building a garage can be a rewarding project, but one step stands out as both critical and challenging: framing the garage door opening. Get this part right, and your garage door will fit snugly, open and close smoothly, and keep out the weather. Make mistakes, and you could face leaks, gaps, or even structural problems down the road. For many homeowners and DIYers, understanding the details of framing is the difference between a professional-looking finish and a constant source of frustration.
This guide walks you through every stage of framing a garage door opening. Whether you’re adding a new garage or replacing a door on an old structure, these instructions help you avoid common mistakes and ensure a solid, lasting result.
You’ll learn the tools and materials you need, how to measure correctly, the step-by-step framing process, and the finishing touches that matter most. Along the way, you’ll find practical tips, real-world advice, and clear explanations to make your project a success.
Understanding Garage Door Framing Basics
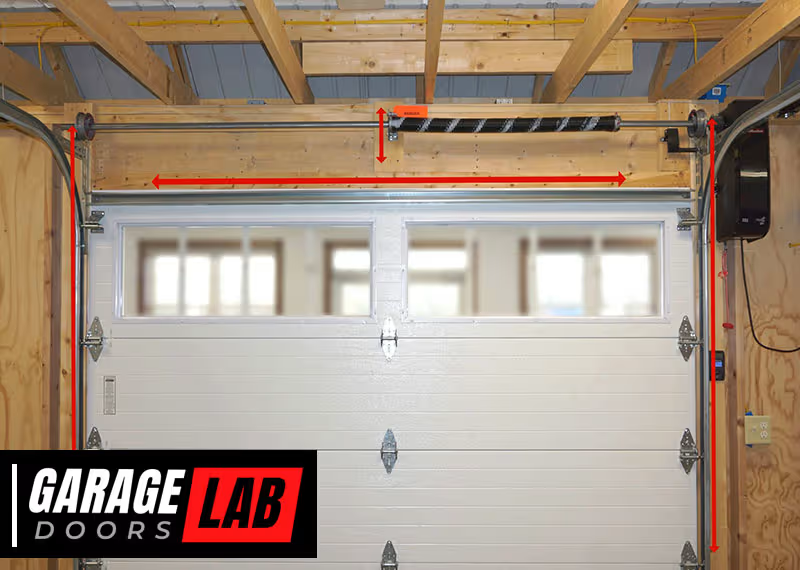
Before you pick up a hammer, it’s important to know what framing a garage door opening really means. The frame is not just a hole in the wall; it’s a system of supports that carry the weight above the door, hold the door hardware, and allow the door to move smoothly. The frame must be strong, square, and sized perfectly to match the door you plan to install.
The typical garage door frame includes:
- King studs: Full-length vertical boards on either side of the opening.
- Jack studs: Shorter boards next to the king studs, supporting the header.
- Header: A horizontal beam above the door, carrying the weight from above.
- Cripple studs: Small vertical boards above the header, filling in the wall up to the top plate.
- Sill (optional): For some doors, a bottom plate or sill is needed.
Each part has a role in making the frame strong and reliable. If you skip or misplace any part, the whole structure can become weak.
Planning The Garage Door Opening
Choosing The Right Size
Garage doors come in standard sizes. Common widths include 8, 9, 10, 12, 16, and 18 feet, with heights usually 7 or 8 feet. Measure your vehicle and check your needs before choosing. If you plan to park large vehicles or want extra room, choose a wider or taller door.
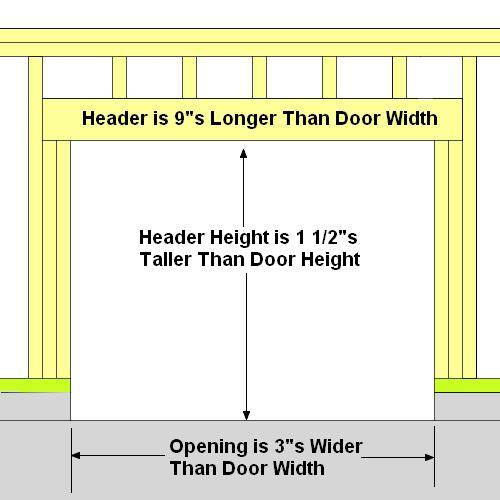
Measuring For The Rough Opening
The rough opening is the space in the wall before the door is installed. For almost all modern garage doors, the rough opening should be the same size as the door. For example, an 8-foot wide by 7-foot high door needs an 8′ x 7′ rough opening.
However, the finished opening will be slightly smaller due to trim and weatherstripping. Manufacturers often provide rough opening sizes in their instructions. Double-check these before cutting any lumber.
Planning For Structure
A garage door opening is a large break in your wall. The header must be strong enough to support the weight above, including the roof if your garage is attached to your house. For most single doors (up to 9 feet), a double 2×10 with plywood in between works. Wider doors need beefier headers, sometimes engineered lumber or steel.
Tip: Consult your local building codes or a structural engineer if you are unsure about header size. Building codes can vary by region and load requirements.
Tools And Materials Needed
Having the right tools makes framing faster, safer, and more accurate. Here’s what you’ll need:
Tools:
- Tape measure (at least 25 feet)
- Framing square
- Level (4 foot is best)
- Circular saw or miter saw
- Hammer or framing nailer
- Chalk line
- Pencil
- Speed square
- Drill/driver with bits
- Sawhorses
Materials:
- Pressure-treated 2x4s (for bottom plate)
- Standard 2x4s or 2x6s (studs, king studs, jack studs)
- Header material (2x10s, 2x12s, or engineered lumber)
- Construction adhesive (optional)
- 16d framing nails or 3-inch screws
- Plywood sheathing (if needed)
- Metal anchors or hurricane ties (for high-wind areas)
Pro Insight: Buy extra lumber to account for mistakes or warped boards. Always inspect your lumber for straightness before using it in the frame.
Preparing The Wall
Marking The Opening
Start by marking the exact position of the garage door on the wall. Use a chalk line to outline the sides and top of the rough opening. Double-check your measurements before making any cuts.
Example: For a 9′ x 7′ door, measure 9 feet wide and 7 feet high from the finished floor (not the subfloor).
Removing Existing Framing (if Remodeling)
If you’re replacing an old garage door, carefully remove any existing framing, trim, or drywall. Use a reciprocating saw to cut old studs and a pry bar to pull out nails. Wear safety glasses and gloves to avoid injury.
Checking For Level And Plumb
Use a level to ensure the floor is flat and the walls are plumb (straight up and down). If the floor slopes, you may need to adjust your framing or use shims to keep the frame square.
Building The Garage Door Frame
Cutting The Bottom Plate
The bottom plate (also called the sole plate) sits on the floor and anchors the studs. If your garage floor is concrete, use pressure-treated wood to resist moisture and rot.
Cut the plate to the width of your opening, plus the thickness of the king studs on each side.
Tip: For a 9′ door with 1.5″ king studs, cut the bottom plate to 9′ + 1.5″ + 1.5″ = 9’3″.
Laying Out The Studs
Lay the bottom plate and a top plate side by side on sawhorses. Mark the location for:
- King studs at each end
- Jack studs next to king studs
- Common studs (usually spaced every 16 inches on center)
- Cripple studs above the header
Use a framing square to ensure your marks are square.
Cutting And Installing King Studs
Cut two full-length studs to fit from the bottom plate to the top plate. These will be your king studs. Attach them at the ends of the opening using 16d nails or 3-inch screws.
Non-obvious insight: Make sure the king studs are perfectly plumb before securing. If they lean, the whole frame will be off.
Cutting And Installing Jack Studs
Jack studs (or trimmers) support the header. They are shorter than king studs, running from the bottom plate to the underside of the header. Nail or screw each jack stud to the inside of the king stud.
For a 7′ high opening and a 9. 25″ (2×10) header, the jack studs should be about 6’2. 75″ (7′ – 9. 25″). Double-check your math before cutting.
Building And Placing The Header
Headers are usually built from two pieces of lumber (like 2x10s or 2x12s) with a piece of 1/2″ plywood sandwiched in between for width. Nail the pieces together with construction adhesive for extra strength.
Lift the header into place on top of the jack studs. Use a helper for heavy headers. Secure the header to the king and jack studs with nails or screws.
Advanced tip: For extra-wide doors or high snow loads, use a laminated veneer lumber (LVL) header.
Adding Cripple Studs
The space above the header up to the top plate needs to be filled with cripple studs. These are short vertical boards that restore the wall’s strength. Space them every 16 inches on center, just like regular studs.
Securing The Frame
Check the frame for square by measuring diagonally from corner to corner. The two measurements should be equal. If not, adjust before nailing everything tight.
Anchor the bottom plate to the concrete floor with concrete anchors or powder-actuated fasteners. For wood floors, use long screws.
Sheathing The Wall
If your garage wall is not already covered, add plywood or OSB sheathing over the frame. Cut the sheathing to fit around the opening. Nail every 6-8 inches along the edges and every 12 inches in the field.
Comparing Framing Materials
Choosing the right materials can impact your garage’s durability and strength. Here’s a quick comparison of common framing materials:
| Material | Pros | Cons | Best For |
|---|---|---|---|
| Standard Lumber (2×10, 2×12) | Widely available, affordable | Heavy, can warp over time | Most single and double doors |
| Engineered Lumber (LVL) | Stronger, less likely to bow, spans wider openings | More expensive, needs special order | Wider/heavy doors, high snow loads |
| Steel Header | Very strong, fire resistant | Requires special tools, costly | Commercial or specialty garages |
Pro Tip: For most residential garages, standard lumber is enough if sized correctly. For extra-wide doors or unusual loads, consider LVL.
Installing Temporary Supports
When you cut out a large section of wall for a new garage door, you remove some of the wall’s strength. Before removing old studs or headers, install temporary supports (called “strongbacks” or “jack posts”) on both sides of the opening. This keeps the structure safe until the new frame is finished.
Common mistake: Skipping temporary supports can lead to sagging walls or even collapse.
Insulating And Weatherproofing
Insulation is important if your garage will be heated or cooled. Place insulation around the frame, especially above the header and in the cripple stud spaces.
Weatherproofing the opening prevents water and drafts from entering. Use flashing tape around the sides and top of the opening before installing trim. Add a sill pan if the bottom of the frame is exposed to weather.
Framing For Special Garage Door Types
Roll-up Doors
Roll-up garage doors need the same rough opening as standard doors, but may require extra headroom for the drum and track. Check the manufacturer’s specs before building the header.
Carriage-style Doors
Carriage doors (that swing open) need a solid frame for the heavy hinges. Add extra blocking in the king studs for hinge support.
Insulated Doors
If you plan to install a thick, insulated garage door, make sure your frame is deep enough to accept the extra width. Use 2×6 studs if needed.
Step-by-step Framing Example
Let’s walk through an example for a 16’ x 7’ double garage door:
- Mark the rough opening: 16’ wide, 7’ high from finished floor.
- Cut the bottom plate to 16’3” (16’ + 1.5” king stud each side).
- Lay out king studs, jack studs, and common studs on bottom/top plates.
- Cut two king studs (full height from floor to top plate).
- Cut two jack studs (7’ – header thickness).
- Build a header: Two 2x12s with 1/2” plywood in between (verify with code).
- Install king studs at each side, attach jack studs next to them.
- Lift header onto jack studs, secure to king studs.
- Fill above header with cripple studs, spaced 16” on center.
- Check for square, secure all connections.
- Attach bottom plate to floor, sheathe the wall if needed.
Non-obvious insight: For a double door, headers get very heavy. Always have at least two helpers when lifting into place.
Table: Rough Opening Sizes For Common Garage Doors
Choosing the right rough opening size is crucial. Here’s a quick reference for standard doors:
| Garage Door Size (W x H) | Recommended Rough Opening | Header Size (typical) |
|---|---|---|
| 8′ x 7′ | 8′ x 7′ | 2×10 |
| 9′ x 7′ | 9′ x 7′ | 2×10 |
| 10′ x 7′ | 10′ x 7′ | 2×12 |
| 16′ x 7′ | 16′ x 7′ | 2×12 or LVL |
| 18′ x 8′ | 18′ x 8′ | Engineered lumber |
Always confirm header size with local codes or a professional.
Final Framing Checks
Before moving on to installing the garage door, make sure to:
- Check that both sides of the opening are perfectly plumb using a level.
- Measure diagonals to confirm the opening is square.
- Verify the width and height match your door’s requirements.
- Ensure the header is fully supported and securely fastened.
Common mistake: Forgetting to re-measure after nailing can lock in a mistake. Measure twice, fasten once.

Adding Trim And Sealing The Opening
Install side jambs (vertical trim boards) and a head jamb (horizontal board above the door) to give a finished look and prepare for weatherstripping. Use rot-resistant wood or PVC for trim, especially near the ground.
Apply caulk around all trim edges to keep out water. Add weatherstripping to the side and top jambs for a tight seal once the door is installed.
Pro Insight: Use expanding foam only in small amounts around the frame. Too much can bow the jambs and cause the door to bind.
Preparing For Garage Door Installation
With the frame finished, clean up the work area. Remove any leftover nails, sawdust, or debris. Make sure the opening is clear and accessible for installers.
If you’re installing the garage door yourself, follow the manufacturer’s instructions exactly. The frame you built is now ready to support years of smooth operation.

Table: Common Framing Mistakes And How To Avoid Them
| Mistake | Problem | How to Avoid |
|---|---|---|
| Wrong rough opening size | Door won’t fit or seal properly | Always check manufacturer specs |
| Header too small | Sags or cracks above door | Consult code or engineer for header size |
| Frame out of square | Door binds or won’t close | Measure diagonals before nailing |
| No temporary supports | Wall shifts or collapses | Install supports before removing studs |
| Skipping weatherproofing | Leaks, rot, drafts | Use flashing, caulk, and weatherstripping |
Building Code And Permit Considerations
Most regions require a building permit for garage door framing, especially if you’re making structural changes. Inspectors will check the header size, fasteners, and that the frame is properly anchored.
Always check with your local building department before starting. Permits protect you from fines and ensure the work is safe.
Real-world example: In some US cities, the code requires double top plates for load-bearing garage door walls, or hurricane ties in wind zones.
For more information on building codes, see this comprehensive resource.
Safety Tips For Diyers
- Always wear safety glasses and gloves.
- Use a dust mask when cutting wood or removing old materials.
- Work with a partner when lifting heavy headers or large sheets of plywood.
- Double-check all measurements before making permanent cuts.
- Don’t remove more wall than needed at one time.
Upgrading Old Garage Door Openings
If you’re working on an older garage, you may find outdated framing or rot. Replace any damaged wood with new, pressure-treated lumber. Bring the framing up to modern code, especially for header size and anchoring.
Experience-based tip: Old garages often have non-standard sizes. Measure everything, and don’t assume the original builders got it right.
Frequently Asked Questions
How Much Bigger Should The Rough Opening Be Than The Garage Door?
The rough opening should be the same size as the door. For example, a 9’x7’ door needs a 9’x7’ rough opening. The garage door company will provide trim and weatherstripping to fill in small gaps.
What Size Header Do I Need For A 16-foot Garage Door?
Most 16-foot doors need at least a double 2×12 header or an engineered LVL beam, depending on local codes and loads. Always confirm with a structural engineer or building inspector.
Can I Frame A Garage Door Opening By Myself?
It’s possible for a skilled DIYer to frame a garage door opening, but you’ll need help lifting heavy headers. For larger doors, two or more people are recommended for safety.
Do I Need A Building Permit To Frame A Garage Door Opening?
In most areas, yes. Permits ensure your work meets building codes and is safe. Check with your local building department before starting.
What If My Floor Isn’t Level?
If your garage floor slopes, shim the bottom of the frame until level, or cut the bottom of the king and jack studs at an angle to match the slope. The rough opening must be square for the door to work correctly.
Framing a garage door opening is a task that rewards careful planning and attention to detail. By measuring accurately, choosing the right materials, and following each step closely, you set the stage for a door that works perfectly and lasts for years. Don’t rush—quality framing is the foundation for every successful garage project. If you ever feel unsure, consult a professional or reference trusted sources like Family Handyman. With patience and the right knowledge, you can complete this project with confidence.


