Now Reading: How to Remove Battery from Chamberlain Garage Door Opener Easily
- 01
How to Remove Battery from Chamberlain Garage Door Opener Easily
How to Remove Battery from Chamberlain Garage Door Opener Easily
A garage door opener is more than just a remote control device. It helps you enter and exit your garage with ease and keeps your home secure. Many homeowners rely on Chamberlain garage door openers because they are reliable and easy to use. But what happens when the battery inside your Chamberlain opener needs to be replaced or removed? If you have never done it before, it can feel confusing.
Removing the battery from your Chamberlain garage door opener may seem simple, but it requires the right steps and knowledge. Doing it incorrectly can lead to problems, such as the opener not working, or even damaging the unit. Also, Chamberlain offers several models, and each may have a slightly different battery location or removal process.
This guide will walk you through everything you need to know, from identifying your opener type to common mistakes and safety tips.
You’ll learn not only how to remove the battery but also why it matters, what tools you need, and what to do if things go wrong. Whether you are a homeowner, a tenant, or helping a family member, this guide will make the task straightforward. Let’s get started.
Why Chamberlain Garage Door Openers Use Batteries
Most Chamberlain garage door openers have a backup battery system. This battery is essential because it allows your garage door to function even when the power goes out. If you live in an area with frequent storms or unreliable electricity, the backup battery is more than just a convenience—it’s a necessity.
The battery also powers the internal clock, memory, and sometimes the light if you have a newer model. If the battery is dead or removed, your garage door opener may lose some settings or not work at all during a power outage.
Some Chamberlain openers use a 12V 5Ah lead-acid battery, while others use a smaller 9V or coin cell for remotes and keypads. Knowing which you have is important before starting the removal process.
Identifying Your Chamberlain Garage Door Opener Model
Before you remove the battery, you must know which Chamberlain model you own. This is because the battery placement and removal method can vary. There are three main types:
- Ceiling-mounted openers: Most common in homes with a large motor unit hanging from the ceiling.
- Wall-mounted openers: Slim units fixed to the wall beside the garage door.
- Keypad or remote controls: Small, battery-operated devices that need battery replacement more often.
To identify your opener model:
- Check the label or sticker on the main unit. It usually displays the model number (e.g., B550, B970, WD832KEV).
- Look for a battery compartment on the side, back, or under a cover.
- If you have the manual, refer to it for the battery location.
Each type has a different battery removal process, which we’ll cover in detail.
Tools And Materials You Will Need
Removing the battery from a Chamberlain garage door opener is a simple job, but having the right tools helps prevent damage and makes the task easier. Here’s what you should gather before starting:
- Phillips screwdriver (for most battery covers)
- Flathead screwdriver (for prying open some compartments)
- Step stool or ladder (if your opener is ceiling-mounted)
- Clean cloth (to wipe dust)
- Protective gloves (optional for safety)
- Pen and paper or smartphone (to note any settings you may need to re-enter later)
Having everything ready means you won’t have to climb up and down or search for tools mid-job.
Safety Precautions Before Removing The Battery
Working with electrical devices always requires caution. Although you are only removing a battery, it’s important to stay safe:
- Disconnect power: Unplug the opener from the wall outlet before removing the battery. This prevents any accidental operation.
- Wait for lights to go out: Some units have internal capacitors. After unplugging, wait 1-2 minutes for all lights to turn off.
- Keep children and pets away: The opener may have sharp edges or small parts.
- Handle batteries carefully: Used batteries can leak chemicals. Wear gloves if you have sensitive skin.
Following these steps reduces the risk of shocks, short circuits, or accidents.

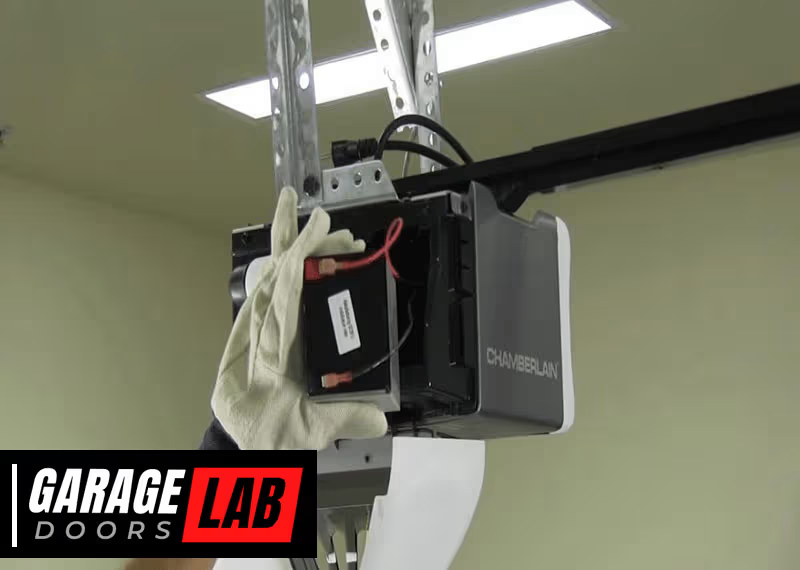
Step-by-step Guide: Removing The Battery From A Ceiling-mounted Chamberlain Garage Door Opener
Ceiling-mounted openers are the most common in US homes. Here’s how to safely remove the battery:
1. Unplug The Unit
Find the power cord, usually plugged into an outlet on the ceiling or wall near the opener. Gently unplug it. This ensures you won’t get shocked or accidentally activate the door.
2. Locate The Battery Compartment
On most Chamberlain models with a backup battery, the battery compartment is on the side of the main unit. Look for a small door or cover, often held by a screw or plastic clip.
3. Open The Battery Compartment
- If there is a screw, use the Phillips screwdriver to remove it.
- If there’s a clip, gently press or pry it open with a flathead screwdriver.
- Set the cover and screw aside in a safe place.
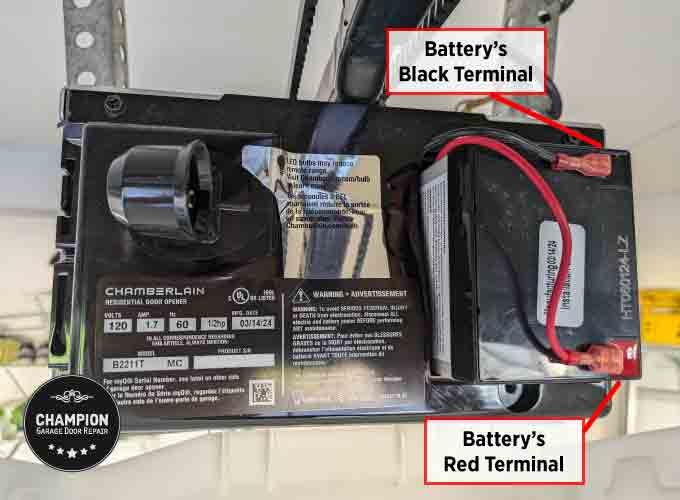
4. Remove The Battery
- You’ll see a rectangular battery, usually with wires attached to the terminals.
- Gently pull off the red (positive) and black (negative) connectors. Wiggle them softly—do not pull hard or you could damage the wires.
- Lift the battery out of the compartment.
Non-obvious tip: Some batteries are held in place by a small strap or clip inside the compartment. If you see a strap, release it before pulling out the battery.
5. Inspect The Battery And Compartment
Check for any signs of corrosion or leaking fluid. If the compartment is dirty, clean it with a dry cloth. Do not use water or cleaning sprays.
6. Store Or Dispose Of The Battery Properly
Never throw old batteries in the regular trash. Take them to a local recycling center or follow your city’s battery disposal guidelines.
Bonus insight: Write down the battery type (e.g., 12V 5Ah) for when you need a replacement. Most units have the type printed on the battery case.
Removing The Battery From A Wall-mounted Chamberlain Garage Door Opener
Wall-mounted openers are less common but growing in popularity. The process is similar but with some differences.
1. Unplug The Unit
The power cord is usually near the bottom or side of the unit. Unplug it and wait a minute.
2. Find The Battery Compartment
Wall-mounted Chamberlain openers often have the battery compartment at the bottom or behind a panel. Look for a small access door.
3. Open The Compartment
- Remove any screws using your Phillips screwdriver.
- Use a flathead screwdriver to pop open the door if there are no screws.
- Keep all screws and covers safely aside.
4. Disconnect And Remove The Battery
- The battery will be connected with two wires—red and black.
- Gently pull the connectors off. Do not pull the wires themselves.
- Remove the battery from the compartment.
Practical tip: Some wall-mounted units have a sliding battery tray. Pull the tray out gently to access the battery.
5. Clean And Inspect
Check for any white or blue powder (corrosion). Clean with a dry cloth. Do not replace a corroded battery; dispose of it safely.
6. Store Or Recycle The Battery
Follow local regulations for battery disposal. Do not leave batteries where children or pets can reach them.
Removing The Battery From Chamberlain Remotes Or Keypads
Many people forget that the remote controls and wireless keypads for Chamberlain openers also use batteries. These may need removal or replacement more often.
1. Identify The Remote/keypad Type
Most Chamberlain remotes use a coin cell (CR2032) or a 9V battery. Wireless keypads usually use a 9V battery.
2. Open The Battery Compartment
- For remotes: Slide or pry open the battery door, often on the back.
- For keypads: Remove the keypad from the wall by sliding it upward, then open the battery cover.
3. Remove The Battery
- Use your fingernail or a small screwdriver to pop out the coin cell.
- For 9V batteries, gently pull out from the clips.
Hidden insight: When removing the battery, avoid touching both terminals at the same time—this can drain the battery faster or cause a short.
4. Insert A Replacement Or Leave Empty
If you are removing the battery for storage, keep it in a cool, dry place. If replacing, insert the new battery and close the cover.
Comparison Of Battery Types In Chamberlain Garage Door Openers
Understanding which battery your Chamberlain opener uses can help you plan for removal and replacement. Here’s a quick comparison:
| Device Type | Battery Type | Location | Average Lifespan |
|---|---|---|---|
| Ceiling-Mounted Opener | 12V 5Ah Lead-Acid | Side/Back Compartment | 1-3 Years |
| Wall-Mounted Opener | 12V 5Ah Lead-Acid | Bottom/Back Compartment | 1-3 Years |
| Remote Control | CR2032 Coin Cell | Back of Remote | 2-5 Years |
| Wireless Keypad | 9V Alkaline | Inside Keypad | 1-2 Years |
This table can help you identify which battery you are working with.

Common Problems When Removing The Battery
Removing a battery from a Chamberlain opener is usually easy, but sometimes problems happen. Here are a few common issues and how to solve them:
Stuck Battery Compartment Cover
If the cover won’t open, do not force it. Check for hidden screws or tabs. Sometimes dust and dirt jam the cover—try gently tapping the side with a screwdriver handle.
Corroded Terminals
If you see white or blue powder on the battery contacts, the battery has leaked. Wear gloves and use a dry cloth to clean. Do not use water or spray cleaners.
Battery Won’t Come Out
Batteries can swell over time. Try gently wiggling the battery side to side. If it still won’t move, do not pry hard—this can break the compartment. In this case, consult a professional.
Wires Come Off With Battery
If a wire comes off when you remove the battery, you may need to reattach it with a crimp or solder. If you are not comfortable, call a technician.
Opener Won’t Work After Battery Removal
Some models need to be reset after battery removal. Check your manual for reset instructions or look for a “learn” button on the unit.
How To Reset Chamberlain Garage Door Opener After Battery Removal
Sometimes, removing the battery erases settings like remote pairings or the time. Here’s how to reset:
- Plug in the opener and wait for the lights to come on.
- Press the ‘Learn’ button on the unit for 6 seconds. This clears old codes.
- Reprogram remotes and keypads by pressing the ‘Learn’ button and then the remote button.
- Set the time and date if your model has a display.
Advanced tip: For some Wi-Fi enabled Chamberlain models, you may need to reconnect the unit to your home Wi-Fi using the MyQ app.
How To Know If Your Battery Needs Removal Or Replacement
People often wonder when it’s time to remove or replace the battery. Signs include:
- Beeping noise from the opener unit (low battery warning)
- Flashing red light on the opener or keypad
- Remote or keypad stops working
- Door won’t open during power outage
Non-obvious insight: Some Chamberlain openers do a self-test every few weeks. If you hear beeping at regular intervals, it’s likely a battery issue—not a malfunction.
Battery Maintenance Tips For Long Life
To avoid frequent battery changes, follow these tips:
- Check batteries twice a year. Add it to your spring and fall maintenance list.
- Keep the compartment dry. Moisture causes corrosion.
- Use high-quality replacements. Cheap batteries don’t last as long and can leak.
- Clean terminals before installing a new battery.
Experience-based tip: Store spare batteries in a cool, dry place, and label them with the purchase date.
What To Do After Removing The Battery
After removing the battery, you have two choices: replace it with a new one or leave it empty (for example, if you are storing the unit). Here’s what to do next:
- Install a new battery as soon as possible if you want the backup feature to work.
- Close the compartment securely to prevent dust or insects from entering.
- Plug the opener back in and test the door operation.
- Check the display or lights to make sure everything works.
Professional Help Vs. Diy: When To Call A Technician
Most people can remove and replace a garage door opener battery themselves. However, you should call a professional if:
- The battery is swollen, leaking, or stuck
- The wires come loose or break during removal
- The unit does not work after replacing the battery
- You see sparks or smell burning when handling the battery
A technician has the tools and experience to handle these problems safely.
Comparing Chamberlain Battery Backup Vs. Other Brands
Chamberlain is known for its reliable battery backup feature, but how does it compare to other brands? Here’s a quick look:
| Brand | Battery Backup Standard | Battery Type | Average Backup Time |
|---|---|---|---|
| Chamberlain | Yes (select models) | 12V 5Ah | 24 hours / 20 cycles |
| LiftMaster | Yes (all new models) | 12V 4.5Ah | 24 hours / 20 cycles |
| Genie | Optional | 12V 5Ah | 24 hours / 20 cycles |
| Craftsman | No/Optional | N/A | N/A |
Insight: California law requires all new garage door openers sold after July 1, 2019, to have battery backup. Chamberlain models sold in California will always include this feature.
Environmental Considerations And Battery Recycling
Batteries contain chemicals that can harm the environment if not disposed of properly. Here’s how to be responsible:
- Take used batteries to a recycling center. Many hardware stores accept them.
- Do not burn or puncture batteries. This releases harmful chemicals.
- Keep old batteries away from water sources.
For more details on recycling, check the official EPA Battery Recycling Guide.
Troubleshooting: If Your Chamberlain Opener Still Beeps After Battery Removal
Sometimes, the opener keeps beeping even after you remove the battery. Possible causes:
- Residual charge: Unplug the unit for 10 minutes, then plug it back in.
- Faulty battery detection circuit: Some models may need a reset.
- Loose connectors: Make sure all wires are secure.
If the problem continues, consult your Chamberlain manual or call customer service.
Real-world Example: Removing A Battery From A Chamberlain B970
Let’s walk through removing the battery from a popular model:
- Unplug the opener.
- On the B970, the battery compartment is on the left side.
- Use a Phillips screwdriver to open the door.
- Disconnect the red and black wires.
- Remove the battery, noting its type (12V 5Ah).
- Check for corrosion, clean, and insert a new battery if needed.
- Replace the cover and plug in the unit.
This process takes about 10 minutes and requires no special skills.
Myths And Misunderstandings About Chamberlain Batteries
Some common myths:
- Myth: “If I remove the battery, the opener won’t work.”
Fact: It will work on AC power but not during a power outage.
- Myth: “Any 12V battery will do.”
Fact: Only use the type recommended by Chamberlain—size and amperage matter.
- Myth: “You must reset everything after battery removal.”
Fact: Most settings are kept in memory, but some models may need re-pairing.
How To Extend The Life Of Your Chamberlain Opener Battery
You can make your battery last longer by:
- Only opening/closing the garage door when necessary during power outages.
- Keeping the opener out of extreme heat or cold.
- Using original or high-quality replacement batteries.
Hidden tip: Many people forget to check the battery during annual garage maintenance. Add it to your checklist!
Frequently Asked Questions
How Often Should I Replace The Battery In My Chamberlain Garage Door Opener?
Most Chamberlain backup batteries last 1 to 3 years. Replace the battery when you hear beeping, see a warning light, or notice the door doesn’t work during a power outage.
What Type Of Battery Does My Chamberlain Opener Use?
Most ceiling and wall-mounted Chamberlain openers use a 12V 5Ah lead-acid battery. Remotes use CR2032 coin cells, and wireless keypads use 9V alkaline batteries. Check your user manual or the old battery for exact type.
Can I Remove The Battery And Still Use My Garage Door Opener?
Yes, your opener will still work when plugged into AC power. However, without the battery, it will not open or close during a power outage, and some features (like lights or clock) may not work.
How Do I Safely Dispose Of The Old Battery?
Take the old battery to a battery recycling center or hardware store that accepts used batteries. Do not throw it in the regular trash or burn it, as batteries contain harmful chemicals.
My Chamberlain Opener Still Beeps After Removing The Battery. What Should I Do?
First, unplug the opener for 10 minutes and plug it back in. If it still beeps, check for loose wires or reset the unit. If the problem continues, contact Chamberlain support or a professional technician.
Removing the battery from your Chamberlain garage door opener is a simple but important maintenance task. With the right tools and steps, you can do it safely and confidently. Always check your model, use the correct battery type, and dispose of old batteries responsibly. By following these guidelines, you keep your garage door working smoothly and your home secure—no matter what happens with the power.


