Now Reading: How to Reprogram a Liftmaster Garage Door Opener Easily
- 01
How to Reprogram a Liftmaster Garage Door Opener Easily
If you own a LiftMaster garage door opener, you know how much convenience it brings to your daily routine. But sometimes, you need to reprogram it—maybe you’ve replaced a lost remote, moved into a new home, or want to update access for security. Many people feel nervous about tackling this task, thinking it requires a technician. Actually, with the right instructions, you can handle it yourself. This guide will walk you through every step, offer troubleshooting advice, and explain tips that most beginners miss. Whether you’re updating remotes or resetting the whole system, you’ll find clear, practical help here.
Understanding Your Liftmaster Garage Door Opener
Before you start, it’s helpful to know the basics of your device. LiftMaster is a leading brand, trusted for its reliability and smart features. Most openers use a radio frequency signal, sent from your remote or keypad to a receiver on the motor unit. Over time, models have evolved, but the core process for programming is similar.
Modern models (built after 1993) use a learn button to sync remotes and keypads. Older models may use DIP switches. Knowing which type you have will save you time and frustration. If you’re not sure, check the label on your opener or look for the learn button location.
Types Of Liftmaster Openers
- Chain Drive: Uses a metal chain to open and close the door. Durable, but can be noisy. This type is popular in detached garages or places where noise is not a big concern. It’s also usually more affordable, making it common in older homes.
- Belt Drive: Similar mechanism, but with a rubber belt. Quieter than chain drive. If your garage is near bedrooms or living spaces, a belt drive is usually preferred because it makes less vibration and sound.
- Screw Drive: Uses a threaded steel rod. Requires less maintenance, but not as common today. These models are reliable in extreme temperatures, but parts can be harder to find.
- Smart/Wi-Fi Enabled: Controlled via apps like myQ. Offer smartphone programming and alerts. These models allow for remote monitoring, custom schedules, and can integrate with home automation systems.
Most programming steps are the same across these types, but smart models add some options, like app pairing and device sharing.
Key Features
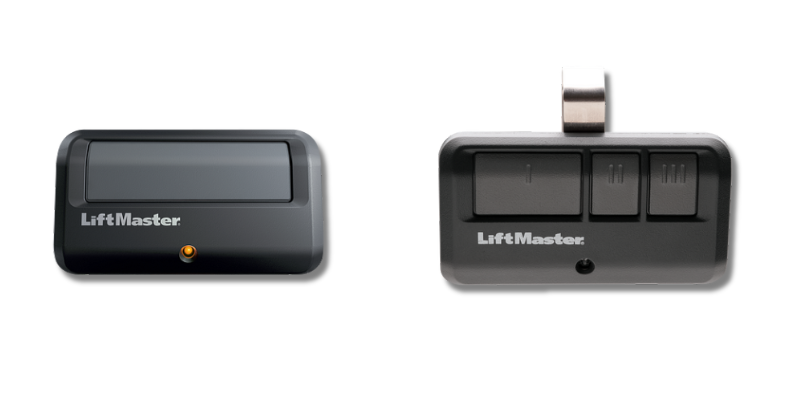
- Remote controls: Handheld devices for easy opening from your car. Some come with multiple buttons for controlling more than one door.
- Keypads: Mounted outside, allowing PIN code entry. Useful for children or if you go jogging without keys.
- Wall control panels: Located inside the garage for manual operation. Some advanced panels display temperature or error messages.
- Safety sensors: Ensure the door doesn’t close on people or objects. These are usually mounted 4-6 inches above the floor on either side of the door.
Understanding your opener’s features helps you program it correctly and safely. For example, some remotes include “lock” buttons to prevent accidental opening, which can confuse new users.
When Should You Reprogram Your Opener?
Reprogramming isn’t just for lost remotes. Here are common situations:
- Lost or stolen remote: Prevent unauthorized access. Even if you think the remote is just misplaced, it’s better to be safe.
- Moving to a new home: Reset all codes for security. The previous owner may have given out codes to neighbors or service people.
- Adding a new remote or keypad: Expand access for family members. Each family member can have a unique remote, or you can set temporary codes for babysitters or cleaners.
- System malfunction: Fix unresponsive remotes or keypads. Sometimes electrical storms or power surges can cause a loss of memory.
- Upgrading to smart features: Connect with mobile devices. Newer smart features require syncing with the opener.
If you’re unsure, it’s safer to reprogram—especially after moving or if you suspect someone else could have access. Regularly updating codes also keeps your system more secure.
Essential Tools And Preparation
You don’t need many tools for this job, but being prepared makes the process smoother.
You will need:
- A sturdy ladder (for ceiling-mounted units; avoid using chairs for safety).
- Your LiftMaster garage door remote(s) and/or keypad.
- The garage door opener’s user manual (optional, but helpful; you can often find PDFs online by searching your model number).
- A pen and paper (to note codes if needed or write down the PIN for reference).
- A flashlight (for dark garages or to read small print on the opener).
Safety tip: Unplug the opener only if you’re working on wiring. For basic programming, keep it plugged in so you can test remotes. It’s also smart to let someone know you’ll be on a ladder, just in case.
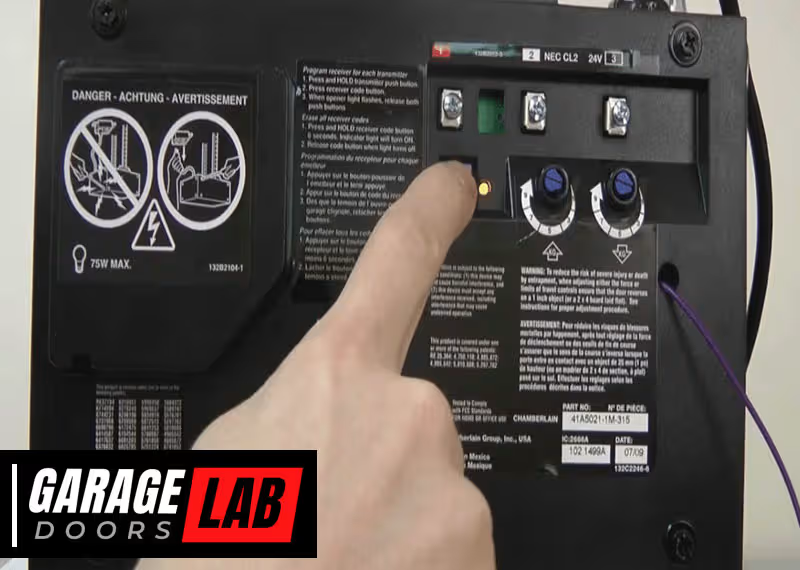
Identifying The Learn Button
The learn button is central to programming. It’s usually located on the back or side of the motor unit, near the light bulb. If your opener has a light cover, gently remove it to look for the button. The button is small (about the size of a pencil eraser) and often labeled.
Colors and their meaning:
- Yellow: Security+ 2.0 (most modern units; supports encrypted signals and multiple remotes).
- Purple: Security+ (2005–2011; uses rolling code technology).
- Red/Orange: Security+ (1997–2005; earlier rolling code models).
- Green: Older Security+ (pre-1997; fixed code, less secure).
The color tells you what remotes and keypads are compatible. If you can’t find the button, remove the light lens or check your manual. Some older units hide the button behind a plastic panel.
Step-by-step: How To Reprogram A Liftmaster Remote
Follow these detailed steps to reprogram your remote. This process works for most units made after 1993.
1. Locate The Learn Button
Climb the ladder and look at the back or side of the opener motor unit. Press the light cover if needed to remove it. If your opener has a “diagnostic” LED, ignore it—look for the actual learn button.
2. Press The Learn Button
Press and release the learn button. A small LED light will turn on and stay solid for 30 seconds. This means the unit is ready to pair with a remote.
> Important: Don’t hold the learn button too long (over 6 seconds), or you might erase all programmed remotes. Beginners sometimes hold the button out of uncertainty and accidentally wipe all codes.
3. Sync The Remote
Within 30 seconds of pressing the learn button:
- Hold your LiftMaster remote near the opener (a few feet away is enough).
- Press and hold the button you want to program.
- When the opener’s lights blink or you hear a click, release the button. On some models, you may hear two clicks.
The remote is now programmed. Test it by pressing the remote button and watching the door. If you have a multi-button remote, you can program different buttons to control different doors.
4. Repeat For Additional Remotes
You can pair up to 8 remotes (some models allow more). Repeat the steps for each one. If you have several remotes, program each quickly before the opener leaves learn mode.
5. Test All Remotes
Make sure each remote opens and closes the door. If one doesn’t work, repeat the steps. If none work, you may have pressed the learn button too long and erased all codes—just start over.
Extra tip: Store at least one remote inside your home as a backup, not just in your car.
How To Program A Liftmaster Keypad
Keypads offer secure access without a remote. Most LiftMaster keypads are wireless and use a PIN code. They’re great for kids, service people, or if you often forget your remote.
1. Clear Old Codes (if Needed)
If you moved into a new home or want to remove old codes:
- Press and hold the learn button on the opener until the LED turns off (about 6 seconds). This erases all remote and keypad codes.
- Some models beep or flash the light to confirm.
2. Enter Programming Mode
- Press and release the learn button. The LED comes on for 30 seconds.
3. Set A New Pin
- Within 30 seconds, go to your keypad (outside garage).
- Enter your chosen 4-digit PIN and press the Enter button.
- The opener’s light will blink or click, confirming the code. On some keypads, you may need to press the “Learn” button, then the PIN, then Enter.
4. Test The Keypad
Enter your new PIN and press Enter. The door should open or close. If not, check the keypad battery or repeat the process.
> Many keypads let you program temporary codes for guests or deliveries. Check your model’s manual for details. Some allow you to set codes that expire after a certain number of uses or after a set time.
Non-obvious insight: If your keypad stops working after a battery change, you may need to reprogram it, as some models lose memory when power is removed.
Erasing All Remote And Keypad Codes
Sometimes you need a complete reset—for example, after a break-in or moving into a new house. This ensures no old remotes or codes can open your door.
Steps To Erase All Codes
- Hold the learn button for 6–10 seconds until the LED turns off.
- All remotes and keypads are now erased.
- Reprogram each remote and keypad you want to use (see steps above).
Tip: Don’t forget to reprogram any smart home integrations if you use them. Devices like myQ bridges or HomeLink in cars may also need to be re-synced.
Advanced insight: If you have more than one opener (for example, two garage doors), you must repeat the erase and reprogram steps on each unit separately.
Programming A Liftmaster Wall Control
Most wall controls don’t need programming, but some advanced models (like Smart Control Panels) do.
For Smart Wall Controls
- Press the menu button on the wall control.
- Navigate to Program or Remote.
- Follow on-screen prompts to add or remove remotes.
This is especially useful for systems with multiple users. Some panels also let you adjust opener lights, lock the system, or see error messages.
Practical example: If you have a vacation home, you can lock the opener from the wall panel so remotes won’t work while you’re away.
Adding A New Remote Or Keypad
If you’re adding a new remote or keypad, check compatibility. Remotes must match the frequency and technology (Security+ 2. 0, etc. ) Of your opener.
To add a new device:
- Press the learn button on the opener.
- Within 30 seconds, press the button on the remote or enter the keypad code.
- Wait for confirmation (light blink or click).
Common mistake: Buying a remote that’s not compatible with your opener’s learn button color. Always check before purchasing.
Non-obvious insight: Some universal remotes require you to select the brand and model before programming; read the packaging carefully to avoid frustration.
How To Program A Liftmaster Myq Smart Opener
Smart openers let you control your garage door with a phone app. myQ is the official app for LiftMaster.
Setting Up Myq
- Download the myQ app from the App Store or Google Play.
- Create an account and follow in-app instructions.
- Press the learn button on your opener when the app prompts you.
- Enter your Wi-Fi details and complete the setup.
During setup, be sure your phone is connected to your home Wi-Fi, not cellular data. The app will walk you through each step, but be patient—it may take a few minutes for the opener to connect.
Benefits Of Myq
- Open or close your garage from anywhere.
- Get alerts if the door is left open.
- Share access with family members. You can invite others to use the door temporarily or permanently.
- Set schedules to automatically close the door at night.
- Integrate with smart home systems (like Amazon Key for in-garage deliveries).
Non-obvious insight: myQ requires a 2.4GHz Wi-Fi network. Many users struggle because they try to connect to a 5GHz network. If your phone is on the wrong band, switch it before starting setup.
Extra tip: Place your Wi-Fi router closer to the garage if you have frequent connectivity issues. A weak signal can cause the opener to lose connection or miss commands.
Troubleshooting Common Programming Problems
Reprogramming doesn’t always go smoothly. Here’s how to handle common issues.
Remote Not Working
- Check batteries. Weak batteries cause many problems.
- Distance: Be within 30 feet of the opener.
- Obstructions: Remove metal objects or move your car if blocking the signal.
- Correct button: Make sure you’re pressing the programmed button.
- Try another remote: If only one remote fails, it may be defective.
Keypad Problems
- PIN not accepted: Try resetting the keypad using the steps above.
- Keypad dirty or worn: Clean with a damp cloth. Replace if keys are stuck.
- Batteries: Many keypads use a 9V battery. Replace if unresponsive.
- Sunlight exposure: Direct sunlight can fade numbers; consider installing a keypad cover for protection.
Opener Won’t Enter Programming Mode
- Power cycle: Unplug the opener for 1 minute, then plug back in.
- Overheated unit: Wait 10 minutes, then try again.
- Faulty learn button: If the LED never lights up, the button or circuit board may need service.
- Electrical noise: Power surges can disrupt the logic board. Use a surge protector to prevent future problems.
Door Opens Randomly
- Interference: Other nearby devices (doorbells, wireless cameras) can cause false signals. Try reprogramming with all other devices off.
- Stuck remote button: Check all remotes for jammed buttons.
- Neighbor’s remote: In rare cases, older fixed-code openers can react to a neighbor’s remote. Upgrading to a rolling code model fixes this.
Advanced tip: If you live in an area with lots of wireless devices, consider upgrading to a newer model with better frequency filtering. Some modern openers can also report interference issues via the myQ app.
Keeping Your Opener Secure
Garage doors are a common entry point for break-ins. Here’s how to keep your system safe:
- Erase old remotes when moving into a new home.
- Use a unique PIN for your keypad. Avoid obvious numbers like “1234” or your address.
- Update codes regularly, especially if you’ve shared them with guests.
- Enable myQ alerts to know if your door is used unexpectedly.
- Don’t leave remotes in your car if parked outside.
- Consider using a garage door shield to block “fishing” attempts, where thieves try to pull the emergency release from outside.
For more security tips, visit the Consumer Reports Garage Door Opener Security Guide.
Non-obvious insight: If your garage is attached to your home, always keep the door to the house locked—even with a secure opener.
Table: Liftmaster Opener Models And Learn Button Colors
Here’s a quick reference for matching remotes to your opener:
| Model Series | Year Made | Learn Button Color | Compatible Remotes |
|---|---|---|---|
| Security+ 2.0 | 2011–Present | Yellow | 891LM, 893MAX, 890MAX |
| Security+ | 2005–2011 | Purple | 370LM, 373P, 375UT |
| Security+ | 1997–2005 | Red/Orange | 971LM, 973LM, 977LM |
| Security+ | Pre-1997 | Green | 61LM, 62LM |
Extra tip: If your remote model is not listed, check the opener manual or LiftMaster’s official website for cross-references.
Table: Common Programming Actions And Time Needed
If you’re planning your work, here’s how long each action usually takes:
| Action | Average Time | Difficulty Level |
|---|---|---|
| Programming a remote | 2–3 minutes | Easy |
| Programming a keypad | 3–5 minutes | Easy |
| Erasing all codes | 1–2 minutes | Easy |
| myQ smart setup | 10–20 minutes | Medium |
Practical note: If you’re programming several remotes or keypads, do them one after another while the opener stays in learn mode.
Table: Common Problems And Solutions
| Problem | Likely Cause | Solution |
|---|---|---|
| Remote not working | Batteries dead | Replace batteries |
| Keypad code not accepted | Incorrect PIN or code erased | Reset PIN, reprogram keypad |
| Opener won’t enter programming mode | Power issue or faulty learn button | Check power, call technician if needed |
| Door opens randomly | Signal interference | Erase and reprogram remotes |
Non-obvious insight: If your keypad or remote stops working after a lightning storm, check for tripped circuit breakers or surge damage to the opener.

Maintenance Tips After Reprogramming
Once you’ve reprogrammed your opener, a little maintenance goes a long way.
- Test the door monthly to ensure it opens and closes smoothly. Watch and listen for any strange movements or noises.
- Check safety sensors (mounted near the bottom of the door). Clean them regularly. If the sensors are misaligned, the door won’t close.
- Listen for strange noises. Grinding or squeaking may mean it’s time for lubrication or repair. Use garage door lubricant—not WD-40—on moving parts.
- Update remotes and keypads every few years. Technology advances, and newer devices are more secure.
- Inspect the opener’s antenna (usually a thin wire hanging from the unit). Make sure it’s not damaged or bent, as this affects range.
Non-obvious insight: If you reprogram after a power surge or lightning storm, check your opener’s surge protector. Power issues can affect programming memory. Also, keep the manual in a safe place for future reference.
When To Call A Professional
Some problems need expert help:
- Learn button doesn’t light up: Circuit board may be damaged.
- Remotes won’t sync after multiple tries: Possible receiver issue.
- Opener moves but won’t stop: Limit switches may need adjustment.
- Physical damage: Cracked units or frayed wires should be repaired by a pro.
- Broken springs or cables: These are under high tension and can cause serious injury.
Don’t risk injury if you’re unsure. Garage door springs are under high tension and can be dangerous. If your opener is more than 15 years old, consider a full system check by a licensed technician.
Frequently Asked Questions
How Do I Know If My Remote Is Compatible With My Liftmaster Opener?
Check the learn button color on your opener. Match it with the remote model (see the table above). If unsure, visit the official LiftMaster website or contact customer service. Also, check for the “Security+” label on both the remote and the opener.
Can I Program A Universal Remote To Work With My Liftmaster Opener?
Yes, most universal remotes work if they support the same frequency and Security+ technology. Follow the same learn button process. For older openers, you may need to use DIP switches or a specific universal remote model. Always read universal remote instructions carefully.
How Often Should I Update My Opener’s Codes?
Update your codes any time you lose a remote, move homes, or share access with new people. As a best practice, change keypad PINs every 6–12 months for security. Regular updates help prevent old codes from being used by anyone you no longer trust.
What Should I Do If My Opener’s Learn Button Is Broken?
If the learn button doesn’t work, try unplugging the unit and resetting it. If the button still won’t respond, you may need a new circuit board. Contact a qualified technician for repair. Avoid using force or opening the unit yourself, as this can void warranties.
Is It Safe To Reprogram My Opener Myself?
Yes, as long as you follow instructions and basic safety tips. Don’t climb a ladder alone, and avoid touching wiring. For complex issues, call a professional. Always test the door after programming to be sure everything works as expected.
Every LiftMaster opener offers reliable performance, but keeping your system up to date is key for both convenience and safety. With this guide, you can confidently reprogram remotes, keypads, and smart controls—ensuring your home stays secure and your garage door always works when you need it.


