Now Reading: How to Set a Clicker Garage Door Opener: Easy Step-by-Step Guide
- 01
How to Set a Clicker Garage Door Opener: Easy Step-by-Step Guide
How to Set a Clicker Garage Door Opener: Easy Step-by-Step Guide
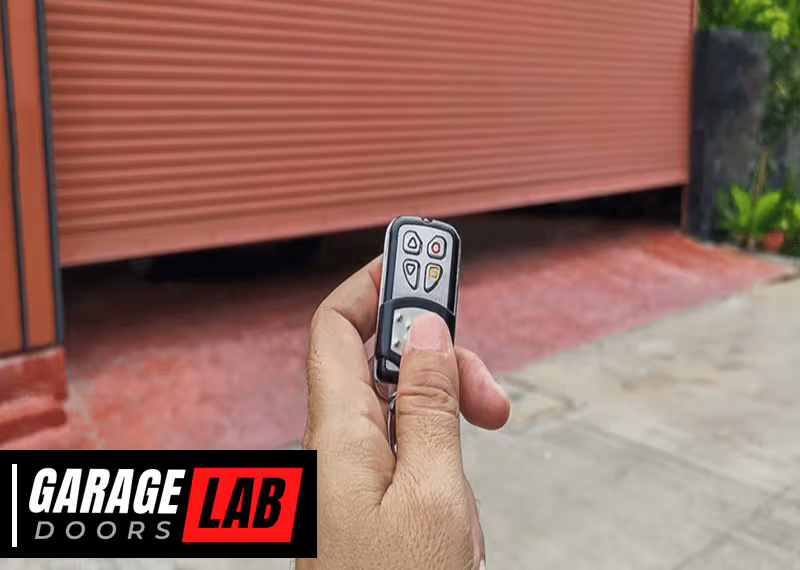
Setting up a Clicker garage door opener can feel challenging, especially if you haven’t worked with garage door systems before. But with the right steps, a little patience, and some clear guidance, you can finish this task in less than an hour. Whether you just bought a new Clicker remote, replaced your garage door opener, or need to reset your current setup, understanding the process is essential for smooth operation and security.
Many homeowners struggle with programming their garage door remotes. They often miss small but important details, leading to frustration or multiple failed attempts. This guide will walk you through each stage, from understanding your Clicker opener’s basics to advanced troubleshooting.
You’ll learn not only how to program it but also how to handle different garage door brands, avoid common mistakes, and keep your system secure.
Let’s break down the process, step by step, so you can confidently set up your Clicker garage door opener and enjoy the convenience and safety it offers.
Understanding The Clicker Garage Door Opener
Before you start, it’s important to know what makes the Clicker garage door opener unique. Clicker is a universal garage door remote. This means it works with most brands, including Chamberlain, LiftMaster, Craftsman, Genie, and others. The main advantage is that you don’t need a different remote for each opener—one Clicker can control multiple doors, even from different manufacturers.
Most Clicker remotes come with two or more buttons, allowing you to program each one for a different door. They use radio signals to communicate with the opener, and programming them means pairing the remote with your opener’s receiver.
Key Features Of A Clicker Remote
- Universal compatibility: Works with almost all major garage door brands.
- Multiple button options: Can control more than one garage door.
- Easy battery access: Replacing the battery is straightforward.
- Security: Uses codes that change each time the remote is used (rolling code technology) on most modern systems.
Why Proper Setup Matters
If your Clicker remote isn’t programmed correctly, it won’t open the door. Worse, improper programming can leave your home less secure. Some people forget to erase old codes, which means lost or stolen remotes might still work. A correct setup ensures safety, reliability, and peace of mind.
What You Need Before Starting
To set up your Clicker garage door opener, gather everything you need before you begin. This saves time and helps you avoid frustration midway through the process.
Essential Items
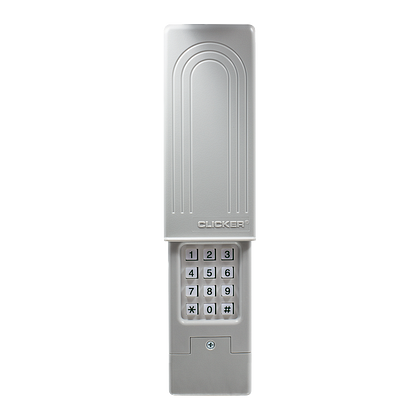
- Clicker remote: Make sure you have the correct model. Most Clicker remotes work with openers made after 1993.
- New battery: Weak batteries can cause programming to fail. Install a fresh battery in your remote.
- Step ladder: Most garage door openers are mounted on the ceiling. A ladder will help you reach the “Learn” button.
- Owner’s manual: Both for your garage door opener and your Clicker remote (available online if you lost the paper copy).
- Pen and paper: For jotting down codes or steps if you need to program multiple remotes.
Safety Precautions
- Unplug the garage door opener if you need to open the cover.
- Clear the area of children and pets.
- Wear safety glasses if you’ll be working above your head.
Many people skip checking the battery or using a ladder, leading to failed attempts or accidents. Don’t overlook these small steps—they save time and trouble.
Identifying Your Garage Door Opener Brand And Model
Not all garage door openers work exactly the same way. While Clicker is a universal remote, the programming steps can vary depending on your opener’s brand and model.
Where To Find Model Information
- On the opener unit: Look for a sticker on the motor housing, often on the side or bottom. This shows the brand, model number, and sometimes the year of manufacture.
- On the wall control panel: Some units display model information when you open the panel.
- Owner’s manual: The manual will list the model and programming instructions.
If you can’t find the model, look up your opener’s appearance online. Most manufacturers have photo guides to help you match your unit.
Why The Brand And Model Matter
- Programming steps: Some brands use different button sequences.
- Compatibility: Openers made before 1993 may not support newer Clicker remotes.
- Frequency: Most modern systems use 315 or 390 MHz, but older units might be different.
If your opener is very old (pre-1993), consider upgrading for better security and compatibility.
Getting To Know The “learn” Button
The “Learn” button is the heart of programming your Clicker remote. This button is located on your garage door opener’s motor unit, usually on the ceiling of your garage.
Finding The Learn Button
- Color: The button is often colored (yellow, red, orange, green, or purple).
- Location: It’s usually near the antenna wire or light cover. Sometimes, you need to remove a small plastic panel to see it.
- Label: It may be labeled as “Learn,” “Program,” or just have a symbol.
Learn Button Colors And Their Meanings
Here’s a quick reference to what the color often means:
| Button Color | Frequency | Typical Brand | Year Range |
|---|---|---|---|
| Yellow | Security+ 2.0 (310/315/390 MHz) | Chamberlain/LiftMaster | 2011-present |
| Purple | 315 MHz | Chamberlain/LiftMaster | 2006-2014 |
| Red/Orange | 390 MHz | Chamberlain/LiftMaster | 1997-2005 |
| Green | 390 MHz | Chamberlain/LiftMaster | 1993-1996 |
If you’re not sure about your opener’s frequency, check the manual or manufacturer’s website. This information is critical for proper programming.
Step-by-step Guide: How To Set A Clicker Garage Door Opener
Now that you understand the basics, let’s dive into the actual process. The steps below apply to most Clicker universal remotes, including models KLIK1U, KLIK3U, and KLIK5U.
1. Prepare The Remote And Opener
- Make sure the opener is plugged in and working.
- Replace the remote’s battery if needed.
- Clear the area around the garage door.
2. Clear Old Codes (optional But Recommended)
If your Clicker remote was used before, it’s wise to erase old codes. This avoids accidental opening by old remotes.
- Hold both buttons on your Clicker until the LED light turns off (about 10 seconds).
- Release the buttons. The remote is now reset.
3. Enter Programming Mode
- Press and hold the remote button you want to program.
- The LED on the remote will turn on and stay lit.
4. Set The Manufacturer’s Code
- Refer to your Clicker manual for the code list. Each brand has a specific code (for example, Genie = 2, Chamberlain = 1).
- While holding the remote button, press the number of times that matches your opener’s brand code.
- Release the button when the LED blinks (usually after entering the code).
5. Pair With The Garage Door Opener
- Climb your ladder and locate the Learn button on the garage door opener.
- Press and release the Learn button. An indicator light will turn on for 30 seconds.
- Within those 30 seconds, press and hold the programmed button on your Clicker remote.
- Hold until you hear a click, see the opener light flash, or the door moves slightly (this means the remote paired successfully).
- Release the remote button.
6. Test The Remote
- Move to a safe spot.
- Press the programmed button. The door should open or close.
- If it doesn’t work, repeat steps 3-5.
7. Program Additional Doors (optional)
- Repeat the process for each additional button if you want to control multiple doors.
8. Secure Your System
- Erase codes from old remotes you no longer use.
- Store your Clicker in a safe place, not visible from outside your car.
Troubleshooting: When Programming Fails
Even with careful following, things sometimes go wrong. Here are some common problems and solutions.
Problem: The Remote Doesn’t Work After Programming
- Weak battery: Replace with a new one.
- Wrong manufacturer code: Double-check the code for your opener’s brand.
- Out of range: Make sure you’re within 20 feet of the opener during programming.
- Older opener: Some pre-1993 models don’t support rolling code remotes.
Problem: Door Only Moves Slightly Or Light Blinks
- Button held too short/long: Make sure you press the remote button for at least 3-5 seconds.
- Multiple remotes interfering: Unplug the opener for 10 seconds, then try again.
Problem: Remote Works Intermittently
- Interference: Wi-Fi routers, LED lights, or other electronics can cause interference. Try programming with those devices off.
- Obstacles: Metal objects or walls can block the signal.
Problem: Learn Button Not Responding
- Wrong button: Double-check you’re pressing the correct Learn/Program button.
- Dirty contacts: Gently clean the area around the button.
Advanced Tip
If you have multiple openers in one garage, program each remote one at a time. Don’t press multiple Learn buttons at once, as this can confuse the system.
Programming Clicker Remotes For Different Garage Door Brands
Let’s look at the specific details for the most popular garage door opener brands. This helps if your opener has unique requirements.
Chamberlain, Liftmaster, Or Craftsman
- Press and release the Learn button (don’t hold).
- Within 30 seconds, press the remote button you want to program.
- Wait for a click or flashing light.
Genie
- Press and hold the Learn button until the light blinks (about 2 seconds).
- Release the Learn button.
- Within 30 seconds, press and hold the remote button.
- Release when the door moves or the light blinks.
Linear, Stanley, Or Multicode
- Press the Learn button (sometimes a small recessed button).
- Press the remote button.
- The opener should accept the code quickly.
Overhead Door Or Wayne Dalton
- Follow the same steps as Genie, as these brands often use similar systems.
Older Models (dip Switch Systems)
Some old openers use a row of tiny switches (dip switches) instead of a Learn button. Here’s what to do:
- Open the remote and the opener’s receiver cover.
- Set the dip switches in the remote to match those in the opener.
- Close everything up and test.
Not all Clicker remotes support dip switch programming. Check your manual.
Keeping Your Garage Door Opener Secure
A properly set up Clicker remote adds convenience, but you shouldn’t forget security. Thieves sometimes try to copy garage door signals or use lost remotes.
Tips For Better Security
- Erase lost remotes: Always erase all codes and reprogram if a remote is lost.
- Keep remotes hidden: Don’t leave them on your car’s dashboard.
- Upgrade old openers: If your system uses fixed codes, consider upgrading to a rolling code system.
- Change codes regularly: Program your remote again every year or after a break-in.
Rolling Code Vs. Fixed Code
Most modern Clicker remotes use rolling code technology. This means the code changes every time you press the button, making it almost impossible for thieves to copy.
| Feature | Rolling Code | Fixed Code |
|---|---|---|
| Security Level | High | Low |
| Ease of Programming | Easy | Manual (dip switches) |
| Vulnerability | Low | High (code grabbers) |
| Year Used | 1993-present | Before 1993 |
If you aren’t sure which system you have, check the opener’s manual or look for dip switches (fixed code) vs. a Learn button (rolling code).

Mistakes To Avoid When Setting A Clicker Garage Door Opener
Even experienced homeowners make small errors when setting up remotes. Avoid these common mistakes to save time and keep your garage secure.
- Not checking compatibility: Always confirm your opener is compatible with your Clicker model.
- Skipping battery replacement: Old batteries can work poorly even if they seem fine.
- Ignoring the Learn button color: The color often changes the programming steps.
- Rushing the process: Take your time, especially when entering codes.
- Programming from too far away: Stay close to the opener during setup.
- Forgetting to erase old codes: If you buy a used remote, always reset it first.
- Leaving the remote in sight: Thieves can break a car window and steal the remote.
- Not testing the remote: Always test the remote before putting away your ladder.
- Mixing up opener brands: If you have two brands in one garage, program each button carefully.
- Not reading the manual: Manuals often have brand-specific steps and troubleshooting tips.
Advanced Tips For Multiple Garage Doors And Vehicles
If you have more than one garage door or want to use your Clicker in more than one vehicle, you can do so with a little extra planning.
Programming Multiple Doors
- Assign each door to a different button on your Clicker.
- Label the remote or use colored stickers to remember which button controls which door.
Sharing The Remote With Family
- Program extra Clicker remotes for each car or family member.
- Teach everyone the basics of using and keeping the remote secure.
Using Homelink Systems
Many modern cars have a built-in HomeLink system. You can program your Clicker remote to your HomeLink system, so you don’t need a separate remote on your visor.
- Hold the Clicker remote close to the HomeLink button in your car.
- Press and hold both the Clicker button and the HomeLink button until the light blinks.
- Program HomeLink to your opener using the Learn button, just like you would with the Clicker.
When To Call A Professional
Most homeowners can set up a Clicker garage door opener themselves. However, some situations call for expert help:
- Very old openers: Systems made before 1993 may need upgrading.
- Malfunctioning openers: If the door won’t move at all, the problem may be with the opener, not the remote.
- Physical damage: Broken wires, burned-out motors, or damaged antennae need a technician.
- Complex setups: Multiple doors with mixed brands or advanced security features can be tricky.
If you’re unsure, don’t risk your safety or your home’s security. Professional installers have the right tools and experience.
Maintenance Tips To Keep Your Clicker Remote Working
A little maintenance goes a long way. Many problems with remotes come from things you can easily prevent.
- Replace batteries yearly: Even if the remote still works, weak batteries can cause intermittent problems.
- Clean the remote: Dust and grime can block signals or make buttons sticky.
- Check for software updates: Some newer garage door openers support firmware updates. Check your manufacturer’s website.
- Inspect the opener regularly: Make sure wires and antennas are in good shape.
Example: Real-world Setup Scenario
Imagine you just moved into a home with two garage doors—one Chamberlain (yellow Learn button, 2015 model), one Genie (red Learn button, 2018 model). You have a Clicker KLIK3U.
- Replace the battery in your Clicker remote.
- Reset the remote by holding both buttons for 10 seconds.
- For the Chamberlain door: Press and release the yellow Learn button, then press and hold Button 1 on the Clicker until the door moves.
- For the Genie door: Press and hold the red Learn button until the light blinks, then press and hold Button 2 on the Clicker until the door moves.
- Test both doors from your car.
- Label Button 1 as “Left” and Button 2 as “Right” so you don’t forget.
This simple process lets you use one remote for both doors, saving time and reducing clutter.
Comparing Clicker Models: Which Should You Choose?
Clicker offers several models. Here’s a simple comparison to help you pick the right one if you’re buying a new remote.
| Model | Number of Buttons | Compatibility | Special Features |
|---|---|---|---|
| KLIK1U | 1 | Most brands (1993+) | Simple, compact |
| KLIK3U | 2 | Most brands (1993+) | Controls two doors |
| KLIK5U | 3 | Most brands (1993+) | Controls three doors |
If you have only one door, the KLIK1U is enough. For families with multiple doors or vehicles, the KLIK3U or KLIK5U is a better choice.
Where To Find Help And More Information
If you lose your manual or have a unique problem, the manufacturer’s website is a great resource. You’ll find updated programming codes, troubleshooting steps, and videos. For example, the official Clicker site at Chamberlain has guides for all their universal remotes.
Community forums and YouTube are also helpful for tricky situations. But always follow official instructions for safety and security.
Frequently Asked Questions
What Should I Do If My Clicker Remote Isn’t Working After Programming?
First, check the battery and replace it if it’s old. Double-check you used the correct manufacturer’s code and pressed the Learn button properly. Try reprogramming closer to the opener. If it still fails, your opener may not be compatible, or there could be interference from other devices.
Can I Use One Clicker Remote For More Than One Garage Door?
Yes, most Clicker remotes have two or more buttons. You can program each button to a different garage door opener, even from different brands. Just repeat the programming steps for each door.
Is It Safe To Buy A Used Clicker Remote?
It’s safe if you reset the remote before use. Hold both buttons until the light turns off to erase old codes. Always program it to your own opener and erase all old remotes from your opener if you’re worried about security.
How Can I Tell If My Garage Door Opener Is Too Old For A Clicker Remote?
Openers made before 1993 usually use dip switches and fixed codes, which many Clicker remotes don’t support. Check for a Learn button (modern) or a row of small switches (old). If you have only dip switches, you may need a different remote or an upgraded opener.
What Should I Do If I Lose My Clicker Remote?
Erase all remote codes from your garage door opener using the Learn button (hold it for about 6 seconds until the light goes out). Then, reprogram your new remote. This keeps your garage secure if someone else finds the lost remote.
Setting up a Clicker garage door opener is a straightforward task when you follow each step carefully. With a little preparation, attention to detail, and regular maintenance, you’ll enjoy years of convenience and peace of mind. If you ever run into trouble, remember there’s plenty of help available from official guides and expert installers.


