Now Reading: How to Put Weather Stripping on Garage Door for Ultimate Seal
- 01
How to Put Weather Stripping on Garage Door for Ultimate Seal
Every year, countless homeowners struggle with garages that feel icy in winter, suffocating in summer, or let in dust, water, and even pests. If your garage door has gaps along the edges or bottom, you’re losing more than comfort—you’re wasting energy, risking damage to your belongings, and inviting problems that are easy to avoid. The good news? Installing weather stripping on your garage door is a smart, straightforward upgrade that you can complete yourself. Done right, it seals out drafts, cuts your energy bills, and protects what matters most.
This guide is your complete roadmap to understanding, choosing, and installing weather stripping for your garage door. You’ll learn exactly what materials work best, how to measure and prepare your door, step-by-step installation instructions, and tips that even seasoned DIYers often overlook.
Whether you’re a new homeowner, a seasoned do-it-yourselfer, or simply tired of cold air and dust sneaking into your garage, everything you need is right here.
Why Garage Door Weather Stripping Matters
A garage door is often the largest opening in a house. Even a small gap can let in enough air to affect your home’s temperature. According to the U.S. Department of Energy, up to 30% of energy loss in homes happens through poorly sealed doors and windows. The garage is a major culprit, especially if it’s attached to your home.
Here’s why garage door weather stripping is important:
- Keeps out drafts: Prevents cold and hot air from entering.
- Reduces energy bills: Less work for your heating and cooling systems.
- Blocks water, dust, and debris: Protects tools, storage, and cars.
- Keeps out insects and rodents: Seals off entry points.
- Reduces noise: Softens outside sounds for a quieter garage.
Many people only notice these problems after a heavy rain or when heating bills spike. The best time to act is before you see the damage.
Types Of Weather Stripping For Garage Doors
Choosing the right weather stripping is essential. Each type is designed for a specific part of the garage door and has unique benefits. Here’s a breakdown to help you decide:
| Type | Main Use | Material | Best For |
|---|---|---|---|
| Bottom Seal | Bottom edge of door | Rubber, vinyl, silicone | Keeping water, debris out |
| Side Seal | Vertical sides of frame | Vinyl, rubber, foam | Blocking air, insects |
| Top Seal | Top edge of frame | Vinyl, rubber | Sealing overhead gaps |
| Threshold Seal | Floor (under door) | Rubber, heavy-duty vinyl | Extra water resistance |
Bottom Seal
This is the most important seal. It attaches to the bottom of the garage door and compresses when the door closes. It blocks water, leaves, and pests. There are “T” style, “bulb” style, and “beaded” designs. Measure the width of your door before buying.
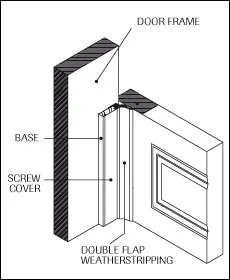
Side And Top Seals
These are usually strips of flexible vinyl or rubber that attach to the frame where the door closes. They prevent drafts and help keep noise out. Some kits include both top and sides, making installation easier.
Threshold Seal
This is a strip you glue to the floor, not the door. It provides a raised barrier for garages with sloped driveways or if water is a big problem. It can be used with or without a bottom seal for extra protection.
Material Comparison
Not all weather stripping materials are equal. Here’s a quick comparison:
| Material | Durability | Weather Resistance | Cost |
|---|---|---|---|
| Rubber | High | Excellent | Medium |
| Vinyl | Medium | Good | Low |
| Foam | Low | Fair | Low |
| Silicone | Very High | Excellent | High |
Rubber is most common for bottom and threshold seals because it’s tough and flexible. Vinyl works for side and top seals but can become brittle in cold weather. Silicone lasts longest but costs more. Foam is easy to install but wears out quickly and is best for temporary fixes.
Tools And Materials You’ll Need
Before starting, gather all the tools and materials. Having everything ready makes the job faster and less frustrating.
Basic Tools:
- Tape measure
- Utility knife or scissors
- Drill with screwdriver bits
- Hammer (if needed for nails)
- Pliers
- Flathead screwdriver
- Pencil or marker
- Step ladder
Materials:
- Weather stripping kit (bottom, side, top, or threshold as needed)
- Galvanized nails or screws (usually included in kits)
- Adhesive (for threshold seals)
- Cleaning supplies (soap, water, rag)
Pro Tip: Always check the packaging for recommended tools. Some bottom seals need special tracks or retainer channels—see what’s already on your door before buying.
Preparing Your Garage Door
Good preparation is the secret to a long-lasting seal. Rushing this step is a common mistake.
- Clean the surfaces: Use soap and water to remove dirt, oil, and old adhesive from the door and frame. Let everything dry completely. Weather stripping won’t stick well to dirty or damp surfaces.
- Remove old weather stripping: Pry off any old, cracked, or damaged seals. Use a flathead screwdriver and pliers to pull out old nails or screws. Scrape off stubborn adhesive with a putty knife.
- Check for damage: Inspect the edges of your garage door and frame. Repair any rotted wood, rust, or cracks. If you install weather stripping on a damaged frame, it won’t seal properly.
- Measure carefully: Measure the width of your garage door (for bottom and threshold seals), and the height of both sides and the top. Write down the measurements to avoid mistakes.
Non-obvious insight: Many people forget to lower the garage door fully before measuring. Always measure with the door closed so you get the tightest fit.
Step-by-step: How To Install Garage Door Weather Stripping
Installing weather stripping is a project most people can finish in a few hours. Here’s how to handle each part of the door.
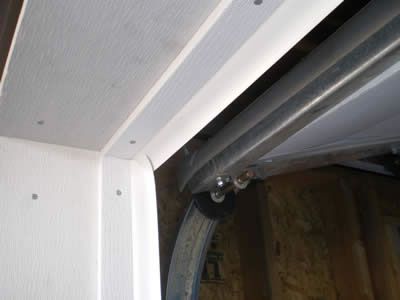
Installing The Bottom Seal
- Open the garage door halfway so you can reach the bottom edge.
- Remove the old seal if present. Slide it out or pull off nails.
- Clean the track or bottom of the door. Dirt and rust will shorten the life of your new seal.
- Cut the new seal to the correct length. Leave an extra inch on each end—it will compress for a better fit.
- Insert the seal into the track (if your door has one). For nailed-on types, hold the seal in place and mark where the nails or screws will go.
- Secure the seal. Slide the seal fully into the track, or nail/screw it every 6-8 inches along the bottom.
- Check the fit by closing the door. The seal should press firmly against the floor, but not make it hard to close.
Pro Tip: If it’s cold, soak rubber seals in warm water first. They’ll be more flexible and easier to install.
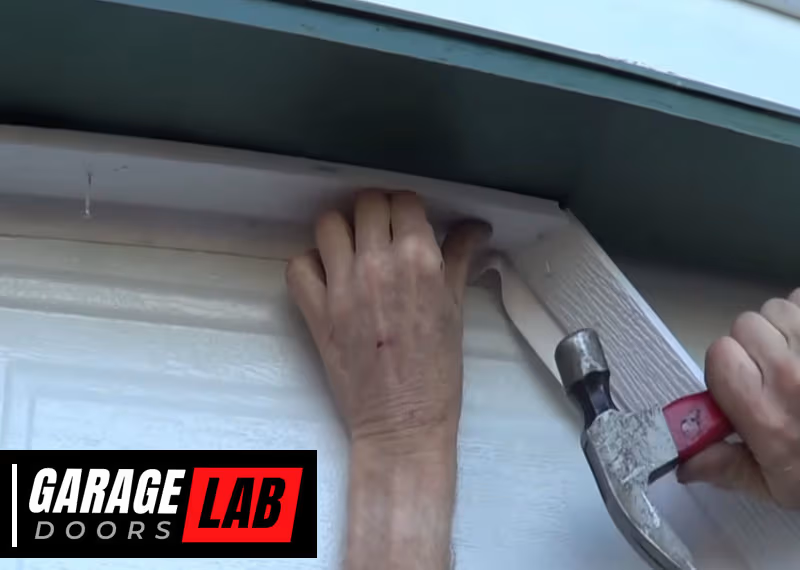
Installing Side And Top Seals
- Close the garage door to expose the frame edges.
- Position the seal so it presses against the door but doesn’t buckle.
- Mark the mounting line with a pencil for a straight installation.
- Cut seals to length for both sides and the top.
- Attach the seal using nails or screws, starting at the top and working down. Space fasteners every 12-18 inches.
- Check for gaps. The seal should touch the door fully with no light coming through.
Non-obvious insight: Some homeowners install side seals too tight, causing the door to stick. Always test the door’s movement after attaching the first few fasteners.
Installing A Threshold Seal
- Clean the garage floor where the threshold will go. Remove oil, dirt, and old adhesive.
- Close the garage door and mark where the seal should sit. It should be centered under the door.
- Cut the threshold seal to fit the width of the door.
- Apply adhesive to the bottom of the seal (use the adhesive recommended by the manufacturer).
- Press the seal firmly into place. Open the door and press down again to ensure a tight bond.
- Let the adhesive cure (usually 24 hours) before driving or walking over the seal.
Pro Tip: Not all adhesives are equal. If your garage floor is damp or oily, use an epoxy-based adhesive for stronger results.
Common Mistakes And How To Avoid Them
Even simple projects have pitfalls. Here are errors many people make when installing garage door weather stripping:
- Choosing the wrong size: Always check the thickness and width of both the door and the seal. A seal that’s too thick can prevent the door from closing fully.
- Skipping cleaning: Adhesives and nails won’t hold if the surface is dirty or wet.
- Over-tightening fasteners: This can warp the seal or the door frame, causing leaks.
- Not sealing all edges: Missing just one edge allows air and water in.
- Ignoring the threshold: If water runs under the door, a threshold seal is often the best fix.
- Not testing the door: After installing, open and close the door several times to check for sticking or gaps.
Practical example: A homeowner in Minnesota installed only a bottom seal. Water still leaked in during spring melt. Adding a threshold seal solved the problem completely.
Weather Stripping Maintenance Tips
A good seal can last 3–10 years, but only if you maintain it. Here’s how to keep it working its best:
- Inspect twice a year: Look for cracks, tears, or areas where the seal is loose.
- Clean with mild soap and water: Dirt and road salt will break down rubber and vinyl.
- Lubricate tracks: If your bottom seal slides in a track, a little silicone spray keeps it moving freely.
- Check after storms: Strong winds can pull seals loose. Push them back into place before they deform.
- Replace when needed: Don’t wait for a complete failure. If you see light or feel a draft, it’s time for a new seal.
Benefits Of Properly Installed Weather Stripping
A well-sealed garage door has more benefits than most people realize. You’ll notice:
- Lower energy bills: Less heat escapes in winter, less heat enters in summer.
- Dryer garage: Water stays out, protecting tools, boxes, and vehicles.
- Cleaner space: Less dust, pollen, and debris blow in.
- Fewer pests: Mice and insects lose an easy entry point.
- Quieter home: Outside noise is reduced, especially important if your garage is under a bedroom or next to a living area.
- Longer door life: Weather stripping prevents rust and rot by keeping moisture away.
When To Replace Old Weather Stripping
Many people don’t realize their garage door seal is worn out until major problems appear. Here’s when you should replace weather stripping:
- Visible cracks or tears
- Hard, brittle, or flaking material
- Gaps where you see daylight
- Drafts or water leaks after rain
- Seal is flattened and no longer compresses
Experience-based guide: Most bottom seals last 3–5 years, while side and top seals can last up to 10 years if not exposed to direct sun. Threshold seals often last the longest.
How To Choose The Right Weather Stripping Kit
With so many products available, it’s easy to feel overwhelmed. Focus on what matters:
- Door material: Steel, wood, and aluminum doors may require different fasteners or adhesives.
- Climate: If you live in a cold or wet area, use rubber or silicone seals for durability.
- Garage floor type: For uneven or sloped floors, a threshold seal is often needed.
- Ease of installation: Kits that come with pre-drilled holes, fasteners, and clear instructions save time.
- Warranty: Good brands offer at least a 1-year warranty on materials.
Common buyer mistake: Choosing the cheapest kit often leads to poor results. Spending a few dollars more on quality rubber or silicone seals pays off in fewer replacements and better protection.
For more on materials and climate recommendations, you can check the U.S. Department of Energy’s air sealing guide.

Troubleshooting: What To Do If You Still Have Leaks
Sometimes, even after installing new weather stripping, water or air still sneaks in. Here’s what to check:
- Seal alignment: The seal must press evenly along the door. If the frame or door is warped, adjust or shim the seal as needed.
- Garage floor: Cracks or uneven surfaces let water in. Fill gaps with concrete patch or use a wider threshold seal.
- Door adjustment: If the door doesn’t close flat, you may need to adjust the opener’s travel settings or the door’s balance.
- Multiple entry points: Don’t forget the access door, windows, or vents. They may also need sealing.
Expert tip: Use a flashlight test at night—close the door, turn off the lights inside, and shine a flashlight from outside. Any light that comes through marks a leak.
Cost Of Garage Door Weather Stripping
Understanding costs helps you plan your project and avoid surprises. Here’s a typical price range:
- Bottom seal: $10–$40, depending on material and length
- Side/top seal kit: $15–$35
- Threshold seal: $20–$60
- Professional installation: $75–$200 (labor only)
Most homeowners spend $40–$100 for materials to seal a standard two-car garage door. Doing it yourself saves the most money.
Is Diy Or Professional Installation Better?
For most people, installing garage door weather stripping is a straightforward DIY project. However, there are times when hiring a pro makes sense:
| DIY | Professional |
|---|---|
| Lower cost | Faster, expert results |
| Good for standard doors | Best for custom/oversized doors |
| Can be done in a few hours | Includes adjustments if door is out of alignment |
| Tools needed | No tools required from you |
If your door is unusually large, warped, or you’re not comfortable with tools, a professional can complete the job quickly and make any needed adjustments.
Environmental Impact And Energy Savings
Sealing your garage door does more than protect your space—it helps the planet. According to the Environmental Protection Agency, air leaks account for up to 20% of a home’s heating and cooling energy loss. Proper weather stripping reduces energy waste, cuts your carbon footprint, and can save 5–10% on your energy bill each year.
Real-world example: In a Midwest home, installing new garage door weather stripping lowered the family’s winter heating bill by $80 over four months.
Additional Tips For Maximum Performance
- Paint or treat wood frames before installing seals. This prevents rot and helps adhesive stick.
- Don’t use foam tape for the bottom seal—it won’t last under pressure.
- Store extra weather stripping in a cool, dry place. Rubber and vinyl degrade in sunlight.
- Install on a dry day. Moisture prevents adhesive from setting.
- Label leftover pieces with size and type for easy repairs later.
Frequently Asked Questions
How Often Should I Replace Garage Door Weather Stripping?
Most weather stripping lasts 3–10 years, depending on the material and exposure to sunlight and weather. Inspect it twice a year and replace when you see cracks, feel drafts, or notice water leaks.
Can I Install Weather Stripping On Any Garage Door Type?
Yes, most standard weather stripping products work on wood, steel, and aluminum garage doors. Make sure to choose the correct type and size for your door and follow the manufacturer’s instructions.
What’s The Difference Between A Bottom Seal And A Threshold Seal?
A bottom seal attaches to the door itself, while a threshold seal sticks to the garage floor. They can be used together for extra protection, especially if your garage has a sloped driveway or water problems.
Will Weather Stripping Stop Mice And Bugs From Entering My Garage?
Properly installed weather stripping blocks most insects and small rodents. However, make sure to seal all edges and check for other entry points like vents or cracks in the walls.
Is Weather Stripping Worth The Cost?
Absolutely. Weather stripping is one of the most cost-effective home improvements. It reduces energy bills, prevents water damage, and protects your belongings for years.
Securing your garage door with quality weather stripping is a small project with big rewards. With the right materials, careful installation, and regular checks, you’ll enjoy a cleaner, more comfortable, and energy-efficient home—no matter what the weather brings.


